
R52 Cabrio dome light questions...


Thread Starter
|
6th Gear
Joined: Jun 2006
Posts: 5,692
Likes: 2
Cabrio dome light questions...
1. How the heck do you remove the dome light cover so you can access the dome light bulb? I tried using a PC flathead screwdriver to pop it off and I can't get it up in there.
2. Does anyone know what the bulb in there is? It's round and it LOOKS like the same bulb as is used in the map lights, but without removing them it's hard to tell.
3. Does anyone know if the map light bulbs are the same in the cabrio as they are in the hard top? I need to know so I can replace them with high-intensity LED replacements (if possible). Also, how the heck do you get 'em out?
4. There are two pop-off vents on each side of the rear-view mirror post, but I can't feel anything up there when I remove them... Is there something up in there that releases the light assembly or light cover perhaps?

6th Gear
Joined: Dec 2004
Posts: 8,354
Likes: 0
From: Overthemountain, AL
It took me a year to even notice that there was a center light in my cabrio. I always thought it was awfully dark in there at night when I opened the door  . It has never worked, only my side maplights have. I guess if replacing the bulb involves taking the whole lighting assembly down I will just have to wait til my next trek to the dealer.
. It has never worked, only my side maplights have. I guess if replacing the bulb involves taking the whole lighting assembly down I will just have to wait til my next trek to the dealer.
Thread Starter
|
6th Gear
Joined: Jun 2006
Posts: 5,692
Likes: 2
I must be doing something wrong... I can't get it off and I feel like I'm forcing it. Did you pry from the edge close tot he windsheild or on the ede facing into the car? When prying against the edge facing into the car, I can't get it to drop down.
Is there something behind the two removable vents on either side of the rear-view mirror stalk that releases the panel? I felt around in there but could not figure it out...
Is there something behind the two removable vents on either side of the rear-view mirror stalk that releases the panel? I felt around in there but could not figure it out...
Trending Topics

3rd Gear
Joined: Sep 2005
Posts: 199
Likes: 0
I've had mine out a couple of times to replace the roof antenna (long story...).
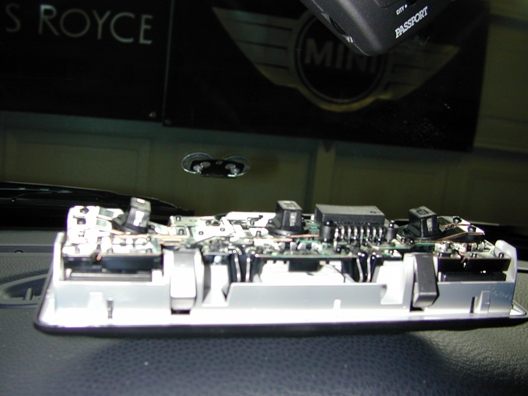
The two metal clips shown in the picture are in the front (the edge facing into the car). There are two plastic edges that fit into slots in the back (the side facint the windshield). It is designed to have the back edges go in first, and then the front (with the flexibile metal clips) snaps up into place.
So you would think the best way is to remove the front edge first, right? I tried and tried and could not remove mine that way. It's a VERY tight fit. I even left strips of duct tape on the front so they hung out when I put the assembly back in once (so I could take it back out that way the next day) and I couldn't get the front edge to budge.
What works for me is to take the back edge (again, the edge toward the windshield) out first. Carefully use a screwdriver covered with tape to pry on that edge, working it back and forth along the slot, and eventually you will be able to pop it down. The good thing about this approach is, even if you gouge up the back edge of the assembly a little it is not visible when you put the assembly back in place.
Hope that helps.
Mark S
Former Vendor
Joined: Dec 2002
Posts: 1,026
Likes: 0
From: Olympia, WA
Many people say front as I look at it, but from a car view the front of the light is to the front of the MINI (i.e. - windshield) The springs clips are on the back side towards the open side of the arch with the top down. The space between the light and the frame is very tight, and it does take some force to pop it down.
Thread Starter
|
6th Gear
Joined: Jun 2006
Posts: 5,692
Likes: 2
Originally Posted by schulzmc
I've had mine out a couple of times to replace the roof antenna (long story...).
The two metal clips shown in the picture are in the front (the edge facing into the car). There are two plastic edges that fit into slots in the back (the side facint the windshield). It is designed to have the back edges go in first, and then the front (with the flexibile metal clips) snaps up into place.
So you would think the best way is to remove the front edge first, right? I tried and tried and could not remove mine that way. It's a VERY tight fit. I even left strips of duct tape on the front so they hung out when I put the assembly back in once (so I could take it back out that way the next day) and I couldn't get the front edge to budge.
What works for me is to take the back edge (again, the edge toward the windshield) out first. Carefully use a screwdriver covered with tape to pry on that edge, working it back and forth along the slot, and eventually you will be able to pop it down. The good thing about this approach is, even if you gouge up the back edge of the assembly a little it is not visible when you put the assembly back in place.
Hope that helps.
Mark S
Yes, that helps a LOT - thanks!

1st Gear
Joined: Jun 2006
Posts: 25
Likes: 0
Somehow I got the clips all bent out of shape taking the unit out from that edge. Now it will not stay up when I replace it..
So I would suggest that you only try to pry it out from the edge nearest the windshield. I noticed that the tabs there are slightly angled upwards.
So I would suggest that you only try to pry it out from the edge nearest the windshield. I noticed that the tabs there are slightly angled upwards.

4th Gear
Joined: Aug 2006
Posts: 411
Likes: 0
From: Cincinnati Ohio area
MINI Bee - Once you have the dome light pulled down, unattach it from the wires so you can remove the center light bulb and either (a) shake the moth out of the hole LOL or (2) unscrew the 2 screws that hold on the facing on.
I just replaced my white bulbs w/ orange LEDs from AutoLumination - I'll post pictures in the Colored LEDs thread.
I just replaced my white bulbs w/ orange LEDs from AutoLumination - I'll post pictures in the Colored LEDs thread.
4th Gear
Joined: Aug 2006
Posts: 411
Likes: 0
From: Cincinnati Ohio area
...yeah... I did all 5 of em. The dome light turned out the best of the 5 - though it's not 100% the exact same color, it'd close enough 
The others though were/are pretty dim & mesh/grid looking b/c the cover/holder for them isn't clear, like the dome light.. it's kind of white-ish; and it has a sort of grid look to it that projects to the floor. I may take the covers off and dremel out a bit of it to get rid of the grid look, and to allow more light down there. I'll definately post pics though tonight on the colored LED thread.
Lastly.... the 5LED light wouldn't fit thru the hole & I couldn't figure out how to get it in there once I inserted the 5LED bulb in the holder... so I started dremeling it for about 30 seconds until I thought to myself "there's gotta be a better way?"
 So I stopped, paused
 and looked it over again...when I saw the 2 screws holding the face on
  . LOL
. LOL
The others though were/are pretty dim &
mesh/grid looking b/c the cover/holder for them isn't clear, like the dome light.. it's kind of white-ish; and it has a sort of grid look to it that projects to the floor. I may take the covers off and dremel out a bit of it to get rid of the grid look, and to allow more light down there. I'll definately post pics though tonight on the colored LED thread.Lastly.... the 5LED light wouldn't fit thru the hole
& I couldn't figure out how to get it in there once I inserted the 5LED bulb in the holder... so I started dremeling it for about 30 seconds until I thought to myself "there's gotta be a better way?" So I stopped, paused and looked it over again...when I saw the 2 screws holding the face on . LOL

Thread
Thread Starter
Forum
Replies
Last Post
ebowling
R50/R53 :: Hatch Talk (2002-2006)
90
Aug 4, 2019 09:15 AM
ECSTuning
Vendor Announcements
0
Aug 19, 2015 12:51 PM
Cal45fan
MINI Parts for Sale
0
Aug 11, 2015 03:50 PM