
Interior/Exterior Colored LED Dome Lights


2nd Gear
Joined: Aug 2006
Posts: 89
Likes: 0
From: Dirty Jersey
Originally Posted by cooper99
Bpago; I would strongly recommend not to get red LED dome lights or interior lights; they offer very very little lighting. Last Saturday, I helped out my friend do a red LED interior light conversion to his RSX-S (took about 3 hours), and he is already back to stock, if that tells you anything.
This is why, in rally, Co-drivers (Navigators) uses a red filter on their reading light.

6th Gear
Joined: Jun 2006
Posts: 5,692
Likes: 2
Red light does not affect your night vision nearly as much as other colors or white - that's why it's used in this application. Lighting up the car (even with red) can cause visual distractions or reflections on the inside of the glass, however, just like any other colored lighting, though. Just an FYI...
PS - My blue cold cathode lamps arrived the other day... I'm plotting out my install as we speak. Once I get those in, I plan to get some blue LED 194's for the door sill lights. The cabrio's dome light assembly is still giving me fits, though - it's really hard to get out w/o damaging it.
PS - My blue cold cathode lamps arrived the other day... I'm plotting out my install as we speak. Once I get those in, I plan to get some blue LED 194's for the door sill lights. The cabrio's dome light assembly is still giving me fits, though - it's really hard to get out w/o damaging it.

Originally Posted by ImagoX
Puppet, this list is from page 2 of this thread and is for the hard top - these were from someone that went blue, but the bulb TYPES should be the same. The lamp number specifically refers to the list over at Autolumination.com:
Front Running Lights: #194 LED �wide angle� style color: ultra white
Front side turn indicators: #194 Silver coated #194 halogen bulbs
Wheel Arches: #194 LED �wide angle� style color: ultra white
License Plate: 39mm Festoon LED color: blue
Step/Entry Lights (under doors) #194 5 LED �Matrix� style LED color: blue
Foot wells #194 5 LED �Matrix� style LED color: blue
Glove Box #194 5 LED �Matrix� style LED color: blue
Map Lights #194 5 LED �Matrix� style LED color: blue
Dome Light-Center Bulb 39mm Festoon Led color: blue
Dome Light-Side Bulbs #194 5 LED �Matrix� style LED color: blue
Boot Light #194 5 LED �Matrix� style LED color: blue
Tail lamp Assembly #1156 24 LED �Matrix� style
Front Turn Indicators #1156 silver coated #1156 orange illuminating
As such, it's right for MOST of the bulbs in our cabrios, but not all. Specifically, the dome lamp and the map lights (maybe) are different form the list above... I have not yet been able to remove the light assembly in the cabrio (it's tricky), but the dome lamp is certainly NOT a "festoon" type light in that car, and I'm not 100% sure that the map lights are the same as in the hard top. Other than that, from what I can tell, all the other lamps are the same.
If/when I finally get the assembly down, I'll post up my findings re: the lights in the dome and map light sockets.


4th Gear
Joined: Aug 2006
Posts: 411
Likes: 0
From: Cincinnati Ohio area
Imagox, I was able to pull my cabrio dome light assembly down yesterday w/ no damage - have you been able to? If not, let me know & I'll post some pictures. Now that I have the bulb out, I can see its 100% not a festoon - now I just gotta figure out what exactly it is! :-) (I think it looks the same as the footwell & door/entry lights?)
4th Gear
Joined: Aug 2006
Posts: 411
Likes: 0
From: Cincinnati Ohio area
Sorry 'bout that... I just compared the cabrio dome to the door/entry light and they're the same light.
I'm ordering (5) total (dome, both door, both footwells). My wife says no the to map lights, glove, etc....she wants SOME white light if she needs it
I'm ordering (5) total (dome, both door, both footwells). My wife says no the to map lights, glove, etc....she wants SOME white light if she needs it
6th Gear
Joined: Jun 2006
Posts: 5,692
Likes: 2
Really? Well I had the foot well lamps out yesterday, and they were the 194 "wedge" type bulbs - I can confirm that. I agree on keeping the map lights white - my wife said the same thing.
Puppet, I had a thread out on the cabrio forum and the reply I got said that said to pop the light panel down from the edge CLOSER to the windscreen - was that how you got it off w/o damaging it?
PS- Got my blue cathodes installed last night, but I didn't have the opportunity to shoot pics of them yet. I will soon, though...
4th Gear
Joined: Aug 2006
Posts: 411
Likes: 0
From: Cincinnati Ohio area
No. I would NOT pop it from closer to the windshield - there are 4 clips - 2 on the windshield side I think were fixed, and 2 on the trunk side were wedged shaped (see picture).
Regardless - this is how I did it...took about 5 minutes or less.

And the little venty thingy I mention in step 2 only fits in 1 way as well..
Finally, push the rear view mirror back in place & yer done,
Hope this helps - Let me know. I just ordered my bulbs today! (5) 194 5 LED wedge style for my dome, footwells and doors.
Regardless - this is how I did it...took about 5 minutes or less.

- Grab the rear view mirror by the neck, and twist counter-clockwise - it'll move about a third of the way around, and then come off.
- Take a small flat head screw driver and gently pry off the little venty thiny (lol) to give yourself access to the dome light assembly. Pry from the edge of it - not the grill/groove portion of it.
- Reach in the small opening and feel around. Do you see in the picture how the dome light assembly is about an inch tall and rectangular? You'll feel that inside. With your hand/fingers inside the opening you just made, find the side of the dome light assembly & gently push down. You'll see it move/give just a little - continue this firm push downward on the dome light assembly, and it will pop down as pictured.
- Twist out the bulb, and replace.
 (test it before you put everything back together)
And the little venty thingy I mention in step 2 only fits in 1 way as well..
Finally, push the rear view mirror back in place & yer done,
Hope this helps - Let me know. I just ordered my bulbs today! (5) 194 5 LED wedge style for my dome, footwells and doors.
6th Gear
Joined: Jun 2006
Posts: 5,692
Likes: 2
Awesome... I had those little "vent thingies" offf and was feeling around in there, but I expected there to be a release clip or something... I never thought to simply press down on it, as I didn't want to snap off the retaining clip I assumed was holding it in. When I tried prying from the edge OPPOSIT the windsheild, it started to gap and I got worried and backed off.
Let me know for sure how the 194 LED lamps work in the dome... When I do mine, I just plan to order 3 blue LEDs (2 for the doors and one for the dome) as well as 2 amber LEDs for the parking lights (I want them to be closer to the color of the turn signals - I don't like the current white look). I have blue cathodes installed in the foot wells AND behind the front seats (to give entering and exiting rear passengers more light back there) and they look REALLY sharp.
Let me know for sure how the 194 LED lamps work in the dome... When I do mine, I just plan to order 3 blue LEDs (2 for the doors and one for the dome) as well as 2 amber LEDs for the parking lights (I want them to be closer to the color of the turn signals - I don't like the current white look). I have blue cathodes installed in the foot wells AND behind the front seats (to give entering and exiting rear passengers more light back there) and they look REALLY sharp.
6th Gear
Joined: Jun 2006
Posts: 5,692
Likes: 2
I'll get pics tonight or tomorrow... I attached the rear cathodes to the inside of the plastic scuff protector that covers the rear of the seat - it provides a perfect lip to protect the cathode bars, and best of all, due to the way the seat is designed, they actually throw a lot MORE light when the seat is tilted forward (exactly how you'd want them to work when a passenger is using the seat release) and dim quite a bit when the seat is pushed back in place... It's almost like the designers knew I'd want to do that one day! 
I put them in because I carry passengers back there quite often (2 kids will do that to you) and when the top is up it's HELLA dark back there because of our front-mounted dome lamp. People were stumbling and grousing, so I figured more light would be a good thing. Plus, it looks really neat.
Since cathodes don't like the undervoltage caused by the dimming light feature (it fries the transformer) I had to use a relay, mounted under the bonnet, to switch on the cathode tubes when the cabin lighting was at full brightness... I had to splice one of the existing foot well lamp's wires to do so, but it's reversable if I need to back out the change afterwards. The benefit to this wiring setup is that, while it was a bit more effort to get the relay wired in and all, I don't have to use a seperate switch to activate the replacement light bars.
4th Gear
Joined: Aug 2006
Posts: 411
Likes: 0
From: Cincinnati Ohio area
Ahhhhhh - that sounds fantastic. My kids say the same thing (too dark back here...).
Can I get/you post the details of your parts? I'll prob stick w/ all orange/amber since I'm replacing the white lights..
Did you do it all yourself (run the wires, etc)? How/where did you hide the wires? The more detail the better 4 me (which is why I posted as much detail as I could think of, in the Dome Light removal post). :-\
I as well would like to not have an additional switch!
6th Gear
Joined: Jun 2006
Posts: 5,692
Likes: 2
I'll post up my How-to when I RErun those wires... My initial install had 2 cathode tubes running off a single transformert back there, concealed inside the e-brake console (plenty of room in there), HOWEVER I ran into a problem with the wires running from the tranny to the light bar. Due to the delicate voltage requirements of the cathodes the wires that are hard-wired to the cathode bars cannot be lengthened (as opposed to the power leads running to the transformer, which can be any length) and they were impossible to conceal AND leave enough slack to let the seats slide back and forth. I dislike that I can see ANY wiring, so I've ordered a second transformer for back there and plan to hide each transformer under the seats with their respective cathode tube.
As for concealing wires, I just ran them up under the center console... a plastic spoon makes for a great wire pusher. It won't cut or mar the wire insulation or damage the bottom edge of the platic peices.
I'll shoot some pics, though tonight or tomorrow so you can see how it looks.
As for parts, I ordered wverything from Oznium.com, and what you'll need to to it proper is:
2 2-bar cathode kit (2 lights and 2 transformers), one pair for the front foot well set and the second for the rears. I used blue but they DO sell orange and red too...
1 extra transformer, so you can use 1 tranny per seat for the rears (easier to hidde wires this way)
1 relay
1 relay harness
1 5A fuse w/ fuse holder
1 barrier strip w/ jumper (available from Radio Shack - splits the positive and negative leads coming off the relay into 4 to power everything).
...plus some wire (I used 18 gauge) and I recommend some split-loom wiring insulation, so you can make everything neat and tidy.
I'll post pics when I do my How-to.
4th Gear
Joined: Aug 2006
Posts: 411
Likes: 0
From: Cincinnati Ohio area
Yeah that'd be great... put me on your Buddy List/PM me/something... I'm really interested in the set up. Sounds like the whole set up was, say, around $40?
The most I've wired in my previous cars... was a set of fog lights.. so I'm not 100% sure what the Barrier Strip is for, nor where exactly it would go (as well, the relay and the other bits, that aren't the lighting tubes..) Why not just put em all under the dash somewhere (your post said you put em under the hood, which means you ran some wires thru the firewall)?
I'm gonna try the orange lights......though the review of em said they were less than orange I wonder if n e body else sells em?
Hopefully I'll get my orange lights tomorrow so I can swap out the dome/door/footwells....
Thanks again for all your help!
The most I've wired in my previous cars... was a set of fog lights.. so I'm not 100% sure what the Barrier Strip is for, nor where exactly it would go (as well, the relay and the other bits, that aren't the lighting tubes..) Why not just put em all under the dash somewhere (your post said you put em under the hood, which means you ran some wires thru the firewall)?
I'm gonna try the orange lights......though the review of em said they were less than orange
I wonder if n e body else sells em?Hopefully I'll get my orange lights tomorrow so I can swap out the dome/door/footwells....
Thanks again for all your help!
6th Gear
Joined: Jun 2006
Posts: 5,692
Likes: 2
Yeah, I hear the orange are sort of a PALE orange... I was going to go that way till I read that several places, so I decided to go wth a contrasting color (blue).
The reason I put the relay up under the bonnet was because I knew that when the cabin lights did the fade, it would make the relay "buzz" for half a second and I wanted to quiet it... turns out, however that MINIs are so dang small that you can still hear it anyway (shrug). I mounted the relay near the battery and used the existing pass-through in the firewall for the wires (pics will follow). In the past, I'd run wires through there for my driving lamps so the Gorilla Tape sealing it was already off and it was easy to pass them through. The barrier strip is basically just a splitter - you can use splices and electrical tape but it's fugly.
Here are some quickie pics:
Front (please don't make fun of my ghetto "floor mat mod" - I know it looks like crap):
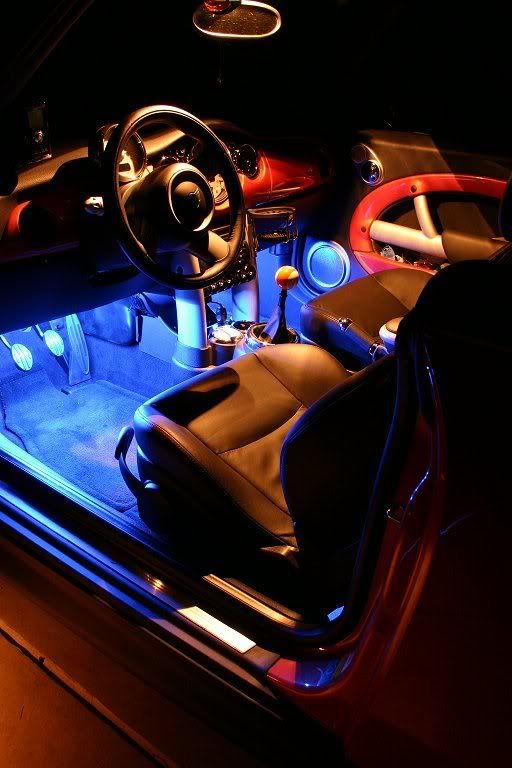
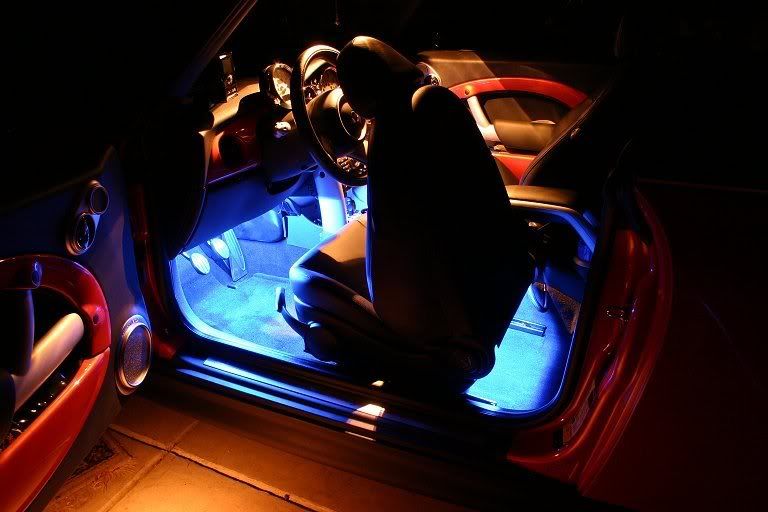
Rear w/ seat forward. When the seat is in the upright position, you can barely see any glow, since the plastic back peice is pretty flush when the seat back is up:
When I replace my dome and door lamps I think it will look REALLY sharp.
The reason I put the relay up under the bonnet was because I knew that when the cabin lights did the fade, it would make the relay "buzz" for half a second and I wanted to quiet it... turns out, however that MINIs are so dang small that you can still hear it anyway (shrug). I mounted the relay near the battery and used the existing pass-through in the firewall for the wires (pics will follow). In the past, I'd run wires through there for my driving lamps so the Gorilla Tape sealing it was already off and it was easy to pass them through. The barrier strip is basically just a splitter - you can use splices and electrical tape but it's fugly.
Here are some quickie pics:
Front (please don't make fun of my ghetto "floor mat mod" - I know it looks like crap):
Rear w/ seat forward. When the seat is in the upright position, you can barely see any glow, since the plastic back peice is pretty flush when the seat back is up:
When I replace my dome and door lamps I think it will look REALLY sharp.
4th Gear
Joined: Aug 2006
Posts: 411
Likes: 0
From: Cincinnati Ohio area
Lighting looks great
So yer basically splicing (using the barrier strip?) in under the dash, passing a wire thru the firewall to the relay near the battery (though I thought your battery was in the trunk), then passing the wire back thru, under your center console where you (will) split it off to either seat, to the transformers, then to the lights? That sound 'bout right?
(Is that the wire behind the back seat in the 2nd picture?)
6th Gear
Joined: Jun 2006
Posts: 5,692
Likes: 2
Yes - the second picture shows the wire running from the transformer concealed in the e-brake housing to the light bar in the seat - I put the wire inside a peice of split-loom to protect it, but I hate that you can see ANYTHING there, so I'm going to re-do it soon such that every wire is concealed under the seat... It will be cleaner-looking and there won't be any chance of a stray foot damaging the wires that way.
The battery IS in the trunk, but there's a convenient positive terminal under the bonnet as well. Thinking about it now, maybe I SHOULD have put the relays up in the boot... it would have been quieter there, for sure. I would have had to run more wiring though - leads form the foot well lamps back to the boot then back up to the front from the boot to the foot wells... Not impossible but sort of time-consuming. I stealthed the majority of my wires, such that all you can really see is a single red wire leading from the positive terminal under the bonnet...
The battery IS in the trunk, but there's a convenient positive terminal under the bonnet as well. Thinking about it now, maybe I SHOULD have put the relays up in the boot... it would have been quieter there, for sure. I would have had to run more wiring though - leads form the foot well lamps back to the boot then back up to the front from the boot to the foot wells... Not impossible but sort of time-consuming. I stealthed the majority of my wires, such that all you can really see is a single red wire leading from the positive terminal under the bonnet...
4th Gear
Joined: Aug 2006
Posts: 411
Likes: 0
From: Cincinnati Ohio area
I replaced the 5 white bulbs w/ (5) orange/amber 5LEDs from AutoLumination. The dome light turned out the best of the 5 - though it's not 100% the exact same color, it's close enough
The others though were/are pretty dim & mesh/grid looking b/c the cover/holder for them isn't clear, like the dome light.. it's kind of white-ish; and it has a sort of grid look to it that projects to the floor. I may take the covers off and dremel out a bit of it to get rid of the grid look, and to allow more light down there. I was trying to think of a way to project more of the LED light downward (sort of the way the dome light has a mirror-like piece above it..) but I'm not sure what I could use.

Installation was straightforward - though allow a minute or two for the regular bulbs to cool b4 pulling them; they're hot . In a few of em, I had to push/pry em out with a small screwdriver from the back.
Lastly.... the 5LED light wouldn't fit thru the hole in the dome light & I couldn't figure out how to get it in there once I inserted the 5LED bulb in the holder... so I started dremeling it for about 30 seconds until I thought to myself "there's gotta be a better way?" So I stopped, relaxed
 and looked it over again...when I saw the 2 screws holding the face on . LOL
I do like the dome light. And I guess to keep it all the same.. the footwells & entry's are what they are. Here are the pics.. You can see the dome looks pretty good, but in the other pic, you can clearly see the grid projected onto the floor. If the images don't work below - here are the links:
Center Console Pic
Floor and Entry Pic


The others though were/are pretty dim &
mesh/grid looking b/c the cover/holder for them isn't clear, like the dome light.. it's kind of white-ish; and it has a sort of grid look to it that projects to the floor. I may take the covers off and dremel out a bit of it to get rid of the grid look, and to allow more light down there. I was trying to think of a way to project more of the LED light downward (sort of the way the dome light has a mirror-like piece above it..) but I'm not sure what I could use. Installation was straightforward - though allow a minute or two for the regular bulbs to cool b4 pulling them; they're hot
. In a few of em, I had to push/pry em out with a small screwdriver from the back.Lastly.... the 5LED light wouldn't fit thru the hole in the dome light
& I couldn't figure out how to get it in there once I inserted the 5LED bulb in the holder... so I started dremeling it for about 30 seconds until I thought to myself "there's gotta be a better way?" So I stopped, relaxed and looked it over again...when I saw the 2 screws holding the face on . LOLI do like the dome light. And I guess to keep it all the same.. the footwells & entry's are what they are. Here are the pics.. You can see the dome looks pretty good, but in the other pic, you can clearly see the grid projected onto the floor. If the images don't work below - here are the links:
Center Console Pic
Floor and Entry Pic
Last edited by PuppetMaster2u; Sep 18, 2006 at 06:52 PM. Reason: Image Fix
6th Gear
Joined: Jun 2006
Posts: 5,692
Likes: 2
Update:
When I re-do the wiring in back, I plan to use THESE THINGS instead... Phil over at Oznium.com (a great vendor and a great site BTW, if that's your sort of thing) just started carrying these flexible, 12v- ready, spiffy LED strips:
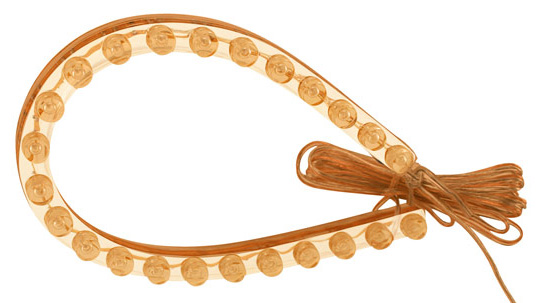
They're LED, so they don't need a transformer - MUCH easier to deal with because of this fact, and these LEDs are moisture and shock proof. For now, I'll leave the cathode bars up front, but I might end up switching out the bars there as well for LEDs - if I do that, I can deinstall the relay and hook them stright to the dimming foot well current (LEDs are fine with undervoltage).
More pics and details to follow...
When I re-do the wiring in back, I plan to use THESE THINGS instead... Phil over at Oznium.com (a great vendor and a great site BTW, if that's your sort of thing) just started carrying these flexible, 12v- ready, spiffy LED strips:
They're LED, so they don't need a transformer - MUCH easier to deal with because of this fact, and these LEDs are moisture and shock proof. For now, I'll leave the cathode bars up front, but I might end up switching out the bars there as well for LEDs - if I do that, I can deinstall the relay and hook them stright to the dimming foot well current (LEDs are fine with undervoltage).
More pics and details to follow...
6th Gear
Joined: Jun 2006
Posts: 5,692
Likes: 2
Yes indeed!! There's a simple positive and ground running out the back from what I hear - these just went live on his site so everyone's scrambling to get some to play with.
LEDs can be dimmed with the cabin lighting with no problems whatsoever, and since they draw so little, you can wire in multiple sets right into the existing foot well wiring. No relay required and the dimming will be retained! Honestly, I want to see the color first-hand (the cathode light is "cold" in a way that's hard to describe and see in photos - it's really, really neat), but if the intensity and quaity of the light is close to cathode then I may just end up replacing the foot well bars as well and removing the relay. I know that purists insist on relaying everything, but LEDs are pretty safe.
These are more expensive than cathodes ($10 for a 9" strip as oppsed to $7 for TWO 12" cathode bars), but they have the benefit of not needing a transformer and would not be limited by non-alterable, pre-set wire lengths in-between the bars. Phil (the owner of Oznium) also indicates that these are something he's re-seling ATM, but that he may be releasing his own version in the future, which would possibly be longer and would be cheaper.

OVERDRIVE
Joined: Aug 2006
Posts: 12,326
Likes: 6
From: PA
Ordered some red #194 5LED Matrix bulbs for my CR Cooper yesterday. Going to start by doing the door entries and foot wells. I'll see where I go from there. Tried to talk the fiance into blue lights for her PW Cooper since it has the Space Blue interior as part of the CM Package. Once she sees my red lights, it'll be a done deal. 