
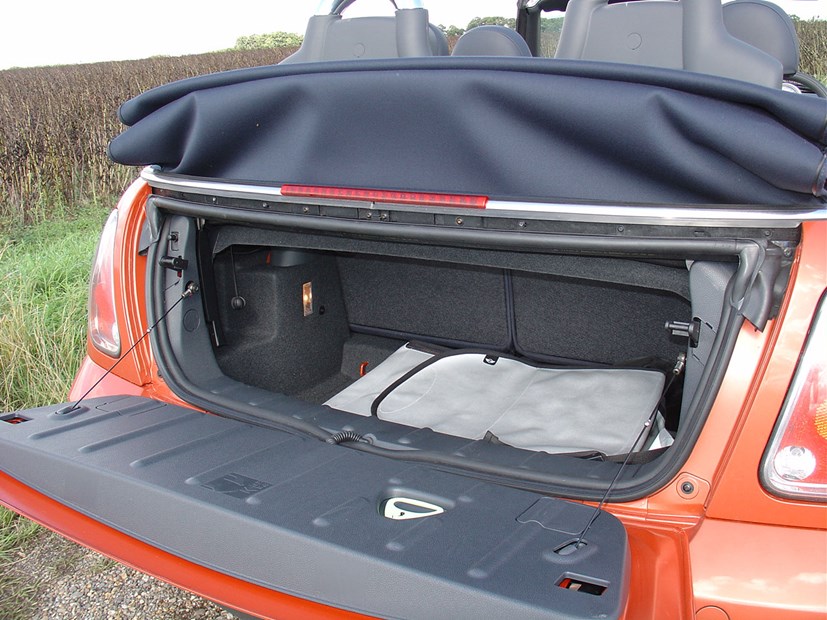
R52 Rear Rubber Top Molding is Rotting Away....

We have a fix it kit now. https://www.ecstuning.com/b-assemble...37123437kt1kt/
Also the original kits also if you like OEM. https://www.ecstuning.com/b-assemble...37123437kt1kt/
Also the original kits also if you like OEM. https://www.ecstuning.com/b-assemble...37123437kt1kt/

Original trims are full kits.
The fix kit just replaces and add a top part of the seal(that cracks) and keeps the old main piece, which you trim off the old cracked part and but up behind the new seal.
The fix kit just replaces and add a top part of the seal(that cracks) and keeps the old main piece, which you trim off the old cracked part and but up behind the new seal.
__________________

MINI Guru/ MINI Owner Since 2004 | NEW Lifetime Part Replacement | Local Pickup
Milltek | Genuine MINI | Forge Motorsport | NM Engineering | ECS Performance | M7 Speed
Customer Service Hours: 8am-8pm EST|Sales Team Hours: 8am-11pm | SAT 10am-7pm 800.924.5172
MINI Guru/ MINI Owner Since 2004 | NEW Lifetime Part Replacement | Local Pickup
Milltek | Genuine MINI | Forge Motorsport | NM Engineering | ECS Performance | M7 Speed
Customer Service Hours: 8am-8pm EST|Sales Team Hours: 8am-11pm | SAT 10am-7pm 800.924.5172

My version of this modification...
I took inspiration from several posts here, combined them into this ....<$45 for this attempt.
First I totally disassembled, then cut the rubber off both parts...cleaned and shape sanded remaining plastics. Then used jb weld to join and make the base a single piece. Sanded to near perfect shape. This took the longest...glue, dry, sand...fill low spots, sand ...etc... Wash it all down with rubbing alcohol once done.

Then used 1" vinyl to wrap the piece..

Purchase the same z-shaped weather strip as the ecs kit. Then added an extra strip of double-sided tape. Be neater then I was....line up the straight edge to the top of the strip better than I did.

I did not take pictures of all the next steps. But i attached the weather strip using the red, original tape against the plastic base and let it cure overnight inside the house. On the car, I used clear nail polish to seal the threads on the bottom of the canvas, to add protection but also to provide a surface for the tape to stick to.
Fill reassembled, not bad...looks better than new from a few feet away. I could have been neater but it's good enough for me ..my rubber was totally deteriorated.


Will let it cure for a few days, the weather strip is tapped to the canvas and the plastic piece. ...some 303 fabric guard before spring and this will be done for now. Let's see how long this lasts. Thanks for all the ideas...NAM is a great resource!
Nice work. ^^
__________________
MINI Guru/ MINI Owner Since 2004 | NEW Lifetime Part Replacement | Local Pickup
Milltek | Genuine MINI | Forge Motorsport | NM Engineering | ECS Performance | M7 Speed
Customer Service Hours: 8am-8pm EST|Sales Team Hours: 8am-11pm | SAT 10am-7pm 800.924.5172
MINI Guru/ MINI Owner Since 2004 | NEW Lifetime Part Replacement | Local Pickup
Milltek | Genuine MINI | Forge Motorsport | NM Engineering | ECS Performance | M7 Speed
Customer Service Hours: 8am-8pm EST|Sales Team Hours: 8am-11pm | SAT 10am-7pm 800.924.5172

1st Gear
Joined: Jun 2020
Posts: 46
Likes: 5
We have a fix it kit now. https://www.ecstuning.com/b-assemble...37123437kt1kt/
Also the original kits also if you like OEM. https://www.ecstuning.com/b-assemble...37123437kt1kt/
Also the original kits also if you like OEM. https://www.ecstuning.com/b-assemble...37123437kt1kt/
Yep. 
__________________
MINI Guru/ MINI Owner Since 2004 | NEW Lifetime Part Replacement | Local Pickup
Milltek | Genuine MINI | Forge Motorsport | NM Engineering | ECS Performance | M7 Speed
Customer Service Hours: 8am-8pm EST|Sales Team Hours: 8am-11pm | SAT 10am-7pm 800.924.5172
MINI Guru/ MINI Owner Since 2004 | NEW Lifetime Part Replacement | Local Pickup
Milltek | Genuine MINI | Forge Motorsport | NM Engineering | ECS Performance | M7 Speed
Customer Service Hours: 8am-8pm EST|Sales Team Hours: 8am-11pm | SAT 10am-7pm 800.924.5172

Neutral
Joined: Jul 2021
Posts: 2
Likes: 0
Buenas tardes!! Podr�as poner aqu� el LINK o el tel�fono del lugar donde la has comprado por favor?? El precio es por cada lado o por ambos lados?? Muchas gracias.
We have them here: https://www.northamericanmotoring.co...ng-away-2.html
Those prices you are finding are old and the price has gone up, but we have them.
Those prices you are finding are old and the price has gone up, but we have them.
__________________
MINI Guru/ MINI Owner Since 2004 | NEW Lifetime Part Replacement | Local Pickup
Milltek | Genuine MINI | Forge Motorsport | NM Engineering | ECS Performance | M7 Speed
Customer Service Hours: 8am-8pm EST|Sales Team Hours: 8am-11pm | SAT 10am-7pm 800.924.5172
MINI Guru/ MINI Owner Since 2004 | NEW Lifetime Part Replacement | Local Pickup
Milltek | Genuine MINI | Forge Motorsport | NM Engineering | ECS Performance | M7 Speed
Customer Service Hours: 8am-8pm EST|Sales Team Hours: 8am-11pm | SAT 10am-7pm 800.924.5172

Neutral
Joined: Aug 2022
Posts: 3
Likes: 1
From: Spokane, WA
Any Answer?
Did you ever receive a satisfactory answer to your question. I am about to replace my molding on my convertible and I still am not sure where these foam strips go.

3rd Gear


Joined: Mar 2021
Posts: 237
Likes: 147
From: Livingston County, MI, USA
I just replaced these mouldings on my daughter's R52S. You should see the foam strips on the ones currently on the car. They fit at the curve of the corners on the outside of the curve underneath the chrome strip. I used the old ones (the ones removed from her car) as the guide of where to attach them on the new ones.
Neutral
Joined: Aug 2022
Posts: 3
Likes: 1
From: Spokane, WA
Please explain what the 6 screws with what looks like nails through them are for and where and how to install the foam strips. Also, why are there no step by step instructions on how to install these on the Mini Convertible?
Sorry just saw this post, the 6 rivets are for the side near the fabric. The main screws are the ones that always rust and crumble. They go around the outside and for that rear light mount. I have replaced mine once already. The little wedge things go on each side near the ends and are for adjustment that can go in and out on the trim near the top inside. Most of the time you only use the screws out of this kit and dont use the rivets or the little plastic wedges, you can replace the foam if you want to renew it on the inside.

DIY in French but you can see what you have to do, get a torques screw driver set https://www.ecstuning.com/b-schwaben...eces/sd-t6pcs/
https://www.northamericanmotoring.co...ing-screw.html


https://www.ecstuning.com/b-genuine-...1137123438kt2/

DIY in French but you can see what you have to do, get a torques screw driver set https://www.ecstuning.com/b-schwaben...eces/sd-t6pcs/
https://www.northamericanmotoring.co...ing-screw.html
https://www.ecstuning.com/b-genuine-...1137123438kt2/
__________________
MINI Guru/ MINI Owner Since 2004 | NEW Lifetime Part Replacement | Local Pickup
Milltek | Genuine MINI | Forge Motorsport | NM Engineering | ECS Performance | M7 Speed
Customer Service Hours: 8am-8pm EST|Sales Team Hours: 8am-11pm | SAT 10am-7pm 800.924.5172
MINI Guru/ MINI Owner Since 2004 | NEW Lifetime Part Replacement | Local Pickup
Milltek | Genuine MINI | Forge Motorsport | NM Engineering | ECS Performance | M7 Speed
Customer Service Hours: 8am-8pm EST|Sales Team Hours: 8am-11pm | SAT 10am-7pm 800.924.5172
Last edited by ECSTuning; Jan 3, 2024 at 11:41 AM.
Just an update, we landed the r52 Convertible ones in stock again. And we are running a rare Genuine MINI sale.
https://www.ecstuning.com/b-genuine-...1137123438kt2/
https://www.ecstuning.com/b-genuine-...1137123438kt2/
__________________
MINI Guru/ MINI Owner Since 2004 | NEW Lifetime Part Replacement | Local Pickup
Milltek | Genuine MINI | Forge Motorsport | NM Engineering | ECS Performance | M7 Speed
Customer Service Hours: 8am-8pm EST|Sales Team Hours: 8am-11pm | SAT 10am-7pm 800.924.5172
MINI Guru/ MINI Owner Since 2004 | NEW Lifetime Part Replacement | Local Pickup
Milltek | Genuine MINI | Forge Motorsport | NM Engineering | ECS Performance | M7 Speed
Customer Service Hours: 8am-8pm EST|Sales Team Hours: 8am-11pm | SAT 10am-7pm 800.924.5172

Just an update, we landed the r52 Convertible ones in stock again. And we are running a rare Genuine MINI sale.
https://www.ecstuning.com/b-genuine-...1137123438kt2/
https://www.ecstuning.com/b-genuine-...1137123438kt2/
Its linked, the url clicked through to the site link on the parts.
Here is all Genuine: https://www.ecstuning.com/b-genuine-mini-parts/v-mini/
Here is all Genuine: https://www.ecstuning.com/b-genuine-mini-parts/v-mini/
__________________
MINI Guru/ MINI Owner Since 2004 | NEW Lifetime Part Replacement | Local Pickup
Milltek | Genuine MINI | Forge Motorsport | NM Engineering | ECS Performance | M7 Speed
Customer Service Hours: 8am-8pm EST|Sales Team Hours: 8am-11pm | SAT 10am-7pm 800.924.5172
MINI Guru/ MINI Owner Since 2004 | NEW Lifetime Part Replacement | Local Pickup
Milltek | Genuine MINI | Forge Motorsport | NM Engineering | ECS Performance | M7 Speed
Customer Service Hours: 8am-8pm EST|Sales Team Hours: 8am-11pm | SAT 10am-7pm 800.924.5172

4th Gear
Joined: Oct 2024
Posts: 453
Likes: 42
Yep we have the fix kit listed above and used by many on here.
https://www.ecstuning.com/b-assemble...37123437kt1kt/

https://www.ecstuning.com/b-assemble...37123437kt1kt/
__________________
MINI Guru/ MINI Owner Since 2004 | NEW Lifetime Part Replacement | Local Pickup
Milltek | Genuine MINI | Forge Motorsport | NM Engineering | ECS Performance | M7 Speed
Customer Service Hours: 8am-8pm EST|Sales Team Hours: 8am-11pm | SAT 10am-7pm 800.924.5172
MINI Guru/ MINI Owner Since 2004 | NEW Lifetime Part Replacement | Local Pickup
Milltek | Genuine MINI | Forge Motorsport | NM Engineering | ECS Performance | M7 Speed
Customer Service Hours: 8am-8pm EST|Sales Team Hours: 8am-11pm | SAT 10am-7pm 800.924.5172
4th Gear
Joined: Oct 2024
Posts: 453
Likes: 42
Yep we have the fix kit listed above and used by many on here.
https://www.ecstuning.com/b-assemble...37123437kt1kt/
https://www.ecstuning.com/b-assemble...37123437kt1kt/
Hello, see above the guys in this thread installed it.
https://www.northamericanmotoring.co...ml#post4577691
https://www.northamericanmotoring.co...ml#post4577691
__________________
MINI Guru/ MINI Owner Since 2004 | NEW Lifetime Part Replacement | Local Pickup
Milltek | Genuine MINI | Forge Motorsport | NM Engineering | ECS Performance | M7 Speed
Customer Service Hours: 8am-8pm EST|Sales Team Hours: 8am-11pm | SAT 10am-7pm 800.924.5172
MINI Guru/ MINI Owner Since 2004 | NEW Lifetime Part Replacement | Local Pickup
Milltek | Genuine MINI | Forge Motorsport | NM Engineering | ECS Performance | M7 Speed
Customer Service Hours: 8am-8pm EST|Sales Team Hours: 8am-11pm | SAT 10am-7pm 800.924.5172
4th Gear
Joined: Oct 2024
Posts: 453
Likes: 42
Hello, see above the guys in this thread installed it.
https://www.northamericanmotoring.co...ml#post4577691
https://www.northamericanmotoring.co...ml#post4577691
Hello, thats the one a bunch of people have been using on here for years.
Also that guy above sanded and painted his and removed more of the seal. Most of the time its a they are just removing the top portion and adding that seal and done.
https://www.northamericanmotoring.co...ml#post4527421
Also that guy above sanded and painted his and removed more of the seal. Most of the time its a they are just removing the top portion and adding that seal and done.
https://www.northamericanmotoring.co...ml#post4527421
__________________
MINI Guru/ MINI Owner Since 2004 | NEW Lifetime Part Replacement | Local Pickup
Milltek | Genuine MINI | Forge Motorsport | NM Engineering | ECS Performance | M7 Speed
Customer Service Hours: 8am-8pm EST|Sales Team Hours: 8am-11pm | SAT 10am-7pm 800.924.5172
MINI Guru/ MINI Owner Since 2004 | NEW Lifetime Part Replacement | Local Pickup
Milltek | Genuine MINI | Forge Motorsport | NM Engineering | ECS Performance | M7 Speed
Customer Service Hours: 8am-8pm EST|Sales Team Hours: 8am-11pm | SAT 10am-7pm 800.924.5172
4th Gear
Joined: Oct 2024
Posts: 453
Likes: 42
Hello, thats the one a bunch of people have been using on here for years.
Also that guy above sanded and painted his and removed more of the seal. Most of the time its a they are just removing the top portion and adding that seal and done.
https://www.northamericanmotoring.co...ml#post4527421
Also that guy above sanded and painted his and removed more of the seal. Most of the time its a they are just removing the top portion and adding that seal and done.
https://www.northamericanmotoring.co...ml#post4527421
Should be enough for both 13ft of the Z shape. Measure the distance before you order.
__________________
MINI Guru/ MINI Owner Since 2004 | NEW Lifetime Part Replacement | Local Pickup
Milltek | Genuine MINI | Forge Motorsport | NM Engineering | ECS Performance | M7 Speed
Customer Service Hours: 8am-8pm EST|Sales Team Hours: 8am-11pm | SAT 10am-7pm 800.924.5172
MINI Guru/ MINI Owner Since 2004 | NEW Lifetime Part Replacement | Local Pickup
Milltek | Genuine MINI | Forge Motorsport | NM Engineering | ECS Performance | M7 Speed
Customer Service Hours: 8am-8pm EST|Sales Team Hours: 8am-11pm | SAT 10am-7pm 800.924.5172