
R52 Rear Rubber Top Molding is Rotting Away....


After beating my head against the wall, I'm going to do this:
Find the absolute lowest price I can on those two parts from an authorized Mini dealer so I have the ability to demand they honor their two year parts warranty. I'll then install the new parts but hang onto the receipt AND the old parts. After about a year and a half, I'll take the receipt and my original parts to my local Mini dealer and demand that they replace them under the 2 year parts warranty. Since I highly doubt that the manufacturing date of the new parts or any other designator will be on the receipt, I see no reason why this won't work. Yes, little underhanded. But when Mini/BMW refuses to acknowledge crappy parts and then charges a fortune for them, AND gives their customers the run around, they deserve to be taken to some small degree. And I'd bet they'll still be making money on the deal. F'em.
Find the absolute lowest price I can on those two parts from an authorized Mini dealer so I have the ability to demand they honor their two year parts warranty. I'll then install the new parts but hang onto the receipt AND the old parts. After about a year and a half, I'll take the receipt and my original parts to my local Mini dealer and demand that they replace them under the 2 year parts warranty. Since I highly doubt that the manufacturing date of the new parts or any other designator will be on the receipt, I see no reason why this won't work. Yes, little underhanded. But when Mini/BMW refuses to acknowledge crappy parts and then charges a fortune for them, AND gives their customers the run around, they deserve to be taken to some small degree. And I'd bet they'll still be making money on the deal. F'em.

Thread Starter
|
6th Gear
Joined: Jun 2009
Posts: 1,237
Likes: 8
From: Silicon Valley
Good question. I'll go ahead with the plan anyway, and if they bring that up, I'll just fight them anywith with the argument "what would you guys have done differently if you installed it?"
Thread Starter
|
6th Gear
Joined: Jun 2009
Posts: 1,237
Likes: 8
From: Silicon Valley
'Ordered my new trim pieces today. Jason H. (there are two Jaysons) at Classic Mini in Wiloughby Hills, Ohio was great. Quick, efficient and knowledgable.
127.30 each plus shipping. He said there is a 2 year warranty on all Mini parts and it doesn't matter whether you or the dealer does the installation. And you can bring up any warranty issues with your local Mini service department as long as you have the original receipt.
127.30 each plus shipping. He said there is a 2 year warranty on all Mini parts and it doesn't matter whether you or the dealer does the installation. And you can bring up any warranty issues with your local Mini service department as long as you have the original receipt.
Last edited by martinb; Jun 28, 2012 at 09:09 AM.
Thread Starter
|
6th Gear
Joined: Jun 2009
Posts: 1,237
Likes: 8
From: Silicon Valley
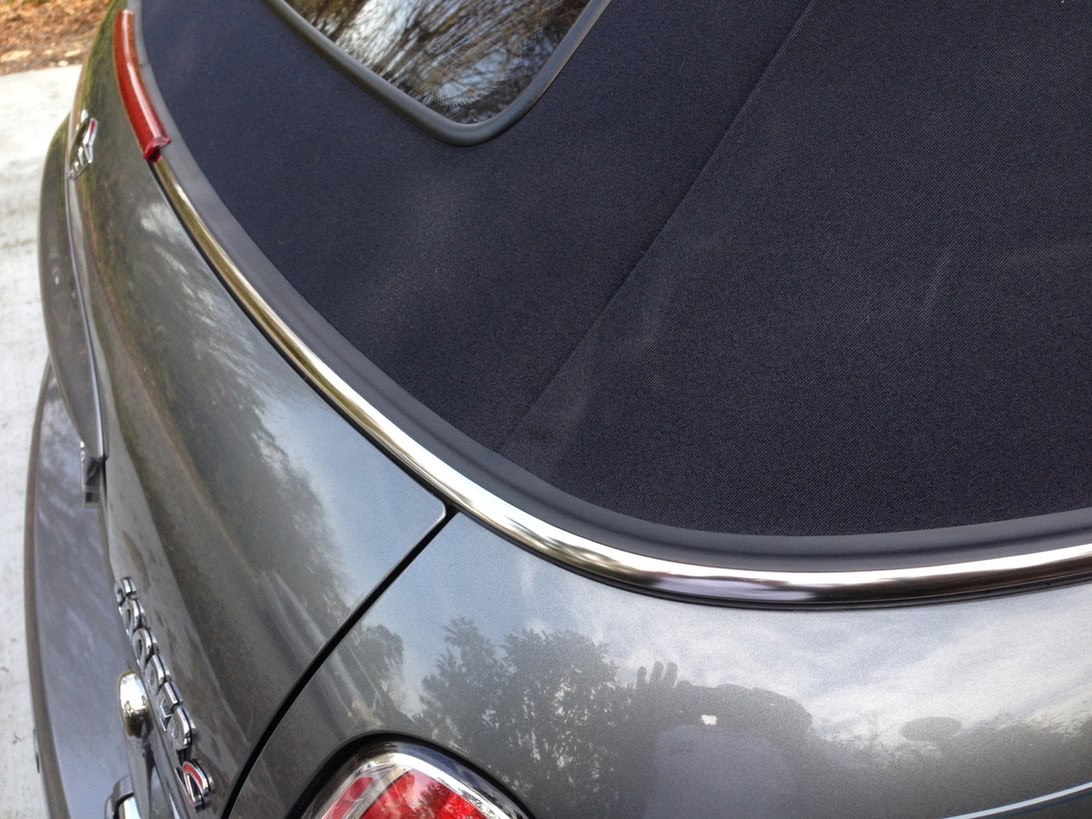
The new trim is installed and looks great. The old trim is in the garage with the receipt for the new trim for later use.
Tip: When installing the new trim and more specifically, the brake light, pull reach behind (ahead) of the brakelight and gently pull on the wires to help it and the rubber gasket go to seat. Otherwise it's easy to trap the wires where they shouldn't be trapped.
Tip: When installing the new trim and more specifically, the brake light, pull reach behind (ahead) of the brakelight and gently pull on the wires to help it and the rubber gasket go to seat. Otherwise it's easy to trap the wires where they shouldn't be trapped.

1st Gear
Joined: Apr 2009
Posts: 17
Likes: 0
From: North Salem
Mounting screws are not accessible
Sorry but can someone clarify this replacement procedure. The torx screws holding the trim assembly on are easily removed when the rear trunk door is opened. This leaves two screws that are attached on the side of the trim beneath the car body. (each trim assembly has two, that mount on the rear side of the car and these are not accessible from the rear trunk). I cannot figure out how to remove these. I even removed my taillight to see if i could access from inside (to no avail)...
Does anyone have any ideas or know the screws I am referring to?
Does anyone have any ideas or know the screws I am referring to?
I replaced mine a year ago, shortly after buying my HO R52. Got the parts from Classic Mini using their contact info here on NAM: https://www.northamericanmotoring.com/classicauto
(1) 51137123437 Convertible Top Moulding Rear Left retail $149.77 / nam price $119.82
(1) 51137123438 Convertible Top Moulding Rear Right retail $149.77 / nam price $119.82
I don't know if Classic is the absolute cheapest, but shipping was very reasonable and the parts arrived quickly. A phone call made sure I got the right parts. Highly recommended.
The rubber on my rear trim pieces was severely deteriorated and cracked. All other trim and gaskets on the car are fine. Easy to remove/replace with exposed screws once you raise the back of the top for rear compartment access. Only gotcha is wire for the center brake light, which was a bit tough to access for disconnect/reconnect.
I can't tell any difference between the new part and the old, so I would be skeptical that any improvements were made. There's no separate part listing for the rubber, so I don't see any way to reuse the chrome unless you try some sort of a DIY solution.

It has been a long time since I replaced mine, but I do remember that I had to remove the large interior plastic trim pieces on each side of the car. Somewhat stiff and difficult to remove, and it took even more effort to get them back in properly. Sorry this is somewhat vague, but it's a fading memory. Hope it helps.
Thread Starter
|
6th Gear
Joined: Jun 2009
Posts: 1,237
Likes: 8
From: Silicon Valley
If you're talking about the 1st gen car, then no panels need to be removed. Simply unlatch the top (those two levers on either side of the rear hatch) and push the back of the top up. I used a piece of wood to hold it up and out of the way while I worked on the trim. Then all fasteners are exposed.
Thread Starter
|
6th Gear
Joined: Jun 2009
Posts: 1,237
Likes: 8
From: Silicon Valley
FYI, my new molding is holding up OK, but then it's only been about a year now. Before the second year is up, I'll be taking my original molding back to Mini and getting it replaced under their 2 year parts warranty.

1st Gear
Joined: Jul 2013
Posts: 22
Likes: 0
Rear Molding
Yes silicone is silicone but how it is delivered is the issue. You do not want to use any petroleum propellents or alcohols. I use F21 made by Turtle Wax. When buying ask to see the MSDS sheet and make sure you know what is being used to deliver the silicone.

I can give you the phone # of my buddy who has a front end totaled R53 sitting around that would probably sell em to you cheap if you asked nicely! PM me and I'll give you his #, he is actually a MINI / MG mechanic, super good dude.


Yes the ones on an R53 Hardtop and R52 Cabrio are totally different and can't be swapped with one another.
We keep the R53 Cabrio ones in stock
http://www.waymotorworks.com/convert...-trim-r52.html
We keep the R53 Cabrio ones in stock
http://www.waymotorworks.com/convert...-trim-r52.html

Thread Starter
|
6th Gear
Joined: Jun 2009
Posts: 1,237
Likes: 8
From: Silicon Valley
The rubber lip is there for one reason, to help deflect water which eases the load of the connection of the fabric top to the rest of the car. If you don't end up with water inside the trunk area (look carefully), don't worry about it.

Candyred - "Does anyone have any ideas or know the screws I am referring to?"
We have the screw hardware kit included with the install kit w/ the moldings. Which we found and included in our larger kit. On older moldings that have deteriorated so bad I have seen them wear down then rub and etch into the top paint on the shoulder of the body, right were they seal.
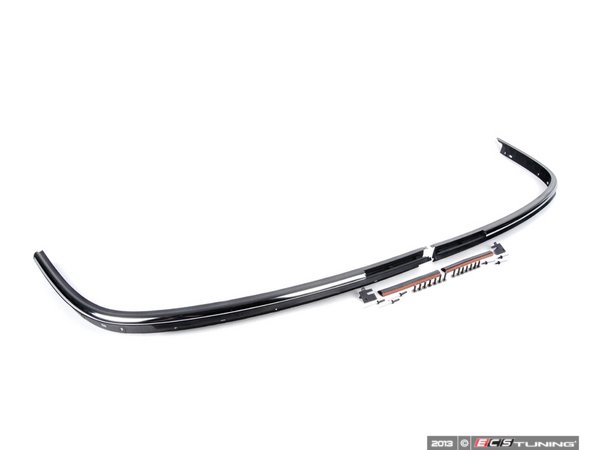
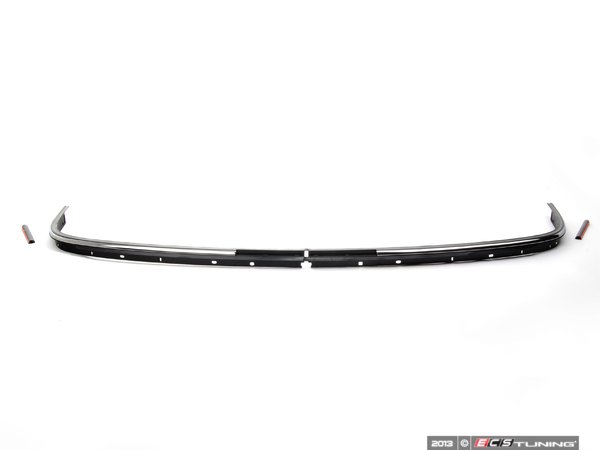
The trim is for the R52 MINI Convertible ( 2005 -2008 ) only:
Easy to unscrew and install.
We have them in kits with and without the hardware ( screws and such ). The screws can really take a beating from salt and weather and then become hard to put back in and tighten. Would be good to check the condition of yours.
Convertible Top Rear Trunk Molding Kit 51137123438KT
http://www.ecstuning.com/Search/SiteSearch/51137123438KT/
With install hardware:

Without install hardware:

Thanks
We have the screw hardware kit included with the install kit w/ the moldings. Which we found and included in our larger kit. On older moldings that have deteriorated so bad I have seen them wear down then rub and etch into the top paint on the shoulder of the body, right were they seal.
The trim is for the R52 MINI Convertible ( 2005 -2008 ) only:
Easy to unscrew and install.
We have them in kits with and without the hardware ( screws and such ). The screws can really take a beating from salt and weather and then become hard to put back in and tighten. Would be good to check the condition of yours.
Convertible Top Rear Trunk Molding Kit 51137123438KT
http://www.ecstuning.com/Search/SiteSearch/51137123438KT/
With install hardware:
Without install hardware:
Thanks
__________________

MINI Guru/ MINI Owner Since 2004 | NEW Lifetime Part Replacement | Local Pickup
Milltek | Genuine MINI | Forge Motorsport | NM Engineering | ECS Performance | M7 Speed
Customer Service Hours: 8am-8pm EST|Sales Team Hours: 8am-11pm | SAT 10am-7pm 800.924.5172
MINI Guru/ MINI Owner Since 2004 | NEW Lifetime Part Replacement | Local Pickup
Milltek | Genuine MINI | Forge Motorsport | NM Engineering | ECS Performance | M7 Speed
Customer Service Hours: 8am-8pm EST|Sales Team Hours: 8am-11pm | SAT 10am-7pm 800.924.5172
Last edited by ECSTuning; Jan 9, 2024 at 08:06 AM.
3rd Gear
Joined: May 2009
Posts: 253
Likes: 0
From: Calabash NC "Seafood Capital of the World"
Candyred - "Does anyone have any ideas or know the screws I am referring to?"
We have the screw hardware kit included with the install kit w/ the moldings. Which we found and included in our larger kit. On older moldings that have deteriorated so bad I have seen them wear down then rub and etch into the top paint on the shoulder of the body, right were they seal.
The trim is for the R52 MINI Convertible ( 2005 -2008 ) only:
Easy to unscrew and install.
We have them in kits with and without the hardware ( screws and such ). The screws can really take a beating from salt and weather and then become hard to put back in and tighten. Would be good to check the condition of yours.
Convertible Top Rear Trunk Molding Kit 51137123438KT
http://www.ecstuning.com/Search/SiteSearch/51137123438KT/
With install hardware:
Without install hardware:
Thanks
Do you have a diagram or pic of where these parts go?

In this pic they are really close to the location. Peal and stick. They mount under the trim in the cavity on each side and act as cushioning foam so when the upper top is locked, trim seal comes down, to the top of the body. They should match up to the old trims you have taken off.
Thanks
Thanks
__________________
MINI Guru/ MINI Owner Since 2004 | NEW Lifetime Part Replacement | Local Pickup
Milltek | Genuine MINI | Forge Motorsport | NM Engineering | ECS Performance | M7 Speed
Customer Service Hours: 8am-8pm EST|Sales Team Hours: 8am-11pm | SAT 10am-7pm 800.924.5172
MINI Guru/ MINI Owner Since 2004 | NEW Lifetime Part Replacement | Local Pickup
Milltek | Genuine MINI | Forge Motorsport | NM Engineering | ECS Performance | M7 Speed
Customer Service Hours: 8am-8pm EST|Sales Team Hours: 8am-11pm | SAT 10am-7pm 800.924.5172
Neutral
Joined: Apr 2014
Posts: 10
Likes: 1
From: Sandusky, OH
I ordered the replacement parts with hardware from ECS and they were very easy to install.. Under an hour including a very good cleaning under the old ones. It was really dirty and full of dirt and sand. Hard to get in here to clean so I busted out the air compressor to blow it all out then wipe it down. Looks brand new now and I put UV / silicone protectant on the new ones before I installed them. If your willing to put up the money for the replacements, don't be scared about he install. They look great.
Awesome pics and like the tips. Most of the time cleaning the gunk behind them and on the lower section of the top and gutter takes the most time.
Looks much better.
: :
:
Looks much better.
:
:
__________________
MINI Guru/ MINI Owner Since 2004 | NEW Lifetime Part Replacement | Local Pickup
Milltek | Genuine MINI | Forge Motorsport | NM Engineering | ECS Performance | M7 Speed
Customer Service Hours: 8am-8pm EST|Sales Team Hours: 8am-11pm | SAT 10am-7pm 800.924.5172
MINI Guru/ MINI Owner Since 2004 | NEW Lifetime Part Replacement | Local Pickup
Milltek | Genuine MINI | Forge Motorsport | NM Engineering | ECS Performance | M7 Speed
Customer Service Hours: 8am-8pm EST|Sales Team Hours: 8am-11pm | SAT 10am-7pm 800.924.5172


Awesome. Looks so clean now. Good job.
__________________
MINI Guru/ MINI Owner Since 2004 | NEW Lifetime Part Replacement | Local Pickup
Milltek | Genuine MINI | Forge Motorsport | NM Engineering | ECS Performance | M7 Speed
Customer Service Hours: 8am-8pm EST|Sales Team Hours: 8am-11pm | SAT 10am-7pm 800.924.5172
MINI Guru/ MINI Owner Since 2004 | NEW Lifetime Part Replacement | Local Pickup
Milltek | Genuine MINI | Forge Motorsport | NM Engineering | ECS Performance | M7 Speed
Customer Service Hours: 8am-8pm EST|Sales Team Hours: 8am-11pm | SAT 10am-7pm 800.924.5172