When you click on links to various merchants on this site and make a purchase, this can result in this site earning a commission. Affiliate programs and affiliations include, but are not limited to, the eBay Partner Network.
Ok so now that I have the vibration from the driveshaft gone, engine motor mount swapped with a good one (Vibra one), plugs swapped, cam sensor swapped and t-stat + tstat housing swapped I shifted focus to the next failure, the BPV. I suspected it was not sealing/closing all the way when it should have so I played with some external springs to "help" it along. Before the application of the band-aide I'd been seeing 10ish psi of boost, after the install now seeing 13~14 psi at about 5500 rpms. Still unclear as to what I should be seeing with the 15% pulley so I have to assume it is close to normal... however, given all that I have seen on this motor in the short 1000 miles I've put on it I would not be surprised if there is a boost leak. So with the $5 band-aid in place I will order up a BPV and swap it out.
So next up... how do I tell if the crank pulley is bad? It does not wobble and the paper work that came with it does not indicate it has been swapped. 136k on it now.
Still need to install the new lower mount + insert... will do that in the next few days. Alta 17% pulley & new tensioner on hand, waiting to go in once all else is fixed. Still on the horizion is a CAC cleaning and fuel rail wrap. Dropped in some stiction eliminator into the oil pan with the expectation that an oil change is on the horizon. Will be going with the tried & true royal purple in most likely a 10W-30 flavor.
What else do I need to address? Crank sensor & valve cover still need to be swapped. Oil cooler? Is there a better solution than just swapping the o-rings?
Superchager... anyone have experience with the re-fill kits out there? I'm expecting to set it up to be able to top it off w/o removing it... if I can find a kit to allow draining, even better.
coolant temps appear to be closer to expected with the new t-stat & housing, someone confirmed that what I see with the CT's is normal. Going to look to the Byteronik s/w to fix the cooling fan temp on setting. I still want to prevent those temp spikes after the motor shuts down so the timer I linked earlier in the build (?) thread will be used.
edit: and oh yeah, still have the header to install, need to make a blanket for it and buy the locking exhaust mani bolts.
Last edited by steve05ram360; Sep 29, 2020 at 09:28 PM.
13-14 PSI is normal with a 15% pulley so spending money on a new BPV is wasteful. 5W-30 is recommended by MINI. You will need to remove the supercharger to access both oil ports and it's not a bad idea to replace the water pump at that time if it hasn't been replaced previously.
13-14 PSI is normal with a 15% pulley so spending money on a new BPV is wasteful. 5W-30 is recommended by MINI. You will need to remove the supercharger to access both oil ports and it's not a bad idea to replace the water pump at that time if it hasn't been replaced previously.
So your advising me to leave a bad BPV in there? ... no thanks, planning to swap in a new one and be done with it. Additionally I'll pull it apart and find out what the root cause of the failure was and look into anything that might be able to extend its life. Thanks for the heads up on oil weight... will still do 10w-30. Paperwork does not indicate a WP swap so I'll go ahead an get that lined up ahead of the SC removal. Thanks the input it is appreciated.
Good choice, just mount a new one. I decided to modify it myself, by putting pretension on the BPV spring by adding 2 simple stainless washers. Simply put, it works and I am still driving it this way. And if you dont like it, its totally reversible without any adverse effects.
Understood, however the only way I see the correct boost is with the heavy spring in place, otherwise boost is low, suspect a broken spring internally. Resistance applied to the actuator with the motor off is not that strong at all...
It is awful tight in there but I think yes. Someone would need to answer the question below though first
If the set screw fell out would the valve still stop at a fully closed position?
If yes, then you can take the right sized 90* allen, grind it down shorter, clean up the business end and attempt to get it in the set screw. If you get that far rotate it CCW (assuming) and back it out until the set screw looses contact with the actuator arm.
In theory it makes sense. The arm is connected to the flap/butterfly. I assumed. unless it�s spring loaded ?
maybe I�ll try and find a diagram of the BPV and see. Or unless someone here has has an extra one out and give it a try.
In theory it makes sense. The arm is connected to the flap/butterfly. I assumed. unless it�s spring loaded ?
maybe I�ll try and find a diagram of the BPV and see. Or unless someone here has has an extra one out and give it a try.
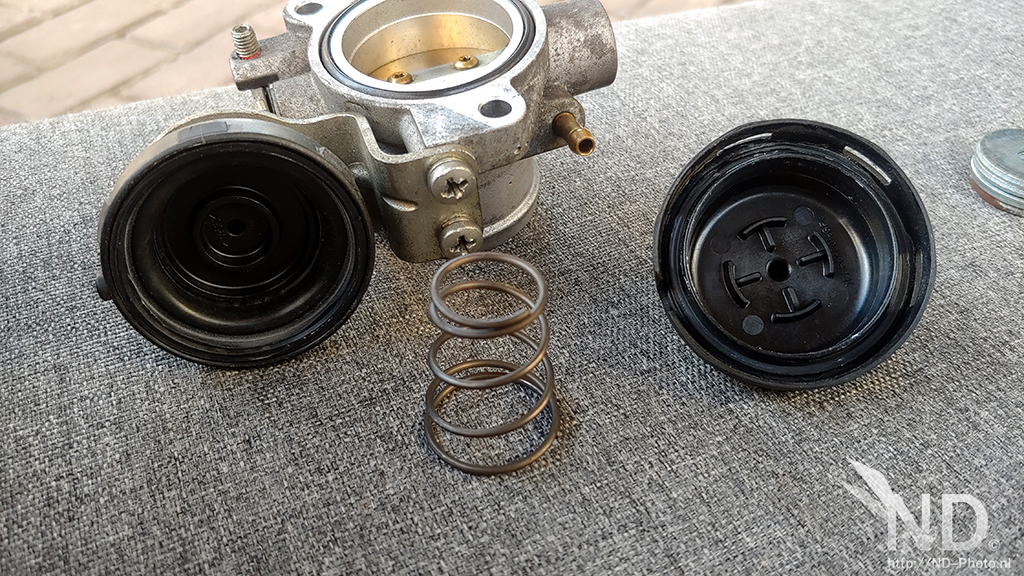
Yeah it is spring loaded with the spring inside the diaphragm... the question would be is if there is a lip on the bore that stops the valve from going past the fully closed position. Thinking about it, probably not so the set screw is needed.
Exactly. What i meant by spring loaded was the lever to the butterfly / flap. But yes. No need the set screw if that�s the case. Unless it goes pass the closing point.
Update... added a 2nd spring to the mix and snapped pics... boost is building sooner now at ~5" vacuum the valve closes. Pics below... I'm sure all this has been done already but... my pics go no where unless the site deletes the upload. This cost under $15, $5 for springs under $5 for the wire (could be a paper clip) that i already had and under $5 for the piece of metal I used to attach the spring. Anyone with angled long nose pliers could get this done in about 10~15 minutes. Only thing not shown is the wire loom plastic which is not installed to go between the springs and the intake hose.
Thanks! Still need to order the new one... been spread really thin lately it has slipped a bit in the priority list. Leaning towards holding off until I pull it to see about just rebuilding it and modifying it like you did.
The compression test numbers were not encouraging, I suspect carbon deposits on the valve seats.
Update... added a 2nd spring to the mix and snapped pics... boost is building sooner now at ~5" vacuum the valve closes. Pics below... I'm sure all this has been done already but... my pics go no where unless the site deletes the upload. This cost under $15, $5 for springs under $5 for the wire (could be a paper clip) that i already had and under $5 for the piece of metal I used to attach the spring. Anyone with angled long nose pliers could get this done in about 10~15 minutes. Only thing not shown is the wire loom plastic which is not installed to go between the springs and the intake hose.
LOL now thats a silly question... of course there is a difference in mpg... -4~5 mpg... it tanked. Now that I have near full boost its dumping all kinds of fuel.... often
But seriously... could not say, I dont commute in it, thats what the ram is for. If you want better mpg's out of the mini what you could try is placing a vacuum switch on the BPV diaphragm to keep a constant vacuum on it. this would keep it in bypass mode until released. You'd need a switch to control it so it engages and holds vacuum. And if your really motivated, any air filter setup that has a box where you can mask off part of the flow into it will give better low end torque and will improve mpg's. What you want is part throttle bottom end torque and to keep rpms lower.
back when the Ram was the only ride I gave it a "makeover" 11 yr makeover thread and got really motivated to get mpg's up as high as I could. Got into a bet with a co-worker for a 5 tank average of 23.0 or better (bet was lunch) and ended up winning with a 23.1 average with 4 tanks over 23. After the bet, the following tank had a tweek to the tune and gave the 2nd best mpg's of the 23's I had. In a nutshell... what I learned was... rotational mass, airflow thru the air box, aerodynamics, LPP timing (key for better mpg on a diesel) all played a part in driving up mpg's. About 6 months ago I thru all the fuel receipts onto a spreadsheet and sorted by month, was averaging 21.0 mpg for 35k miles in the year following the bet. here is a pic of the truck... 6800#'s, 6 spd manual trans.
Cost in all the mods was not an issue, it was done for a refresh of the truck and ultimately the challenge of getting avg mpg's up as high as I could. Right now the truck has 443k on it, performs exceptionally well for that many miles (also figured out how to keep it going as a daily driver, all kinds of cr@p starts creeping in when they are driven unloaded daily as the miles pile up).
In theory it makes sense. The arm is connected to the flap/butterfly. I assumed. unless it�s spring loaded ?
maybe I�ll try and find a diagram of the BPV and see. Or unless someone here has has an extra one out and give it a try.