
R50/53 Replacing Rear Wheel Arch Trim?


Thread Starter
|
Moderator
Joined: Oct 2004
Posts: 941
Likes: 4
Replacing Rear Wheel Arch Trim?
Hey, everybody-
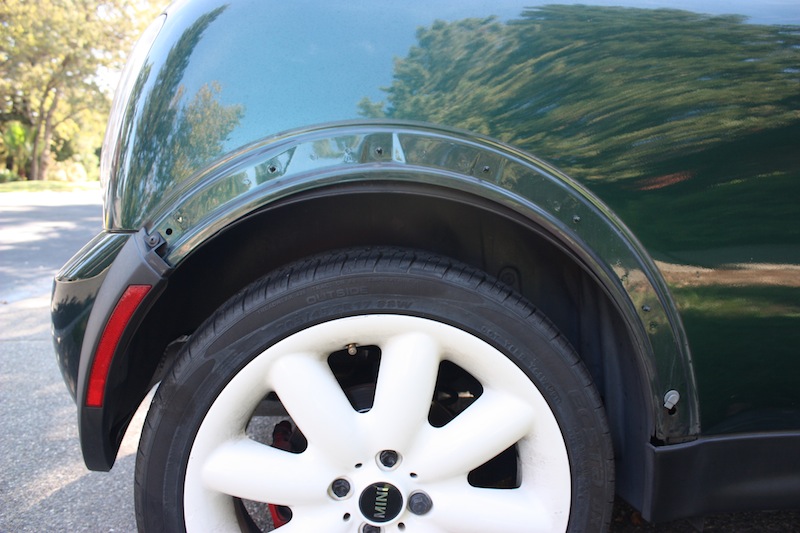
My wheel arch trim came off in a touchless car wash. I'm wondering how to replace it, and whether it's standard operating procedure to replace any or all of the connectors. Here's what I've got:
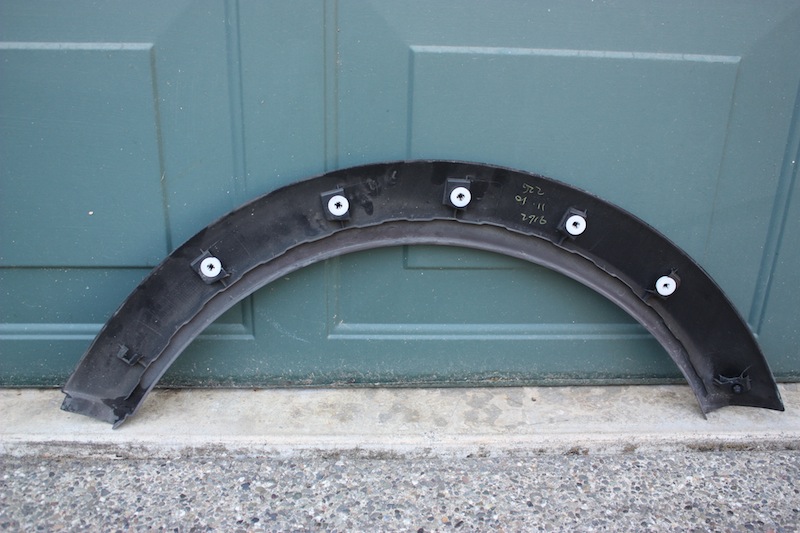
And the trim piece:
I feel very lucky that I discovered this soon enough to get the piece back. I don't want this to fall off again! Do I need to replace any of the connectors to make sure it's mounted securely?
There are the five white circular clips in the photo above. At the rear is one of those "screw anchor" type connectors that plugs into the hole in the body:

I am most puzzled by this light gray tab that's still attached to the front of the wheel arch:

This somehow attaches to a U-shaped mount molded into the inside of the trim piece:

Am I supposed to leave this gray piece attached to the body and slip the U-shaped mount back over it somehow? Or do I remove it, attach it to the trim, and then insert it back into the body? Should I replace it - and any of the other clips - with new pieces?
Any assistance would be much appreciated. Thanks!
My wheel arch trim came off in a touchless car wash. I'm wondering how to replace it, and whether it's standard operating procedure to replace any or all of the connectors. Here's what I've got:
And the trim piece:
I feel very lucky that I discovered this soon enough to get the piece back. I don't want this to fall off again! Do I need to replace any of the connectors to make sure it's mounted securely?
There are the five white circular clips in the photo above. At the rear is one of those "screw anchor" type connectors that plugs into the hole in the body:
I am most puzzled by this light gray tab that's still attached to the front of the wheel arch:
This somehow attaches to a U-shaped mount molded into the inside of the trim piece:
Am I supposed to leave this gray piece attached to the body and slip the U-shaped mount back over it somehow? Or do I remove it, attach it to the trim, and then insert it back into the body? Should I replace it - and any of the other clips - with new pieces?
Any assistance would be much appreciated. Thanks!
Last edited by LombardStreet; Oct 13, 2012 at 12:00 PM.


Easiest to leave the front tab in the body if you can slide it into the appropriate spot. Mine was a @itch to get out. As long as everything snaps back in, you're good. I had to get a new rear anchor as it was deformed, but yours looks good.
Thread Starter
|
Moderator
Joined: Oct 2004
Posts: 941
Likes: 4
Thanks for the help!

6th Gear
Joined: Aug 2003
Posts: 1,344
Likes: 0
From: Uniontown, PA
When I had to remove the rear wheel arch trim, a couple of those white clips broke off. I bought new ones on line from Pelican Parts. They were OEM parts at a good price.
I believe they are listed as a vendor on nam
I believe they are listed as a vendor on nam


Thread Starter
|
Moderator
Joined: Oct 2004
Posts: 941
Likes: 4
A few weeks later, I went through a touchless car wash and drove home. When I came out to the car the next morning, I noticed the trim was missing. Went straight back to the car wash and found it sitting along the wall, behind some of the machinery.
The connectors must have been weakened when the body shop removed this piece the first time. In the car wash, my guess is that the wind from the big blow dryers at the exit somehow got under the trim and popped it off again.
So I figured the connectors had become further weakened after being undone twice now. I went down to my local dealer and bought replacements for all of them. Cost me more than $20, but I figure the peace of mind is worth it. I feel like I was very lucky to get the piece back after it came off once. Didn't want to press my luck any further!

Joined: Feb 2020
Posts: 1
Likes: 0
Need this part
Where can I buy this piece. This happened to me and I thought I had it on tight and it is now gone....
Trending Topics

1st Gear
Joined: Mar 2019
Posts: 30
Likes: 4
A bit of an old post.
I had the same thing happen on the driver side. You can find them on amazon loaded with the appropriate clips or from a mini dealership.
Even with new clips though mine wouldn't attach to the body. Mine had some kind of rubber foam to help keep them attached. I used some automotive goop and that seems to be helping them stay on, definitely avoiding automated car washes though.

Neutral
Joined: Nov 2020
Posts: 2
Likes: 1
For anybody trying to remove these trim pieces from a series 1 mini (2003-2007) - do not just pry off from the outside, as this may break the trim piece and/or the attaching clips.
To remove the fronts, remove the tire, and the wheel fender liner. Then you can get access to the back of the clips. Use needle nose plyers to squeeze the ends of the clips together, then they will come out and can be reused.
You can use jb weld or similar epoxy to repair any broken parts of the trim piece if you don't want to buy new trim pieces.
To reinstall - put the clips on the trim piece and just press into the holes.

Hey, everybody-
My wheel arch trim came off in a touchless car wash. I'm wondering how to replace it, and whether it's standard operating procedure to replace any or all of the connectors. Here's what I've got:
Attachment 162471
And the trim piece:
Attachment 162472
I feel very lucky that I discovered this soon enough to get the piece back. I don't want this to fall off again! Do I need to replace any of the connectors to make sure it's mounted securely?
There are the five white circular clips in the photo above. At the rear is one of those "screw anchor" type connectors that plugs into the hole in the body:
Attachment 162473
I am most puzzled by this light gray tab that's still attached to the front of the wheel arch:
Attachment 162474
This somehow attaches to a U-shaped mount molded into the inside of the trim piece:
Attachment 162475
Am I supposed to leave this gray piece attached to the body and slip the U-shaped mount back over it somehow? Or do I remove it, attach it to the trim, and then insert it back into the body? Should I replace it - and any of the other clips - with new pieces?
If you�ve pressed the gray clip out of the car without deforming, it should be reusable.
I have to replace one of these as well, so if you find a good price, please let me know.

Thread
Thread Starter
Forum
Replies
Last Post
igzekyativ
MINIs & Minis for Sale
34
Jul 16, 2020 12:54 PM