
R50/53 To the guy with the eBay light bar...


To the guy with the eBay light bar...
I cant seem to find the link.. But someone on here was making a 4 light bar for the R53's and they had a few on Ebay.. Wanted to see if your still making them and when I could get one. It was like 30 or 40 bucks. Nice looking system. I am in the need for more light


I think this should help:
- eBay seller name was reddrockets - there aren't any light bars on eBay from him right now, but there are a few contacts in the thread here:
https://www.northamericanmotoring.co...d.php?t=125573
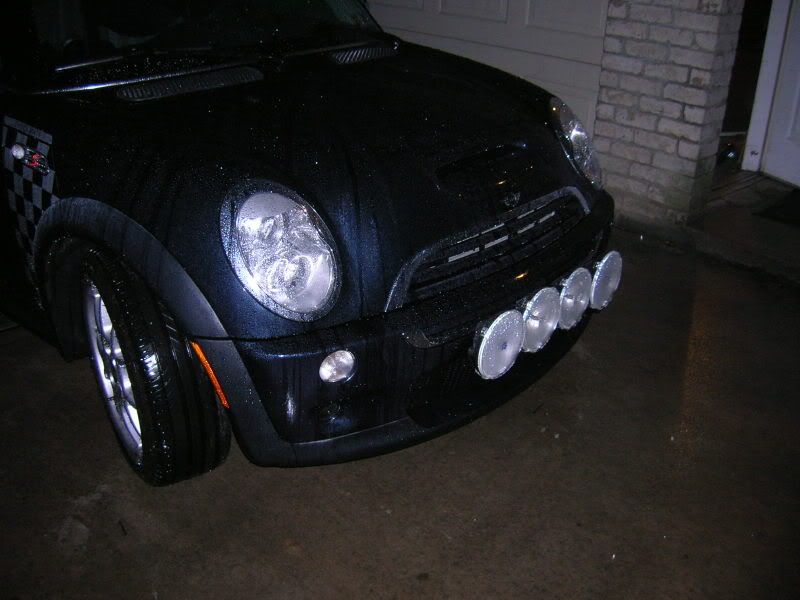
- Pictures of mine (note: I rotated the front bar 90 degrees so the lights would be closer to the bumper):


... and yeah, I know it was dirty - did the install last winter. It's clean now.
Gotcha covered?
- eBay seller name was reddrockets - there aren't any light bars on eBay from him right now, but there are a few contacts in the thread here:
https://www.northamericanmotoring.co...d.php?t=125573
- Pictures of mine (note: I rotated the front bar 90 degrees so the lights would be closer to the bumper):
... and yeah, I know it was dirty - did the install last winter. It's clean now.
Gotcha covered?
Last edited by DixonL2; Sep 12, 2008 at 07:24 PM.
Thank you! Thats the one. So now that you jumped in, please give us an update on the bar. Any issues? Still happy?
And also did you like the yellow fogs? What brand were ther and why did you change them to the clears?
Thanks!
And also did you like the yellow fogs? What brand were ther and why did you change them to the clears?
Thanks!
Trending Topics
OK, in brief:
- Works great, a little vibration -not a lot - only noticeable on very rough roads on the lo-ong driving beams. Pretty sturdy.
- Hella 500's, look good, decent light. Driving beams are almost pencil beam, about double the light from the highs. Fogs are pretty good, a little more beam scatter than some. I picked up a stone on the yellows and replaced with clears - rallylights.com had the lights alone for $20 each, but only in white. I like the white light better, but the yellow looked better. I'll be getting whiter bulbs -next to the xenons the clears look yellow.
- Mounting - the vertical brackets are screwed into the aluminum front bumper with self-tapping screws. They are also at 90 degrees to the crossbar - but the Mini bumper is curved. Wasn't an issue for me as I was redrilling the holes in the crossbar (flipped it 90 degrees to get the lights closer), but if I had it to do again I'd have mounted the supports closer to each other, or pre-bent them in a vise (if I had one) to match the curve. You can mount it a little higher or lower.
I'd buy it again, was a great purchase. I got mine used so can't vouch for how quick Reddrockets (he posts here, BTW) handles business. If I had to do it again I'd through-bolt the mounts using stainless bolts and nylock nuts, measure a little better so the brackets were closer together, and that's about it. Pleased.
Oh - what's NOT shown makes a difference:
- Put the lights on relays and hide 'em, wiring-plug-end-down for weather resistance, where the stock DS horn was
- Relays allow fogs on with parking lights, and driving lights on with highs
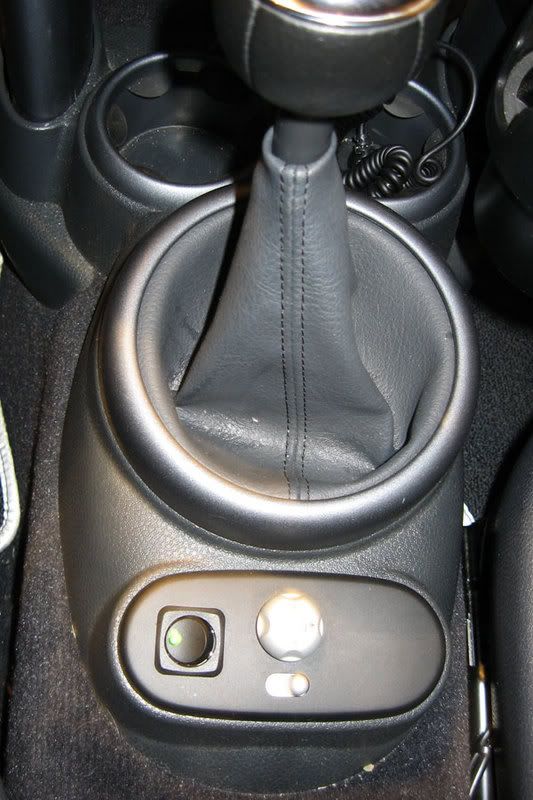
- Put switches on the downtube, driver's side inner. Looks reasonably stock if you can even see 'em. Don't know that I'd do that again, fishing those wires was a pain!
- Used stainless bolts to hold the bar on, and greased the fastener so it didn't rust
- Wired using a trailer plug at the grille so I can unplug the lights and remove 'em, leaving only the mounting posts sticking out
- Covered the "leading edge" of the metal piece (the part perpendicular to the ground) with blackout tape to absorb some road grit and delay the onset of the rustbug.
- Put the lights on relays and hide 'em, wiring-plug-end-down for weather resistance, where the stock DS horn was
- Relays allow fogs on with parking lights, and driving lights on with highs
- Put switches on the downtube, driver's side inner. Looks reasonably stock if you can even see 'em. Don't know that I'd do that again, fishing those wires was a pain!
- Used stainless bolts to hold the bar on, and greased the fastener so it didn't rust
- Wired using a trailer plug at the grille so I can unplug the lights and remove 'em, leaving only the mounting posts sticking out
- Covered the "leading edge" of the metal piece (the part perpendicular to the ground) with blackout tape to absorb some road grit and delay the onset of the rustbug.

5th Gear
Joined: Feb 2007
Posts: 930
Likes: 2
Ahhh yes it is.
There's another spot on the e-brake handle surround that looks like it would support a switch. I was going to use that, but had enough fun fishing the line to the spot I did. I do like the convenience of just reaching down and flipping the switch. Its in a very natural place to reach. I have a switch for my LightForce lights in my truck that is a pain to reach. Still haven't figured out a good place for that one. FWIW those LightForce lights are like turning on the sun!
There's another spot on the e-brake handle surround that looks like it would support a switch. I was going to use that, but had enough fun fishing the line to the spot I did. I do like the convenience of just reaching down and flipping the switch. Its in a very natural place to reach. I have a switch for my LightForce lights in my truck that is a pain to reach. Still haven't figured out a good place for that one. FWIW those LightForce lights are like turning on the sun!

I just took my brackets off they have a little surface rust at the tip (and a few extra holes so I could mount as low as possible) but worked great.
I have never used the bar. It is a great setup very well made. I highly recommend getting one. For the 500s its the perfect size just sticks out more than ones like Altas but that can be remedied as Dixon pointed out.
Hella FF700's don't fit 4 across so I made my own bar. Then my bar didn't really support the weight of the lights with just 2 attachment points. (lots of bounce) So now I over engineered brackets and a bar for the 700's and have the ebay bar sitting in the garage.
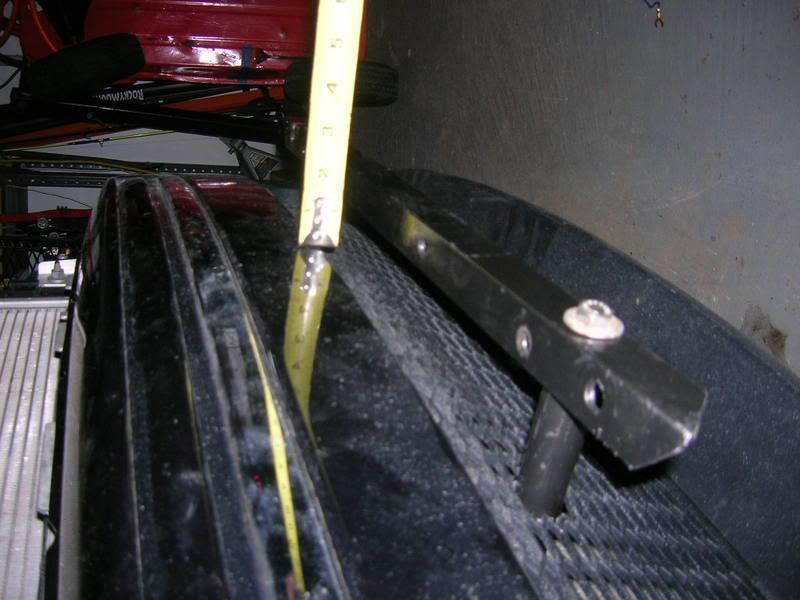
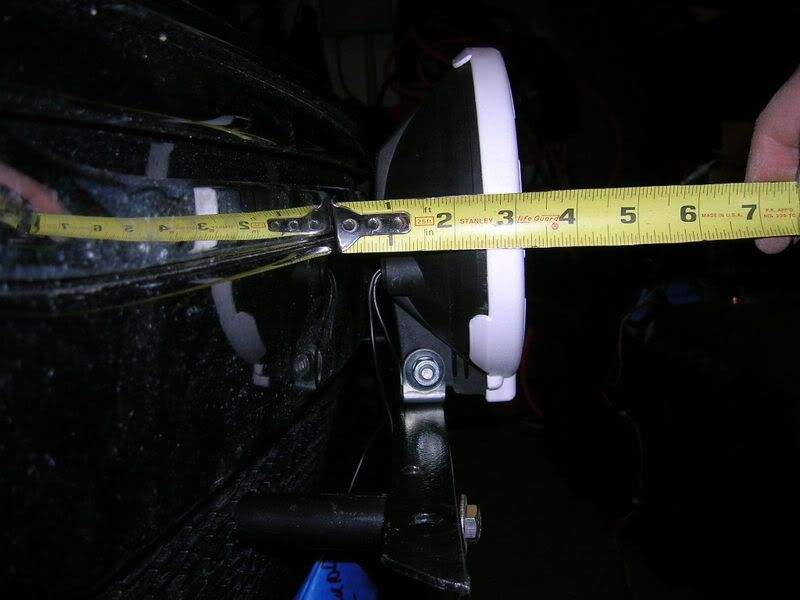
Yep - the remedy is simple, involves a little measuring and drilling two holes. Note the picture of the bar, from the back over the naked bumper. See how the holes are on the front (downmost) side of the bar? Now look at the picture of the lights with the tape measure. See how I've flipped the bar end-to-end, and rotated it 90 degrees on its axis? This makes the flat surface on top the "mounting surface". instead of mounting the lights on the front of the bar. Keeps 'em tighter against the bumper that way. Easy too, because I mounted the brackets on the bumper, THEN measured and drilled. I hit the holes with etching primer, then flat black, before mounting - again, to delay the rustbug. No issues!


Thread
Thread Starter
Forum
Replies
Last Post
Interior/Exterior DEPO/Helix Projector Headlights Installed
Alkaidovich
Interior/Exterior
68
Jan 30, 2021 01:35 AM
ryGuyMCS
MINI Parts for Sale
2
Oct 20, 2015 02:24 PM
JHolland
R56 :: Hatch Talk (2007+)
1
Aug 13, 2015 10:47 PM