
Navigation & Audio iPod Gen2 Installation Guide for '05s or later


Thread Starter
|
4th Gear
Joined: Jan 2006
Posts: 310
Likes: 0
From: Seattle
iPod Gen2 Installation Guide for '05s or later
After DIYing my own it should only take me around 15 minutes to do it again.
This guide should be used in conjunction with the OEM installation manual (new) to visualize my instructions.
Note: Car toys quoted $150 + tax to do the install and the dealers may
not be much cheaper. It's only 8 screws and no splicing so consider DIYing it.
Requirements:
'05 or later MINI. The pre '05s may require splicing and crimping, further
dash disassembly and may use the older kit and guide.
OEM Gen 2 iPod Kit
Various torx bits, mine needed T25 and T30.
5/8 drill bit and drill.
Small tweezer or big needle or tiny flathead.
1. Download and review both the iPod interface .zips at
http://new.minimania.com/Downloads.cfm
but use the (new) one.
2. Disconnect the negative terminal on the battery.
3. Under the steering wheel, use both hands and pull abruptly down on
the panel, it opens similar to a glove box.
4. Remove the 4 torx screws on both the center console pillars. They
should slide down and you can pull them to the left and right to reveal
the 4 radio screws.
5. Remove the 4 phillips screws from the radio. Pull strait out. You
should be able to set the radio on your shifter ring, if it catches, just
reach in and feed the cable group out slowly.
6. Remove the "****" that holds the wire group to back of the unit.
7. The wire housing uses a zero insertion force lever to detach it from the
pins. Squeeze and lift the lever and it will slide the housing out about a
half inch. Pull it the rest of the way off.
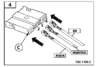
8. Using the instructions remove the 3 (not 4 as in the old manual) wires.
To do this, examine the iPod kit's wires, you'll see that they have a taper
that secures them. This taper needs to be depressed to remove the
original wires from the housing. The easiest way to do this is flip over the
housing (Non wire side). You'll see all the tapers of each pin. Depress the
taper on the bottom of the housing using tweezers, needle or small
screwdriver while pulling slightly on the wire you are extracting.
9. Clip these three wires into the 4 pin clip that came with your iPod kit.
Make sure you clip them in as the instructions state as these would be
hard to remove as the taper is not as exposed. You only use hole 4,3 and
2.
10. Clip in the 3 wires from the iPod group in the same slots the you just
removed the previous wires from. The colors for each are the same.
11. Squeeze and remove the white rectangle 12 pin wire group from the
housing. This is REPLACED by the white rectangle 12 pin wire group on
the iPod kit.
12. Connect the 4 hole (3 wire bypass) clips.
13. Connect the PS2 like white and black cables accordingly. You may
need to disconnect the white cable to route it to the glove box in the next
step and reconnect. You can also reconnect the negative terminal on the
battery and test everything out at this point but disconnect the terminal
before continuing.
14. To drill the hole examine inside the radio dash cavity and your glove
box. You can choose several spots where you want to drill your hole. Drill
the hole through your glove box. Slice the rubber hole cover and insert
the iPod connector cable. Reaching in the radio dash cavity with one hand
and the glove box with the other, get the lip through and twist while pulling should seat the rubber hole cover as designed.
15. Reconnect the negative terminal and test everything out.
16. Reassemble, it may take some work to get the radio unit back in with
all the new cables. Keep adjusting to provide the most clearance but you
still may need to push quite a bit to get it flush with the screw hole
plates.
You're Done! The CDC mode will allow for your pre set buttons to switch
between 6 playlists labeled MINI1, MINI2, etc. If you don't have a MINI6 it
will include every song your iPod.
This guide should be used in conjunction with the OEM installation manual (new) to visualize my instructions.
Note: Car toys quoted $150 + tax to do the install and the dealers may
not be much cheaper. It's only 8 screws and no splicing so consider DIYing it.
Requirements:
'05 or later MINI. The pre '05s may require splicing and crimping, further
dash disassembly and may use the older kit and guide.
OEM Gen 2 iPod Kit
Various torx bits, mine needed T25 and T30.
5/8 drill bit and drill.
Small tweezer or big needle or tiny flathead.
1. Download and review both the iPod interface .zips at
http://new.minimania.com/Downloads.cfm
but use the (new) one.
2. Disconnect the negative terminal on the battery.
3. Under the steering wheel, use both hands and pull abruptly down on
the panel, it opens similar to a glove box.
4. Remove the 4 torx screws on both the center console pillars. They
should slide down and you can pull them to the left and right to reveal
the 4 radio screws.
5. Remove the 4 phillips screws from the radio. Pull strait out. You
should be able to set the radio on your shifter ring, if it catches, just
reach in and feed the cable group out slowly.
6. Remove the "****" that holds the wire group to back of the unit.
7. The wire housing uses a zero insertion force lever to detach it from the
pins. Squeeze and lift the lever and it will slide the housing out about a
half inch. Pull it the rest of the way off.
8. Using the instructions remove the 3 (not 4 as in the old manual) wires.
To do this, examine the iPod kit's wires, you'll see that they have a taper
that secures them. This taper needs to be depressed to remove the
original wires from the housing. The easiest way to do this is flip over the
housing (Non wire side). You'll see all the tapers of each pin. Depress the
taper on the bottom of the housing using tweezers, needle or small
screwdriver while pulling slightly on the wire you are extracting.
9. Clip these three wires into the 4 pin clip that came with your iPod kit.
Make sure you clip them in as the instructions state as these would be
hard to remove as the taper is not as exposed. You only use hole 4,3 and
2.
10. Clip in the 3 wires from the iPod group in the same slots the you just
removed the previous wires from. The colors for each are the same.
11. Squeeze and remove the white rectangle 12 pin wire group from the
housing. This is REPLACED by the white rectangle 12 pin wire group on
the iPod kit.
12. Connect the 4 hole (3 wire bypass) clips.
13. Connect the PS2 like white and black cables accordingly. You may
need to disconnect the white cable to route it to the glove box in the next
step and reconnect. You can also reconnect the negative terminal on the
battery and test everything out at this point but disconnect the terminal
before continuing.
14. To drill the hole examine inside the radio dash cavity and your glove
box. You can choose several spots where you want to drill your hole. Drill
the hole through your glove box. Slice the rubber hole cover and insert
the iPod connector cable. Reaching in the radio dash cavity with one hand
and the glove box with the other, get the lip through and twist while pulling should seat the rubber hole cover as designed.
15. Reconnect the negative terminal and test everything out.
16. Reassemble, it may take some work to get the radio unit back in with
all the new cables. Keep adjusting to provide the most clearance but you
still may need to push quite a bit to get it flush with the screw hole
plates.
You're Done! The CDC mode will allow for your pre set buttons to switch
between 6 playlists labeled MINI1, MINI2, etc. If you don't have a MINI6 it
will include every song your iPod.

Neutral
Joined: Dec 2006
Posts: 2
Likes: 0
IPOD Install Troubleshooting
Last night, I used your posting as well as the downloaded instructions for the ipod adapter for our '06 Cooper S. I performed all of the directions but when I went to test the system, the power on the deck will not come on. I rechecked all of the plugs and fuses and everything looks correct. I would appreciate any help that you could provide.

2nd Gear
Joined: Jul 2006
Posts: 130
Likes: 0
From: Phoenix, AZ
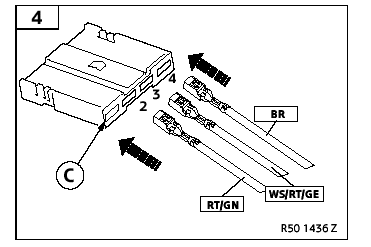
Okay I found my issue, so maybe this will help someone else. I did not have the wires in "part C" correctly. The picture shows the clip upside down from what worked for me. The wires should go into slots 2, 3, and 4 somewhat easily. I put them in upside down based on the picture below...
The top of the connector at the end of the wires has a triangular compression fitting that should go into part C on the side with an open slit on it. This way you can see the wires pass to the end of part C. It snapped together more surely when I did this and worked excellent. I hope this helps!
The top of the connector at the end of the wires has a triangular compression fitting that should go into part C on the side with an open slit on it. This way you can see the wires pass to the end of part C. It snapped together more surely when I did this and worked excellent. I hope this helps!

2nd Gear
Joined: Apr 2006
Posts: 55
Likes: 0
From: Bham, AL
I've got no power to the unit. It seems to be installed correctly. I took it apart and reconnected, still nothing.
Help!
I took the interface off and still no power. I've checked the fuses in the fuse panel for the HU and on the back of the HU. Still nothing. What could I have done wrong? Have I killed the HU?
Help!
I took the interface off and still no power. I've checked the fuses in the fuse panel for the HU and on the back of the HU. Still nothing. What could I have done wrong? Have I killed the HU?
2nd Gear
Joined: Apr 2006
Posts: 55
Likes: 0
From: Bham, AL
Trending Topics
4th Gear
Joined: Jan 2005
Posts: 479
Likes: 0
From: Bay Area, CA
Just finished this installation... successfully! 
One thing to note, the downtubes don't pop down as easily as this thread and others make it sound. We actually referenced newministuff.com's DIY guide to move the center console to get the downtubes out of the way without breaking anything. Only took a few extra minutes and worked like a charm!
Total time of install: 1.5 hours.
Thanks Crusoe, for the instructions! Very helpful!
Cheers,
4th Gear
Joined: Jan 2005
Posts: 479
Likes: 0
From: Bay Area, CA
Doh! Thought it was working, but tried to turn to Sirius this morning and got not sound. iPod, CD player (in H/U) and AM/FM work fine. Sirius displays the stations/songs on the head unit but there's no audio. Any ideas why? (I did a search but found bubcus.)
4th Gear
Joined: Jan 2005
Posts: 479
Likes: 0
From: Bay Area, CA
Okay, after sifting through most of MLWagner79's posts, I finally found this one: https://www.northamericanmotoring.co...4&postcount=13
She mentions a Y-splitter... I'm thinking that's what I need. Is this a MINI part or something I can get elsewhere? Does anyone have DIY instructions anywhere? I'm not willing to pay the dealership for install.
She mentions a Y-splitter... I'm thinking that's what I need. Is this a MINI part or something I can get elsewhere? Does anyone have DIY instructions anywhere? I'm not willing to pay the dealership for install.

Neutral
Joined: Jan 2007
Posts: 6
Likes: 0
From: Southern California
Wow, it's amazing how easy this is! Great instructions. With this and a image gallery from Goose,
https://www.northamericanmotoring.co...1&ppuser=17989
finished in 2 hours. Took a little longer because I forgot to put the blue clip back in.
Thank you Crusoe!
https://www.northamericanmotoring.co...1&ppuser=17989
finished in 2 hours. Took a little longer because I forgot to put the blue clip back in.
Thank you Crusoe!

Thread
Thread Starter
Forum
Replies
Last Post
igzekyativ
MINIs & Minis for Sale
34
Jul 16, 2020 12:54 PM
squawSkiBum
MINI Parts for Sale
15
Oct 2, 2015 09:21 AM
Mini Mania
Vendor Announcements
0
Aug 19, 2015 09:12 AM