When you click on links to various merchants on this site and make a purchase, this can result in this site earning a commission. Affiliate programs and affiliations include, but are not limited to, the eBay Partner Network.
Leaking counterbalance shaft cover seals/gaskets - anyone run into this?
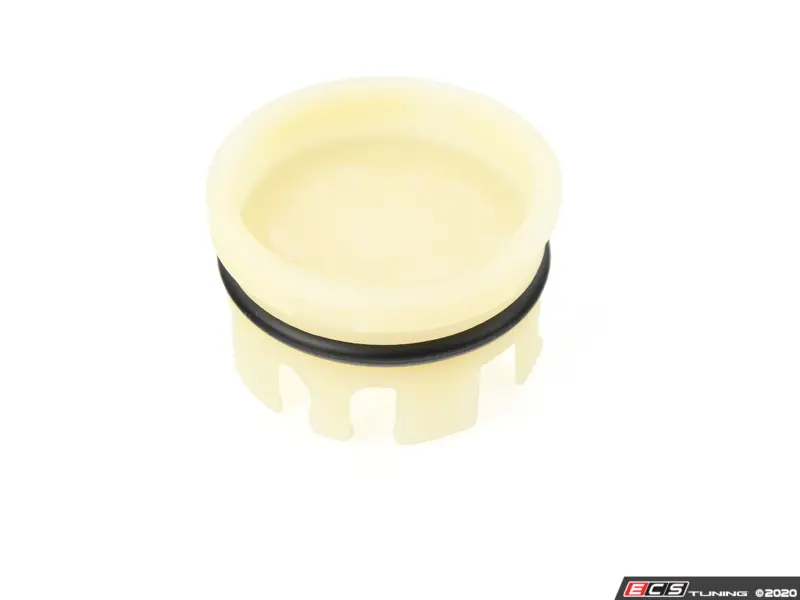
For the longest I have been eyeballing what looked like light remnants of an oil leak in a weird place -- a round, yellow plastic cover at the front end (crank pulley end) of the cylinder block, to the upper left of the crank pulley. I've been eyeing it more suspiciously of late, as I've been detecting more oil there but presumed it was coming from somewhere else, like maybe the front crank seal.
Jury is still out on the front crank seal. But today I ran across this statement in a Facebook-side MINI maintenance group: "Theres 2 small caps about an inch in diameter that are used for the casting process that usually leak. Part number is 11117797932"
That part number is the round yellow plastic cover I have been eyeing with suspicion. There are two of them, and sitting behind them inside the cylinder block are the engine's two counterbalance shafts.
Googling around got me to a thread over at Bimmerpost about this issue on the B48 engine. One question surfaced in that discussion is whether the covers need a sealant (separately from the o-rings that come on the covers). The Bimmerpost discussion never answered that, but my conclusion is no, based on instructions in TIS for removal and replacement of the counterbalance shafts. Those instructions direct removal of the covers using a prytool like a screwdriver, and similar reinsertion, with no mention of applying or otherwise dealing with a sealant.
The Bimmerpost thread, BTW, has good photos of old and new covers that give a clear idea of why they might end up leaking: heat, full stop. Worth a look.
So replacement of these looks pretty straightforward, or at least the one closest to the upper left of the crank pulley should be easy enough. I'll find out how easy the other is to access without having to get some other part out of the way -- and whether it is leaking -- when I next get under the car.
My question is this: have you spotted and/or dealt with this on your B series engine (B36 / B38 / B46 / B48)? I'd like to know.
Thanks!
PS Hey @cmt52663 you may find this of interest.
Update: confirmed that the o-ring seals that come with the plugs were in horrible shape, flattened out and leaking. Replaced.
Side observation: almost every seal I end up pulling off the car shows signs of "been there a while." General best practices on a BMW/MINI in my mind, at this point, is that if you expose a seal you should take the time to replace it, unless you know it has been recently replaced and there is no risk simply leaving it as-is. Whatever their materials choice protocol is, the seals seem to be, effectively, wear items.
HI thanks for these details apd providing the part numbers. What mileage is this occurring at?
I'd say I found it was "real" (as in "yikes where is this oil coming from") at 111K miles or so. There was enough oil coming off of the cap closest to the rear of the vehicle -- not in a clear wet trail, but being spread around lots of places (the RF lower control arm, for example) -- that I thought I had a front crank seal leak.
That said, I had been watching the plug since at least last year. Heck, I think I was watching it at least 20K miles ago, trying to figure out where some unexplained oil-sheeny dirt on it was coming from. If you see that on yours, it's leaking. And if you're going to replace one, replace both. They're going to be in the same general condition.
How many hours did it take you to replace both? Trying to get a sense of what's reasonable for hours billed by my mechanic.
It was done at the same time as other work so I can�t really give a sense of how much time it takes as a standalone repair. The caps are friction fit, you pop them out with a screwdriver or similar and installation is simply by pushing the caps back into place. The effort level for the caps proper is therefore minimal. Billable time is consequently going to be driven by whatever it takes to gain sufficient physical access to remove / replace the caps.
Originally Posted by Banner28
Out of curiosity, where are the two "caps"? The parts diagram don't really give a good idea on where they're located.
Also, was the final verdict that any sort of "sealant" is not needed?
The caps are on the front of the engine (meaning the face where the serpentine belt and various pulleys are). They are yellow-white plastic, diameter somewhere between the size of a quarter and a half-dollar coin. There are two, and they are located about the same distance from the crankcase vertical centerline and from engine bottom. Once you spot them they are pretty obvious. You will *not* spot either easily unless you start removing upper engine components or, alternatively, removing the lower engine bay cover and looking up. If you remove the fender liner in front of the serpentine belt/etc. you will get a clear view of at least one of them.
Re the sealant question: the plugs come with a rubber o-ring installed. The original
plugs have the same o-ring. On both original plugs the rings had deteriorated and split, with a good-sized gap visible between the split ends of the ring. Consequently the seal was no longer complete, and hence the leak.
Given the basic design and the inclusion of new o-rings already fit to the new plugs, and given that part of the BMW/MINI �thing� seems to be materials choices that include rubber and plastic that deteriorates and fails, my own inclination is to regard the plugs and o-rings as wear items and replace both of them on principle and opportunistically, when doing other front-of-engine maintenance.
I lean against sealant for three reasons.
(1) the area of application is not intended to end up with any sort of permanently-attached material. It is intended to remain a clean surface. The caps are �remove when needing to service or otherwise remove the balance shafts�-intended, not �seal and remain in place forevermore�-intended.
(2) with (1) in mind, sealant is also invariably messy, further making it something you don�t want in places not designed for it.
(3) it is a lot harder to remove and replace a failed plastic cap fixed in place by sealant than one that is friction-fit with a rubber o-ring, and that plastic is as suspect to me for future failure as any other plastic BMW uses underhood. Though the discussion here is largely about failure of the o-ring, I say the cap itself will ultimately need replacement, whenever it reaches the point of materials failure.
Other opinions may vary, but that�s my take and how I intend to maintain my F56S, FWIW.
I just discovered my F55 S is seeping the tiniest amount of oil from the same place. I looked online and it appears nearly all higher mileage B48s are seeing this problem. Apparently MINI charges 6 hours of labor to replace that cap. I saw a YouTube video where someone did it in less than 10 minutes.
I'll just check that this excellent information is cross-linked to the "High Mileage" thread - thanks y'all!
FYI Gollum IV at 142k miles had not yet had this issue.
Cheers,
Charlie
I wouldn�t have ever known it was leaking except I just happened to get under the car to look at the rear engine mount and was like, what�s this plastic piece. And then saw the smallest amount of oil seeping. I also discovered the oil filter housing itself is either leaking from the bottom drain or it isn�t tightened all the way. It�s just the smallest little seep. Not even enough to drip onto the underbody cover or floor with the cover removed.
I wouldn�t have ever known it was leaking except I just happened to get under the car to look at the rear engine mount and was like, what�s this plastic piece. And then saw the smallest amount of oil seeping. I also discovered the oil filter housing itself is either leaking from the bottom drain or it isn�t tightened all the way. It�s just the smallest little seep. Not even enough to drip onto the underbody cover or floor with the cover removed.
Keep an eye on that oil filter housing leak. Known failure point. Usually it's the coolant that leaks, though, rather than the oil. But it starts slow (*really* slow) and then one day... your coolant is missing or almost missing, lost to the coolant gremlins (well, to evaporation as it runs down the crankcase onto the oil pan and evaporates, or gets absorbed by the underbody cover, or... well, yino). If it's definitely engine oil then... ok that may be something else, and it will mess up on the coolant side, uh, evenutally/later :D
The plastic counterbalance shaft covers - again, the o-ring that runs around the inside of the plug eventually deteriorates and breaks, leaving open space for oil to get through. The oil leak gets worse over time. Eventually it will leak enough to get oil all over stuff and make you think you have a big (or bigger) leak somewhere else (like the front crank seal). Great little leak for setting you up for wild goose chases
I just discovered my F55 S is seeping the tiniest amount of oil from the same place. I looked online and it appears nearly all higher mileage B48s are seeing this problem. Apparently MINI charges 6 hours of labor to replace that cap. I saw a YouTube video where someone did it in less than 10 minutes.
It was done on a longitudinal B48 in an X3, but the guy just popped it off with a screwdriver and then popped the new one on. There�s two of them. I know one of them on my car looks easy to get to, not sure about the other one.
It was done on a longitudinal B48 in an X3, but the guy just popped it off with a screwdriver and then popped the new one on. There�s two of them. I know one of them on my car looks easy to get to, not sure about the other one.
Makes sense. Yeah, the big thing is getting to them in a way that (1) you can execute the removal and (2) execute the replacement. Access is the hard part. So you either have to remove a bunch of stuff to get it out of the way, or you need the right tool+approach to avoid having to remove so many things.
Dealer/shop pricing is going to run based on getting stuff out of the way; but if I were attempting DIY, I'd be focusing on a long flat-bladed screwdriver and really long needle-nose pliers (as mentioned for plug #2 in that video).
I got the rear one out today. It wasn�t the easiest but definitely DIY friendly. Just requires taking off passenger front wheel. I used two long screwdrivers and carefully pried off the cap. The O-ring/gasket was completely flat and I could actually spin the plastic cap around in its seated position before taking it off. New one was pretty easy to get in. I took a long socket extension and tapped the outside of the cap with a rubber mallet and it popped right in.
To get to the front one I think I would need to remove the front passenger wheel well liner. I�m not exactly sure how hard that is. I hate dealing with plastic clips and there�s a bunch of them. It looks like if the wheel well liner came off there might be access. Thankfully the front cap isn�t leaking yet. Were both of yours leaking or just the rear one like mine? I suspect the heat from the turbo/exhaust side of the engine is enough to help cook that rear cap and gasket a little more than the intake side.
To get to the front one I think I would need to remove the front passenger wheel well liner. I�m not exactly sure how hard that is. I hate dealing with plastic clips and there�s a bunch of them. It looks like if the wheel well liner came off there might be access. Thankfully the front cap isn�t leaking yet. Were both of yours leaking or just the rear one like mine? I suspect the heat from the turbo/exhaust side of the engine is enough to help cook that rear cap and gasket a little more than the intake side.
If I recall correctly, the rear was definitely leaking but visual inspection had me very suspicious of both. I do recall the rear one having my direct attention first though.
Yes, you can take the wheel well liner off. That's actually a routine op for all manner of front-of-engine tasks. It isn't really a plastic clip thing, either. Short version:
(1) do NOT attempt to remove the textured decorative plastic fender arch, or anything that the fender arch attaches to. You will find out the hard way that it is unnecessary and very easy to break clips you can't repair (especially its attachment to the front spoiler).
(2) The plastic extensions to front and rear of the wheel that are attached to the wheel well liner are *part* of the wheel well liner. Think of them as "feet." So you'll have to remove the 8mm hex-head screws holding them in place.
(3) the wheel well liner is held in place by a bunch of the same 8mm hex-head screws, two plastic-cap tall hex nuts (same kind as you'll find holding the small section of the windshield cowl in place), and at least three plastic expanding rivets (those things where there is an insert, similar to a drywall anchor, with a plastic rivet pressed into the center to expand and hold it). Two of those expanding rivets, by the way, anchor the wheel well liner to the brake air duct in front of the wheel.
(4) at the front of the wheel well liner (meaning in front of the wheel), very close to where the wheel arch sidemarker is located, there is **supposed** to be one of those 8mm hex screws. If you still have that and nobody has tried to shove a plastic rivet or something else into it, good. Why good? Because the front spoiler on each side has a plastic tab, easily snapped, that in turn has a metal u-nut of a kind (just Google u-nut if you're unfamiliar -- weird name I don't get it but the search will show piles of them) slid onto the plastic tab. The 8mm screw screws into the u-nut. I bought my F56S used; the u-nut was gone; someone had shoved plastic rivets in there; by the time I figured out the ear thing they had both snapped; the wheel arch trim did not properly anchor and it ticked me off until I finally replaced the wheel arch trim and the front spoilers at not-cheap cost (don't get me started on the sidemarker lights being held in place with felt-tape adhesive, and logic-ing my way through removing the from the old trim / prepping them for placement in new...)
All that said, the good news is: zero clips involved in holding the wheel well liner in place. none. Nada. Zero. It is still annoying to deal with, but you don't have to worry about clips.
Side note: all those 8mm bolts and the various things they screw into -- for ongoing maintenance of an F56 I'm now keeping a small stash of replacement bolts and the various things they screw into on hand. Most of them screw into plastic inserts that will strip out or otherwise deteriorate over time, and it's no fun to be reassembling everything and find one screw just spins in place, meaning you have to revisit the underside of your car "later" to finish the job. Happy to provide part numbers if you're interested in them.