
R50/53 Oil Filter $ - WTF?


3rd Gear
Joined: Jan 2013
Posts: 152
Likes: 3
You went to the dealer? Are you insane?
$7 on Amazon.
$7 on Amazon.


5th Gear
Joined: Apr 2011
Posts: 754
Likes: 1
From: Bucks County PA
Go to Ebay. May not be oem but a heck of a lot cheaper.
http://www.ebay.com/sch/i.html?_trks...at=0&_from=R40
http://www.ebay.com/sch/i.html?_trks...at=0&_from=R40


Trending Topics

5th Gear
Joined: Apr 2013
Posts: 731
Likes: 5
From: Near Portland, OR, USA
Will be doing first oil change since I've owned the car soon. I have to know, "What's the problem with generic oil filters?"
My local parts store has WIX, which I've never heard of. They also have FRAM, and Bosch, which I'm sure I've used at one time or another with previous cars I've owned, no problems. I don't mind getting an OEM/BMW oil filter if there's a good reason. It's just less convenient, as it would be a drive to an overpriced dealership, or ordering online, and waiting for shipping.
Another question: Will I be able to re-use the drain bolt, or is it designed as a one time use thing?
Thanks

OVERDRIVE
Joined: Jul 2006
Posts: 7,037
Likes: 283
From: Melbourne, FL
Will I be able to re-use the drain bolt, or is it designed as a one time use thing?
Strongly suggest you read this b4 you begin and maybe dig for similar topics about stuck drain plugs . . .
https://www.northamericanmotoring.co...that-dumb.html
WRT filters - there have been a number of reports of filters found to have collapsed when removed later (how long ago did that happen) AND O-Rings not fitting correctly causing leaks when using other than OE filters. An owner since 02 who also does oil changes for other folks I ONLY buy OE (not from a dealer and usually 3 or 6 at a time)
I have had folks bring me MANN to use on their car and I have used these without a problem - but be aware the filter is NOT an exact match to the OE . . .

This article applies to the Gen 1 2002-2006 R50 MINI Cooper and R53 Cooper S Hatchback.
A Little Background...
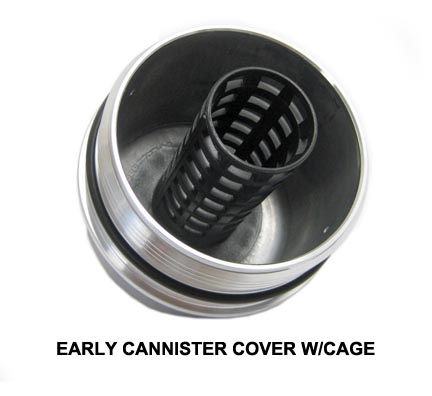
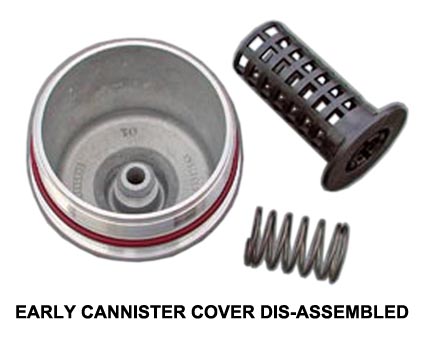
The early MINI with production dates up to 07/2004 has a couple extra pieces inside the oil filter cannister cover - a spring and plastic cage. These items were eliminated on the later models after 07/2004.
The oil filter specification with the initial production of the MINI required a 'paper filter' which necessitated a plastic cage in the cannister cover to prevent the filter from collapsing under pressure. For this reason, the early production MINIs have a spring loaded plastic 'cage' built into the oil filter cannister cover. This 'cage' provides a rigid structure within the filter to maintain its shape under pressure. The cage also helps to 'seal' the top of the filter for proper oil circulation thru the filter.
The early 'all paper' oil filters designed for use with the caged cover did not have any internal support structure (or 'built-in' cage). BE CAREFUL when purchasing aftermarket oil filters as there are still some of these 'uncaged' filters in the market.
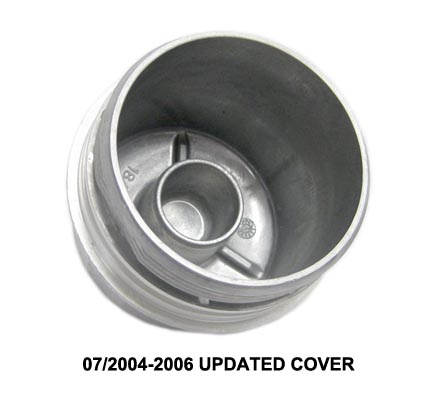
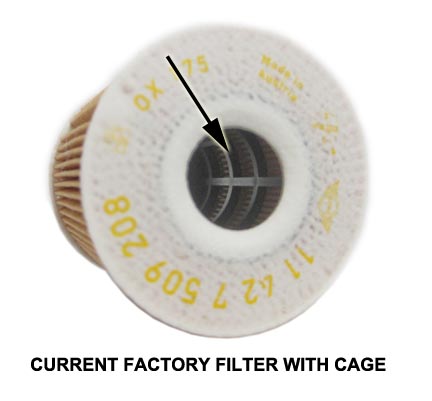
Beginning with the 07/2004 production, they changed the filter specification and a plastic 'cage' was built into the filter itself, eliminating the need for the cage in the cannister cover.
The potential problem...
A potential problem arises with your 2002-2004 MINI during a filter change when the plastic cage 'detaches' from the cannister cover and gets pulled out with the oil filter, allowing the spring to pop free. If the technician is not familiar with the early filter setup - the plastic cage gets thrown out with the dirty oil filter. (You can find replacement cannister covers here.) Without the spring and cage in the early cannister, the filter fails to seal against the cover resulting in 'low oil pressure' warining light.
Since the cannister cover is built differently for the 'cage version' vs. the later version, the filter will not seal properly without the cage, allowing unfiltered oil to circulate around the filter. Circulating unfiltered oil is NOT good for your engine...
Another problem arises if you should happen to purchase an early 'un-caged' oil filter. If you use this filter with the later 'uncaged' cannister cover, the filter will collapse affecting filtration and oil pressure.

The solution...
If you find a loose spring with the oil filter without the plastic cage, MINI recommends replacing the entire Oil Filter Housing module with the newer style housing.
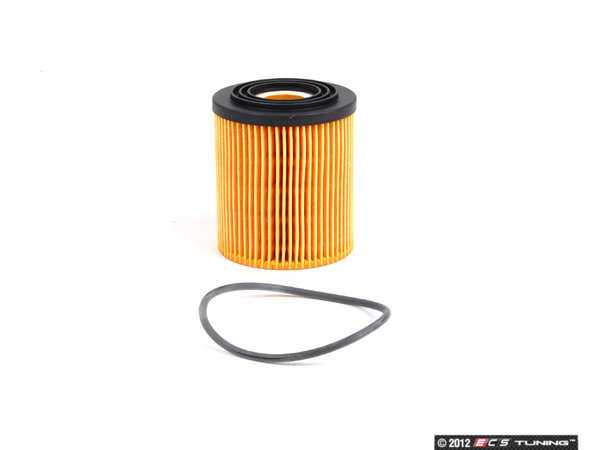
Make sure the new oil filter has the plastic cage 'built-in'. You will be safe with the factory filter (NME1050 ) or the MANN filter (NME1056 ).
Note:
We've had occasional reports of the oil light staying on at idle and going off as soon as the rev's are up. We have seen a couple issues that have caused this:
1. One of the valves inside the filter base is damaged (missing pieces).
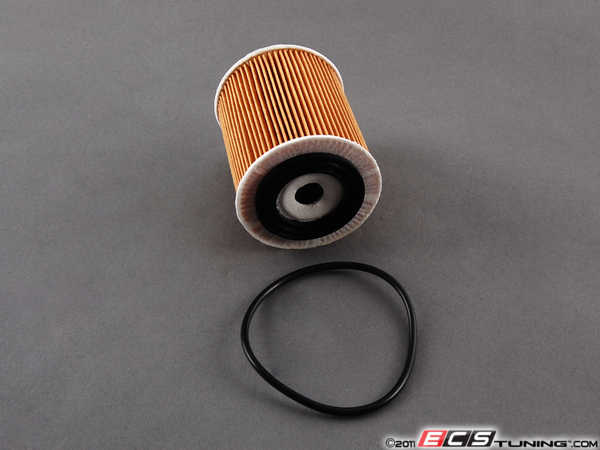
2. Aftermarket oil filter with inadequate 'stiffness' on the ends of the filter causing oil to bypass the filter (Wix filter caused this problem for one customer). The factory oil filter has a rigid black plastic base on the bottom to press against the valves at the base of the oil flter housing.
Helpful Hints for changing the oil...
Frequently, the cannister cover will be very difficult to break free. Use a breaker bar with CAUTION! You may need a 'low profile' socket due to the limited space available.
If you loosen the filter cannister cover enough to break the seal, it will help drain the oil from the filter as you drain the oil pan. Less mess later!
When replacing the O-ring (which is included with the new factory filter), save the old one just in case (will explain later).
When replacing the O-ring on the cannister cover, make sure you lubricate the O-ring with PLENTY of fresh oil before you install it, and lubricate again after it is in place on the cannister cover. If you fail to do this, the O-ring will bunch up and cause a leak!
The new oil filter should be 'pre-seated' into the base and cover before installation. Take the filter (plastic side down) and press firmly into the base until it is fully seated. Remove and do the same into the cannister cover. This reduces the resistance from initial seating. You can leave the filter seated into the cover and screw the cover back onto the base, or you can leave the filter in the base fully seated and screw the cover back onto the base.
Getting the Cannister Cover started into the base is a little tricky - having the O-ring well lubricated will make it a little easier. Start the cover onto the base carefully, confirming the cover is 'square' with the base to prevent cross-threading. Once you have it started, you will still have slight resistance from the new O-ring, but you should be able to get the cover well onto the base by hand.
Torque the cannister cover to 18 lb-ft.
The factory Drain Plug gasket is a plastic gasket that is molded into the Drain Plug. Best to replace the drain plug at every oil change. The cost is minimal compared to headaches from a leaky plug! (The linked filter part numbers above includes a new drain plug.)
Torque the Drain Plug to 18 lb-ft as well.
You can also use a magnetic drain plug that will help trap microscopic metal debris and can be re-used.
Fill with a name brand FULL SYNTHETIC motor oil. It should take close to 5 quarts. MINI recommends oils in SAE classes 5W-40 and 5W-30. MINI likes Castrol Synthetic, many MINI owners use Mobile 1 Synthetic.
After you confirm everything is buttoned up, and you have fresh oil in the engine, start the engine. The red Engine Oil Pressure warning light should go off in a couple seconds. After a running the engine for 15 seconds or so, shut off the engine and let sit for a few minutes. Check for leaks, and re-check the oil level. If everything is dry and the dip stock shows 'full' - go for a drive!
If you run the car and find a puddle of oil under the engine, there is a good chance the O-ring was damaged when you installed the cannister cover. Take the old O-ring that you saved, and re-install - with care!
To reset the oil service reminder,
1. Push the Trip Button
2. Turn ignition key to position 1 and 51A will appear to left of mileage
3. Release trip button
4. Wait 3 seconds
5. Push trip button
6. Wait (5-8 seconds) for RST to appear in left corner
7. Release trip button
8. Push trip button
9. 15000 will appear as new service interval
10. Release trip button
ADDENDUM
We have also had reports of 'oil pressure warning light' and customers finding a 'small spring' loose at the bottom of the base.
Here is a photo of what the Filter Cannister Base should look like:
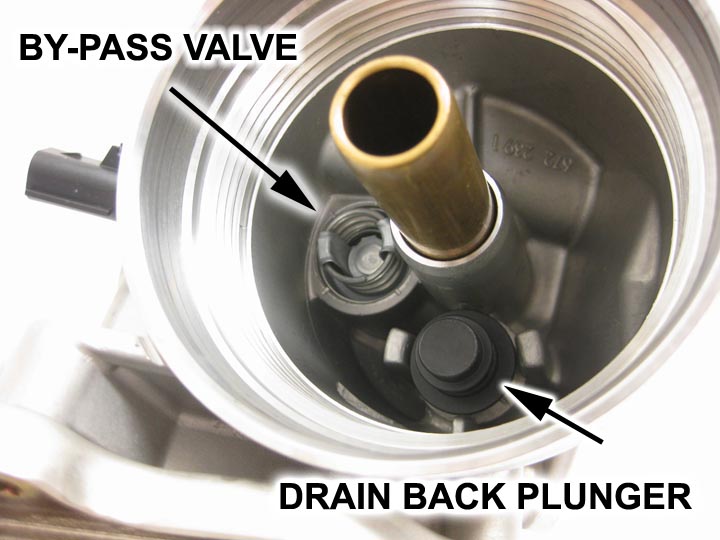
If either of these valves are damaged, you will need to replace the entire housing.
A Little Background...
The early MINI with production dates up to 07/2004 has a couple extra pieces inside the oil filter cannister cover - a spring and plastic cage. These items were eliminated on the later models after 07/2004.
The oil filter specification with the initial production of the MINI required a 'paper filter' which necessitated a plastic cage in the cannister cover to prevent the filter from collapsing under pressure. For this reason, the early production MINIs have a spring loaded plastic 'cage' built into the oil filter cannister cover. This 'cage' provides a rigid structure within the filter to maintain its shape under pressure. The cage also helps to 'seal' the top of the filter for proper oil circulation thru the filter.
The early 'all paper' oil filters designed for use with the caged cover did not have any internal support structure (or 'built-in' cage). BE CAREFUL when purchasing aftermarket oil filters as there are still some of these 'uncaged' filters in the market.
Beginning with the 07/2004 production, they changed the filter specification and a plastic 'cage' was built into the filter itself, eliminating the need for the cage in the cannister cover.
The potential problem...
A potential problem arises with your 2002-2004 MINI during a filter change when the plastic cage 'detaches' from the cannister cover and gets pulled out with the oil filter, allowing the spring to pop free. If the technician is not familiar with the early filter setup - the plastic cage gets thrown out with the dirty oil filter. (You can find replacement cannister covers here.) Without the spring and cage in the early cannister, the filter fails to seal against the cover resulting in 'low oil pressure' warining light.
Since the cannister cover is built differently for the 'cage version' vs. the later version, the filter will not seal properly without the cage, allowing unfiltered oil to circulate around the filter. Circulating unfiltered oil is NOT good for your engine...
Another problem arises if you should happen to purchase an early 'un-caged' oil filter. If you use this filter with the later 'uncaged' cannister cover, the filter will collapse affecting filtration and oil pressure.
The solution...
If you find a loose spring with the oil filter without the plastic cage, MINI recommends replacing the entire Oil Filter Housing module with the newer style housing.
Make sure the new oil filter has the plastic cage 'built-in'. You will be safe with the factory filter (NME1050 ) or the MANN filter (NME1056 ).
Note:
We've had occasional reports of the oil light staying on at idle and going off as soon as the rev's are up. We have seen a couple issues that have caused this:
1. One of the valves inside the filter base is damaged (missing pieces).
2. Aftermarket oil filter with inadequate 'stiffness' on the ends of the filter causing oil to bypass the filter (Wix filter caused this problem for one customer). The factory oil filter has a rigid black plastic base on the bottom to press against the valves at the base of the oil flter housing.
Helpful Hints for changing the oil...
Frequently, the cannister cover will be very difficult to break free. Use a breaker bar with CAUTION! You may need a 'low profile' socket due to the limited space available.
If you loosen the filter cannister cover enough to break the seal, it will help drain the oil from the filter as you drain the oil pan. Less mess later!
When replacing the O-ring (which is included with the new factory filter), save the old one just in case (will explain later).
When replacing the O-ring on the cannister cover, make sure you lubricate the O-ring with PLENTY of fresh oil before you install it, and lubricate again after it is in place on the cannister cover. If you fail to do this, the O-ring will bunch up and cause a leak!
The new oil filter should be 'pre-seated' into the base and cover before installation. Take the filter (plastic side down) and press firmly into the base until it is fully seated. Remove and do the same into the cannister cover. This reduces the resistance from initial seating. You can leave the filter seated into the cover and screw the cover back onto the base, or you can leave the filter in the base fully seated and screw the cover back onto the base.
Getting the Cannister Cover started into the base is a little tricky - having the O-ring well lubricated will make it a little easier. Start the cover onto the base carefully, confirming the cover is 'square' with the base to prevent cross-threading. Once you have it started, you will still have slight resistance from the new O-ring, but you should be able to get the cover well onto the base by hand.
Torque the cannister cover to 18 lb-ft.
The factory Drain Plug gasket is a plastic gasket that is molded into the Drain Plug. Best to replace the drain plug at every oil change. The cost is minimal compared to headaches from a leaky plug! (The linked filter part numbers above includes a new drain plug.)
Torque the Drain Plug to 18 lb-ft as well.
You can also use a magnetic drain plug that will help trap microscopic metal debris and can be re-used.
Fill with a name brand FULL SYNTHETIC motor oil. It should take close to 5 quarts. MINI recommends oils in SAE classes 5W-40 and 5W-30. MINI likes Castrol Synthetic, many MINI owners use Mobile 1 Synthetic.
After you confirm everything is buttoned up, and you have fresh oil in the engine, start the engine. The red Engine Oil Pressure warning light should go off in a couple seconds. After a running the engine for 15 seconds or so, shut off the engine and let sit for a few minutes. Check for leaks, and re-check the oil level. If everything is dry and the dip stock shows 'full' - go for a drive!
If you run the car and find a puddle of oil under the engine, there is a good chance the O-ring was damaged when you installed the cannister cover. Take the old O-ring that you saved, and re-install - with care!
To reset the oil service reminder,
1. Push the Trip Button
2. Turn ignition key to position 1 and 51A will appear to left of mileage
3. Release trip button
4. Wait 3 seconds
5. Push trip button
6. Wait (5-8 seconds) for RST to appear in left corner
7. Release trip button
8. Push trip button
9. 15000 will appear as new service interval
10. Release trip button
ADDENDUM
We have also had reports of 'oil pressure warning light' and customers finding a 'small spring' loose at the bottom of the base.
Here is a photo of what the Filter Cannister Base should look like:
If either of these valves are damaged, you will need to replace the entire housing.
Last edited by Braminator; Jul 16, 2013 at 06:27 AM.
5th Gear
Joined: Apr 2013
Posts: 731
Likes: 5
From: Near Portland, OR, USA
You guys are the best! I have lots of reading now. First car I changed the oil in was my Dad's Alfa Romeo -with its aluminum oil pan, I learned long ago to use a torque wrench. My Mopar-neighbor used to think we were nuts, LOL
I'll read up on all that though, as I learn more of MINI idiosyncrasies.
What do you guys think of this photo. This drain plug was in the cup holder when I bought the car. I first wondered if it was used already, but now I don't really see any tool marks, and the ridge on the inside rubber part looks tall and defined. It may have kicked around with a handful of quarters in the cup holder, judging from the bolt face.
In your opinion, do used ones come out that clean, or is this new?
OVERDRIVE
Joined: Jul 2006
Posts: 7,037
Likes: 283
From: Melbourne, FL
I'd order a Fumoto and hold off on the change
The plastic looks the same on all I've removed . . .

left ... mangled after being stuck and attacked by an extractor
right .... one that's never been a problem
does the plastic seal look different?
The plastic looks the same on all I've removed . . .

left ... mangled after being stuck and attacked by an extractor
right .... one that's never been a problem
does the plastic seal look different?

Neutral
Joined: Oct 2012
Posts: 10
Likes: 0
I second that emotion.
The Fumoto valve makes changeing your oil so mush easier. Especially if you've upgraded your plastic "skid plate" to one of the metal ones.
The Fumoto valve makes changeing your oil so mush easier. Especially if you've upgraded your plastic "skid plate" to one of the metal ones.

5th Gear
Joined: Apr 2013
Posts: 731
Likes: 5
From: Near Portland, OR, USA
Ya... I see the scary part of it. Anyone had a fumoto open by itself?
OVERDRIVE
Joined: Jul 2006
Posts: 7,037
Likes: 283
From: Melbourne, FL
once you hold one in your hands you'll never worry about it opening
however if you remain concerned they offer an additional locking ring for industrial applications
http://www.qwikvalve.com/5-8-Safety-Clip.html
*For users under extreme conditions:
If you are using the Engine Oil Drain Valve on off-road vehicles such as farm tractors and logging equipment under extreme environment (i.e. corn fields, brush areas), it is recommended that a hose clip as shown below be used for extra safety and security. The hose clip, which can be purchased at our online store or any hardware stores, will firmly keep the lever in the locked position at all times.

I've been using the valves (no additional clip) on various vehicles for 8 years or so now, and have never had so much as a drip.
however if you remain concerned they offer an additional locking ring for industrial applications
http://www.qwikvalve.com/5-8-Safety-Clip.html
*For users under extreme conditions:
If you are using the Engine Oil Drain Valve on off-road vehicles such as farm tractors and logging equipment under extreme environment (i.e. corn fields, brush areas), it is recommended that a hose clip as shown below be used for extra safety and security. The hose clip, which can be purchased at our online store or any hardware stores, will firmly keep the lever in the locked position at all times.
I've been using the valves (no additional clip) on various vehicles for 8 years or so now, and have never had so much as a drip.


Brilliant post Braminator, well written and illustrated.
Go OEM for the filter, as described above with Braminator's posting. Dealers local to me have them from $11-15 CAD.
Get a Fumoto valve, they're worth every cent. Get one with a nipple and you can direct the oil with a tube for zero mess. Canadians can get them from a Canadian distributor.
Go OEM for the filter, as described above with Braminator's posting. Dealers local to me have them from $11-15 CAD.
Get a Fumoto valve, they're worth every cent. Get one with a nipple and you can direct the oil with a tube for zero mess. Canadians can get them from a Canadian distributor.

3rd Gear
Joined: May 2013
Posts: 185
Likes: 0
Thanks Braminator - I had the low pressure light at ignition and pulled out the oil filter. Crumpled up into a very small ball. Put in a Mann and problem solved. No one around here keeps them in stock so amazon I go.
Great advice as usual Bram. 
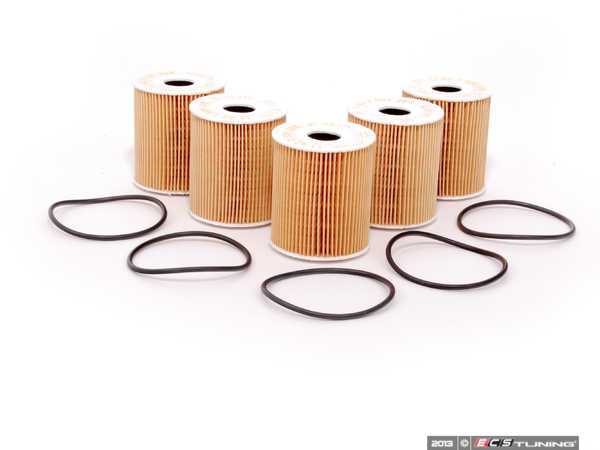
We have the Mann Gen 1 Oil Filter in stock just encase you are still looking for one. Or a couple. When you install the oil filter housing cap on the housing , it might take a couple times to get it on straight so you don't cross thread. Also watch the O-ring, I put a little oil on the O-ring then install on the housing cap, so it does not catch dry on the sides and then works its way out and slicing it causing a leak. You don't know till you feel a like rubber sticking out near the housing lid, housing base seam.
Mann Filter with O-ring Part number 11427512446
http://www.ecstuning.com/Search/SiteSearch/11427512446/ES257649/
Or
MINI Genuine Filter w. O-ring part number 11427512446
http://www.ecstuning.com/Search/SiteSearch/ES24009/ES24009/
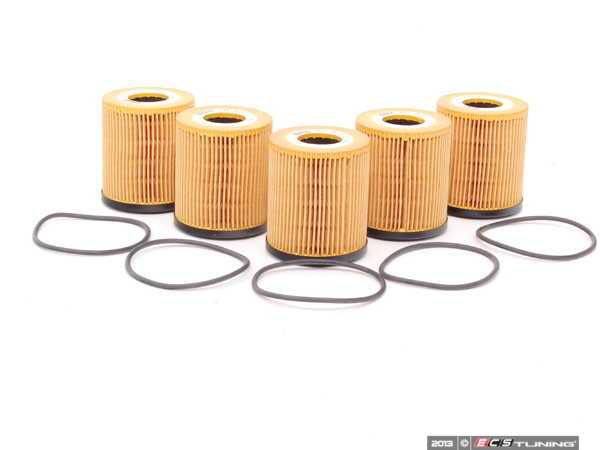
We also have them is 5 packs. So you can stock them for your next oil change or maybe help out another MINI owner with there oil change.
Mann Oil Filter 5 pack part number 114275124465PKT2
http://www.ecstuning.com/Search/SiteSearch/114275124465PKT2/
or
MINI Genuine Oil Filter Kit. 5 pack Part number 114275124465PKKT
http://www.ecstuning.com/Search/SiteSearch/114275124465PKKT/
Thanks
We have the Mann Gen 1 Oil Filter in stock just encase you are still looking for one. Or a couple. When you install the oil filter housing cap on the housing , it might take a couple times to get it on straight so you don't cross thread. Also watch the O-ring, I put a little oil on the O-ring then install on the housing cap, so it does not catch dry on the sides and then works its way out and slicing it causing a leak. You don't know till you feel a like rubber sticking out near the housing lid, housing base seam.
Mann Filter with O-ring Part number 11427512446
http://www.ecstuning.com/Search/SiteSearch/11427512446/ES257649/
Or
MINI Genuine Filter w. O-ring part number 11427512446
http://www.ecstuning.com/Search/SiteSearch/ES24009/ES24009/
We also have them is 5 packs. So you can stock them for your next oil change or maybe help out another MINI owner with there oil change.
Mann Oil Filter 5 pack part number 114275124465PKT2
http://www.ecstuning.com/Search/SiteSearch/114275124465PKT2/
or
MINI Genuine Oil Filter Kit. 5 pack Part number 114275124465PKKT
http://www.ecstuning.com/Search/SiteSearch/114275124465PKKT/
Thanks
__________________

MINI Guru/ MINI Owner Since 2004 | NEW Lifetime Part Replacement | Local Pickup
Milltek | Genuine MINI | Forge Motorsport | NM Engineering | ECS Performance | M7 Speed
Customer Service Hours: 8am-8pm EST|Sales Team Hours: 8am-11pm | SAT 10am-7pm 800.924.5172
MINI Guru/ MINI Owner Since 2004 | NEW Lifetime Part Replacement | Local Pickup
Milltek | Genuine MINI | Forge Motorsport | NM Engineering | ECS Performance | M7 Speed
Customer Service Hours: 8am-8pm EST|Sales Team Hours: 8am-11pm | SAT 10am-7pm 800.924.5172
