When you click on links to various merchants on this site and make a purchase, this can result in this site earning a commission. Affiliate programs and affiliations include, but are not limited to, the eBay Partner Network.
DISCLAIMER: This is a VERY simplified write up and requires lots of patience and putting on/ removing the diffuser as well as the right tools. Most people wouldn't even go as far as removing the batter box into the trunk let alone make a custom straight exhaust to make this happen since it's just under $1k for all mods including diffuser and is PERMANENT!.
So this weekend my friend helped me put on my rear diffuser that's been sitting in my room for three years! It felt amazing to finally put it on! However, this took Saturday afternoon (2:00pm-5:00pm) and Sunday morning (8:45am-12:30pm).
Modifying the bumper is REQUIRED to make it fit like OEM as well as cutting the diffuser and brackets.
Unfortunately, I didn't take too many pics, but modifying it is rather simple. You just need the right tools to get it done! Hopefully I can explain with the few pics I did take.
Tools Used:
1) Phillips Screwdriver
2) 10mm socket (wrench or power tools, whatever is available)
3) Torx key for diffuser (forgot what size)
4) Box cutter (for cutting into bumper)
5) Electric drill (for cutting into bumper)
6) Sawzall (for cutting diffuser and diffuser brackets)
7) Welder
8) Patience
Things that need to be done:
1) Create tabs that line up with diffuser
2) Trim diffuser to fit around control arms
3) Trim diffuser brackets to fit around control arms
4) Weld brackets in place
Let's get this started
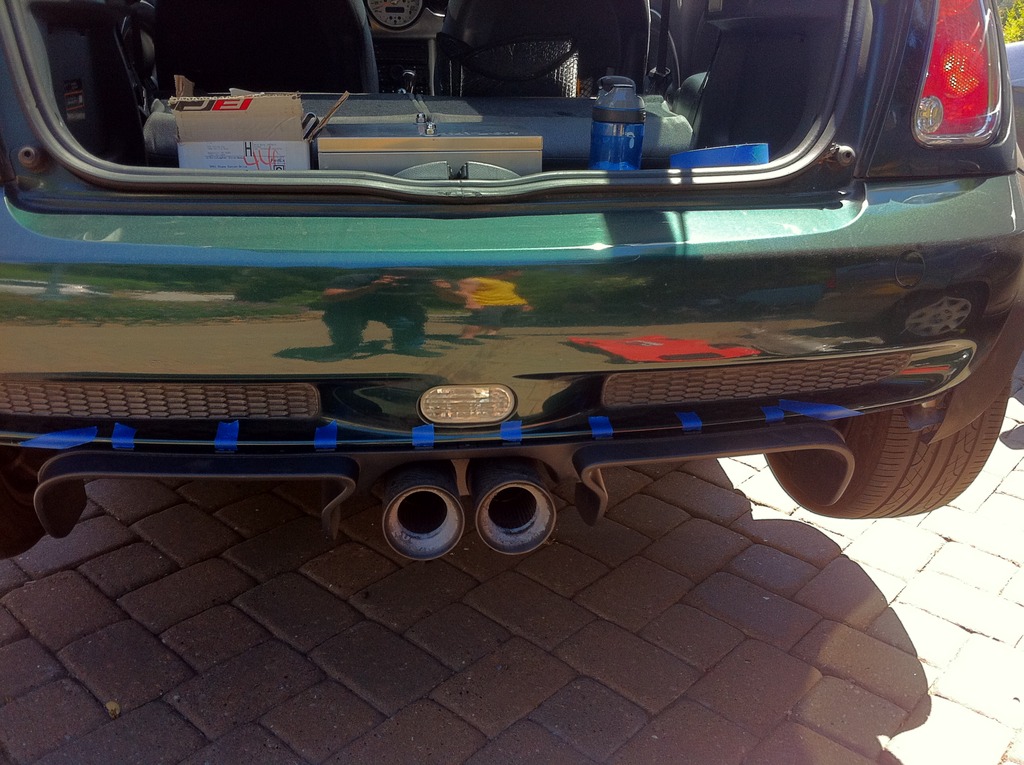
One problem is having the clips of the diffuser go into and line up where the OEM trim is. We fixed this by marking where we needed to extend the mounting slots for the diffuser. All you need is a drill and painter's tape to make this happen The pic above shows where we marked where we needed to make the new tabs. You also need to cut a small chunk of the bumper off on the outsides (the slanted blue tape in the pic) so the diffuser can slide in. There's also little tiny tabs sticking out that need to be cleared with the drill so the diffuser an sit in all the way in (easy to understand when you have it in front of you).
The harder part is cutting into the bumper with a box cutter above where the tabs are. The Diffuser tabs are much farther in and shorter than the oem trim, so cutting them between 1/4" and 1/2" should do it. For those of you doing this and have the pieces in front of you, you'll see what I mean! You just gotta take little chunks at a time so you don't overdo it and it snaps in place really nicely.
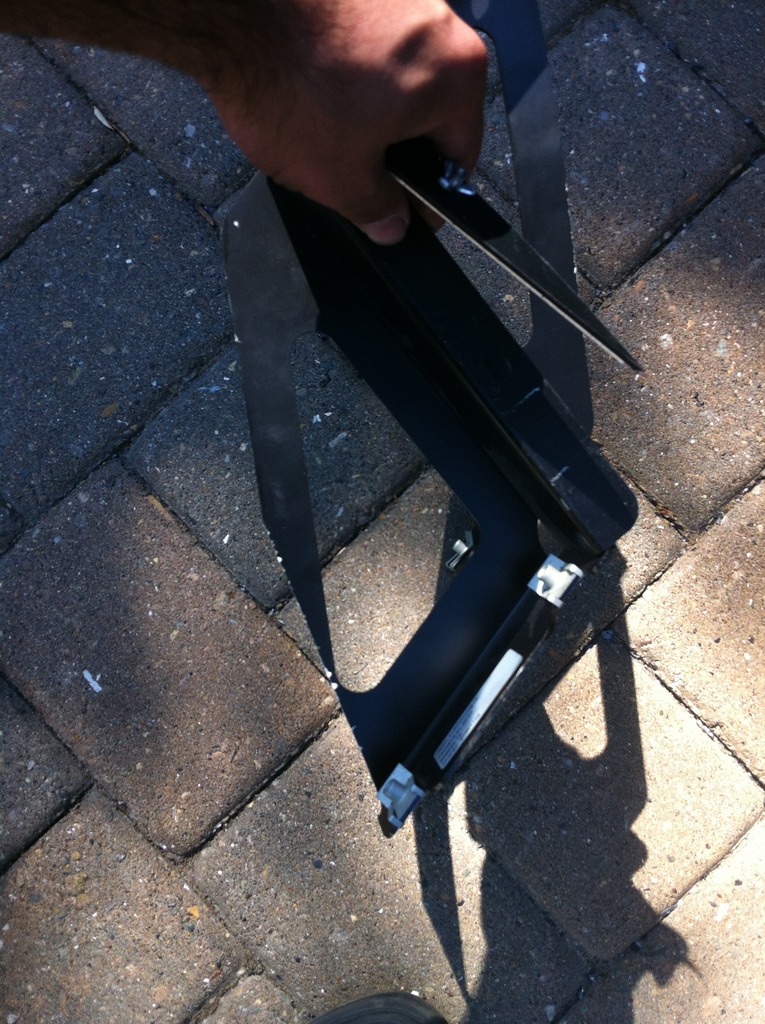
Fitting in the rear part of the diffuser was the BIGGEST PAIN. First of all, the lower rear control arms get in the way. You must cut pieces of the diffuser that rub up against the control arm off (not pictured). I still have stock control arms, which are pretty thick, but I'm sure aftermarket ones will require less cutting since they're slimmer. Another problem was that the brackets also hit the control arms so they had to be cut (pictured above).
(NOT MY CAR/PICTURE)
One of the biggest problems was mounting the diffuser brackets onto the subframe of the car. The metal of the subframe is too weak and thin to hold screws as well as in a weird location: A hollow railing next to the exhaust brackets. Luckily my friend has a welder so he shaved some of the crap on the subframe off so he could weld it. He also made spacers that he welded onto the brackets about 1/4" thick (two 1/8" pieces welded together) that mounted between the subframe and diffuser brackets so there could be enough space between the diffuser and control arms. Also, the holes in the diffuser that line up with the brackets need to be "extended" by using a drill so there's more play to line it up nicely.
The result is a nice, flush, OE looking diffuser (technically it is OEM but not 1st gen ). One thing I still need to do is cut the stock trim to fit on the outside of the diffuser.
Once this is done, you're ready to put it on and motor on!
Nice write up! I have a M7 Full Carbon Fiber diffuser that Ive been putting off installing as well haha. I live in Los Gatos, we should meet up sometime Id love to check out the GP2 diffuser in person to get a better idea of what has to be done to fit it
Do you have dual exhaust cat backs on the car or single for everything to clear?
Originally Posted by csgirardeau
DISCLAIMER: This is a VERY simplified write up and requires lots of patience and putting on/ removing the diffuser as well as the right tools. Most people wouldn't even go as far as removing the batter box into the trunk let alone make a custom straight exhaust to make this happen since it's just under $1k for all mods including diffuser and is PERMANENT!.
So this weekend my friend helped me put on my rear diffuser that's been sitting in my room for three years! It felt amazing to finally put it on! However, this took Saturday afternoon (2:00pm-5:00pm) and Sunday morning (8:45am-12:30pm).
Modifying the bumper is REQUIRED to make it fit like OEM as well as cutting the diffuser and brackets.
Unfortunately, I didn't take too many pics, but modifying it is rather simple. You just need the right tools to get it done! Hopefully I can explain with the few pics I did take.
Tools Used:
1) Phillips Screwdriver
2) 10mm socket (wrench or power tools, whatever is available)
3) Torx key for diffuser (forgot what size)
4) Box cutter (for cutting into bumper)
5) Electric drill (for cutting into bumper)
6) Sawzall (for cutting diffuser and diffuser brackets)
7) Welder
8) Patience
Things that need to be done:
1) Create tabs that line up with diffuser
2) Trim diffuser to fit around control arms
3) Trim diffuser brackets to fit around control arms
4) Weld brackets in place
One problem is having the clips of the diffuser go into and line up where the OEM trim is. We fixed this by marking where we needed to extend the mounting slots for the diffuser. All you need is a drill and painter's tape to make this happen The pic above shows where we marked where we needed to make the new tabs. You also need to cut a small chunk of the bumper off on the outsides (the slanted blue tape in the pic) so the diffuser can slide in. There's also little tiny tabs sticking out that need to be cleared with the drill so the diffuser an sit in all the way in (easy to understand when you have it in front of you).
The harder part is cutting into the bumper with a box cutter above where the tabs are. The Diffuser tabs are much farther in and shorter than the oem trim, so cutting them between 1/4" and 1/2" should do it. For those of you doing this and have the pieces in front of you, you'll see what I mean! You just gotta take little chunks at a time so you don't overdo it and it snaps in place really nicely.
Fitting in the rear part of the diffuser was the BIGGEST PAIN. First of all, the lower rear control arms get in the way. You must cut pieces of the diffuser that rub up against the control arm off (not pictured). I still have stock control arms, which are pretty thick, but I'm sure aftermarket ones will require less cutting since they're slimmer. Another problem was that the brackets also hit the control arms so they had to be cut (pictured above).
One of the biggest problems was mounting the diffuser brackets onto the subframe of the car. The metal of the subframe is too weak and thin to hold screws as well as in a weird location: A hollow railing next to the exhaust brackets. Luckily my friend has a welder so he shaved some of the crap on the subframe off so he could weld it. He also made spacers that he welded onto the brackets about 1/4" thick (two 1/8" pieces welded together) that mounted between the subframe and diffuser brackets so there could be enough space between the diffuser and control arms. Also, the holes in the diffuser that line up with the brackets need to be "extended" by using a drill so there's more play to line it up nicely.
The result is a nice, flush, OE looking diffuser (technically it is OEM but not 1st gen ). One thing I still need to do is cut the stock trim to fit on the outside of the diffuser.
Once this is done, you're ready to put it on and motor on!
Wish we had more pictures as I'm trying to fit this as well but the exhaust system is going to be hard to clear. Also does it get extra hot with all the extra plastic and such around the exhausts?
What exactly did you remove to attach the parts you are showing? Appreciate what photos there are but wish we had a few more showing exactly what you modified and or how you attached
Since this older thread has been resuscitated.
I figured I inject a question:
I do like the looks and benefit that a diffuser provides aerodynamically but was just curious as to whether (as an added benefit), to reducing drag and thereby helping to reduce the dirt and crap that accumulates on our rear hatches???.
Sorry for brining back an older topic. Most likely the original owner may not be active on this page anymore as it's been quite a few years.
I would assume (to the question whether it would help getting rid of the dust that accumulates) that it would help as air is being rerouted and now exiting in different patterns underneath and over the car.
Not sure if if would entirely get rid of it but I would think it would at least help with that.
I'll be posting more pictures later on( the latest would be next weekend)
I want to show everyone what's truly involved as the post I'm commenting on has been immensely helpful, it has not answered enough of my questions to be completely confident in how it'll turn out.
Also anyone who's put together a Gp2 defuser feel free to drop some pictures of where what hardware goes as I got zero instructions lol. Just a big bag of Alen headed screws, washers, clips that slide onto the parts to help secure the threaded part of the screws when tightened down.
This is what I've found out so far though from figuring out what's involved so far.
First step would be to to remove two Phillips headed screws located underneath the rear bumper towards the end of the rear bumper trim valance,
Pop those out and you'll need to push or either wiggle whatever retaining tabs/clips that are holding the trim from popping out.
After that if your car comes with a rear exhaust skid plate setup you'll need to remove the four bolts that hold that plate over where the battery box is located. It'll be directly behind the center rear exhaust tailpipes are.
I'm still trying to figure out what needs to exactly come off the car to attach or fit the rear brackets that would attach to the chassis( did the original poster of this post have to take the whole rear suspension off?
It seems it would depend on what exhaust setup you're running and whether or not how many exhaust resonators are on the car.
I'm running I think either 2. 1/4" or 2.5" inch miltek setup so others may have more room than me especially with the additional exhaust hangers in some places.
Thanks for the response. I can only imagine that the rear diffuser would actually help with funneling dirty air/dirt away from the rear hatch. I have no evidence. Just imagination.
I do often notice that much of the dirt that winds up on the rear hatch/window is coming from the upper sides where the side windows curve and wrap around to the back hatch creating a substantial amount of draft/dirty air. Just my observation.
It may or may not provide you any clues; but have you seen this video?
In the video: the guy is working on an aero swap on an early R56 where he shows the installation of the (similar) rear diffuser @ time stamp 7:06.
You may have seen the video. I thought it my be of interest if you haven't.
I look forward to seeing how your future post and how you fared with the installation.
A diffuser and splitter will help reduce drag and improve stability, but the airflow separation you get at the back of the hatch back creates a lot of turbulence and buffeting. You can see it in that picture from the GP2 testing.
Had to watch the video
Seriously though - I would swear my 1967 VW split windshield bus had less drag and dirt accumulation on the rear hatch than my 2004 R53


 (NOT MY CAR/PICTURE)
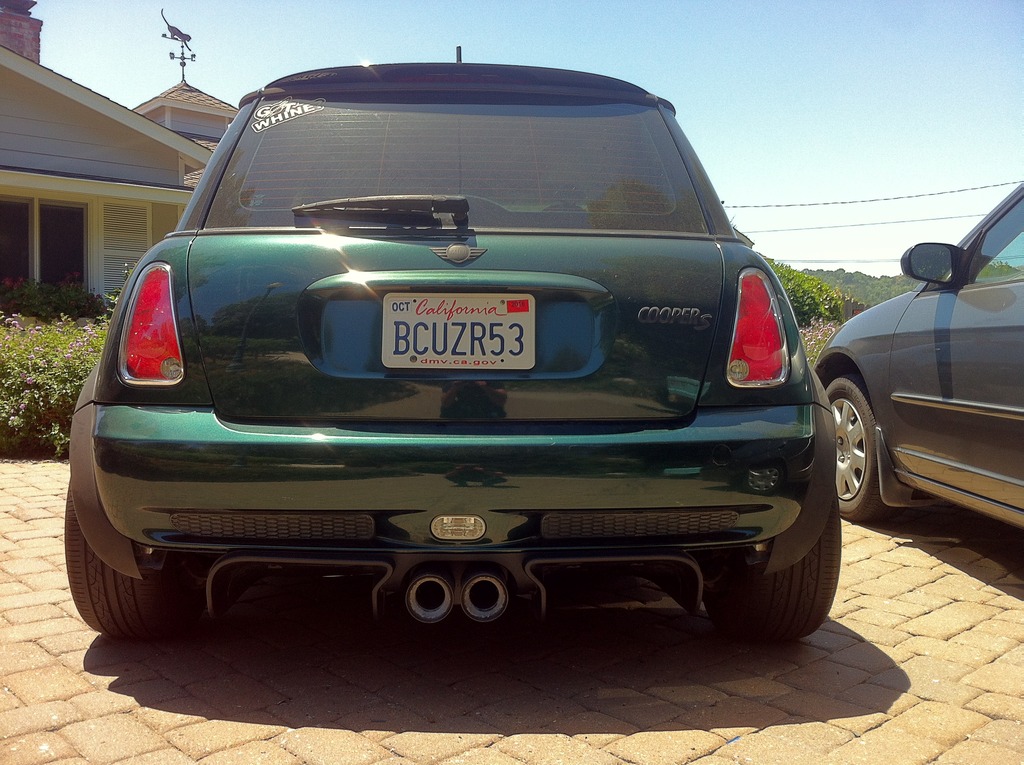


 (NOT MY CAR/PICTURE)


