
Interior/Exterior Matching factory gauges


Banned
Joined: Nov 2006
Posts: 4,862
Likes: 3
From: Fresno Ca.
I think SRTech has a multi gauge R53 setup that shows the attachment options next time I'm in the shop I will take a picture. I plan on using my existing two cups on one side (right) and putting a double on the left. Where as I already have the two singles might as well use them. The other option if I'm not happy with the look is to go to two double cup holders one for the right and one for the left 
Banned
Joined: Nov 2006
Posts: 4,862
Likes: 3
From: Fresno Ca.
Here is the actual link to Craven, which is what it is. Just remember I believe Steves group buy is still going on.http://www.cravenspeed.com/index.php...ug=ipod-cradle

Former Vendor
Joined: May 2005
Posts: 3,480
Likes: 0
From: Oakhurst/Fresno, CA
The shop link is in my sig, but I don't think Steve has updated it yet. I'm sure we can get you a pic though Here is the actual link to Craven, which is what it is. Just remember I believe Steves group buy is still going on.
http://www.cravenspeed.com/index.php...ug=ipod-cradle
Here is the actual link to Craven, which is what it is. Just remember I believe Steves group buy is still going on.http://www.cravenspeed.com/index.php...ug=ipod-cradle
I will have the Blackberry Curve mount in stock in a couple of days. Remember that the CravenSpeed mounts only fit uncovered phones. The group buy goes until the end of this month.Steve


Tom S
Former Vendor
Joined: May 2005
Posts: 3,480
Likes: 0
From: Oakhurst/Fresno, CA

Steve
Former Vendor
Joined: May 2005
Posts: 3,480
Likes: 0
From: Oakhurst/Fresno, CA
Steve


4th Gear
Joined: Jul 2008
Posts: 522
Likes: 0
Just a quick question, how come the stepper gauges need 12V+ source when ignition is on and one permanent 12V+ source as well? Just curious as my current gauge(other make) only requires the 12V+ when ignition is on.

3rd Gear

Joined: May 2007
Posts: 183
Likes: 0
From: Eastern Panhandle, WV
Paul from Marshall could probably give you a better answer, but I believe the 12V+ directly to the battery is for the recall function. The gauge will work without it if you do not want the peak recall function, or the ability to dim the gauge lighting. The gauge lighting is dimmed via varying the voltage to the 12V+ (Ignition) switched signal. When this voltage drops (for dimming) it does not provide enough voltage to power the gauge.
4th Gear
Joined: Jul 2008
Posts: 522
Likes: 0
Thanks rjb. I am trying to avoid anymore wiring than I would have to. I will not be using the dimming feature or the recall function. So I was just wondering if I could leave that out altogether. I guess I will wait for Paul or Steve to confirm.
PS. The gauges are awesome in appearance!
PS. The gauges are awesome in appearance!
Banned
Joined: Nov 2006
Posts: 4,862
Likes: 3
From: Fresno Ca.
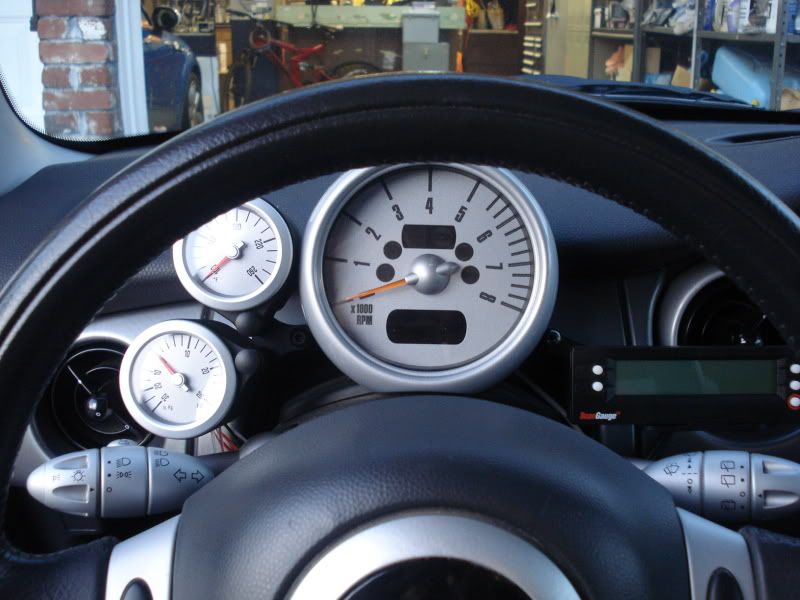
Just changed up my setup. Went to a dual gauge setup on the left side, used two single pod's and a "y" connector, I like it better than the dual pod setup. On the right side I installed my Scangauge with Cravens new Scangauge bracket. I think it came out nice?

Looks great. I have been thinking about getting this setup. Can you comment a bit more on the Craven Speed Scangauge bracket?

Banned
Joined: Nov 2006
Posts: 4,862
Likes: 3
From: Fresno Ca.
I might add a gauge above the scangauge eventually.


Former Vendor
Joined: May 2005
Posts: 3,480
Likes: 0
From: Oakhurst/Fresno, CA
Steve

Former Vendor
Joined: May 2005
Posts: 3,480
Likes: 0
From: Oakhurst/Fresno, CA
Steve


