
Interior/Exterior Matching factory gauges


Coordinator :: Eastern Iowa MINIs
Joined: Dec 2006
Posts: 5,520
Likes: 4
From: Decorah, IA

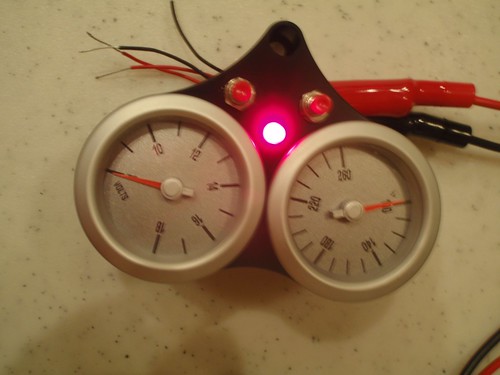
Mike, the gauges look great. Looks like the protective plastic is still covering the face of the boost gauge, or is that just a reflection?


4th Gear
Joined: Jul 2008
Posts: 522
Likes: 0

HELP!!! Please...
Ok, I installed the electric oil pressure gauge and the mechanical boost gauge today. They look great, they work great, everything's great...EXCEPT, now there is a very loud and annoying buzz coming from either my tach or one of the two gauges. And the buzz continues whether the car is on/off, key in ignition or not!!
The only thing I can think that might be causing it is that I tapped the amber wire into the gray with red stripe wire that is in the tach wiring harness (just behind the tach). Everything else is normal...I took power from the cigarette lighter fuse, I found a solid ground under the dash.
Ok all you gurus, can anybody help me here?
Last edited by anitan1; Jan 30, 2010 at 07:34 PM.
Ok, I installed the electric oil pressure gauge and the mechanical boost gauge today. They look great, they work great, everything's great...EXCEPT, now there is a very loud and annoying buzz coming from either my tach or one of the two gauges. And the buzz continues whether the car is on/off, key in ignition or not!!
The only thing I can think that might be causing it is that I tapped the amber wire into the gray with red stripe wire that is in the tach wiring harness (just behind the tach). Everything else is normal...I took power from the cigarette lighter fuse, I found a solid ground under the dash.
Ok all you gurus, can anybody help me here?
The only thing I can think that might be causing it is that I tapped the amber wire into the gray with red stripe wire that is in the tach wiring harness (just behind the tach). Everything else is normal...I took power from the cigarette lighter fuse, I found a solid ground under the dash.
Ok all you gurus, can anybody help me here?
Marshalls gauges are so sensitive that the mech boost gauge will end up fluctuating trying to keep up with the minor pressure changes. Putting a small piece of cotton ball into the air tube behind the gauge assuming that you did not use the "T" fitting in the install as I did not use it in my install. Hope that helps.
I haven't tried that yet, because where I out the orange wire it's very difficult to get to. When I disconnect 12V power it stops. I'll try disconnect the orange wire today and let you know. I wonder if I'm putting some kind of feedback into the tach from the orange wire?
I haven't tried that yet, because where I out the orange wire it's very difficult to get to. When I disconnect 12V power it stops. I'll try disconnect the orange wire today and let you know. I wonder if I'm putting some kind of feedback into the tach from the orange wire?

1st Gear
Joined: May 2008
Posts: 48
Likes: 0
From: Madison, WI
So here's a question for anyone running both oil pressure and oil temp gauges. What is the best way to install both sensors? Are both sensors needed? It's too bad the other terminal on the oil pressure sending unit wasn’t oil temp. Thanks!

2nd Gear
Joined: Sep 2009
Posts: 88
Likes: 0
From: Stone Mountain Georgia
1st Gear
Joined: May 2008
Posts: 48
Likes: 0
From: Madison, WI
For the oil temperature gauge you will need an adapter like this to go into the oil pan.
Last edited by KurTecH; Feb 1, 2010 at 01:52 PM.
1st Gear
Joined: May 2008
Posts: 48
Likes: 0
From: Madison, WI
I wonder if they can do an Air/Fuel ratio gauge for the mini?
The gauges on this site look exactly like marshall gauges and the Air/Fuel ratio gauge looks like it has the same original needle that the un-mini'd marshall ones have.
http://www.innovatemotorsports.com/p...s/g2_gauge.php
The gauges on this site look exactly like marshall gauges and the Air/Fuel ratio gauge looks like it has the same original needle that the un-mini'd marshall ones have.
http://www.innovatemotorsports.com/p...s/g2_gauge.php

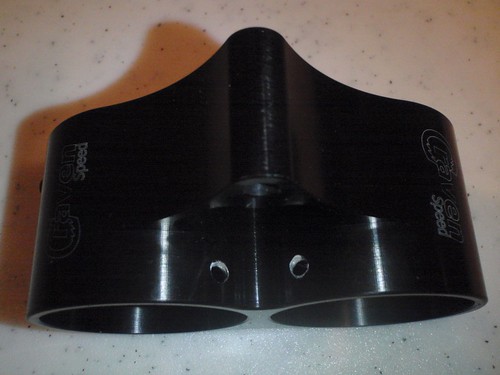
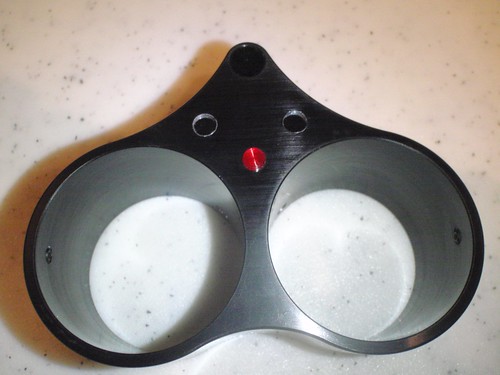
I thought I would share a little mod that I did to my Craven Dual Pods to accommodate the momentary switch used to set the electric gauges.
For those who may not be familiar with them, the electric stepper gauges come with a small red button switch that is used to set Hi/Lo alerts and also allows you recall your maximum amount. If, say, you want the gauge to alert you when the temperature exceeds 300 degrees, you can set the gauge to alert you (by flashing the backlighting) when that temp is exceeded.
The gauges also come with a 12V output that turns on when there is an alert in case you want to add a supplemental warning light (or sound).
After hearing about someone modding their DualPod to add the switch, I decided to do the same thing and also add a warning LED. I decided to add the additional LED because I'm not certain I would notice the backlight flashing during the daytime in bright sun.
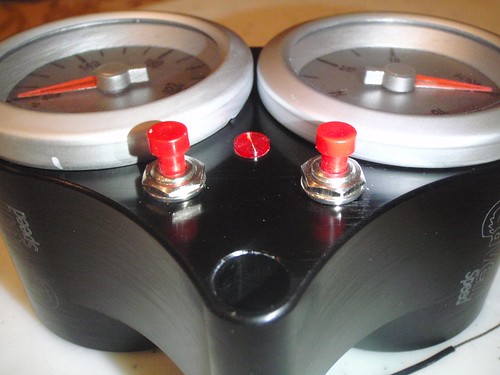
First, I found a nice little red mountable LED from Radio Shack that already has the appropriate resistor built in to run off of 12V.
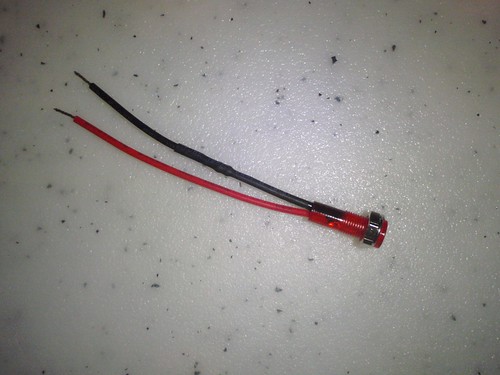
I then drilled three holes into the DualPod to accommodate two switches and the LED. (The switches uses a 9/32" hole, the LED 13/64")
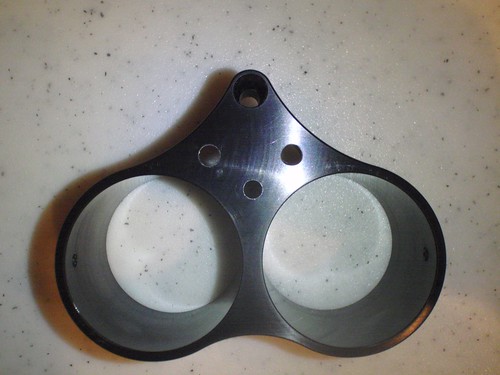
I also drilled a small hole between each gauge cup and the center section to run the wires out of sight between the gauge cup and the switches.
I wired the LED so that it will light up if either gauge's warning goes off. I could have done two LEDs, but I liked the symmetry of this layout and I figured I just needed it to get my attention.
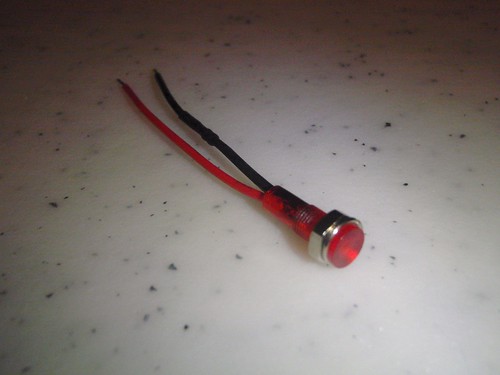
Here's what the LED looks like installed.
Here it is with the switches installed.
And finally, testing out the LED. FYI - I have rotated the gauges in their cups so that the "normal" status has both gauge indicators pointing at each other. It's more visible to to me through the steering wheel and I can easily tell which gauge is out of norm with just a quick glance.
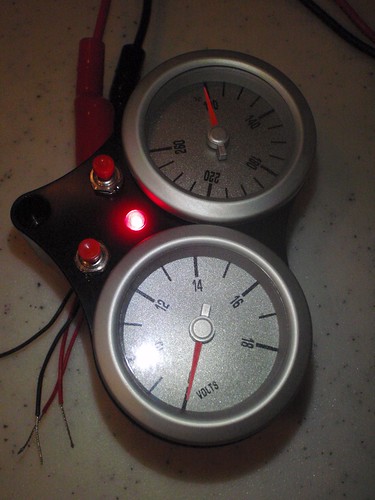
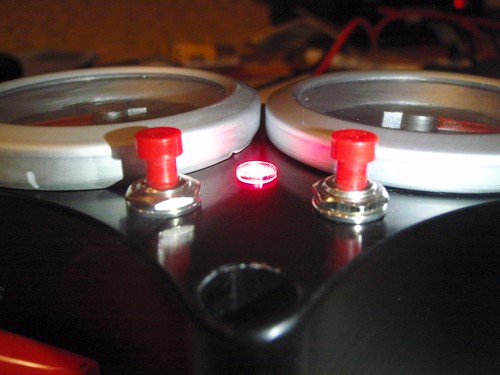
The LED is pretty directional, so it will catch your attention when it's right in front of you.
I also added the switch and an LED to my other DualPod that holds my Oil Pressure and Boost Gauge. Since only the Oil Pressure is an electric stepper gauge there is only one switch on that side.
I'll post some pictures once they are back in the car.
Cheers,
Tom
For those who may not be familiar with them, the electric stepper gauges come with a small red button switch that is used to set Hi/Lo alerts and also allows you recall your maximum amount. If, say, you want the gauge to alert you when the temperature exceeds 300 degrees, you can set the gauge to alert you (by flashing the backlighting) when that temp is exceeded.
The gauges also come with a 12V output that turns on when there is an alert in case you want to add a supplemental warning light (or sound).
After hearing about someone modding their DualPod to add the switch, I decided to do the same thing and also add a warning LED. I decided to add the additional LED because I'm not certain I would notice the backlight flashing during the daytime in bright sun.
First, I found a nice little red mountable LED from Radio Shack that already has the appropriate resistor built in to run off of 12V.
I then drilled three holes into the DualPod to accommodate two switches and the LED. (The switches uses a 9/32" hole, the LED 13/64")
I also drilled a small hole between each gauge cup and the center section to run the wires out of sight between the gauge cup and the switches.
I wired the LED so that it will light up if either gauge's warning goes off. I could have done two LEDs, but I liked the symmetry of this layout and I figured I just needed it to get my attention.
Here's what the LED looks like installed.
Here it is with the switches installed.
And finally, testing out the LED. FYI - I have rotated the gauges in their cups so that the "normal" status has both gauge indicators pointing at each other. It's more visible to to me through the steering wheel and I can easily tell which gauge is out of norm with just a quick glance.
The LED is pretty directional, so it will catch your attention when it's right in front of you.
I also added the switch and an LED to my other DualPod that holds my Oil Pressure and Boost Gauge. Since only the Oil Pressure is an electric stepper gauge there is only one switch on that side.
I'll post some pictures once they are back in the car.
Cheers,
Tom
Coordinator :: Eastern Iowa MINIs
Joined: Dec 2006
Posts: 5,520
Likes: 4
From: Decorah, IA
Really nice work, and a superb way to take advantage of the extra features offered by the stepper gauges. My approach -- hiding the button switches in the back of the gauge cups -- seems rather lame now by comparison.
Thanks for sharing!
Thanks for sharing!

Former Vendor
Joined: May 2005
Posts: 3,480
Likes: 0
From: Oakhurst/Fresno, CA
I thought I would share a little mod that I did to my Craven Dual Pods to accommodate the momentary switch used to set the electric gauges.
For those who may not be familiar with them, the electric stepper gauges come with a small red button switch that is used to set Hi/Lo alerts and also allows you recall your maximum amount. If, say, you want the gauge to alert you when the temperature exceeds 300 degrees, you can set the gauge to alert you (by flashing the backlighting) when that temp is exceeded.
The gauges also come with a 12V output that turns on when there is an alert in case you want to add a supplemental warning light (or sound).
After hearing about someone modding their DualPod to add the switch, I decided to do the same thing and also add a warning LED. I decided to add the additional LED because I'm not certain I would notice the backlight flashing during the daytime in bright sun.
First, I found a nice little red mountable LED from Radio Shack that already has the appropriate resistor built in to run off of 12V.
I then drilled three holes into the DualPod to accommodate two switches and the LED. (The switches uses a 9/32" hole, the LED 13/64")
I also drilled a small hole between each gauge cup and the center section to run the wires out of sight between the gauge cup and the switches.
I wired the LED so that it will light up if either gauge's warning goes off. I could have done two LEDs, but I liked the symmetry of this layout and I figured I just needed it to get my attention.
Here's what the LED looks like installed.
Here it is with the switches installed.
And finally, testing out the LED. FYI - I have rotated the gauges in their cups so that the "normal" status has both gauge indicators pointing at each other. It's more visible to to me through the steering wheel and I can easily tell which gauge is out of norm with just a quick glance.
The LED is pretty directional, so it will catch your attention when it's right in front of you.
I also added the switch and an LED to my other DualPod that holds my Oil Pressure and Boost Gauge. Since only the Oil Pressure is an electric stepper gauge there is only one switch on that side.
I'll post some pictures once they are back in the car.
Cheers,
Tom
I'm glad to see your setup. Thanks for posting.Steve
Seems like a great setup for those with the stepper gauges. Wasn't there something posted that the dual gauge pods are no longer being produced and limited to stock already produced?
Former Vendor
Joined: May 2005
Posts: 3,480
Likes: 0
From: Oakhurst/Fresno, CA
I have the new dimmer circuit for the stepper gauges in stock and they work great! This is the circuit that works with the MINI's dimmer so you don't have to dim the gauges separately. They are $45.Steve
I thought I would share a little mod that I did to my Craven Dual Pods to accommodate the momentary switch used to set the electric gauges.
For those who may not be familiar with them, the electric stepper gauges come with a small red button switch that is used to set Hi/Lo alerts and also allows you recall your maximum amount. If, say, you want the gauge to alert you when the temperature exceeds 300 degrees, you can set the gauge to alert you (by flashing the backlighting) when that temp is exceeded.
The gauges also come with a 12V output that turns on when there is an alert in case you want to add a supplemental warning light (or sound).
After hearing about someone modding their DualPod to add the switch, I decided to do the same thing and also add a warning LED. I decided to add the additional LED because I'm not certain I would notice the backlight flashing during the daytime in bright sun.
First, I found a nice little red mountable LED from Radio Shack that already has the appropriate resistor built in to run off of 12V.
I then drilled three holes into the DualPod to accommodate two switches and the LED. (The switches uses a 9/32" hole, the LED 13/64")
I also drilled a small hole between each gauge cup and the center section to run the wires out of sight between the gauge cup and the switches.
I wired the LED so that it will light up if either gauge's warning goes off. I could have done two LEDs, but I liked the symmetry of this layout and I figured I just needed it to get my attention.
Here's what the LED looks like installed.
Here it is with the switches installed.
And finally, testing out the LED. FYI - I have rotated the gauges in their cups so that the "normal" status has both gauge indicators pointing at each other. It's more visible to to me through the steering wheel and I can easily tell which gauge is out of norm with just a quick glance.
The LED is pretty directional, so it will catch your attention when it's right in front of you.
I also added the switch and an LED to my other DualPod that holds my Oil Pressure and Boost Gauge. Since only the Oil Pressure is an electric stepper gauge there is only one switch on that side.
I'll post some pictures once they are back in the car.
Cheers,
Tom
For those who may not be familiar with them, the electric stepper gauges come with a small red button switch that is used to set Hi/Lo alerts and also allows you recall your maximum amount. If, say, you want the gauge to alert you when the temperature exceeds 300 degrees, you can set the gauge to alert you (by flashing the backlighting) when that temp is exceeded.
The gauges also come with a 12V output that turns on when there is an alert in case you want to add a supplemental warning light (or sound).
After hearing about someone modding their DualPod to add the switch, I decided to do the same thing and also add a warning LED. I decided to add the additional LED because I'm not certain I would notice the backlight flashing during the daytime in bright sun.
First, I found a nice little red mountable LED from Radio Shack that already has the appropriate resistor built in to run off of 12V.
I then drilled three holes into the DualPod to accommodate two switches and the LED. (The switches uses a 9/32" hole, the LED 13/64")
I also drilled a small hole between each gauge cup and the center section to run the wires out of sight between the gauge cup and the switches.
I wired the LED so that it will light up if either gauge's warning goes off. I could have done two LEDs, but I liked the symmetry of this layout and I figured I just needed it to get my attention.
Here's what the LED looks like installed.
Here it is with the switches installed.
And finally, testing out the LED. FYI - I have rotated the gauges in their cups so that the "normal" status has both gauge indicators pointing at each other. It's more visible to to me through the steering wheel and I can easily tell which gauge is out of norm with just a quick glance.
The LED is pretty directional, so it will catch your attention when it's right in front of you.
I also added the switch and an LED to my other DualPod that holds my Oil Pressure and Boost Gauge. Since only the Oil Pressure is an electric stepper gauge there is only one switch on that side.
I'll post some pictures once they are back in the car.
Cheers,
Tom
We used to run our race car's guages so that normal op positon was at the 12 o'clock....but I really like your idea better.

4th Gear

Joined: Nov 2004
Posts: 526
Likes: 2
From: DFW Texas
I plan on installing both oil temperature and pressure gauges. It's my understanding that the best way to install both gauges is the following: for the oil pressure gauge you should use the tapless adapter which is available from CravenSpeed or for Gen2, use this one. It will allow you to retain the factory idiot light connection. For the oil temperature gauge you will need an adapter like this to go into the oil pan.
Steve and I have had an ongoing discussion with Marshall trying to resolve the inaccuracy. In my research I did find a better solution for using the drain plug bung in a different adapter (#114850) here which should get the sender/probe deeper into the oil and beyond the bung if the hex head top of the sender will fit down into the adapter but still allow it to be tightened.
But after talking it over with a local shop that builds race-prepped cars, and before the adapter arrived, I decided to move the temp sender/probe into the oil flow where the temp should be more accurate. There is only one place I can find to do this without adding an oil cooler like the one that MINI Madness sells with built-in ports for pressure and temp senders in the adapter plate. So I have a spare/new oil filter cap on order, and another temp sender. We're going to drill and tap the center (top) of the cap and install the sender there. The probe will extend down in the oil flow in the middle of the filter and should present a more accurate reading of the actual temp of the flowing oil. Hopefully I'll have this done in a week or so.
I stick with good oil (Amsoil XL) and change it often because of what I "think" the oil temps are hitting. The ambient temp here in Texas summers could help push the operating temp of the oil above the recommended range - even for Amsoil. I'm anxious to see what the real temps are during AX and during DEs. I suspect that the temps are high enough when really flogging the car to warrant an upgraded oil cooler, but we'll see.
My first guess at a best location would be the sump, but close to as opposed to at the drain plug. Of course the complication here would be removal of the pan and then bung welding, etc.
At the filter housing is definitely in the flow and sounds like a much easier compromise.
At the filter housing is definitely in the flow and sounds like a much easier compromise.

Former Vendor
Joined: May 2005
Posts: 3,480
Likes: 0
From: Oakhurst/Fresno, CA

Steve