
How To Interior/Exterior :: Remove/install exterior door handles


Thread Starter
|
Auto on Sport Button guy
Joined: Apr 2007
Posts: 702
Likes: 2
From: Portland, OR
Interior/Exterior :: Remove/install exterior door handles
I just finished my comfort access door handle install today. I replaced my chrome with the satin black wrap from Vinylstyles. Lyle offered up some good tips on how to do this, but then I remembered that thread on how to remove the door panels. I found removing and reinstalling the inner door panel to be the more difficult/tedious aspect of this install. So if you can make it this far, then you could definitely handle the door handle install. The pannel removal thread is not entirely accurate, but the pictures and info are quite helpful, so I will offer up some suggestions as an addendum to the link posted here.
https://www.northamericanmotoring.co...highlight=door
Ok. Following the steps mentioned in this thread.
Step 2: you do not need to disconnect the light in the arm rest.
Stop 6: Remove the speaker as mentioned. There are a total of 11 torx T30 shoulder screws to remove. If it's not a T30, leave it alone!
Step 8: Peer inside the hole where the speaker goes to see the L shaped bracket that connects up to the window track. This is where a T handle torx wrench inserted through the bottom of the door would come in really handy. I only had torx bits to use with my socket wrench, but that worked ok.
Step 10: This is explained rather well actually. At this point you would definitely benifit from a ratchet wrench with a T25 bit. The door will be hanging on by these last 3 screws. They are facining in the opposite direction of all the other T30 panel screws you have removed.
Moving beyond the door panel removal. Peer inside the door and you will see that the door handle is held in place by two 5mm allen bolts. Disconnect the black door handle cable, it just slips into place. You will see a rubber flap covering some holes in the door near the handle. Use a 5mm ball end allen wrench through the hole to get to the far side door handle screw. The other handle screw can be removed with an L key allen or better yet, an allen bit on the socket wrench to speed up a very tedious process!
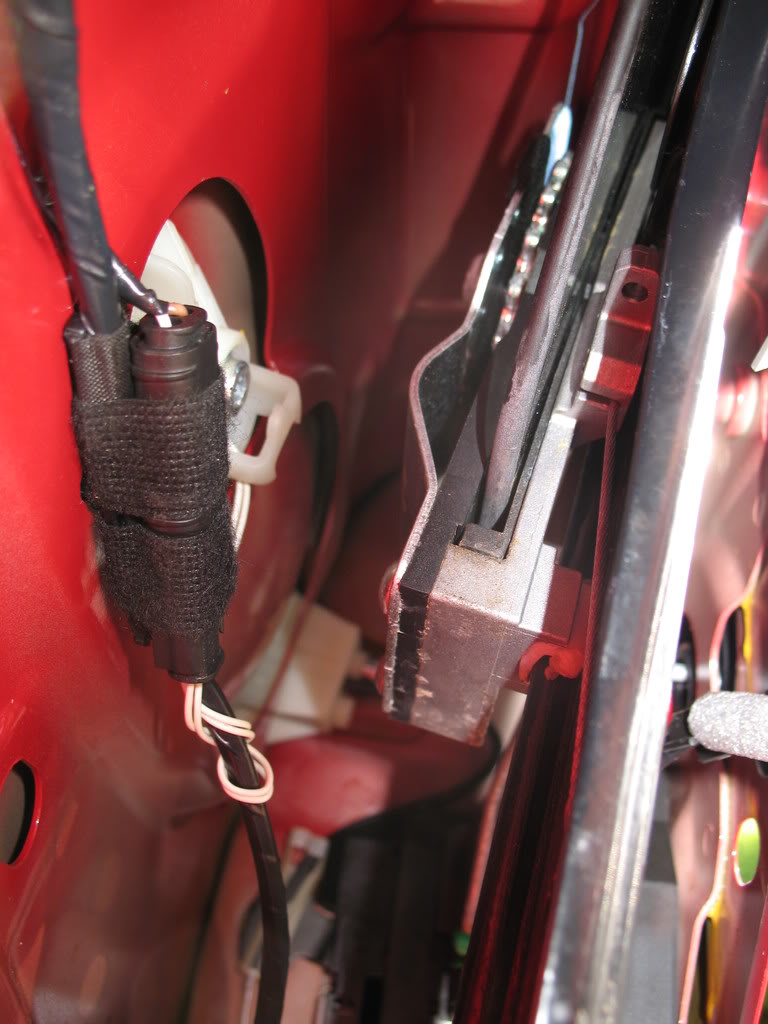
Here is a shot of the white blastic block that the door handle mates to. That block snaps into the door. You will see a silver 5mm allen bolt to remove as well as the cable harnes below it.

Here is the shot of my L key to get to this bolt. When reinstalling the bolt I had to use a socket extension on the end of the allen key to get enough torque to tighten the bolt all the way. A t handle ball end allen would be ideal here.
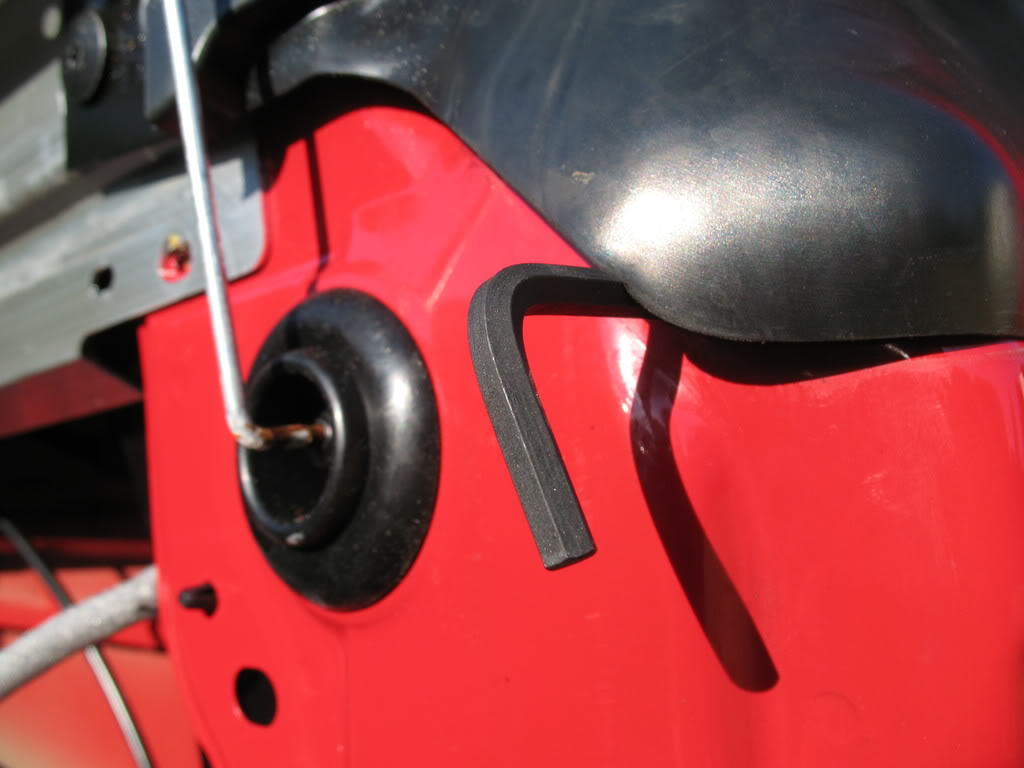
Here is a shot of the other allen bolt. Notice the tight working space. I would have really liked an allen bit on a socket wrench for this bolt. I used my L key and it's rather tedious. You can also see the plug for the comfort access. It's wrapped in a fabric tape. I had to cut the tape to disconnect it.
No more chrome!
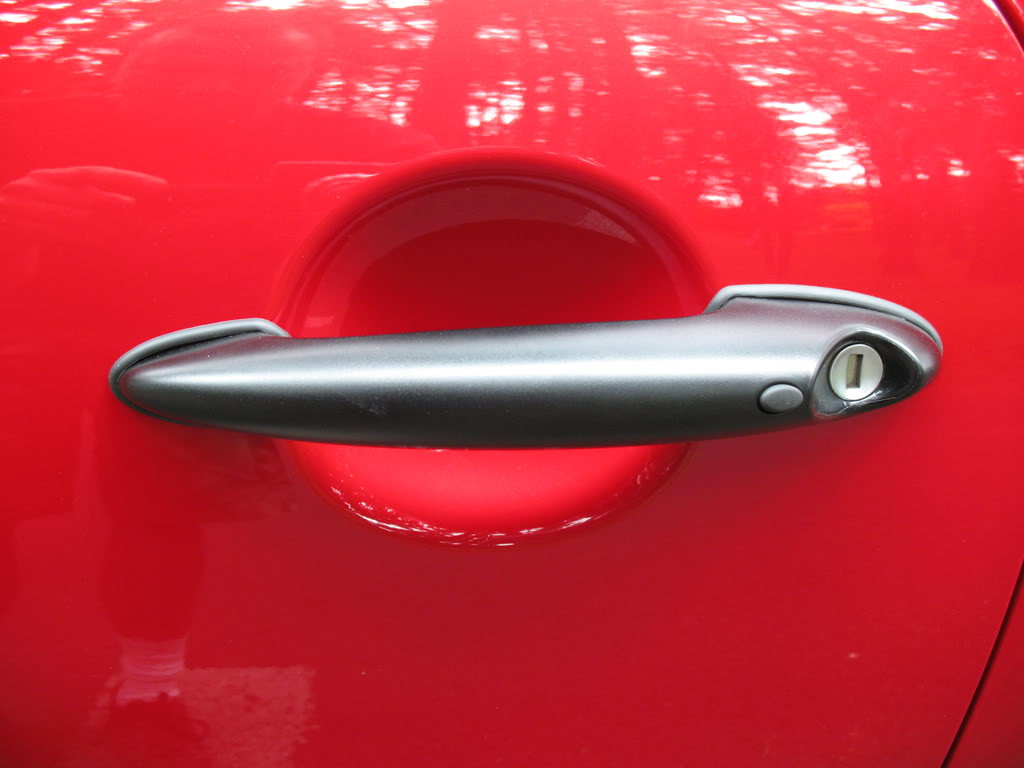
Lastly here is a shot of the satin door handle and it's associated parts.

https://www.northamericanmotoring.co...highlight=door
Ok. Following the steps mentioned in this thread.
Step 2: you do not need to disconnect the light in the arm rest.
Stop 6: Remove the speaker as mentioned. There are a total of 11 torx T30 shoulder screws to remove. If it's not a T30, leave it alone!
Step 8: Peer inside the hole where the speaker goes to see the L shaped bracket that connects up to the window track. This is where a T handle torx wrench inserted through the bottom of the door would come in really handy. I only had torx bits to use with my socket wrench, but that worked ok.
Step 10: This is explained rather well actually. At this point you would definitely benifit from a ratchet wrench with a T25 bit. The door will be hanging on by these last 3 screws. They are facining in the opposite direction of all the other T30 panel screws you have removed.
Moving beyond the door panel removal. Peer inside the door and you will see that the door handle is held in place by two 5mm allen bolts. Disconnect the black door handle cable, it just slips into place. You will see a rubber flap covering some holes in the door near the handle. Use a 5mm ball end allen wrench through the hole to get to the far side door handle screw. The other handle screw can be removed with an L key allen or better yet, an allen bit on the socket wrench to speed up a very tedious process!
Here is a shot of the white blastic block that the door handle mates to. That block snaps into the door. You will see a silver 5mm allen bolt to remove as well as the cable harnes below it.
Here is the shot of my L key to get to this bolt. When reinstalling the bolt I had to use a socket extension on the end of the allen key to get enough torque to tighten the bolt all the way. A t handle ball end allen would be ideal here.
Here is a shot of the other allen bolt. Notice the tight working space. I would have really liked an allen bit on a socket wrench for this bolt. I used my L key and it's rather tedious. You can also see the plug for the comfort access. It's wrapped in a fabric tape. I had to cut the tape to disconnect it.
No more chrome!
Lastly here is a shot of the satin door handle and it's associated parts.


Don't know if you noticed but this thread is almost 2 years old. Perhaps you should send the OP a PM.

Neutral
Joined: Feb 2010
Posts: 10
Likes: 0
I have replaced mine, no you don't have to remove the glass or the window assembly. Expect for the first door to spend about 2 hours, second door should not take more than one hour.

Just changed my handles
I just swapped out "chrome" handles for checkers on my "05 R50 and this thread, however old it may be, was my savior! Did not remove glass, and first door took me a couple hours frankly because I didn't have the right tools. Two key tools: 5mm Hex wrench WITH ball end, mini ratchet with 5mm hex screw drive bit. I went to Home Depot and bought a General Tools Ratcheting Offset Screwdriver Set ($9.98) and I also bought a separate, complete standard screwdriver set ($29.95) primarily to get the 5mm bit. I probably could have found the bit elsewhere cheaper but it was 9:49 at night and I wanted to finish the door that night and Home Depot didn't offer a bit set alone that included 5mm. Still beats the heck out of the $288.00 the dealer wanted for install (and that was with a 15% discount if I bought the handles from him! (which I didn't....)).
So, thanks for the great thread and info. Also, check out this YouTube video on how to remove the door panel. I found this to be very helpful even though my '05 'Justa" has the fourth screw hidden behind the inside door pull. I started with this video and it gave me confidence on the "forcefulness" required to pop the panel off the door once you have the screws out.
http://www.youtube.com/watch?v=wC0ciLIp6YY

1st Gear
Joined: Jul 2012
Posts: 32
Likes: 0
Great thread. Worked great for my 2013 Clubman. One thing I should point out, that's not in any other "door panel removal" thread, you will have better access to those last 3 screws if the window is rolled up. Especially if you have tinted windows, you don't want to risk scratching the tint.

1st Gear
Joined: Aug 2013
Posts: 49
Likes: 0
From: Bullhead City, AZ
This is a great thread. I used it to fix my PS ext door handle today. It was loose and turned out that the bracket had a hairline crack in it and the bolt came out. Took it off, used 2-ton epoxy to fix the crack and then I added a second cap head bolt on the bottom hole. Not sure why that doesn't come like that from the factory. One bolt on the bigger side of the handle does not seem like enough to hold long term. Mine lasted 5 years.
A couple pointers.... use a 1/4 in ratchet and socket to hold the torx bit and it will take the upper/inner 3 screws out easy. So easy that you can put them back on quickly too.
This job took me about 2.5 hrs but some head scratching that would not happen the second time.
A couple pointers.... use a 1/4 in ratchet and socket to hold the torx bit and it will take the upper/inner 3 screws out easy. So easy that you can put them back on quickly too.
This job took me about 2.5 hrs but some head scratching that would not happen the second time.
Trending Topics

1st Gear
Joined: Oct 2013
Posts: 37
Likes: 0
My door handle removal experience
Between this how-to and the other linked to on this page, there was a ton of great information. I just removed my door handles so I could vinyl wrap my doors without worrying about the tricky door handle areas (I tried 3 times! Couldn't get it to look acceptable to me). I would say this is a little tricky, but not really that hard overall. Just tedious (you should see the container I have to organize all the screws I removed).
One important thing I wanted to add (and forgive me if it's been said elsewhere on the forum) is that I was able to remove the styrofoam block without pulling the bolt through it and messing up the styrofoam (or rendering the washer on the end of the bolt useless, as I believe the other tutorial mentioned).
So to recap, after taking out all the visible screws from the inner door panel, removing the screws separating the two "L" brackets from the bottom of the door, and removing the 3 screws in the metal bar that the door panel hangs from, there is a styrofoam block sitting inside the door. There is a bolt through it attached to the door panel. The other tutorial recommends pulling the bolt and washer through the styrofoam, but i was able to lift the whole styrofoam block out with the door panel without having to bust the styrofoam. you have to lift up pretty hard, but I was able to do it on both doors no problem.
I was glad I didn't have to F up the styrofoam and wanted to share my experience.
Best of luck!
Brian

Neutral

Joined: May 2011
Posts: 1
Likes: 0
From: Way east Kansas
One more handy tip
I did not have a 5mm ball end for the inner handle screw, but once broken loose with an L shaped alan head, a 3/16" fits close enough to finish the job, and I had one on hand so no special tool shopping
My $.02
My $.02

Thread
Thread Starter
Forum
Replies
Last Post
molala
MINIs & Minis for Sale
1
Oct 2, 2015 01:53 PM