
How To Drivetrain :: DIY fuel filter change MCS


Drivetrain :: DIY fuel filter change MCS
Required:
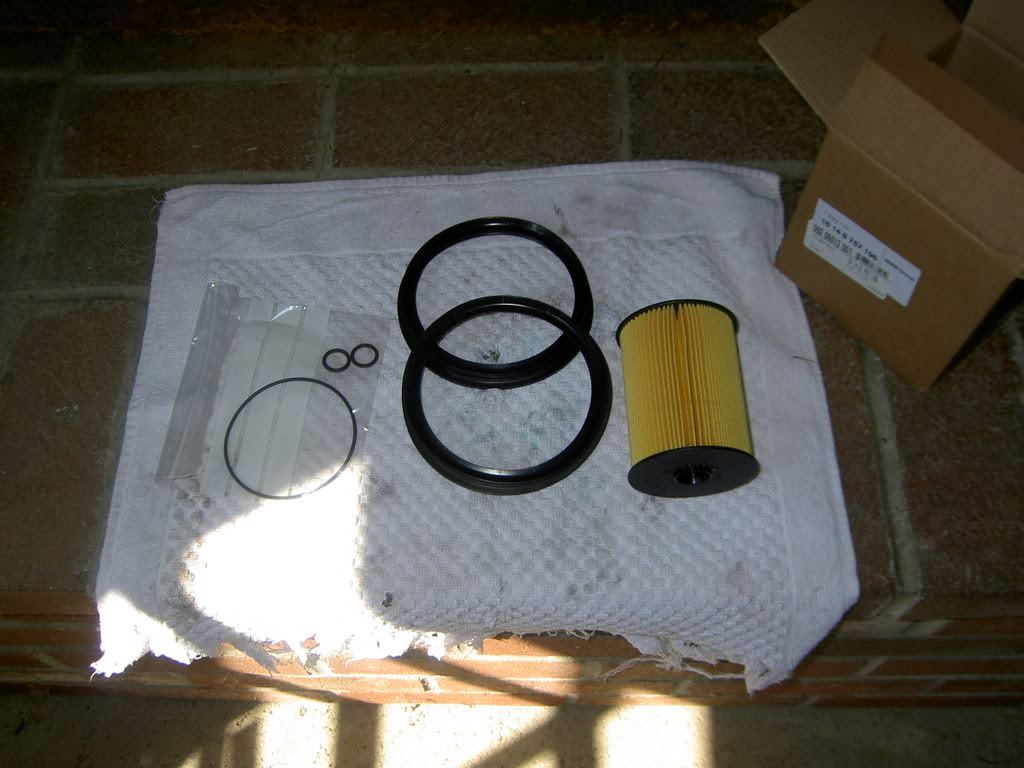
1) New Filter and gasket and O Ring kit ( Purchased mine from Atlantic British at Minicarparts.net - for about 38 bucks.
2) 10mm socket
3) flat bladed screw driver
4) rubber mallet or light hammer
5) Small angled hook tool to remove small O-Rings
6) Old (clean) Turkey baister
7) Rags
8) Rubber Gloves
9) Plastic Covering - to Cover the area working to protect from gasoline drips ect.
10) Vaseline
The Fuel Filter is located under the back passenger side seating area. You need to pull up the lower portion of the back seat, Front comes straight up, the back releases when it is then pulled forward.
Find the large black Tank Cover lid. Cover the area surrounding it with duct tape and thick plastic. You dont want the inside of your MINI stinking like petrol when we are done.
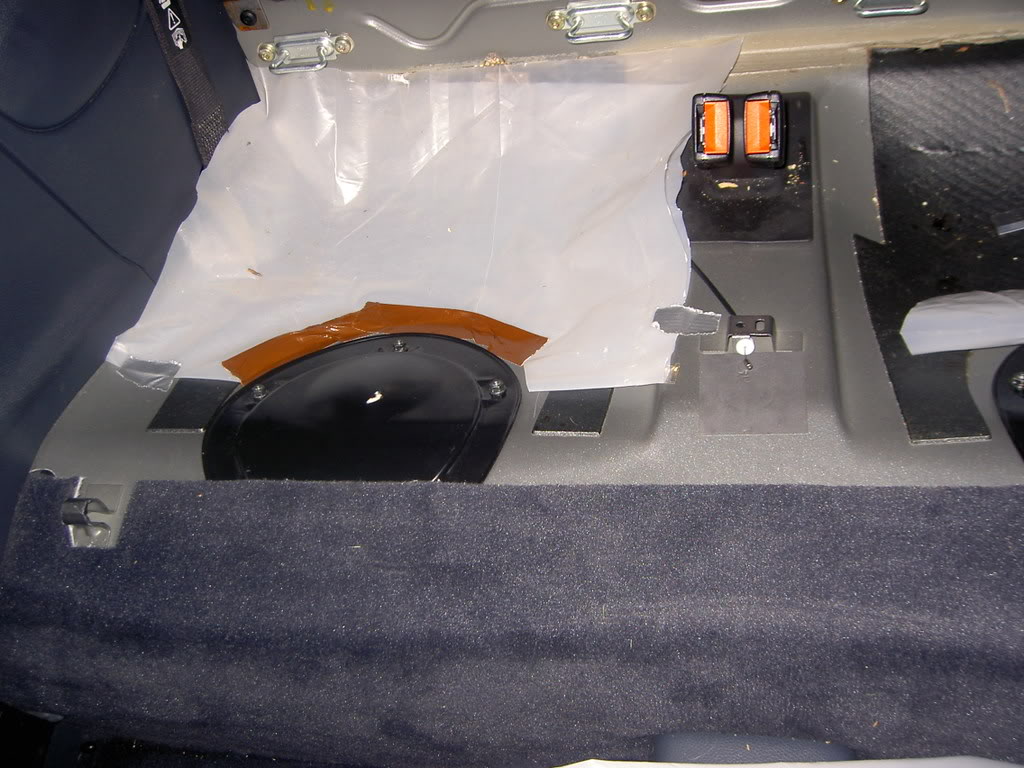
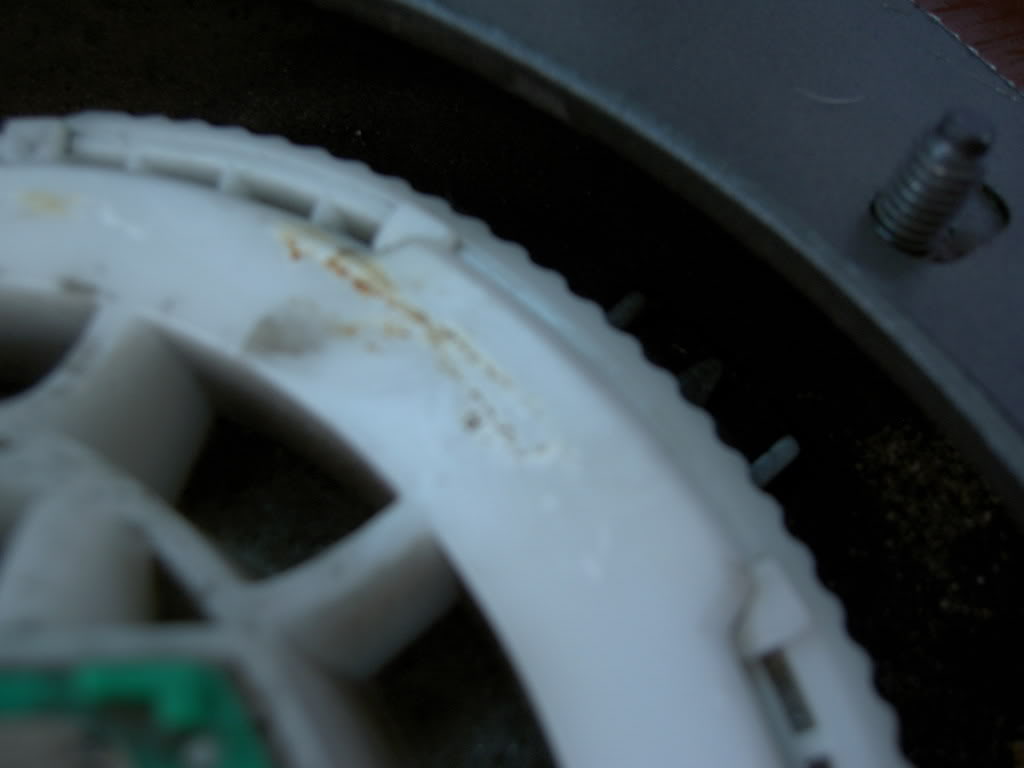
Removed the five 10mm nuts with socket, pry up the panel exposing the top of the entire sending unit. Some Chipmonk left me a gift on mine Vacuum any debris that is ontop before proceeding....

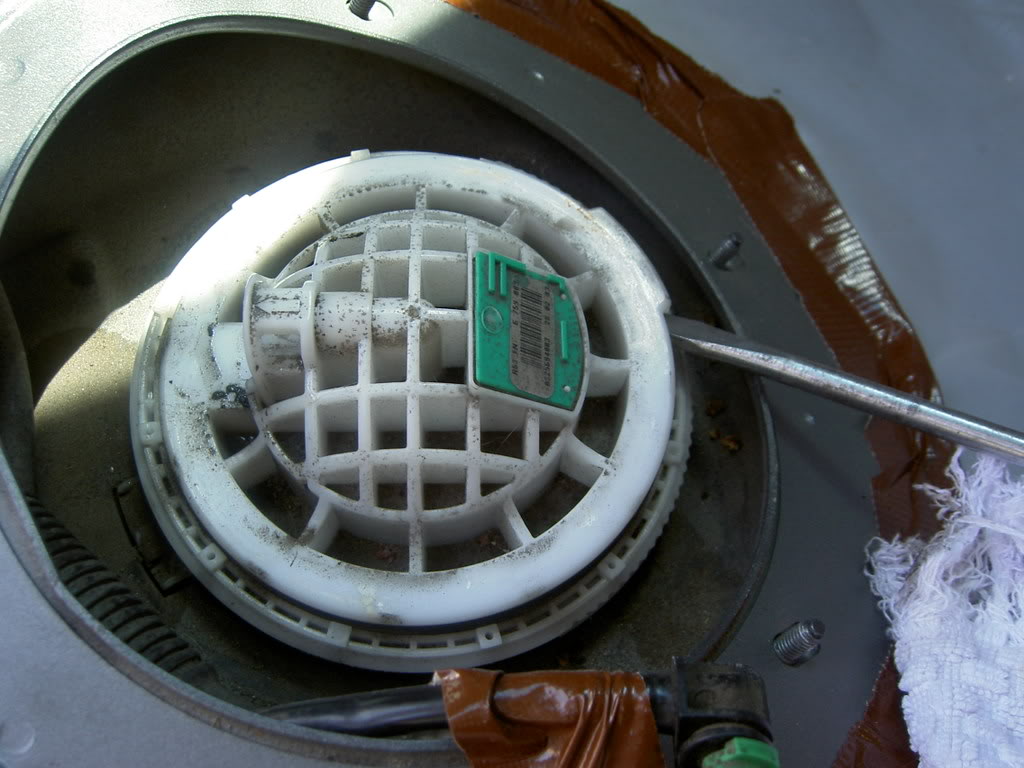
Loosen the Locking Collar Ring with flat bladed screw driver and rubber mallet, gently tapping until the ring moves freely enough to remove by hand.
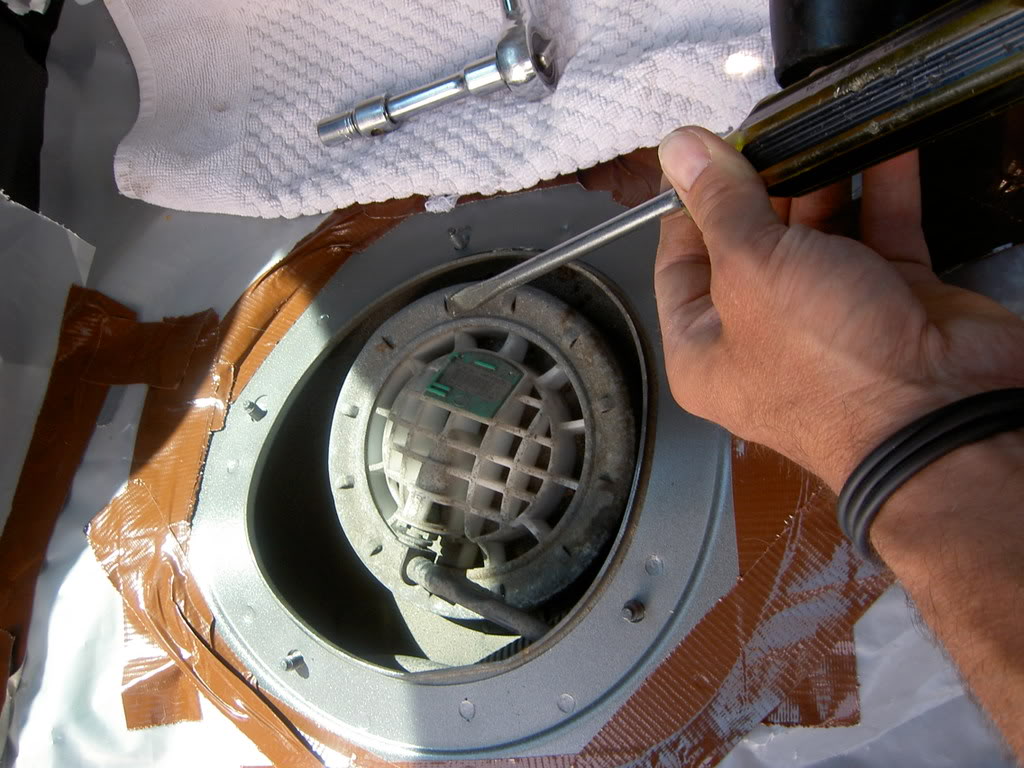
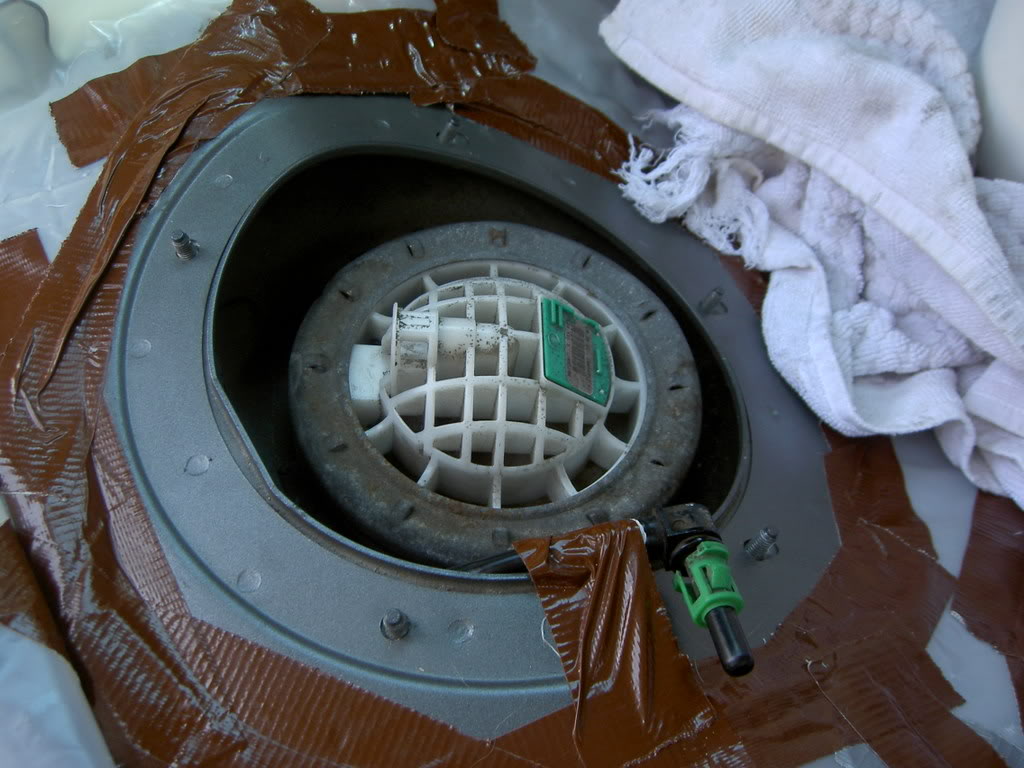
If you are able to remove the ring then proceed to cover the fuel line connector with rags, and press the green side tabs INWARD and pull the connector out. A little petrol will come out under some pressure, but not a big deal.
Remove the metal locking ring, and secure the fuel connector aside and out of the way with some duct tape..
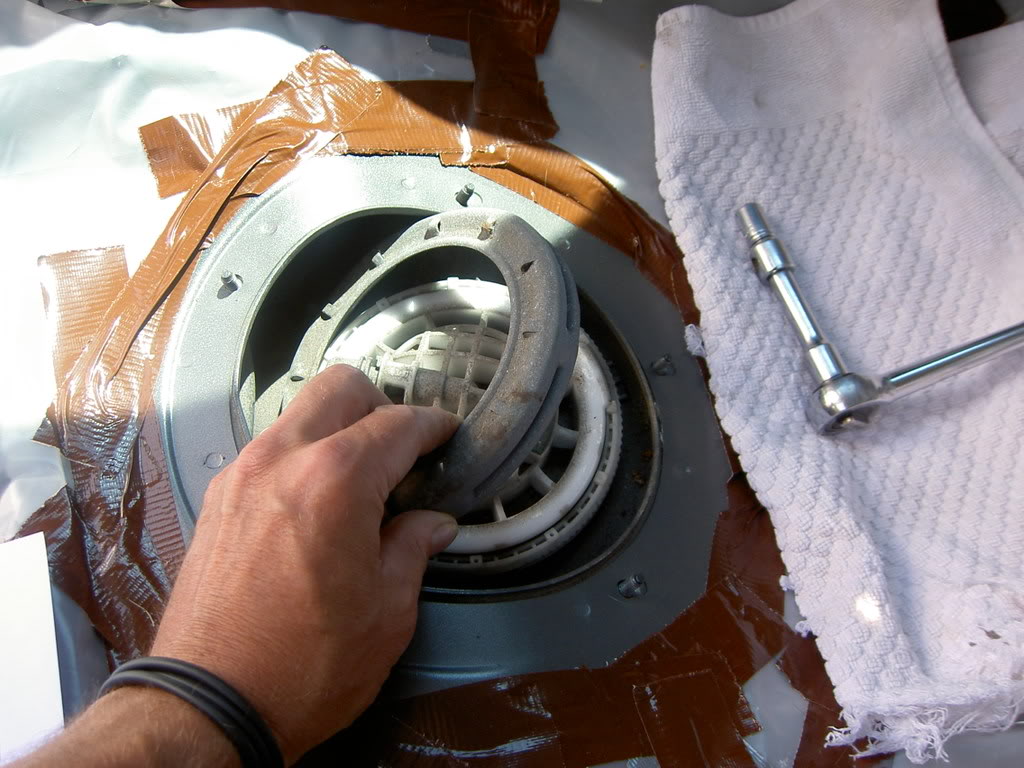
Gently pry up the Entire Sending Unit, Remeber it is sitting in a fuel tank....NO SMOKING PLEASE
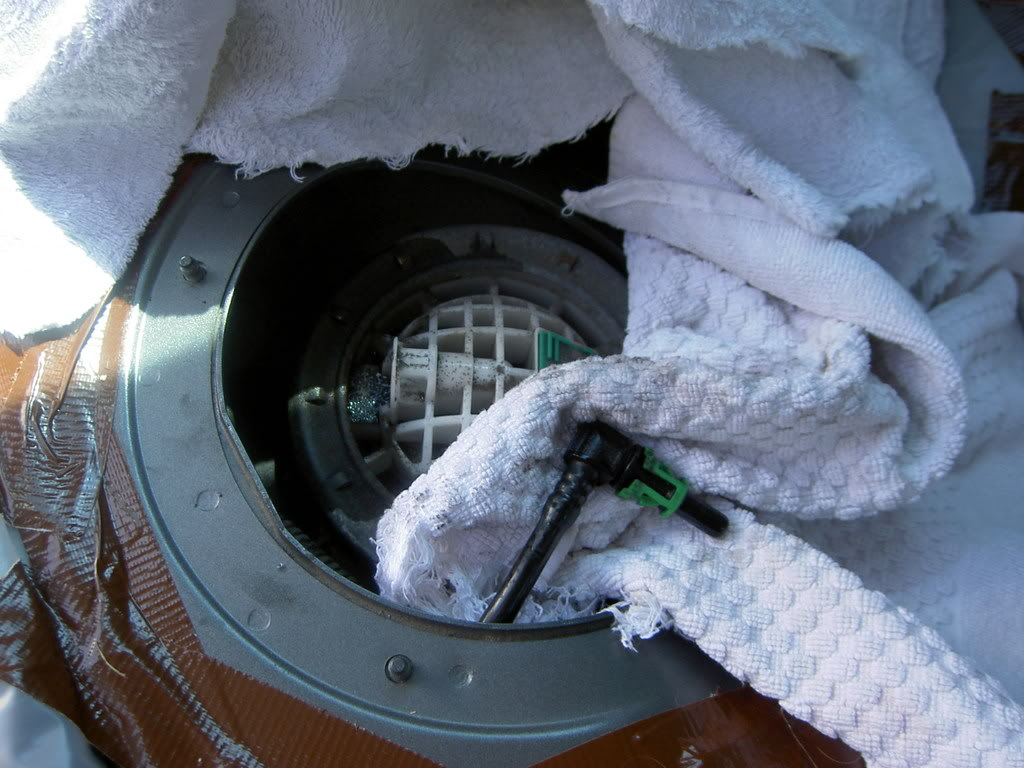
Gently Lift the unit up about 3-4 inches ONLY, grab the top with one hand and the sides with the other and twist to unlock the top and pull the cap off. It was not easy, and you have to be careful of the various things attached to the bottom part ( sending unit arms and stuff ) Some of it is made of (breakable) plastic and you dont want that stuff falling into your tank !!!! I used a rag wedged in between the unit and the tank edge to help keep it in place.
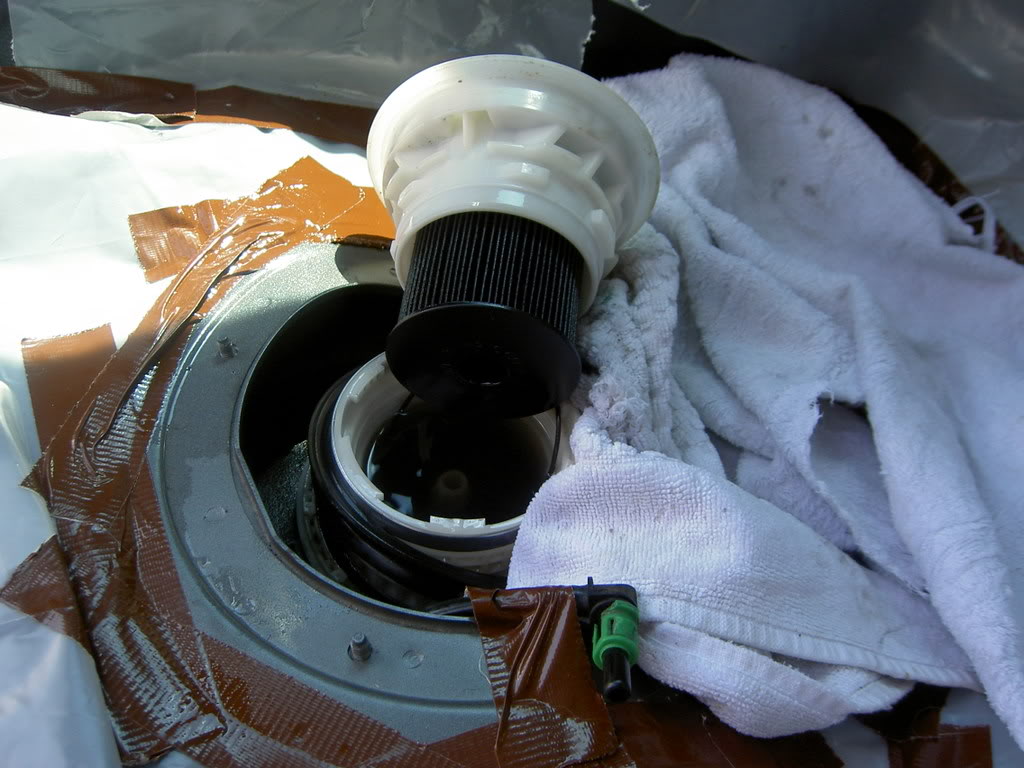
After separating the top from the bottom, gentley place the bottom back, and remove the top and the filter should come with it. Carefully remove the old filter from the cap and dispose of it immediately in old coffee can or something similar. That black fuel can make a mess.
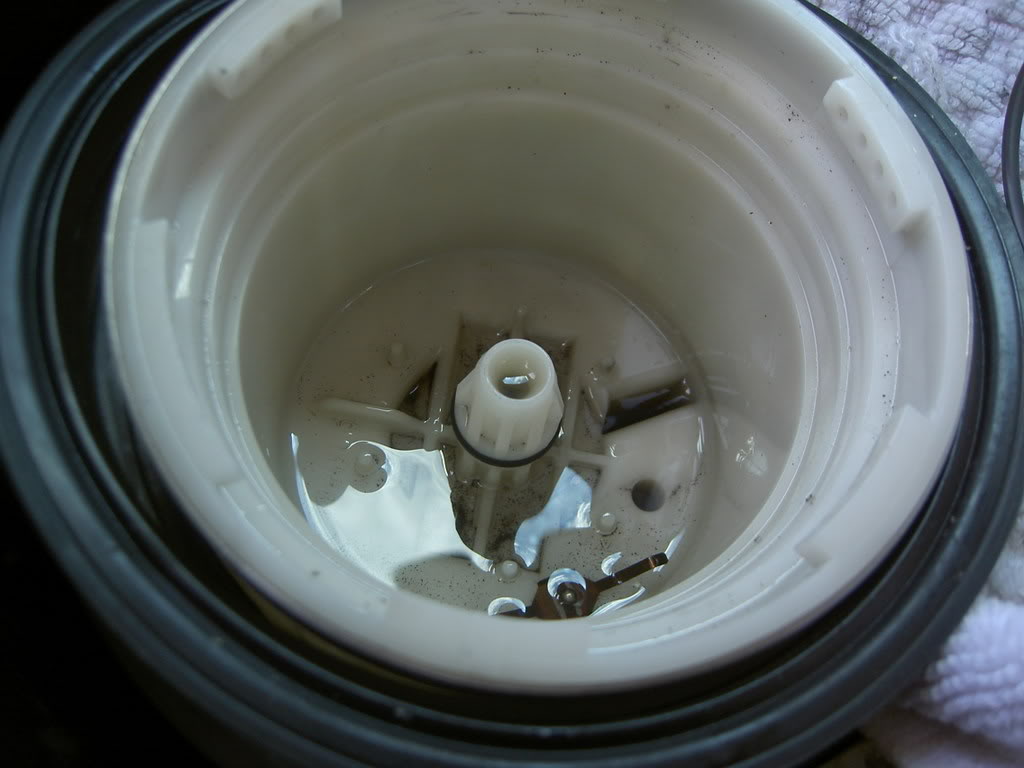
Remove the Large thin O-Ring and using the turkey baister suck the blackish fuel from the inside of the bottom assembly exposing the small O-ring and center post. ( please dispose of this old fuel properly )
)
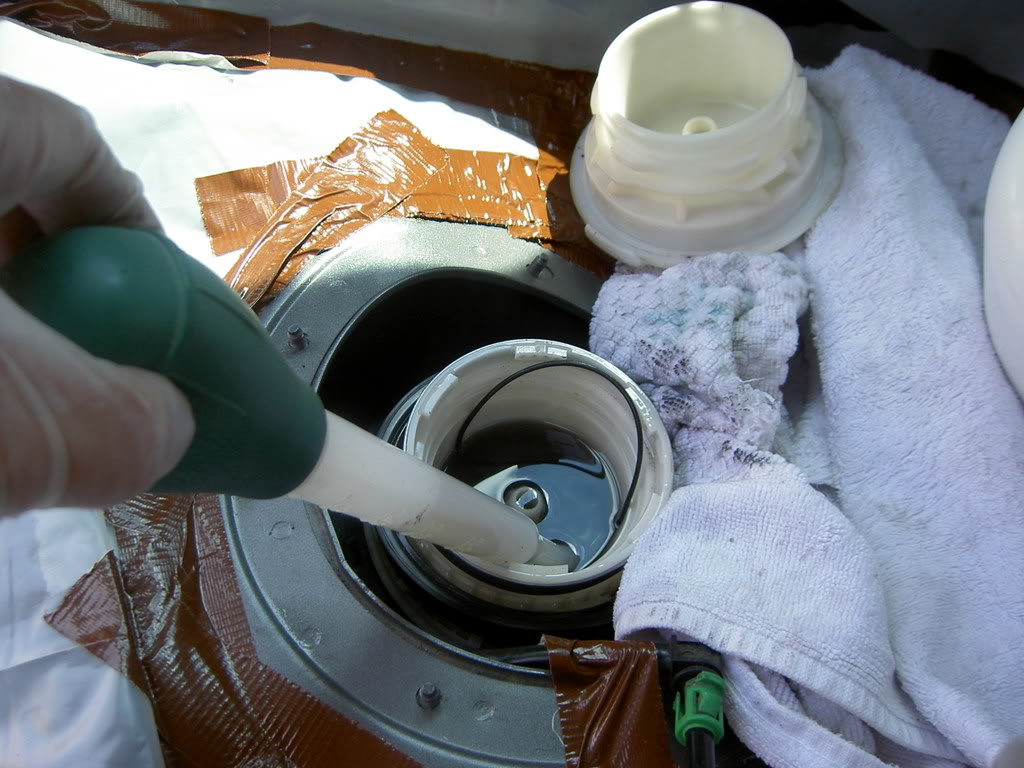
Remove the small O-Ring from the center post with a small hooked tool. Mine was somewhat brittle enough to removed by just picking at it.....But make sure to remove any small pieces that may fall to the bottom of canister.
Remove O-Ring from inside of Cap too.
Break out the Lube - Cover the new O-rings with a small amount of Vaseline before installing them.
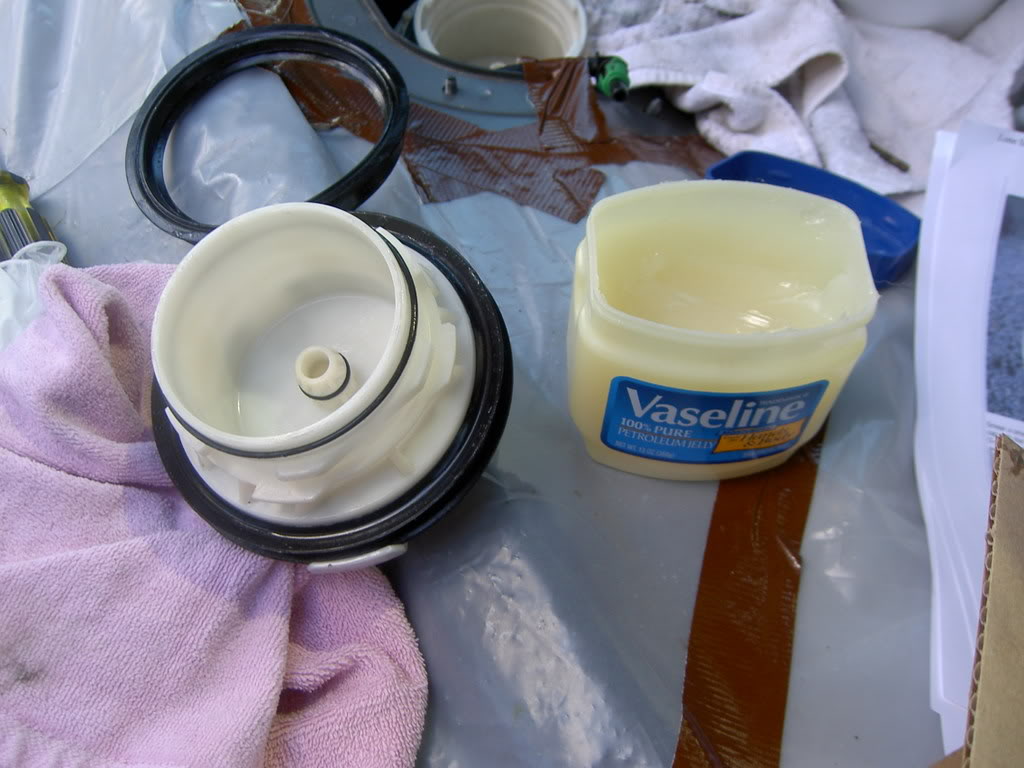
This particular Gasket ring has to go in ONLY one way, Make sure you put install this with words " THIS SIDE DOWN " facing down into tank.
Pull up Canister from tank a few inches, holding tightly - press the new filter into bottom half with slight twisting motion. Then press the canister cap on the same way and press the two halves of the canister together, and a short twist to lock them together.
Slide the Gasket seal down ( with words " THIS SIDE DOWN" ) and press into place with your fingers, working them around the assembly until the gasket is flush

Place the canister in the tank with the lid tab lined up with the tank collar
slot,
Twist the metal locking ring back on hand tight, then securely with flat blade screw driver and mallet giving it a few taps to snug it up good ( Do not strip it, it should just snug up about 1 inch further or so
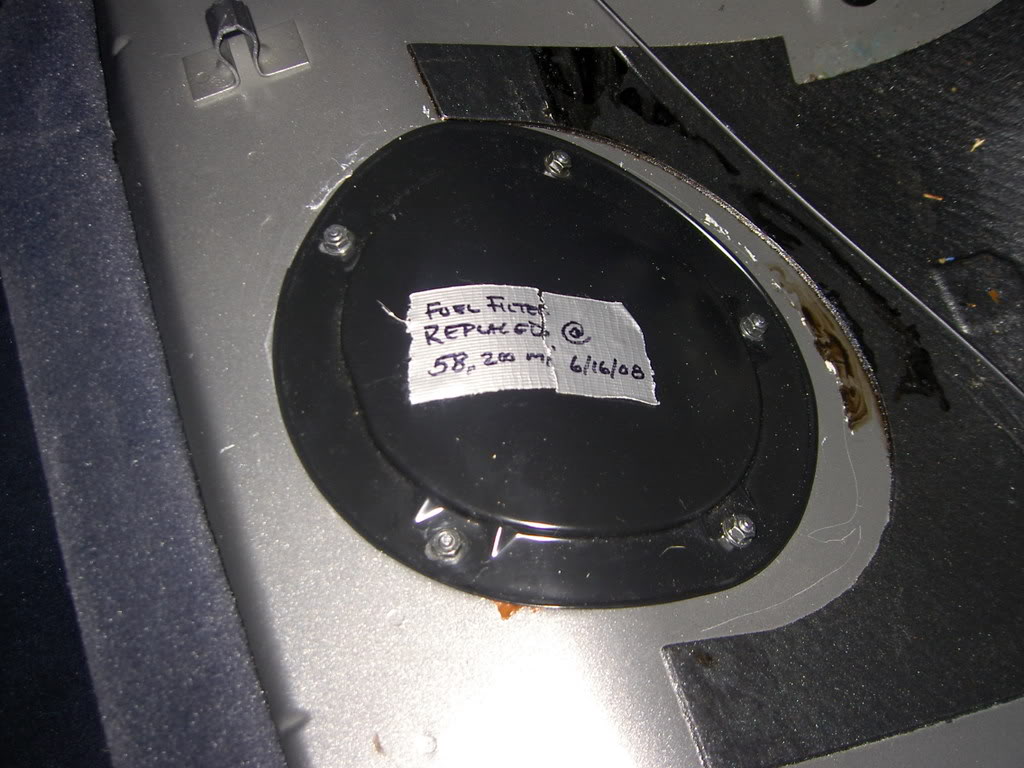
Push in the fuel line unitl the green locking tabs snap in place. Refasten the tank cover with the 10mm nuts. Remove plastic covering and duct tape, place a label over the lid with mileage and date of Filter change, secure back seat into place.
Place your key in the ignition and turn to positon 2 then to the off position about 5-6 times. This will re-pressurize the fuel system. Then it should start right up. Just for the heck of it, check under your vehicle for the next few days for any leaking fuel from that area. Mine was bone dry, but I was very careful and took my time with everything I did.
This was my first time and I was done in one hour. I should think it could be done in half that time with this experience.
My MCS now starts up first time everymoring as well
1) New Filter and gasket and O Ring kit ( Purchased mine from Atlantic British at Minicarparts.net - for about 38 bucks.
2) 10mm socket
3) flat bladed screw driver
4) rubber mallet or light hammer
5) Small angled hook tool to remove small O-Rings
6) Old (clean) Turkey baister
7) Rags
8) Rubber Gloves
9) Plastic Covering - to Cover the area working to protect from gasoline drips ect.
10) Vaseline
The Fuel Filter is located under the back passenger side seating area. You need to pull up the lower portion of the back seat, Front comes straight up, the back releases when it is then pulled forward.
Find the large black Tank Cover lid. Cover the area surrounding it with duct tape and thick plastic. You dont want the inside of your MINI stinking like petrol when we are done.
Removed the five 10mm nuts with socket, pry up the panel exposing the top of the entire sending unit. Some Chipmonk left me a gift on mine
Vacuum any debris that is ontop before proceeding.... Loosen the Locking Collar Ring with flat bladed screw driver and rubber mallet, gently tapping until the ring moves freely enough to remove by hand.
If you are able to remove the ring then proceed to cover the fuel line connector with rags, and press the green side tabs INWARD and pull the connector out. A little petrol will come out under some pressure, but not a big deal.
Remove the metal locking ring, and secure the fuel connector aside and out of the way with some duct tape..
Gently pry up the Entire Sending Unit, Remeber it is sitting in a fuel tank....NO SMOKING PLEASE
Gently Lift the unit up about 3-4 inches ONLY, grab the top with one hand and the sides with the other and twist to unlock the top and pull the cap off. It was not easy, and you have to be careful of the various things attached to the bottom part ( sending unit arms and stuff ) Some of it is made of (breakable) plastic and you dont want that stuff falling into your tank !!!! I used a rag wedged in between the unit and the tank edge to help keep it in place.
After separating the top from the bottom, gentley place the bottom back, and remove the top and the filter should come with it. Carefully remove the old filter from the cap and dispose of it immediately in old coffee can or something similar. That black fuel can make a mess.
Remove the Large thin O-Ring and using the turkey baister suck the blackish fuel from the inside of the bottom assembly exposing the small O-ring and center post. ( please dispose of this old fuel properly
)Remove the small O-Ring from the center post with a small hooked tool. Mine was somewhat brittle enough to removed by just picking at it.....But make sure to remove any small pieces that may fall to the bottom of canister.
Remove O-Ring from inside of Cap too.
Break out the Lube - Cover the new O-rings with a small amount of Vaseline before installing them.
This particular Gasket ring has to go in ONLY one way, Make sure you put install this with words " THIS SIDE DOWN " facing down into tank.
Pull up Canister from tank a few inches, holding tightly - press the new filter into bottom half with slight twisting motion. Then press the canister cap on the same way and press the two halves of the canister together, and a short twist to lock them together.
Slide the Gasket seal down ( with words " THIS SIDE DOWN" ) and press into place with your fingers, working them around the assembly until the gasket is flush
Place the canister in the tank with the lid tab lined up with the tank collar
slot,
Twist the metal locking ring back on hand tight, then securely with flat blade screw driver and mallet giving it a few taps to snug it up good ( Do not strip it, it should just snug up about 1 inch further or so
Push in the fuel line unitl the green locking tabs snap in place. Refasten the tank cover with the 10mm nuts. Remove plastic covering and duct tape, place a label over the lid with mileage and date of Filter change, secure back seat into place.
Place your key in the ignition and turn to positon 2 then to the off position about 5-6 times. This will re-pressurize the fuel system. Then it should start right up. Just for the heck of it, check under your vehicle for the next few days for any leaking fuel from that area. Mine was bone dry, but I was very careful and took my time with everything I did.
This was my first time and I was done in one hour. I should think it could be done in half that time with this experience.
My MCS now starts up first time everymoring as well
Last edited by MrCooperS; May 31, 2010 at 05:42 PM.


That's your first pick. If you copy the "Direct Link" part below your pic on Photobucket, come back to your post on NAM in a different tab and copy that url into the box that appears after clicking on the yellow square with the drawing of a mountain on it, you'll get the pick like I just posted. You can do that for all of your pics if you want and it will be easier for users to print out your entire post for the how-to. Thanks for posting btw!
That's your first pick. If you copy the "Direct Link" part below your pic on Photobucket, come back to your post on NAM in a different tab and copy that url into the box that appears after clicking on the yellow square with the drawing of a mountain on it, you'll get the pick like I just posted. You can do that for all of your pics if you want and it will be easier for users to print out your entire post for the how-to. Thanks for posting btw!
Here ya go:
Required:
1) New Filter and gasket and O Ring kit ( Purchased mine from Atlantic British at Minicarparts.net - for about 38 bucks.
2) 10mm socket
3) flat bladed screw driver
4) rubber mallet or light hammer
5) Small angled hook tool to remove small O-Rings
6) Old (clean) Turkey baister
7) Rags
8) Rubber Gloves
9) Plastic Covering - to Cover the area working to protect from gasoline drips ect.
10) Vaseline

The Fuel Filter is located under the back passenger side seating area. You need to pull up the lower portion of the back seat, Front comes straight up, the back releases when it is then pulled forward.
Find the large black Tank Cover lid. Cover the area surrounding it with duct tape and thick plastic. You dont want the inside of your MINI stinking like petrol when we are done.

Removed the five 10mm nuts with socket, pry up the panel exposing the top of the entire sending unit. Some Chipmonk left me a gift on mine Vacuum any debris that is ontop before proceeding....

Loosen the Locking Collar Ring with flat bladed screw driver and rubber mallet, gently tapping until the ring moves freely enough to remove by hand.

If you are able to remove the ring then proceed to cover the fuel line connector with rags, and press the green side tabs INWARD and pull the connector out. A little petrol will come out under some pressure, but not a big deal.

Remove the metal locking ring, and secure the fuel connector aside and out of the way with some duct tape..

Gently pry up the Entire Sending Unit, Remeber it is sitting in a fuel tank....NO SMOKING PLEASE

Gently Lift the unit up about 3-4 inches ONLY, grab the top with one hand and the sides with the other and twist to unlock the top and pull the cap off. It was not easy, and you have to be careful of the various things attached to the bottom part ( sending unit arms and stuff ) Some of it is made of (breakable) plastic and you dont want that stuff falling into your tank !!!! I used a rag wedged in between the unit and the tank edge to help keep it in place.
After separating the top from the bottom, gentley place the bottom back, and remove the top and the filter should come with it. Carefully remove the old filter from the cap and dispose of it immediately in old coffee can or something similar. That black fuel can make a mess.

Remove the Large thin O-Ring and using the turkey baister suck the blackish fuel from the inside of the bottom assembly exposing the small O-ring and center post. ( please dispose of this old fuel properly )

Remove the small O-Ring from the center post with a small hooked tool. Mine was somewhat brittle enough to removed by just picking at it.....But make sure to remove any small pieces that may fall to the bottom of canister.

Remove O-Ring from inside of Cap too.

Break out the Lube - Cover the new O-rings with a small amount of Vaseline before installing them.

This particular Gasket ring has to go in ONLY one way, Make sure you put install this with words " THIS SIDE DOWN " facing down into tank.

Pull up Canister from tank a few inches, holding tightly - press the new filter into bottom half with slight twisting motion. Then press the canister cap on the same way and press the two halves of the canister together, and a short twist to lock them together.
Slide the Gasket seal down ( with words " THIS SIDE DOWN" ) and press into place with your fingers, working them around the assembly until the gasket is flush

Place the canister in the tank with the lid tab lined up with the tank collar
slot,

Twist the metal locking ring back on hand tight, then securely with flat blade screw driver and mallet giving it a few taps to snug it up good ( Do not strip it, it should just snug up about 1 inch further or so

Push in the fuel line unitl the green locking tabs snap in place. Refasten the tank cover with the 10mm nuts. Remove plastic covering and duct tape, place a label over the lid with mileage and date of Filter change, secure back seat into place.

Place your key in the ignition and turn to positon 2 then to the off position about 5-6 times. This will re-pressurize the fuel system. Then it should start right up. Just for the heck of it, check under your vehicle for the next few days for any leaking fuel from that area. Mine was bone dry, but I was very careful and took my time with everything I did.
This was my first time and I was done in one hour. I should think it could be done in half that time with this experience.
My MCS now starts up first time everymoring as well
1) New Filter and gasket and O Ring kit ( Purchased mine from Atlantic British at Minicarparts.net - for about 38 bucks.
2) 10mm socket
3) flat bladed screw driver
4) rubber mallet or light hammer
5) Small angled hook tool to remove small O-Rings
6) Old (clean) Turkey baister
7) Rags
8) Rubber Gloves
9) Plastic Covering - to Cover the area working to protect from gasoline drips ect.
10) Vaseline
The Fuel Filter is located under the back passenger side seating area. You need to pull up the lower portion of the back seat, Front comes straight up, the back releases when it is then pulled forward.
Find the large black Tank Cover lid. Cover the area surrounding it with duct tape and thick plastic. You dont want the inside of your MINI stinking like petrol when we are done.
Removed the five 10mm nuts with socket, pry up the panel exposing the top of the entire sending unit. Some Chipmonk left me a gift on mine
Vacuum any debris that is ontop before proceeding.... Loosen the Locking Collar Ring with flat bladed screw driver and rubber mallet, gently tapping until the ring moves freely enough to remove by hand.
If you are able to remove the ring then proceed to cover the fuel line connector with rags, and press the green side tabs INWARD and pull the connector out. A little petrol will come out under some pressure, but not a big deal.
Remove the metal locking ring, and secure the fuel connector aside and out of the way with some duct tape..
Gently pry up the Entire Sending Unit, Remeber it is sitting in a fuel tank....NO SMOKING PLEASE
Gently Lift the unit up about 3-4 inches ONLY, grab the top with one hand and the sides with the other and twist to unlock the top and pull the cap off. It was not easy, and you have to be careful of the various things attached to the bottom part ( sending unit arms and stuff ) Some of it is made of (breakable) plastic and you dont want that stuff falling into your tank !!!! I used a rag wedged in between the unit and the tank edge to help keep it in place.
After separating the top from the bottom, gentley place the bottom back, and remove the top and the filter should come with it. Carefully remove the old filter from the cap and dispose of it immediately in old coffee can or something similar. That black fuel can make a mess.
Remove the Large thin O-Ring and using the turkey baister suck the blackish fuel from the inside of the bottom assembly exposing the small O-ring and center post. ( please dispose of this old fuel properly
)Remove the small O-Ring from the center post with a small hooked tool. Mine was somewhat brittle enough to removed by just picking at it.....But make sure to remove any small pieces that may fall to the bottom of canister.
Remove O-Ring from inside of Cap too.
Break out the Lube - Cover the new O-rings with a small amount of Vaseline before installing them.
This particular Gasket ring has to go in ONLY one way, Make sure you put install this with words " THIS SIDE DOWN " facing down into tank.
Pull up Canister from tank a few inches, holding tightly - press the new filter into bottom half with slight twisting motion. Then press the canister cap on the same way and press the two halves of the canister together, and a short twist to lock them together.
Slide the Gasket seal down ( with words " THIS SIDE DOWN" ) and press into place with your fingers, working them around the assembly until the gasket is flush
Place the canister in the tank with the lid tab lined up with the tank collar
slot,
Twist the metal locking ring back on hand tight, then securely with flat blade screw driver and mallet giving it a few taps to snug it up good ( Do not strip it, it should just snug up about 1 inch further or so
Push in the fuel line unitl the green locking tabs snap in place. Refasten the tank cover with the 10mm nuts. Remove plastic covering and duct tape, place a label over the lid with mileage and date of Filter change, secure back seat into place.
Place your key in the ignition and turn to positon 2 then to the off position about 5-6 times. This will re-pressurize the fuel system. Then it should start right up. Just for the heck of it, check under your vehicle for the next few days for any leaking fuel from that area. Mine was bone dry, but I was very careful and took my time with everything I did.
This was my first time and I was done in one hour. I should think it could be done in half that time with this experience.
My MCS now starts up first time everymoring as well


Banned
Joined: Mar 2008
Posts: 922
Likes: 0
From: Lake forest, California
a half hour. thats not a bad.
Danny of mini corsa knocked mine out in probably half that if not less.
I was happy to pay him to do it... Hes great.
Danny of mini corsa knocked mine out in probably half that if not less.
I was happy to pay him to do it... Hes great.
Trending Topics


Hello everyone 
I followed these instructions exactly but there is one problem, where the heck does the second thick black gasket go?
If you look at the first picture of the fuel filter kit it comes with:
- two small o-rings
- one large thin o-ring
- two large thick gaskets
- fuel filter
Going through the steps the small o-ring goes on the bottom of the fuel canister on the center post. And the other small o-ring goes on the center post on the inside of the fuel canister cap
Fuel filter goes into the fuel canister on top of the center post
The large thin o-ring goes on the fuel canister cap and one of the large thick gaskets goes on top of the fuel tank.
After this part the DIY tells you to reassemble everything. WAIT!?!?!!?
It doesnt tell you what to do with the second thick black gasket that says "this side down"......
Can someone please tell me where this goes? I ordered my kit from www.minicarparts.net just like the one posted in this thread. Did BMW give an extra gasket by accident, I highly doubt it.
Please some help


2nd Gear
Joined: Aug 2008
Posts: 111
Likes: 3
From: Knoxville, TN
Good question, I did mine 2 weeks ago and I couldn't find where it went either.
2nd Gear
Joined: Aug 2008
Posts: 111
Likes: 3
From: Knoxville, TN
To answer your question, my gas mileage went down about 1mpg. Dirty filters create a lean condition so replacing one will never give you better mileage in my opinion. My car had 100k miles and it was very black. The turkey baster is a good idea, I soaked the fuel with rags.

There are two for canister, one for base and one for lid. Not an issue, be just swap it out next filter change.....
No fuel mileage change for one good reason....the country has switched to 10% ethenol fuel, ALL cars will experience a 3+% reduction of their usual MPG. Seems sort of stupid we added the crap to begin with if you ask me because it is a trade off. We have more fuel but get worse MPG using it.....good example as to why GOVERNMENT should never be allowed to run ANYTHING in the Public sector......
2nd Gear
Joined: Aug 2008
Posts: 111
Likes: 3
From: Knoxville, TN
Still not sure. Mine only had 1 when I disassembled. One goes at the base, then you slide the assembled canister and the lid makes contact with the upper part of the base gasket. I'm thinking it goes under the base that never gets removed for this procedure. I tried to add another one under the lid, but it wouldn't seat enough to get the tightening ring down. But again, mine only had 1 to begin with.
Still not sure. Mine only had 1 when I disassembled. One goes at the base, then you slide the assembled canister and the lid makes contact with the upper part of the base gasket. I'm thinking it goes under the base that never gets removed for this procedure. I tried to add another one under the lid, but it wouldn't seat enough to get the tightening ring down. But again, mine only had 1 to begin with.
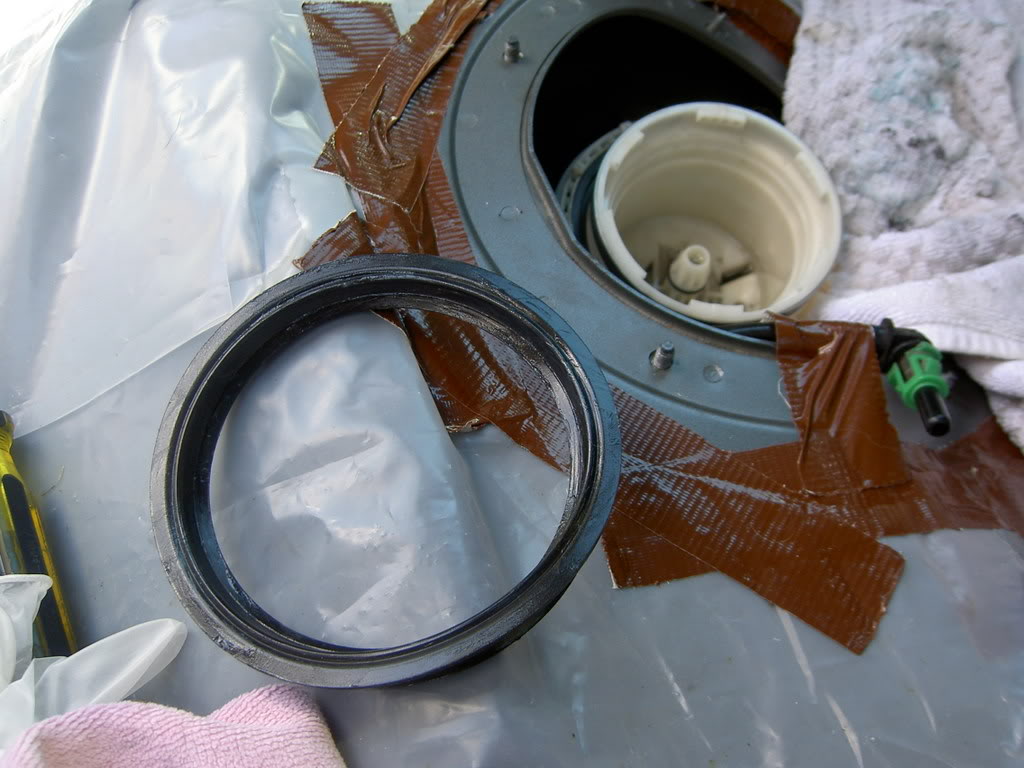
Open photo here: Arrow point to other gasket.
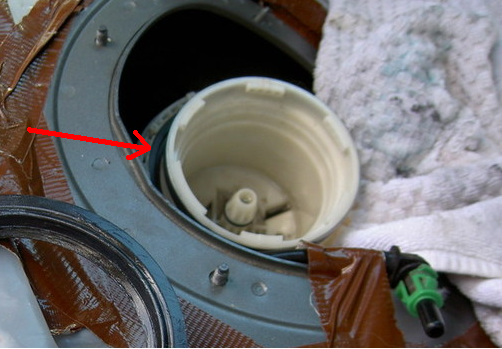
The second large thick gasket goes on the other side of the gas tank where the fuel pump is. Replacing this gasket is similar to the fuel filter side.
Removed the black metal cover, clean all the nasty dust/dirt off the top, remove the metal locking ring by turning it counter clockwise. The fuel pump is spring loaded and will pop up on its own, pull the gasket off and work it around the pump. Replace everything in reverse order.
I replaced mine only because I just couldnt throw away a brand new gasket
2nd Gear
Joined: Aug 2008
Posts: 111
Likes: 3
From: Knoxville, TN
Thanks, now I feel better. I knew there weren't two on the passenger side. I did try to install the second one under the cap as eurothrasher described, but the cap won't seat with the extra thickness.