
How To Drivetrain :: DIY fuel filter change MCS


3rd Gear
Joined: Nov 2006
Posts: 257
Likes: 1
+10 Well i bought a filter 3 yrs ago and never installed it as when i heard it's in the tank i said forget it.Thanks to this thread it's installed in 30 mins.Filter was filthy black with dirt,i really cant see how this could be a lifetime part with what was in there,did it on a fairly empty tank and misfired at first but soon self primed itself,cleared the engine check light with code reader and bingo good to go.Many thanks to the OP.


Yes! Use the hammer and screwdriver to rotate the locking ring.

3rd Gear
Joined: Apr 2009
Posts: 157
Likes: 0
From: Panther City, Texas
A mechanic friend of mine replace his awhile back, he said it was a real pain in the **** for his first attempt, but after reading this thread as long as your well prepared this shouldn't be too difficult.


Neutral
Joined: Apr 2009
Posts: 3
Likes: 1
problem solved...
I just changed my fuel filter as per the instructions posted above.
I closed everything up and then primed the pump... and then primed again and again and again but could not get ignition.
I opened everything back up and found that the big thin gasket from the kit (the one that goes on the top half of the filter housing) had slipped off.
(now that i think back, locking the two halves back together was way too easy).
I fished the gasket out, put it back on, locked everything back up, and fired up first time.
I hope this helps someone...

4th Gear
Joined: Sep 2004
Posts: 356
Likes: 0
From: Federal Way, WA
Look up you car on real.oem.com...enter the last 7 of you vin to get the right break down...also check your tank seals...some were packed that were diesel only///look on the side that says this side down...the bentley manual has nothing on the change out for the filter..good luck
 I ordered the exact part number that was posted earlier.
I ordered two kits online and I received gaskets with the "diesel only" print. Did you ultimately receive the correct gaskets? What did the dealer say regarding the packing error? This sounds hit and miss as to which gaskets you'll receive. I ordered the exact part number that was posted earlier.
I ordered the exact part number that was posted earlier.Mine said diesel only. I used it and it worked fine

1st Gear
Joined: Sep 2007
Posts: 44
Likes: 0
Just changed my filter today- DIY was very helpful, probably should have waited for a day when it wasn't 95 out with humidity to match...need AC in my garage...
Toughest part was twisting off the top of the cannister- hard to hold the bottom and twist off the top when your sweating so much everything is wet!!
FINALLY got the top off and then the rest went pretty quickly.
One tip- putting the lid back on is easier if you put the top gasket on the cannister itself, not the lid.
Drove the car around a little first with the cover off to make sure there were no leaks. Turned the key a couple times to "prime" it first- then it started right up- no codes or starting issues.
2003 MCS with about 43K miles. Did the LCA bushings and ball joints last weekend- should be set for a while!!!

6th Gear
Joined: Sep 2003
Posts: 2,268
Likes: 4
From: Always curious ...
We got a little break (50 degrees) from the cold here, so I did the filter change today. As posted above, the really difficult part was removing the upper/lid of the cannister---both twisting it to unlock position as well as pulling the top off. But for those planning to do this themselves, I am a 145 lb weakling, so it is possible! 
Another tip--wear safety goggles or glasses when pulling off the fuel line. It sprayed a bit into my face--fortunately, I wear glasses.
I also let the car sit overnight, so not much fuel came out of the line---just a quick spray and that was it.
Thanks once more for the great instructions.
Another tip--wear safety goggles or glasses when pulling off the fuel line. It sprayed a bit into my face--fortunately, I wear glasses.
I also let the car sit overnight, so not much fuel came out of the line---just a quick spray and that was it.
Thanks once more for the great instructions.
6th Gear
Joined: Sep 2003
Posts: 2,268
Likes: 4
From: Always curious ...

 I have a half tank of gas and have turned the key to position 2 about 10 times and still NADA. Any advice? Is there another way to pressurize the system?
4th Gear
Joined: Jul 2009
Posts: 385
Likes: 4
Just put another 5 gallons in - now I am a hair from the full line. Tried the "key in position 2" thing about 10 times - tried to start the car about 4 times and NADA. Took off the filter housing and noticed that the fuel line was not pressurized even though there is ample fuel.

6th Gear
Joined: Sep 2003
Posts: 2,268
Likes: 4
From: Always curious ...
When the local MINI dealer gave me a 'diesel only' gasket and I tried to return it, the head parts guy said it is OK to use it and said they are using those gaskets without a problem. I insisted on returning it and purchased a set online stating to the vendor that I did not want the diesel only gaset. They sent the gasket and it said 'diesel only'.

Not having another long break to get the filter replaced, I went ahead and installed it. No problems since installation. I compared the one I took out (not "diesel only") with the new one and they looked, felt, and smelled (
) identical. So, not sure what's going on, but I think you are OK using it. Others who have installed these gaskets way before I did have not reported any problems. (Fingers crossed.)

Required:
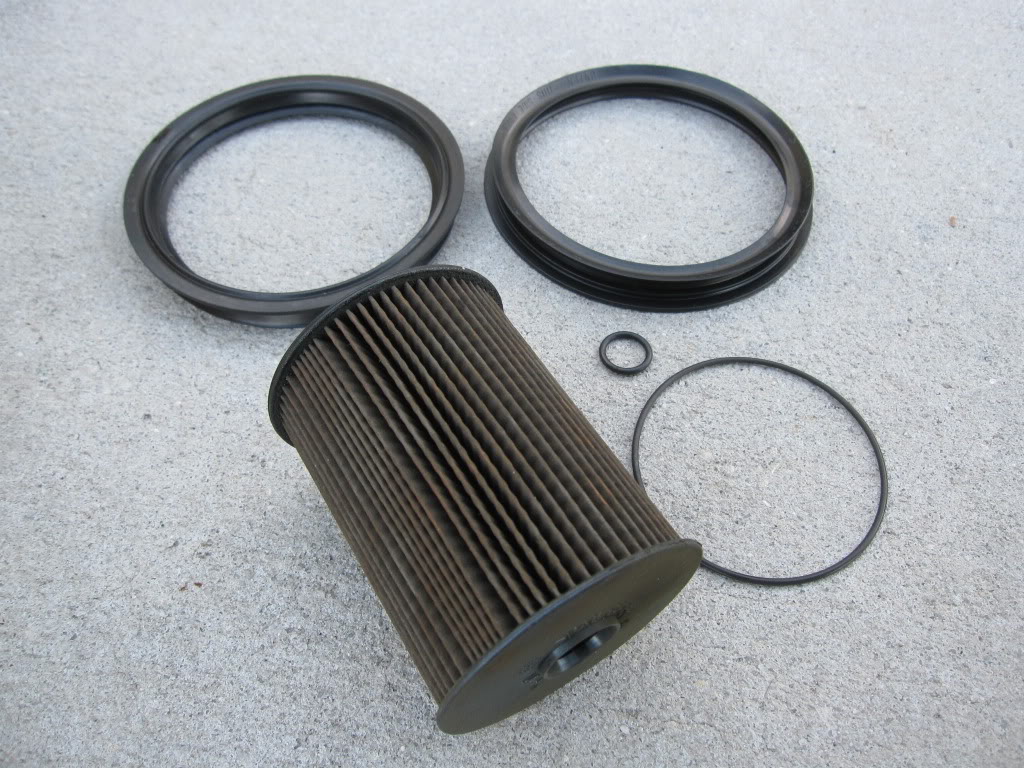
1) New Filter and gasket and O Ring kit ( Purchased mine from Atlantic British at Minicarparts.net - for about 38 bucks.
2) 10mm socket
3) flat bladed screw driver
4) rubber mallet or light hammer
5) Small angled hook tool to remove small O-Rings
6) Old (clean) Turkey baister
7) Rags
8) Rubber Gloves
9) Plastic Covering - to Cover the area working to protect from gasoline drips ect.
10) Vaseline

http://s294.photobucket.com/albums/m...t=PICT1662.jpg
The Fuel Filter is located under the back passenger side seating area. You need to pull up the lower portion of the back seat, Front comes straight up, the back releases when it is then pulled forward.
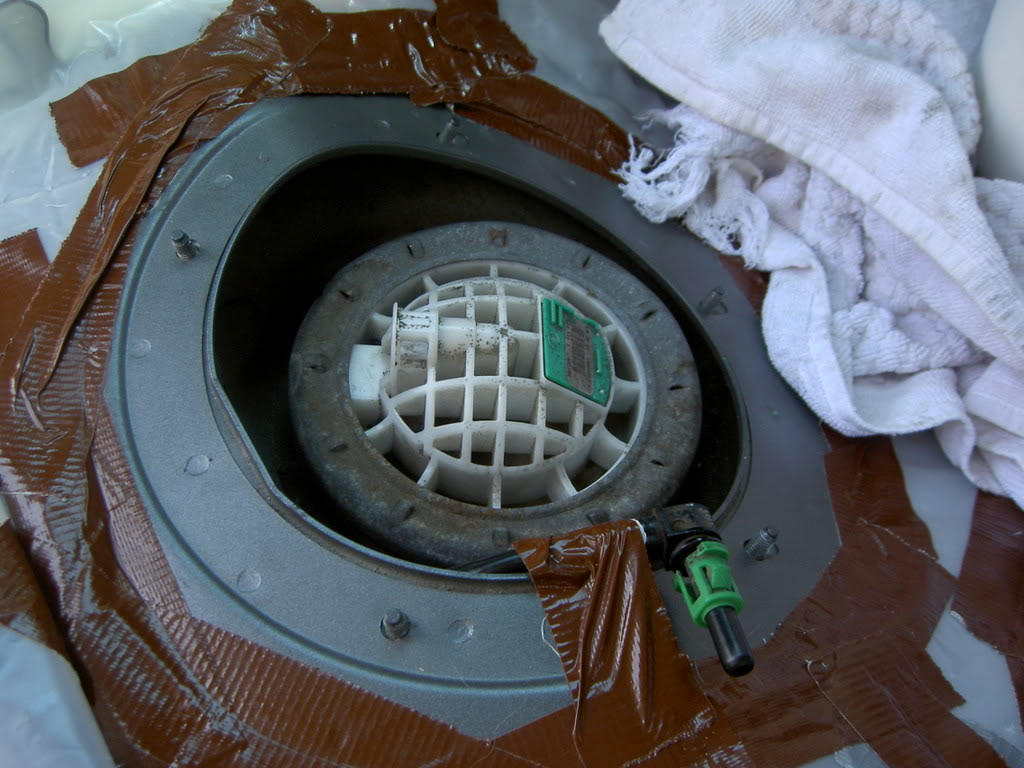
Find the large black Tank Cover lid. Cover the area surrounding it with duct tape and thick plastic. You dont want the inside of your MINI stinking like petrol when we are done.
http://s294.photobucket.com/albums/m...t=PICT1659.jpg
Removed the five 10mm nuts with socket, pry up the panel exposing the top of the entire sending unit. Some Chipmonk left me a gift on mine Vacuum any debris that is ontop before proceeding....
http://s294.photobucket.com/albums/m...t=PICT1664.jpg
Loosen the Locking Collar Ring with flat bladed screw driver and rubber mallet, gently tapping until the ring moves freely enough to remove by hand.
http://s294.photobucket.com/albums/m...t=PICT1665.jpg
If you are able to remove the ring then proceed to cover the fuel line connector with rags, and press the green side tabs INWARD and pull the connector out. A little petrol will come out under some pressure, but not a big deal.
http://s294.photobucket.com/albums/m...t=PICT1667.jpg
Remove the metal locking ring, and secure the fuel connector aside and out of the way with some duct tape..
http://s294.photobucket.com/albums/m...t=PICT1666.jpg
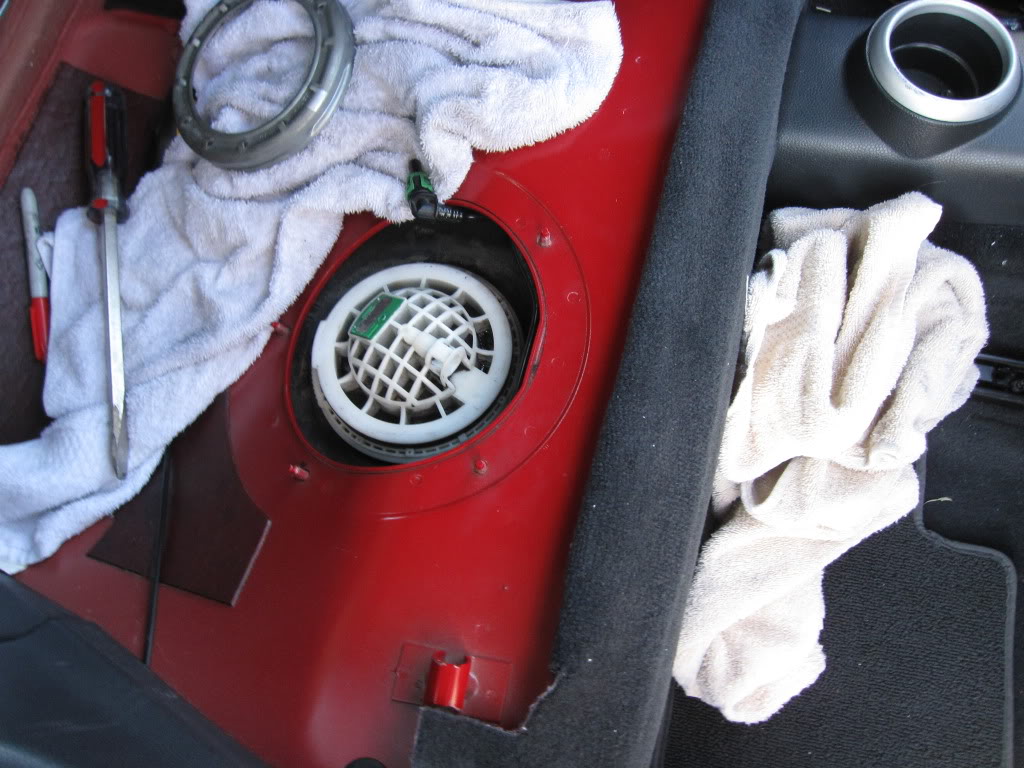
Gently pry up the Entire Sending Unit, Remeber it is sitting in a fuel tank....NO SMOKING PLEASE
http://s294.photobucket.com/albums/m...t=PICT1670.jpg
Gently Lift the unit up about 3-4 inches ONLY, grab the top with one hand and the sides with the other and twist to unlock the top and pull the cap off. It was not easy, and you have to be careful of the various things attached to the bottom part ( sending unit arms and stuff ) Some of it is made of (breakable) plastic and you dont want that stuff falling into your tank !!!! I used a rag wedged in between the unit and the tank edge to help keep it in place.
After separating the top from the bottom, gentley place the bottom back, and remove the top and the filter should come with it. Carefully remove the old filter from the cap and dispose of it immediately in old coffee can or something similar. That black fuel can make a mess.
http://s294.photobucket.com/albums/m...t=PICT1671.jpg
Remove the Large thin O-Ring and using the turkey baister suck the blackish fuel from the inside of the bottom assembly exposing the small O-ring and center post. ( please dispose of this old fuel properly )
)
http://s294.photobucket.com/albums/m...t=PICT1672.jpg
Remove the small O-Ring from the center post with a small hooked tool. Mine was somewhat brittle enough to removed by just picking at it.....But make sure to remove any small pieces that may fall to the bottom of canister.
http://s294.photobucket.com/albums/m...t=PICT1673.jpg
Remove O-Ring from inside of Cap too.
http://s294.photobucket.com/albums/m...t=PICT1674.jpg
Break out the Lube - Cover the new O-rings with a small amount of Vaseline before installing them.
http://s294.photobucket.com/albums/m...t=PICT1675.jpg
This particular Gasket ring has to go in ONLY one way, Make sure you put install this with words " THIS SIDE DOWN " facing down into tank.
http://s294.photobucket.com/albums/m...t=PICT1676.jpg
Pull up Canister from tank a few inches, holding tightly - press the new filter into bottom half with slight twisting motion. Then press the canister cap on the same way and press the two halves of the canister together, and a short twist to lock them together.
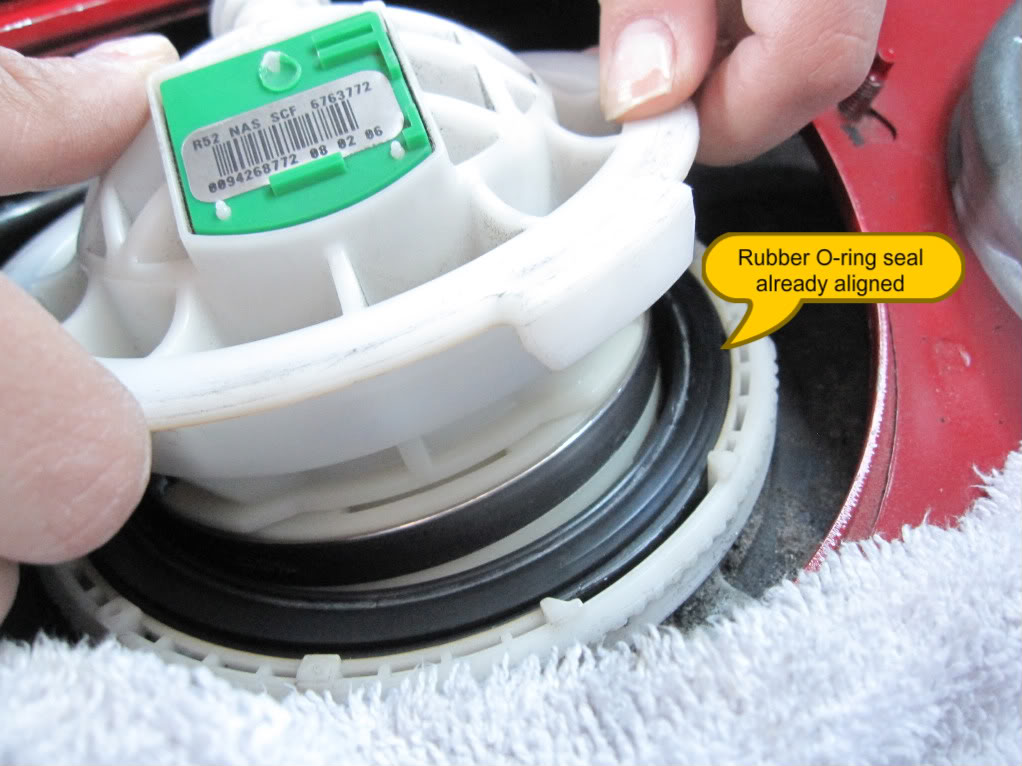
Slide the Gasket seal down ( with words " THIS SIDE DOWN" ) and press into place with your fingers, working them around the assembly until the gasket is flush
http://s294.photobucket.com/albums/m...t=PICT1677.jpg
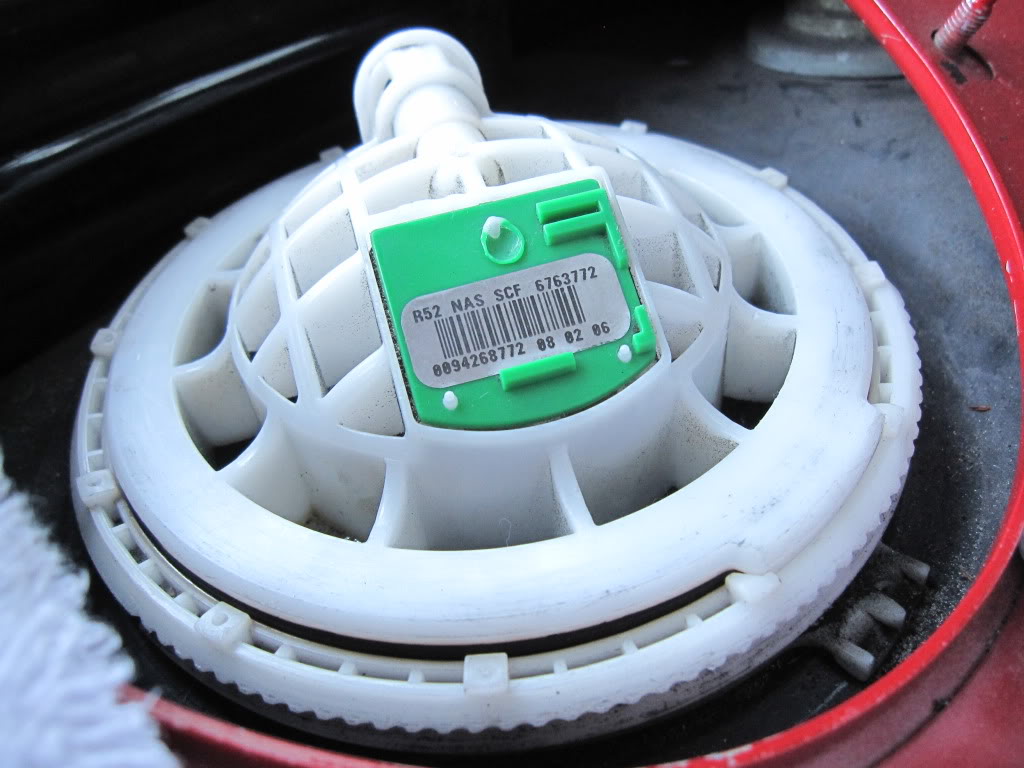
Place the canister in the tank with the lid tab lined up with the tank collar
slot,
http://s294.photobucket.com/albums/m...t=PICT1678.jpg
Twist the metal locking ring back on hand tight, then securely with flat blade screw driver and mallet giving it a few taps to snug it up good ( Do not strip it, it should just snug up about 1 inch further or so
http://s294.photobucket.com/albums/m...t=PICT1681.jpg
Push in the fuel line unitl the green locking tabs snap in place. Refasten the tank cover with the 10mm nuts. Remove plastic covering and duct tape, place a label over the lid with mileage and date of Filter change, secure back seat into place.
http://s294.photobucket.com/albums/m...t=PICT1682.jpg
Place your key in the ignition and turn to positon 2 then to the off position about 5-6 times. This will re-pressurize the fuel system. Then it should start right up. Just for the heck of it, check under your vehicle for the next few days for any leaking fuel from that area. Mine was bone dry, but I was very careful and took my time with everything I did.
This was my first time and I was done in one hour. I should think it could be done in half that time with this experience.
My MCS now starts up first time everymoring as well
1) New Filter and gasket and O Ring kit ( Purchased mine from Atlantic British at Minicarparts.net - for about 38 bucks.
2) 10mm socket
3) flat bladed screw driver
4) rubber mallet or light hammer
5) Small angled hook tool to remove small O-Rings
6) Old (clean) Turkey baister
7) Rags
8) Rubber Gloves
9) Plastic Covering - to Cover the area working to protect from gasoline drips ect.
10) Vaseline
http://s294.photobucket.com/albums/m...t=PICT1662.jpg
The Fuel Filter is located under the back passenger side seating area. You need to pull up the lower portion of the back seat, Front comes straight up, the back releases when it is then pulled forward.
Find the large black Tank Cover lid. Cover the area surrounding it with duct tape and thick plastic. You dont want the inside of your MINI stinking like petrol when we are done.
http://s294.photobucket.com/albums/m...t=PICT1659.jpg
Removed the five 10mm nuts with socket, pry up the panel exposing the top of the entire sending unit. Some Chipmonk left me a gift on mine
Vacuum any debris that is ontop before proceeding.... http://s294.photobucket.com/albums/m...t=PICT1664.jpg
Loosen the Locking Collar Ring with flat bladed screw driver and rubber mallet, gently tapping until the ring moves freely enough to remove by hand.
http://s294.photobucket.com/albums/m...t=PICT1665.jpg
If you are able to remove the ring then proceed to cover the fuel line connector with rags, and press the green side tabs INWARD and pull the connector out. A little petrol will come out under some pressure, but not a big deal.
http://s294.photobucket.com/albums/m...t=PICT1667.jpg
Remove the metal locking ring, and secure the fuel connector aside and out of the way with some duct tape..
http://s294.photobucket.com/albums/m...t=PICT1666.jpg
Gently pry up the Entire Sending Unit, Remeber it is sitting in a fuel tank....NO SMOKING PLEASE
http://s294.photobucket.com/albums/m...t=PICT1670.jpg
Gently Lift the unit up about 3-4 inches ONLY, grab the top with one hand and the sides with the other and twist to unlock the top and pull the cap off. It was not easy, and you have to be careful of the various things attached to the bottom part ( sending unit arms and stuff ) Some of it is made of (breakable) plastic and you dont want that stuff falling into your tank !!!! I used a rag wedged in between the unit and the tank edge to help keep it in place.
After separating the top from the bottom, gentley place the bottom back, and remove the top and the filter should come with it. Carefully remove the old filter from the cap and dispose of it immediately in old coffee can or something similar. That black fuel can make a mess.
http://s294.photobucket.com/albums/m...t=PICT1671.jpg
Remove the Large thin O-Ring and using the turkey baister suck the blackish fuel from the inside of the bottom assembly exposing the small O-ring and center post. ( please dispose of this old fuel properly
)http://s294.photobucket.com/albums/m...t=PICT1672.jpg
Remove the small O-Ring from the center post with a small hooked tool. Mine was somewhat brittle enough to removed by just picking at it.....But make sure to remove any small pieces that may fall to the bottom of canister.
http://s294.photobucket.com/albums/m...t=PICT1673.jpg
Remove O-Ring from inside of Cap too.
http://s294.photobucket.com/albums/m...t=PICT1674.jpg
Break out the Lube - Cover the new O-rings with a small amount of Vaseline before installing them.
http://s294.photobucket.com/albums/m...t=PICT1675.jpg
This particular Gasket ring has to go in ONLY one way, Make sure you put install this with words " THIS SIDE DOWN " facing down into tank.
http://s294.photobucket.com/albums/m...t=PICT1676.jpg
Pull up Canister from tank a few inches, holding tightly - press the new filter into bottom half with slight twisting motion. Then press the canister cap on the same way and press the two halves of the canister together, and a short twist to lock them together.
Slide the Gasket seal down ( with words " THIS SIDE DOWN" ) and press into place with your fingers, working them around the assembly until the gasket is flush
http://s294.photobucket.com/albums/m...t=PICT1677.jpg
Place the canister in the tank with the lid tab lined up with the tank collar
slot,
http://s294.photobucket.com/albums/m...t=PICT1678.jpg
Twist the metal locking ring back on hand tight, then securely with flat blade screw driver and mallet giving it a few taps to snug it up good ( Do not strip it, it should just snug up about 1 inch further or so
http://s294.photobucket.com/albums/m...t=PICT1681.jpg
Push in the fuel line unitl the green locking tabs snap in place. Refasten the tank cover with the 10mm nuts. Remove plastic covering and duct tape, place a label over the lid with mileage and date of Filter change, secure back seat into place.
http://s294.photobucket.com/albums/m...t=PICT1682.jpg
Place your key in the ignition and turn to positon 2 then to the off position about 5-6 times. This will re-pressurize the fuel system. Then it should start right up. Just for the heck of it, check under your vehicle for the next few days for any leaking fuel from that area. Mine was bone dry, but I was very careful and took my time with everything I did.
This was my first time and I was done in one hour. I should think it could be done in half that time with this experience.
My MCS now starts up first time everymoring as well
Eurotrahser, thanks for sharing this! very helpful!
For those having issues putting back the metallic ring, Be sure to FIRST place the O-ring rubber seal aligned with the black plastic lip of the tank, THEN push down the fuel pump all the way down until it is tight... Then putting back the metallic ring is very easy, about two whole twists.


1st Gear
Joined: Dec 2002
Posts: 12
Likes: 0
From: Memphis, Tennessee
My tips:
The second large gasket is for the other fuel tank port. I put mine in a zip-lock baggy for the next time.
I can't imagine BMW using a material that would hold up to Diesel but not petrol.
Be careful not to knock the clip on the side of the canister off. I believe it's a bracket that holds the fuel pick-up in place inside the tank.
Don't button everything up immediately before you start the car. If the car doesn't fire after 4 or 5 cranks, take the canister back out and make sure the filter is fully seated and the o-ring is correctly positioned. The canister lid should make a satisfying feeling seal when locked into place if everything is correct and you should actually hear a strong suction when the pump comes on as you turn the key.
Took me longer than others, but the car definitely feels healthier.
My occasional rough idle seems to be gone and I'm hoping it'll take care of my cold start problem, too.
I don't think MINI took into account the rubbish gas we're getting these days when they didn't recommend replacement of the fuel filter.
