

Removed Clear Bra w/After Pics


Removed Clear Bra w/After Pics

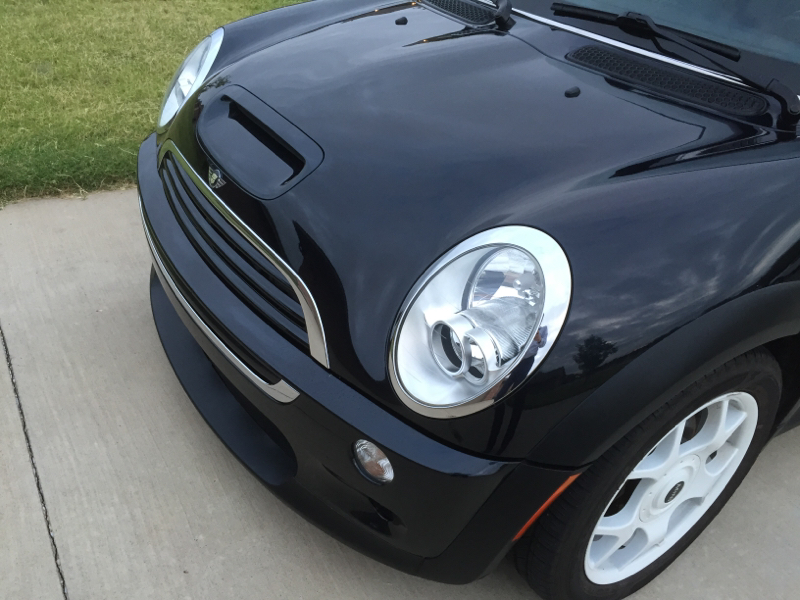
My clear bra had been on my MINI since I bought it new in 2006, but I finally removed it. (I almost waited too long.) It took me a few hours, but it wasn't too bad once I figured out the technique. I tried a hair dryer at first, but it didn't help. (Plus, my wife was not a fan of me taking her hair dryer to the garage. Haha!) The trick is stretching the plastic as you pull it off. This technique leaves zero residue. As I tried to figure this out, I created plenty of residue. I used tea tree oil to remove what little residue there was. The head lights were the worst. They were a mess. Overall, it came off alright. There's a small etch mark across the bonnet. The clear coat came off in a small spot on the door panel, but other than that it was okay. I won't get another clear bra again. I didn't like the way it looked, but it's nice to have clean paint on a car that is almost 10 years old. I will post pics of the final product (after I detailed it). I can also post the YouTube video that helped me with the removal if someone is interested. Here are the pics.
Last edited by MiniSuperCooper; Nov 8, 2015 at 04:44 PM.

2nd Gear
Joined: Jun 2015
Posts: 108
Likes: 0
I'm glad you were able to get yours off. Did you have it on the front bumper as well? Mine came off the hood with no problem, but the ft bumper is a PITA!! It's very brittle and coming off in tiny pieces. I'm almost at the point of where I'm just going to pull the bumper off and take it to a body shop and let them strip and repaint it.
My bumper was easy, but I know what you mean. My hood was the same way. It would come off in tiny pieces. It would break, and I would fall on my bum. I think my hood took more abuse from the sun, and it was very brittle. The job took around 4-5 hours I think, and I spent 3-4 hours on the hood. I finally gave up on the hood. I went to bed and gave my hands a few days to rest before tackling it again. The rest of the car only took an hour or so.
I'm not sure if this will work for you, but I found that I could get bigger pieces if I kept pressure on the plastic. If I gave the plastic any slack in order to get a better grip, it would break as soon as I pulled. (As you're finding out, this is frustrating. My fingers were incredibly sore from this whole process. By the time I finished, it felt like I didn't have any fingerprints left.)
Stretching it doesn't work perfectly, but it works better than anything else I found. I just kept pressure on it and kept it stretched. I worked slowly. It still broke, but I was getting bigger chunks that way. Kind of like this:
I decided to remove my clear bra after I found this video. I feel bad for this guy, and the video makes me cringe. That poor car. I kept my MINI waxed, so I'm guessing that's the only reason mine didn't look like this. I'm so thankful mine wasn't this bad.
I hope everything works out for you. If you get a chance, I'd be interested in knowing how you ended up removing it.
2nd Gear
Joined: Jun 2015
Posts: 108
Likes: 0
I feel your pain, literally! My hood was relatively easy.....heat gun on low setting and slowly just peeled it off. It didn't take me more than about an hr or so.
The bumper on the other hand is just really frustrating. It has little cracks in it where it's become really brittle and it's impossible to get it to come off in bigger pieces. I may need a friend to work the heat gun while I use two hands to strategically pull the bra.
Your post has definitely motivated me again though, for sure! And like you, I'll never do a clear bra again!
My hood was relatively easy.....heat gun on low setting and slowly just peeled it off. It didn't take me more than about an hr or so.The bumper on the other hand is just really frustrating. It has little cracks in it where it's become really brittle and it's impossible to get it to come off in bigger pieces. I may need a friend to work the heat gun while I use two hands to strategically pull the bra.
Your post has definitely motivated me again though, for sure! And like you, I'll never do a clear bra again!
Trending Topics


Wow came out good. Most of the time you will have line from the old to the new paint also some ghosting. Great job.

__________________

MINI Guru/ MINI Owner Since 2004 | NEW Lifetime Part Replacement | Local Pickup
Milltek | Genuine MINI | Forge Motorsport | NM Engineering | ECS Performance | M7 Speed
Customer Service Hours: 8am-8pm EST|Sales Team Hours: 8am-11pm | SAT 10am-7pm 800.924.5172
MINI Guru/ MINI Owner Since 2004 | NEW Lifetime Part Replacement | Local Pickup
Milltek | Genuine MINI | Forge Motorsport | NM Engineering | ECS Performance | M7 Speed
Customer Service Hours: 8am-8pm EST|Sales Team Hours: 8am-11pm | SAT 10am-7pm 800.924.5172
2nd Gear
Joined: Jun 2015
Posts: 108
Likes: 0
However, after being on a vehicle for a number of years, the clear bra can start to deteriorate and crack, becoming pretty unsightly. That was the case with mine at least. At this point, removing them can be a total nightmare. It's just extremely time consuming. I FINALLY got the clear bra off my bumper after about a total of 8-10 hrs of heat gunning, solvents, plastic razors....it was no fun.
Personally, I'd rather just deal with getting minor rock chips over the years and end up re-painting my front bumper at some point. The cost of installing clear bra is more expensive than a repaint on the bumper.

1st Gear
Joined: Jun 2014
Posts: 27
Likes: 0
From: St. Paul, Minnesota
The clear bra definitely does what it's supposed to do-protects the paint from small chips, and from being faded by the sun.
However, after being on a vehicle for a number of years, the clear bra can start to deteriorate and crack, becoming pretty unsightly. That was the case with mine at least. At this point, removing them can be a total nightmare. It's just extremely time consuming. I FINALLY got the clear bra off my bumper after about a total of 8-10 hrs of heat gunning, solvents, plastic razors....it was no fun.
Personally, I'd rather just deal with getting minor rock chips over the years and end up re-painting my front bumper at some point. The cost of installing clear bra is more expensive than a repaint on the bumper.
You will get a little ghost effect , same if you take off the stripes , a little compound and a machine buffer should take out most and blend it. You can see a little in direct sunlight.
__________________
MINI Guru/ MINI Owner Since 2004 | NEW Lifetime Part Replacement | Local Pickup
Milltek | Genuine MINI | Forge Motorsport | NM Engineering | ECS Performance | M7 Speed
Customer Service Hours: 8am-8pm EST|Sales Team Hours: 8am-11pm | SAT 10am-7pm 800.924.5172
MINI Guru/ MINI Owner Since 2004 | NEW Lifetime Part Replacement | Local Pickup
Milltek | Genuine MINI | Forge Motorsport | NM Engineering | ECS Performance | M7 Speed
Customer Service Hours: 8am-8pm EST|Sales Team Hours: 8am-11pm | SAT 10am-7pm 800.924.5172

Thread
Thread Starter
Forum
Replies
Last Post
Alpha Motoring
MINI Parts for Sale
3
Nov 10, 2015 07:08 AM
newminijcw
MINIs & Minis for Sale
9
Oct 21, 2015 02:37 PM
patsum
MINI Parts for Sale
3
Oct 1, 2015 06:33 AM