

How to repair side skirt damage?


Thread Starter
|
3rd Gear
Joined: Mar 2006
Posts: 249
Likes: 0
How to repair side skirt damage?
Sorry for the repost, I posted this in the first gen mini int/ext mod section but then thought it would get more attention here. So here is the link to the other thread:
https://www.northamericanmotoring.co...d.php?t=135668
The summary of it is that I need some advice on how to repair this:

https://www.northamericanmotoring.co...d.php?t=135668
The summary of it is that I need some advice on how to repair this:

2nd Gear
Joined: Jan 2006
Posts: 149
Likes: 0
From: Tampa, FL
Man, at first I thought someone was posting a picture of my car, I have very similar damage to my driver's side skirt. :(
I am planning on replacing the whole thing because I did not know if it could be repaired.
I am planning on replacing the whole thing because I did not know if it could be repaired.
Thread Starter
|
3rd Gear
Joined: Mar 2006
Posts: 249
Likes: 0
I'm confident that with the right set of materials, tools, time, and determination, that I can repair this myself and get it fairly close to hidden.
What I'm thinking is that I'll remove the entire skirt, clean it up really nice, and epoxy it together as clean as possible. Then, I will use some CR touch-up paint in an airbrush or something to make the lines dissapear.
If anyone has any better ideas, advice from experience, let me know.
Treed, have you received a quote on the cost of replacing the entire piece?


6th Gear
Joined: Sep 2007
Posts: 1,342
Likes: 4
From: Youngsville, NC, USA
A lot of people on my CRX site use a plastic welder
from harbor frieght (fenders, doors, bumpers, etc are plastic
and prone to cracks).
You have to figure out what type of plastic it is too.
I'm not sure if harbor frieght has the complete selection of
welding rods. I've seen kits on ebay where there are a variety
of rods, or rods and the welder.
You need compressed air source to run the thing.
Once you weld it back, you fill in a little with bondo, sand
and paint.
Although you might be able to get away with some type of glue
applied with a toothpick to the crack, and touch up paint.
NOTE: you weld this thing from the backside, not the front.
Very good results have been obtained doing the above.
The epoxy method has not worked well (not saying it wont in
your case) for me. I ended up just buying new fenders.
Coordinator :: Eastern Iowa MINIs
iTrader: (1)
Joined: Aug 2007
Posts: 1,163
Likes: 1
From: Round Rock, TX
if I remember right the replacement side skirt is $75 plus shippiing then paint so like $200 complete or so. I dont know if your going to be able to repair hidden but just throwing the number out there as an FYI.
Please lets see pictures when complete!!
Please lets see pictures when complete!!
6th Gear
Joined: Sep 2007
Posts: 1,342
Likes: 4
From: Youngsville, NC, USA
If you are on the ultra budget
you could try:
1. take the thing off,
2. use masking tape, the blue kind works best
and tape it from the front side making sure to
cover the cracks well.
3. from the backside, take #80 sandpaper and
really rough it up, then clean with a strong
solvent like xylene (be very careful to not get this
on the paint part). Then take one of those fiberglass
repair kits (available at car parts store) and fiberglass
the whole back side. You'll want to use the whole kit.
Making it like 1/4 inch deep, with the fiberglass mesh too.
All the way to the rear and maybe 6-8 inches toward the front.
NOTE: Do not put too much on at one time it will get too hot
and melt the plastic.
When it is completely dry take off the tape and
you can use a razor blade to scratch off the little
fiberglass line bump where the crack was.
I have had decent success this way (still ended up replacing
the part when I painted again).
You really have to use overkill on body panels. They undergo
a lot of stress, and, not much glue/epoxy/whatever sticks to them
well at all.
But after thinking about it if you are looking for a $20 fix, that
is your best bet.
Trending Topics
Thread Starter
|
3rd Gear
Joined: Mar 2006
Posts: 249
Likes: 0
I'm not on the "ultra" budget, just don't want to spend $800 to repair something that shouldn't have ever happened... :(
Anyway, I took the skirt off and discovered it is PUR GF 20 (whatever that means). The PUR part is PolyUrethaneResin. I am trying to get my hands on one of these as we speak:
http://www.urethanesupply.com/5600ht.php
They are actually ~$150 + shipping and would be handy to have around. The set comes with PUR welding rod, so that should do it. I'll keep you all posted.
Thread Starter
|
3rd Gear
Joined: Mar 2006
Posts: 249
Likes: 0
Read this thread I started here:
http://www.eng-tips.com/viewthread.cfm?qid=214279
Will be interesting to see if this PUR is thermoplastic or thermoset. I hope I don't get attacked by cyanide gas!!!
http://www.eng-tips.com/viewthread.cfm?qid=214279
Will be interesting to see if this PUR is thermoplastic or thermoset. I hope I don't get attacked by cyanide gas!!!
Thread Starter
|
3rd Gear
Joined: Mar 2006
Posts: 249
Likes: 0
Thanks for the tip on Minspeed. I spoke with Pete, very nice guy. He's gotta get me an actual number tomorrow, but his unpainted part price was very reasonable. I may not need that plastic welder after all for this job, though I am stoked I'll have it anyway for stuff :D (I'm gonna attempt the repair regardless)


Thread Starter
|
3rd Gear
Joined: Mar 2006
Posts: 249
Likes: 0
Well, I got the plastic welder today. Very cool. I found out that PUR used in automotive is generally thermoset, which cannot be welded with heat. However, I followed the instructions for the thermoset by cutting a v-groove in the back with a Dremel, and "glueing" the parts together using urethane "rod." I'll tell you what, it works.
Unfortunately, I didn't have an extra set of hands so the pieces aren't mated up properly. The cracks are more visible than I'd like, so I'm going to wait till my wife gets home from her work trip in a few days and tear it apart. I'll have her hold it together for me while I do the "welding."
It seems quite sturdy, and because the "glue" is actualy polyurethane, the joints are flexible and sturdy. This may work out afterall.
Hey Treed, do you have a picture of your damaged panel?
2nd Gear
Joined: Jan 2006
Posts: 149
Likes: 0
From: Tampa, FL
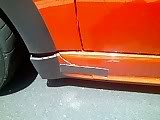
Here's a crappy cell phone pic. There's a piece of black gorilla glue tape on the crack. Once the crack gets to the bottom, it goes along the black/red 'seam' for a few more inches. :(
I should hopefully have my new piece tomorrow. *fingers crossed *
I should hopefully have my new piece tomorrow. *fingers crossed *
Thread Starter
|
3rd Gear
Joined: Mar 2006
Posts: 249
Likes: 0
Hmm, does't look too bad, much less to repair than mine. Ship it to me!
So hey! My wife and I worked together (she was the jig lol) to weld these pieces back together. I think we did a fantastic job. I only welded the backside, as opposed to both sides as the instructions said, but I want to preserve the paint and I think it'll be good enough. We shall see.
I'm going to have to get some new clips for attachment, and some touch-up in CR to cover the cracks. I'll post a pic when its done.
Last edited by succubus; Apr 17, 2008 at 05:16 PM.

Thread
Thread Starter
Forum
Replies
Last Post
cm.d
1st Gen Countryman (R60) Talk (2010-2015)
4
Aug 19, 2015 08:51 AM
Minibeagle
Stock Problems/Issues
6
Aug 13, 2015 10:00 AM