
F55/F56 Hardwiring in the F56


Thread Starter
|
2nd Gear
Joined: Mar 2012
Posts: 93
Likes: 15
From: Austin, Texas
Hardwiring in the F56 DIY
Hi guys,
I made a little write up from when I hardwired my dashcam. The same would apply for a radar detector. Let me know if you guys find any errors or have any questions. You'll want to download the PDF for the best image quality. Thanks for looking!
-J.T.
-->Click here for the PDF<--
I made a little write up from when I hardwired my dashcam. The same would apply for a radar detector. Let me know if you guys find any errors or have any questions. You'll want to download the PDF for the best image quality. Thanks for looking!
-J.T.
-->Click here for the PDF<--
Last edited by glucklich21; Jul 11, 2014 at 01:45 PM.

Very thorough write-up with excellent pictures.
The only change I could suggest is an explicit warning in the A pillar cover removal (and reinstallation) to be cautious of the airbag behind this pillar.
Given that this is a guide to wiring changes, perhaps it is a given to have disconnected the battery, but a lot of instructions that deal with panels where there are airbags call for the battery to be disconnected before removing said panels.
But again, well done, and thanks for posting!

Thread Starter
|
2nd Gear
Joined: Mar 2012
Posts: 93
Likes: 15
From: Austin, Texas
Very thorough write-up with excellent pictures.
The only change I could suggest is an explicit warning in the A pillar cover removal (and reinstallation) to be cautious of the airbag behind this pillar.
Given that this is a guide to wiring changes, perhaps it is a given to have disconnected the battery, but a lot of instructions that deal with panels where there are airbags call for the battery to be disconnected before removing said panels.
But again, well done, and thanks for posting!
The only change I could suggest is an explicit warning in the A pillar cover removal (and reinstallation) to be cautious of the airbag behind this pillar.
Given that this is a guide to wiring changes, perhaps it is a given to have disconnected the battery, but a lot of instructions that deal with panels where there are airbags call for the battery to be disconnected before removing said panels.
But again, well done, and thanks for posting!
Thanks!
Glad I could help!

This is great stuff Gluck. Good Work!
We need these in a separate folder. "How To's" or something like that!
We need these in a separate folder. "How To's" or something like that!
Trending Topics

Thread Starter
|
2nd Gear
Joined: Mar 2012
Posts: 93
Likes: 15
From: Austin, Texas
I got mine from my local O'Reilly's. Amazon also carries them.
Danke. I'm curious when we are going to get our appropriate sections.
I got mine from my local O'Reilly's. Amazon also carries them.
Amazon.com: Bussmann (BP/HHH-RP) ATM Mini Circuit Converter: Automotive
I got mine from my local O'Reilly's. Amazon also carries them.
Amazon.com: Bussmann (BP/HHH-RP) ATM Mini Circuit Converter: Automotive
Thread Starter
|
2nd Gear
Joined: Mar 2012
Posts: 93
Likes: 15
From: Austin, Texas
I found while installing my driving lights this weekend that there's a threaded powersource on the backside of the fuse box. It will require the removal of the glovebox and undoing a clip that holds the fuse box in place, but totally worth it over using fuse taps.
Also worth mentioning, look at the color of the majority of the wires coming out of the fuse box. Red is constant power, green is ignition, and intermediate purple is switched. Explains why I had such a problem finding a switched fuse.
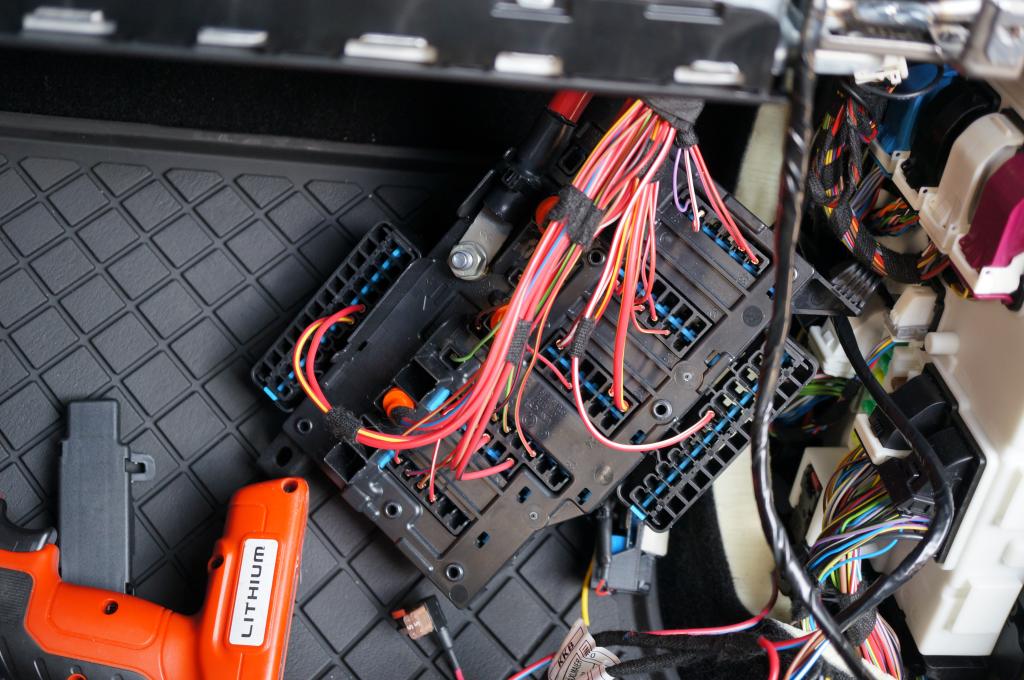
Also worth mentioning, look at the color of the majority of the wires coming out of the fuse box. Red is constant power, green is ignition, and intermediate purple is switched. Explains why I had such a problem finding a switched fuse.

3rd Gear
Joined: Aug 2014
Posts: 193
Likes: 1
I was hard-wiring my Valentine-1 last night and kept wondering why every circuit (that ordinarily...) should be switched was in fact, still hot. Fuse 52 was the only one I could really find that actually was switched like normal.
I am not 100% on this but I suspect that because of the whole "auto start"-thing, a bunch of these cricuits need to remain hot in order for that to work.
The hardwire job went fine once I tapped into Pos. 52. Thanks for your very helpful DIY on this.

1st Gear
Joined: Jul 2014
Posts: 21
Likes: 0
Is there no way to tap into a dome light wire?
https://www.northamericanmotoring.co...ew-mirror.html
These seems much more difficult.
https://www.northamericanmotoring.co...ew-mirror.html
These seems much more difficult.
Thread Starter
|
2nd Gear
Joined: Mar 2012
Posts: 93
Likes: 15
From: Austin, Texas
+1 ^^^^
I was hard-wiring my Valentine-1 last night and kept wondering why every circuit (that ordinarily...) should be switched was in fact, still hot. Fuse 52 was the only one I could really find that actually was switched like normal.
I am not 100% on this but I suspect that because of the whole "auto start"-thing, a bunch of these cricuits need to remain hot in order for that to work.
The hardwire job went fine once I tapped into Pos. 52. Thanks for your very helpful DIY on this.
Is there no way to tap into a dome light wire?
https://www.northamericanmotoring.co...ew-mirror.html
These seems much more difficult.
https://www.northamericanmotoring.co...ew-mirror.html
These seems much more difficult.


2nd Gear
Joined: Mar 2016
Posts: 143
Likes: 15
From: Atlanta, GA
That was an awesome guide! I got stuck trying to hardwire my dashcam. I couldn't figure out to how route the wire down the a-pillar to the fusebox. Your guide helped me figure it out and I have it working now.


Well done, really like the step by step.  Post in the "how to" 100% agree
Post in the "how to" 100% agree
__________________

MINI Guru/ MINI Owner Since 2004 | NEW Lifetime Part Replacement | Local Pickup
Milltek | Genuine MINI | Forge Motorsport | NM Engineering | ECS Performance | M7 Speed
Customer Service Hours: 8am-8pm EST|Sales Team Hours: 8am-11pm | SAT 10am-7pm 800.924.5172
MINI Guru/ MINI Owner Since 2004 | NEW Lifetime Part Replacement | Local Pickup
Milltek | Genuine MINI | Forge Motorsport | NM Engineering | ECS Performance | M7 Speed
Customer Service Hours: 8am-8pm EST|Sales Team Hours: 8am-11pm | SAT 10am-7pm 800.924.5172

Great guide. I didn't hardwire my dashcam but hid the power line as much as I could along this general route. The line is tucked inside the headliner along the windshield, wrapped around the top of the A pillar, then re-tucked inside the rubber weather stripping running down to the floorboard area. The remaining wire is stashed in some space behind the glovebox and then connected to the central cigarette lighter. Works well enough for me, and it's 95% hidden except for the lighter and the 5-inch A-pillar piece.
I tried initially suctioning the dashcam onto the dotted area at the top of the windshield (like the guide) but while driving it quickly fell off, I think because of the lack of suction to the actual glass. I moved the suction cup to attach to all glass and it hasn't moved a single time. Has anybody else successfully been able to keep their dashcam mounted on that dotted area?
I tried initially suctioning the dashcam onto the dotted area at the top of the windshield (like the guide) but while driving it quickly fell off, I think because of the lack of suction to the actual glass. I moved the suction cup to attach to all glass and it hasn't moved a single time. Has anybody else successfully been able to keep their dashcam mounted on that dotted area?

1st Gear
Joined: Mar 2017
Posts: 15
Likes: 0
Hi, I can't seem to reinstall the door sill trim... Could someone please tell me how it is supposed to go back into the clips? Should it be pushed in (by force) or slide in (from the side)? Any tips or instructions would be muchly appreciated. Thanks!
It is easier the 2nd time!
2nd Gear
Joined: Mar 2016
Posts: 143
Likes: 15
From: Atlanta, GA
Be careful when reinstalling the door sill trim. You'll want to align the pointed end of the white clips properly with the holes when you push on the door sill trim. If you don't align the clips correctly, you'll end up bending the white clips. They're hard to straighten out and then you'll spend more time aligning the clips with the holes.
1st Gear
Joined: Mar 2017
Posts: 15
Likes: 0
Thank you Gregory and aabcds! I finally managed to put everything back together! Not knowing whether to slide or push was only half of the problem; the other half is I didn't remove the lower kick panel. YMMV but for me it was impossible to slide the clips back on until I removed the lower kick panel.
Neutral
Joined: Sep 2006
Posts: 3
Likes: 0
I have a question about what can be wired to that tap. I'm not very satisfied with the options on the market for dash cams that have two cameras for recording front and back, so I was thinking that I might just go ahead and use two stand-alone dash cams. One in the front, and one in the back. I have a Garmin up front right now and I'm going to transfer that over to my F56 once it's delivered. I have the hardwire kit for it. My question is: could I use two hardwire kits on the same fuse for automatic power on? Would there be any negative effects? Also, since this guide is from back when the F56 was new, has anything changed for the 2019 F56?
Thanks in advance for any replies!
Thanks in advance for any replies!