
Drivetrain installed engine damper, what do you guys think....


 are you going to sell those in volume?
The discussion is here...
https://www.northamericanmotoring.co...ad.php?t=89687
that a straight mount to some motor mount part?

looks like partsman shot it down for me though... lol
 sorry
sorry

4th Gear
Joined: Feb 2003
Posts: 502
Likes: 0
From: Grand Rapids, Michigan
Kenchan,
I still think that this will help isolate the movement. The OEM engine suspension isolates using the big rubber isolator attached to the frame on 02 and 03's. There are stiffer rubber bushings that people buy that help lessen the engine movement. I think that with the attachment to this bolt, that this will do the same.
I will do some more research and I will let you know what I find.

6th Gear
Joined: Jun 2004
Posts: 1,216
Likes: 17
Arly, I'd like to hear what you think of the damper itself. This whole time I see you talking about brackets but I haven't seen anything about whether or not you can tell a difference in the ride.
Of course to properly A/B it I would suggest using both type of brackets (i.e. mine and yours) on the same car to do a comparison.
Like Partsman said, connecting the damper to an area that already has a rubber bushing defeats the purpose and/or reduces its efficiency.
Thumbs up on coming up with your own solution. Waiting to hear your comments on the ride.
4th Gear
Joined: Feb 2003
Posts: 502
Likes: 0
From: Grand Rapids, Michigan
LOTF,
I could not mount it in the original position because I have an 02 MCS. I also did not want to eliminate one of my 2 OCC's. So I looked for another answer. I would buy your brackets, but I wanted to see if I could find another way. I will attach your damper with my brackets and see if I feel an improvement. I will see if I can replace the rubber bushing with a solid piece of aluminum. That might be the solution?? Or maybe tie into my OCC bracket that attaches to the engine bolt?
I could not mount it in the original position because I have an 02 MCS. I also did not want to eliminate one of my 2 OCC's. So I looked for another answer. I would buy your brackets, but I wanted to see if I could find another way. I will attach your damper with my brackets and see if I feel an improvement. I will see if I can replace the rubber bushing with a solid piece of aluminum. That might be the solution?? Or maybe tie into my OCC bracket that attaches to the engine bolt?
6th Gear
Joined: Jun 2004
Posts: 1,216
Likes: 17
LOTF,
I could not mount it in the original position because I have an 02 MCS. I also did not want to eliminate one of my 2 OCC's. So I looked for another answer. I would buy your brackets, but I wanted to see if I could find another way. I will attach your damper with my brackets and see if I feel an improvement. I will see if I can replace the rubber bushing with a solid piece of aluminum. That might be the solution??
I could not mount it in the original position because I have an 02 MCS. I also did not want to eliminate one of my 2 OCC's. So I looked for another answer. I would buy your brackets, but I wanted to see if I could find another way. I will attach your damper with my brackets and see if I feel an improvement. I will see if I can replace the rubber bushing with a solid piece of aluminum. That might be the solution??
4th Gear
Joined: Feb 2003
Posts: 502
Likes: 0
From: Grand Rapids, Michigan
Thanks,
Another thing to measure is the travel that this damper will have. I think I will tie a tie wrap around the shaft of the damper and see how much it travels during operation. This will tell me the effectiveness of my setup. If it moves then I know that it is working.
Another thing to measure is the travel that this damper will have. I think I will tie a tie wrap around the shaft of the damper and see how much it travels during operation. This will tell me the effectiveness of my setup. If it moves then I know that it is working.
6th Gear
Joined: Jun 2004
Posts: 1,216
Likes: 17
Thanks,
Another thing to measure is the travel that this damper will have. I think I will tie a tie wrap around the shaft of the damper and see how much it travels during operation. This will tell me the effectiveness of my setup. If it moves then I know that it is working.
Another thing to measure is the travel that this damper will have. I think I will tie a tie wrap around the shaft of the damper and see how much it travels during operation. This will tell me the effectiveness of my setup. If it moves then I know that it is working.


4th Gear
Joined: Feb 2003
Posts: 502
Likes: 0
From: Grand Rapids, Michigan
So where I am attaching my damper will reinforce the oem damper/engine suspension? This will make the engine not move as much then. I am trying to see if partman's observation of my bracket location is as bad as he is trying to give others. I know he said that the damper will be not as effective because of the rubber bushing. However that bolt is torqued pretty high I remember (80-100 ft lbs). I am wondering how much movement is actually occurring at that location? I will investigate this and report.
So where I am attaching my damper will reinforce the oem damper/engine suspension? This will make the engine not move as much then. I am trying to see if partman's observation of my bracket location is as bad as he is trying to give others. I know he said that the damper will be not as effective because of the rubber bushing. However that bolt is torqued pretty high I remember (80-100 ft lbs). I am wondering how much movement is actually occurring at that location? I will investigate this and report.
I just don't think it will be as effective as the direct connection(w/no brackets) or as effective as Shoe's bracket setup.
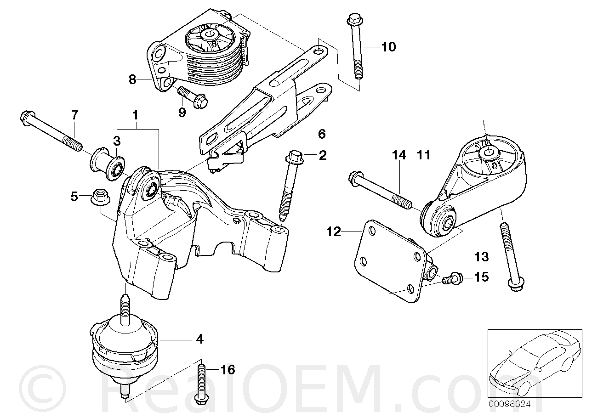
You are using a bolt that is rubber bushed in two places, at #3 and #8...
To get the most effect out of the damper, it needs to be mounted solidly to the engine or to something that is mounted solidly to the engine.
I'm not saying that your setup will not work, i'm just saying it will not be as effective.
I think your brackets look great, and I applaud you for fabbing them yourself.
4th Gear
Joined: Feb 2003
Posts: 502
Likes: 0
From: Grand Rapids, Michigan
partsman,
I understand your point. I looked at this also on real oem.com. With the other end of the damper solidly attached to the frame at the front, I am essentially stiffening the oem engine suspension. I located my brackets in the only place I could since I had the OCC in the area that shoe had with his brackets. And since I have an 02, I could not place it in the original location without doing some grinding. I suggested to shoe that I might look into adding a solid bushing where the rubber is now and I should get the same effect as what you suggest. Well see. Thanks for the input as well. This is the type of dicussion that should occur here at NAM.
I understand your point. I looked at this also on real oem.com. With the other end of the damper solidly attached to the frame at the front, I am essentially stiffening the oem engine suspension. I located my brackets in the only place I could since I had the OCC in the area that shoe had with his brackets. And since I have an 02, I could not place it in the original location without doing some grinding. I suggested to shoe that I might look into adding a solid bushing where the rubber is now and I should get the same effect as what you suggest. Well see. Thanks for the input as well. This is the type of dicussion that should occur here at NAM.
6th Gear
Joined: Jun 2004
Posts: 1,216
Likes: 17
partsman,
I understand your point. I looked at this also on real oem.com. With the other end of the damper solidly attached to the frame at the front, I am essentially stiffening the oem engine suspension. I located my brackets in the only place I could since I had the OCC in the area that shoe had with his brackets. And since I have an 02, I could not place it in the original location without doing some grinding. I suggested to shoe that I might look into adding a solid bushing where the rubber is now and I should get the same effect as what you suggest. Well see. Thanks for the input as well. This is the type of dicussion that should occur here at NAM.
I understand your point. I looked at this also on real oem.com. With the other end of the damper solidly attached to the frame at the front, I am essentially stiffening the oem engine suspension. I located my brackets in the only place I could since I had the OCC in the area that shoe had with his brackets. And since I have an 02, I could not place it in the original location without doing some grinding. I suggested to shoe that I might look into adding a solid bushing where the rubber is now and I should get the same effect as what you suggest. Well see. Thanks for the input as well. This is the type of dicussion that should occur here at NAM.
Mine is attached to the of the passenger side cowl vent partitionand it works really well there. Cleaning it requires that I take it off the brackets but only adds a few minutes to the procedure.
Here's the pic:


Originally Posted by Arly
I located my brackets in the only place I could since I had the OCC in the area that shoe had with his brackets. And since I have an 02, I could not place it in the original location without doing some grinding. I suggested to shoe that I might look into adding a solid bushing where the rubber is now and I should get the same effect as what you suggest. Well see. Thanks for the input as well. This is the type of dicussion that should occur here at NAM.
I also understand that you needed a mount where you didn't have to move the OCC.
I think the solid bushing will help with the effectiveness of the damper, just make sure the bolt fits in there snug with no play.
Please try it first with the rubber bushing and let us know how it feels.
shoe- you got bigger issues... those TEIN's are making your coolant
spill out even out of the 'revised' bottle. 
also, can you still get to the oil filter with that catch can there? oh?!
hehe, just playin'.
spill out even out of the 'revised' bottle.
also, can you still get to the oil filter with that catch can there? oh?!
hehe, just playin'.
6th Gear
Joined: Jun 2004
Posts: 1,216
Likes: 17
6th Gear
Joined: Jun 2006
Posts: 5,692
Likes: 2
Grrr... mounted the damper too close to the belt tensioner, and the tensioner rubbed a bare patch in the blue shaft after a brief test drive. Doh! So, of COURSE I dropped both bolts into the depths of the Black Lagoon Engine Bay while trying to finagle the thing out to add the second bell washer. Double-doh!
You should have seen me trying to dislodge the bolts by using the old "hard acceleration, hard stop" trick. needless to say, the engine bay isn't giving up its prize that easily (sigh)...

You should have seen me trying to dislodge the bolts by using the old "hard acceleration, hard stop" trick. needless to say, the engine bay isn't giving up its prize that easily (sigh)...

Grrr... mounted the damper too close to the belt tensioner, and the tensioner rubbed a bare patch in the blue shaft after a brief test drive. Doh! So, of COURSE I dropped both bolts into the depths of the Black Lagoon Engine Bay while trying to finagle the thing out to add the second bell washer. Double-doh!
You should have seen me trying to dislodge the bolts by using the old "hard acceleration, hard stop" trick. needless to say, the engine bay isn't giving up its prize that easily (sigh)...
You should have seen me trying to dislodge the bolts by using the old "hard acceleration, hard stop" trick. needless to say, the engine bay isn't giving up its prize that easily (sigh)...
You can also put your telescoping magnet up there(from underneath) and try to snag them.
6th Gear
Joined: Jun 2006
Posts: 5,692
Likes: 2
Tapping didn't work but I can try going from underneath... It's too tight to get under there, though without jacking up the car (at least for me). Shoe sent me the specs for the bolts in case I have to get a new set...

Don't feel bad Matt, I dropped mine not once but four times during the install. I ended up just taking that plastic air dam piece off under the front bumper. After that every time I dropped the bolt or the nut or the bolt and nut or my wrench or my flashlight, they just fell right though to the ground.