
Drivetrain Has anyone installed intercooler muffler delete?


Be very careful if you make your own delete pipe. If you paint it, the paint will get doft due to heat and the tubes will slip off under boost. I wouldn't paint where the tubes will be clamped. Also, you'll need to score the pipe where the tubes will be clamped and use nothing less than T-bolt clamps. Having the tubes come of at night with no tools to fix it is a *****.

4th Gear
Joined: Aug 2009
Posts: 468
Likes: 2
i didn't notice any power loss . mabye because mine is just a muffler delete but the rest of the piping is stock size, as opposed to the NM, Forge etc which are all bigger pipes. prob same reason I didn't notice any gain either.

1st Gear
Joined: Aug 2011
Posts: 29
Likes: 0
Im considering this pre cooler pipe instead of a strait pipe
http://www.siliconeintakes.com/produ...e64ac1a56f7d95
Thoughts ?
http://www.siliconeintakes.com/produ...e64ac1a56f7d95
Thoughts ?

2nd Gear
Joined: Aug 2009
Posts: 121
Likes: 0
From: Philly
Im considering this pre cooler pipe instead of a strait pipe
http://www.siliconeintakes.com/produ...e64ac1a56f7d95
Thoughts ?
http://www.siliconeintakes.com/produ...e64ac1a56f7d95
Thoughts ?


be very careful if you make your own delete pipe. If you paint it, the paint will get doft due to heat and the tubes will slip off under boost. I wouldn't paint where the tubes will be clamped. Also, you'll need to score the pipe where the tubes will be clamped and use nothing less than t-bolt clamps. Having the tubes come of at night with no tools to fix it is a *****.

Thanks for the idea! I just made my own the other night and painted it black as well. What did you use to flare the ends? (Sorry, someone had to ask haha..) I had some time trying to fit the 2" pipe back in the rubber hoses, they are pretty snug! I can't imagine trying to fit it with a flare on the ends.

1st Gear
Joined: Aug 2012
Posts: 12
Likes: 0
Just did the delete with an 8" piece of hose. The hose clamps were not all the way tightened down the first time and blew the hose off. Drove home about a mile and made the repair. Now I have a check engine light that is staying on, any ideas and how can I get it to go off?


2nd Gear
Joined: Aug 2012
Posts: 110
Likes: 0
From: McHenry, Illinois
I bought the pipe that Bschuh66 posted about. I like the idea of the heat sink rather than just a straight pipe. Tried to install it last night, but ran into issues with the dreaded t25 bolt. The car ate the first socket i tried
 , I'm sure I'll find it when I eventually take the front bumper off to put in an intercooler. Quick trip to Autozone for another one. Still couldn't get it
 . I'll have to go to my dad's house today and grab some of my proper tools and try again tonight.
Tried to install it last night, but ran into issues with the dreaded t25 bolt. The car ate the first socket i tried, I'm sure I'll find it when I eventually take the front bumper off to put in an intercooler. Quick trip to Autozone for another one. Still couldn't get it. I'll have to go to my dad's house today and grab some of my proper tools and try again tonight.
2nd Gear
Joined: Aug 2012
Posts: 110
Likes: 0
From: McHenry, Illinois
Ok....attempt #2.
http://flic.kr/p/dpScMb
I moved the bottle out of the way with a 10mm socket
http://www.flickr.com/photos/89506085@N05/8146320787/
and went after the fabled Bolt of the Sixteen Hells
http://www.flickr.com/photos/89506085@N05/8146354078/
T25 socket with a 4 inch extension and, TAA DAA!
http://www.flickr.com/photos/89506085@N05/8146319963/
I loosened the clamp on the turbo and reached under the front to get the clamp at the intercooler. I had to use a 7mm wrench to get the bottom one because it's a tight spot. Next I pulled the ends free and removed the whole thing through the bottom
http://www.flickr.com/photos/89506085@N05/8146353228/
After that it was like 1..
http://www.flickr.com/photos/89506085@N05/8146319171/
2...
http://www.flickr.com/photos/89506085@N05/8146318869/
3...
http://www.flickr.com/photos/89506085@N05/8146352184/
And reinstall from the top
http://www.flickr.com/photos/89506085@N05/8146318281/
I went for a drive and i could tell a difference. The turbo was a bit louder and it seemed to have a little more pep. Not monumental, but something. $48 with shipping. IMO it's a better buy than anything else on the market for this mod. I thought about the $5 pipe route, but i figured it was worth the extra for the heat sink. Anyway, I hope this helps someone....
Last edited by Lazlo10S; Nov 19, 2012 at 10:00 PM. Reason: photo problem
Well being that the muffler has a perforated chamber inside of the larger housing, it gives the air from the turbo room to expand and slow down, creating a slight loss in boost and bit of lag in throttle response. Granted its not much, but in theory I definitely see how it would be slightly restrictive.

5th Gear
Joined: Jul 2011
Posts: 1,025
Likes: 2
From: Los Angeles
Well being that the muffler has a perforated chamber inside of the larger housing, it gives the air from the turbo room to expand and slow down, creating a slight loss in boost and bit of lag in throttle response. Granted its not much, but in theory I definitely see how it would be slightly restrictive.
Just a thought, just because so many people are so quick to drop money on over priced tubes. I could be totally wrong here.
Last edited by NewCooperFanatic; Dec 25, 2012 at 07:20 PM.
Hmm.......I was just thinking maybe it acted like a golf ball. The dimples on a golf ball help reduce drag to aid in flying further. So my thought was that perhaps the chamber did the same thing.
Just a thought, just because so many people are so quick to drop money on over priced tubes.
Just a thought, just because so many people are so quick to drop money on over priced tubes.
5th Gear
Joined: Jul 2011
Posts: 1,025
Likes: 2
From: Los Angeles
i definitely see where you're coming from, however the inner chamber of the muffler is indeed lined with holes rather than dimples which allows the air to expand past the initial diameter of the inner pipe. And the DIY IC muffler delete costs less than $10, and for that there's almost no reason not to do it lol. I have one, it works great
Thanks again.
Happy Holidays folks!

3rd Gear
Joined: Aug 2009
Posts: 168
Likes: 0
I'm in the process of making a home made muffler delete. One suggestion on getting the T25 bolt out. I was fiddling with it from the top, since I didn't have the car raised. I spent about 15 minutes with an angled wrench, until I realized I have a flexible bit extension. Screw came out quickly after that.
1st Gear
Joined: Aug 2012
Posts: 11
Likes: 0
From: GA, USA
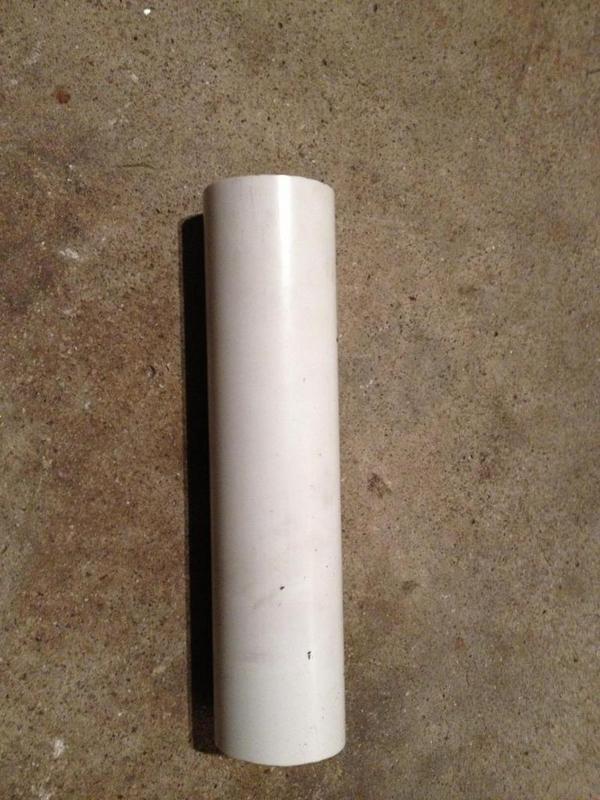
so i spent 30 minutes and $3. coming from a honda kid that likes the engine bay to look less stock, removing of anything is a plus for me! here is what i did...
NOTE... this upgrade does not show any sign of power increase and minimal sound enhancement. to achieve such results, as listed prior, intercooler, intake, and exhaust systems would need to be upgraded.
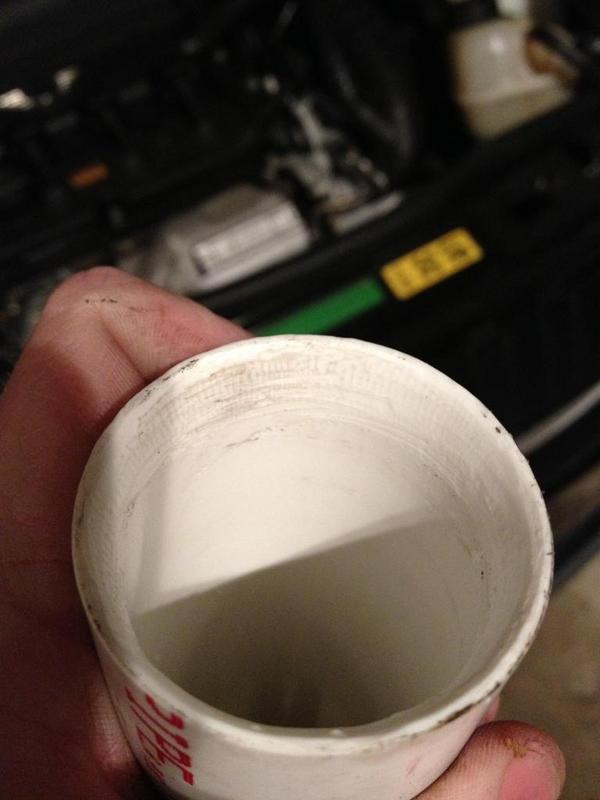
this is the tapper i did to promote better airflow
NOTE... this upgrade does not show any sign of power increase and minimal sound enhancement. to achieve such results, as listed prior, intercooler, intake, and exhaust systems would need to be upgraded.
- go to "Home Depot" and head to the plumbing section.
- find the precut PVC 1-1/4". they are all cut to 24". i used the saw they have available to make additional cuts to cut it into 3, 8" sections.
- head to checkout, the part is listed for $2.70 and you only pay for one.
- after removal, very simple if you have a 7mm, 8mm, T20 sockets, 6"< extension, flex tip, drill, and floor jack.
- raise car on driver side. remove bolt from radiator overflow container and carefully position it out of the way. loosen hose clamp at turbo. use T20, flex tip, and extension to remove mounting bolt.
- pull from hose the top to get it out of the engine bay. then loosen hose clamp below muffler delete.
- for best results, tapper both ends of the pipe with a dremmel tool. be sure to remove all debri before installing
- attach upper tube to PVC, attach upper tube to turbo, secure radiator overflow container, attach pvc to lower tube, lower car. DONE!!!
this is the tapper i did to promote better airflow


Ok....attempt #2.
http://flic.kr/p/dpScMb
I moved the bottle out of the way with a 10mm socket
http://www.flickr.com/photos/89506085@N05/8146320787/
and went after the fabled Bolt of the Sixteen Hells
http://www.flickr.com/photos/89506085@N05/8146354078/
T25 socket with a 4 inch extension and, TAA DAA!
http://www.flickr.com/photos/89506085@N05/8146319963/
I loosened the clamp on the turbo and reached under the front to get the clamp at the intercooler. I had to use a 7mm wrench to get the bottom one because it's a tight spot. Next I pulled the ends free and removed the whole thing through the bottom
http://www.flickr.com/photos/89506085@N05/8146353228/
After that it was like 1..
http://www.flickr.com/photos/89506085@N05/8146319171/
2...
http://www.flickr.com/photos/89506085@N05/8146318869/
3...
http://www.flickr.com/photos/89506085@N05/8146352184/
And reinstall from the top
http://www.flickr.com/photos/89506085@N05/8146318281/
I went for a drive and i could tell a difference. The turbo was a bit louder and it seemed to have a little more pep. Not monumental, but something. $48 with shipping. IMO it's a better buy than anything else on the market for this mod. I thought about the $5 pipe route, but i figured it was worth the extra for the heat sink. Anyway, I hope this helps someone....
http://flic.kr/p/dpScMb
I moved the bottle out of the way with a 10mm socket
http://www.flickr.com/photos/89506085@N05/8146320787/
and went after the fabled Bolt of the Sixteen Hells
http://www.flickr.com/photos/89506085@N05/8146354078/
T25 socket with a 4 inch extension and, TAA DAA!
http://www.flickr.com/photos/89506085@N05/8146319963/
I loosened the clamp on the turbo and reached under the front to get the clamp at the intercooler. I had to use a 7mm wrench to get the bottom one because it's a tight spot. Next I pulled the ends free and removed the whole thing through the bottom
http://www.flickr.com/photos/89506085@N05/8146353228/
After that it was like 1..
http://www.flickr.com/photos/89506085@N05/8146319171/
2...
http://www.flickr.com/photos/89506085@N05/8146318869/
3...
http://www.flickr.com/photos/89506085@N05/8146352184/
And reinstall from the top
http://www.flickr.com/photos/89506085@N05/8146318281/
I went for a drive and i could tell a difference. The turbo was a bit louder and it seemed to have a little more pep. Not monumental, but something. $48 with shipping. IMO it's a better buy than anything else on the market for this mod. I thought about the $5 pipe route, but i figured it was worth the extra for the heat sink. Anyway, I hope this helps someone....
2nd Gear
Joined: Aug 2012
Posts: 110
Likes: 0
From: McHenry, Illinois
I'm glad I could help. I hope it works out. Actually I have a small update on that. There is an access hole in the front cross member to get at the clamp on the bottom hose in the intercooler. If I had done this on a lift, I would have found it. Not sure if it's the same on the CM, but there you go. Good luck and motor on....


