
Multi-lamp driving lights installed! Anyone want a How-to?


Thread Starter
|
6th Gear
Joined: Jun 2006
Posts: 5,692
Likes: 2
Multi-lamp driving lights installed! Anyone want a How-to?
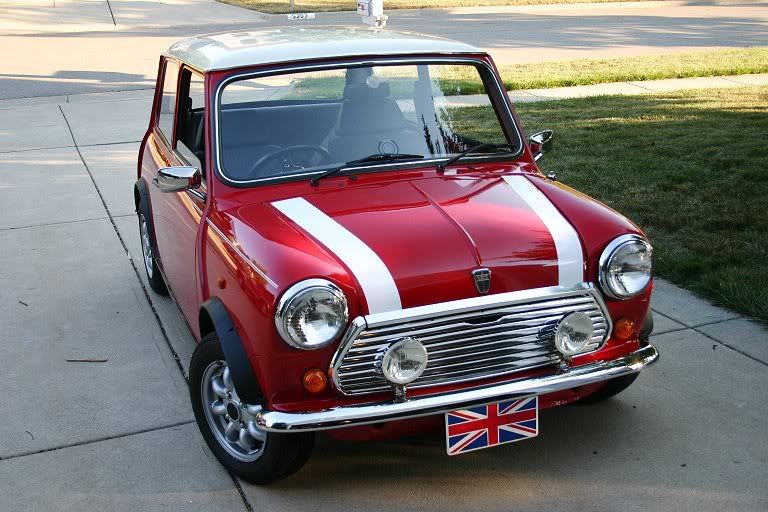
I got my driving lamps installed finally!
Before (a pair were installed when I bought the car, but only worked intermittantly - plus they were fused with a PAIR of 20A fuses, which was far too high for the application):
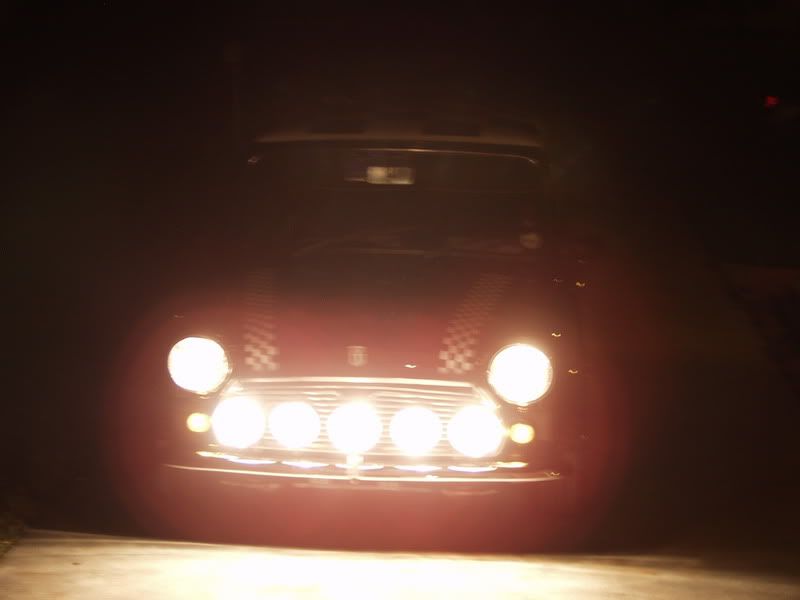
After!

I hooked these up so that:
* They are operatable via switch independently from the main/high beams
* They are drinven by a 40A relay, which assures that the switch will not be overdriven (read as: melted by) too much voltage
* They are only operatable if the ignition is switched on (prevents the operator from accidentally leaving the lamps on if they walk away from the car
* They are independently fused with the proper fuse - no danger of stressing the main fuse panel
* The lights are wired into the rear fog switch in the OEM toggle bank. This switch, which is illuminated, serves to notify the operator that the lamps are on. Since I do not have a rear fog installed, the switch was doing nothing and this way I don't have to install a separate switch.
I took some photos as I was working, just in case anyone wanted a How-to - does anyone? Driving lamps aren't exactly high-tech but they are an electrical mod and so should be done properly, and the instructions that come with aftermarket lights tend to be a bit spare. For instance, Wipac's (the manufacturer's) instructions indicate to not bother using a separate fuse because, and I quote: "the relay serves the purpose of a fuse", which is just crazy...
If there's interest, I can write it up, covering the bracket installation, relay wiring and switch wiring as well as proper lamp aiming and everyhting else...
Before (a pair were installed when I bought the car, but only worked intermittantly - plus they were fused with a PAIR of 20A fuses, which was far too high for the application):
After!
I hooked these up so that:
* They are operatable via switch independently from the main/high beams
* They are drinven by a 40A relay, which assures that the switch will not be overdriven (read as: melted by) too much voltage
* They are only operatable if the ignition is switched on (prevents the operator from accidentally leaving the lamps on if they walk away from the car
* They are independently fused with the proper fuse - no danger of stressing the main fuse panel
* The lights are wired into the rear fog switch in the OEM toggle bank. This switch, which is illuminated, serves to notify the operator that the lamps are on. Since I do not have a rear fog installed, the switch was doing nothing and this way I don't have to install a separate switch.
I took some photos as I was working, just in case anyone wanted a How-to - does anyone? Driving lamps aren't exactly high-tech but they are an electrical mod and so should be done properly, and the instructions that come with aftermarket lights tend to be a bit spare. For instance, Wipac's (the manufacturer's) instructions indicate to not bother using a separate fuse because, and I quote: "the relay serves the purpose of a fuse", which is just crazy...
If there's interest, I can write it up, covering the bracket installation, relay wiring and switch wiring as well as proper lamp aiming and everyhting else...
Last edited by ImagoX; Aug 5, 2007 at 06:57 PM.
6th Gear
Joined: Jul 2006
Posts: 1,284
Likes: 1
From: St. Petersburg, Florida
should have jammed one more in there like my old car......looks great.....glad to see you finally with a classic......took ya long enough....lol

Last edited by Big Norm; Aug 5, 2007 at 06:34 PM.
6th Gear
Joined: Jul 2006
Posts: 1,284
Likes: 1
From: St. Petersburg, Florida
wipers........didn't know that the mini's ever came with "working" wipers......
tell you what, not only did 5 driving lamps improve visability it also looked like something out of a Steven King book while driving down the road
tell you what, not only did 5 driving lamps improve visability it also looked like something out of a Steven King book while driving down the road
Thread Starter
|
6th Gear
Joined: Jun 2006
Posts: 5,692
Likes: 2

And yeah, "just" having 4 really REALLY helped driving home from Dayton.... Lights up the road quite a bit.

4th Gear
Joined: Dec 2004
Posts: 337
Likes: 0
From: Pelham AL
Looks great! I wonder if the added load is an issue for the alternator? I can't say what the rating of mine is, but I need to check that out at some point.
Trending Topics
6th Gear
Joined: Jul 2006
Posts: 1,284
Likes: 1
From: St. Petersburg, Florida
yeah mine worked "kinda".......i had one speed......SLOW.....rainX was my solutuin........anyways......car is looking great.....keep up the nice mods
Thread Starter
|
6th Gear
Joined: Jun 2006
Posts: 5,692
Likes: 2
I ran mine for 2+ hours last night as well as the main beams and the car started right up in the morning. It should be OK - lots of people add 4 driving lamps plus ALSO upgrade the main beams to 110V xenons. I think you only run into alternator issues if you put in something like a massive sound system with a 500 watt amp or something - those babies really can suck down the juice...
6th Gear
Joined: Jul 2006
Posts: 1,284
Likes: 1
From: St. Petersburg, Florida
never had a prob with mine either........figure when i drove with all....it was a total of 7 headlamp.......


That is such a great look Matt. I really debated whether to mention this or not, so don't take it the wrong way, but have you noticed ... (how can I put this delicately?) ... well it seems that, um ... well it's just that from my perspective, and I may be wrong since I don't own a Mini, not that they aren't great looking little cars and all, but your ... well your, I'm just gonna come right out and say it, because you have help me with so many things like the gauge face install, and how to remove the mirror caps, and you're a fellow detailer and Prima user, I just feel like if nobody else is going to point this out that I should, because you are such a great member of the MINI & Mini community, and keep in mind that this in no way diminishes the respect I have for you and your great cars look, besides you are a published author and you have a right for straight talk so here it is ... I just happen to notice that, well your steering wheel is on the wrong side. Oh man, I'm sorry I just blurted that out but gosh it is so obvious from the photo.
Sorry dude.
Nice Mini!
Sorry dude.
Nice Mini!

6th Gear
Joined: Jul 2006
Posts: 5,782
Likes: 0
From: San Diego, Ca
That is such a great look Matt. I really debated whether to mention this or not, so don't take it the wrong way, but have you noticed ... (how can I put this delicately?) ... well it seems that, um ... well it's just that from my perspective, and I may be wrong since I don't own a Mini, not that they aren't great looking little cars and all, but your ... well your, I'm just gonna come right out and say it, because you have help me with so many things like the gauge face install, and how to remove the mirror caps, and you're a fellow detailer and Prima user, I just feel like if nobody else is going to point this out that I should, because you are such a great member of the MINI & Mini community, and keep in mind that this in no way diminishes the respect I have for you and your great cars look, besides you are a published author and you have a right for straight talk so here it is ... I just happen to notice that, well your steering wheel is on the wrong side. Oh man, I'm sorry I just blurted that out but gosh it is so obvious from the photo.
Sorry dude.
Nice Mini!
Sorry dude.
Nice Mini!

It's a stunning mini, Matt.


6th Gear
Joined: Dec 2002
Posts: 1,539
Likes: 0
That is such a great look Matt. I really debated whether to mention this or not, so don't take it the wrong way, but have you noticed ... (how can I put this delicately?) ... well it seems that, um ... well it's just that from my perspective, and I may be wrong since I don't own a Mini, not that they aren't great looking little cars and all, but your ... well your, I'm just gonna come right out and say it, because you have help me with so many things like the gauge face install, and how to remove the mirror caps, and you're a fellow detailer and Prima user, I just feel like if nobody else is going to point this out that I should, because you are such a great member of the MINI & Mini community, and keep in mind that this in no way diminishes the respect I have for you and your great cars look, besides you are a published author and you have a right for straight talk so here it is ... I just happen to notice that, well your steering wheel is on the wrong side. Oh man, I'm sorry I just blurted that out but gosh it is so obvious from the photo.
Sorry dude.
Nice Mini!
Sorry dude.
Nice Mini!

Thread Starter
|
6th Gear
Joined: Jun 2006
Posts: 5,692
Likes: 2
That is such a great look Matt. I really debated whether to mention this or not, so don't take it the wrong way, but have you noticed ... (how can I put this delicately?) ... well it seems that, um ... well it's just that from my perspective, and I may be wrong since I don't own a Mini, not that they aren't great looking little cars and all, but your ... well your, I'm just gonna come right out and say it, because you have help me with so many things like the gauge face install, and how to remove the mirror caps, and you're a fellow detailer and Prima user, I just feel like if nobody else is going to point this out that I should, because you are such a great member of the MINI & Mini community, and keep in mind that this in no way diminishes the respect I have for you and your great cars look, besides you are a published author and you have a right for straight talk so here it is ... I just happen to notice that, well your steering wheel is on the wrong side. Oh man, I'm sorry I just blurted that out but gosh it is so obvious from the photo.
Sorry dude.
Nice Mini!
Sorry dude.
Nice Mini!

1st Gear
Joined: May 2007
Posts: 29
Likes: 0
From: Phoenix, AZ
Secret? 
There is one other thing to consider, possibly a future upgrade to your lighting installation or more correctly an upgrade to your wiring configuration. When I installed the set of four dirving lights on my car I added an extra relay and trigger wire to the setup to allow some additional control to the lighting system.
The #1 control relay supplies power to the outside pair of lights, and is triggered by the fog light switch as you have chosen. These lights are aimed low and wide for better close range lighting, and also more visibility into approaching curves.
The #2 control relay supplies power to the inner pair of driving lights, and is triggered by the high beam power supply wire. This pair of lights is aimed straight and about 2deg off parallel of the road surface, great for long range lighting when driving at speed, and due to the fact that they operate in conjunction with my high beams, I can delete them as needed without having to reach for another switch.
Both relays are connected to the battery supply by 10ga power wire and have 12ga wire and in-line 20a fuses connecting the relays to the driving lights. I am using a stock alternator and 800cca Optima battery, which provides power to the entire vehicle, the driving lights, and a 1150 watt sound system. The only other upgrade to the power/charging system has been the addition of a pair of 1 Farad stiffening capacitors, which act as a reserve high demand power source for the audio system.
Thread Starter
|
6th Gear
Joined: Jun 2006
Posts: 5,692
Likes: 2
Secret?
There is one other thing to consider, possibly a future upgrade to your lighting installation or more correctly an upgrade to your wiring configuration. When I installed the set of four dirving lights on my car I added an extra relay and trigger wire to the setup to allow some additional control to the lighting system.
There is one other thing to consider, possibly a future upgrade to your lighting installation or more correctly an upgrade to your wiring configuration. When I installed the set of four dirving lights on my car I added an extra relay and trigger wire to the setup to allow some additional control to the lighting system.
The #1 control relay supplies power to the outside pair of lights, and is triggered by the fog light switch as you have chosen. These lights are aimed low and wide for better close range lighting, and also more visibility into approaching curves.
The #2 control relay supplies power to the inner pair of driving lights, and is triggered by the high beam power supply wire. This pair of lights is aimed straight and about 2deg off parallel of the road surface, great for long range lighting when driving at speed, and due to the fact that they operate in conjunction with my high beams, I can delete them as needed without having to reach for another switch.
The #2 control relay supplies power to the inner pair of driving lights, and is triggered by the high beam power supply wire. This pair of lights is aimed straight and about 2deg off parallel of the road surface, great for long range lighting when driving at speed, and due to the fact that they operate in conjunction with my high beams, I can delete them as needed without having to reach for another switch.
Both relays are connected to the battery supply by 10ga power wire and have 12ga wire and in-line 20a fuses connecting the relays to the driving lights. I am using a stock alternator and 800cca Optima battery, which provides power to the entire vehicle, the driving lights, and a 1150 watt sound system. The only other upgrade to the power/charging system has been the addition of a pair of 1 Farad stiffening capacitors, which act as a reserve high demand power source for the audio system.
Watts / Volts = Amps
So if I assume you're running a pair of 55W lamps per fuse:
110W / 12V = 9.16A (so a 10A fuse will do you).
If you run 4 lamps on a single circuit, it's:
220W / 12V = 18.3A (so use a single 20A fuse for all 4).
With my setup, I purchased 20A and 25A fuses, just in case the 20A unit did not give me enough "overhead" to safely run all 4, but so far the 20A is handling the load with no issues. That said, 20A per pair is still less current than the melting point of your thick wiring (I used 14 gauge wire on my circuit since that's what my relay wiring harness used), but you really should use the smallest fuse that you can for whatever load you expect to create.
I'll put all of this in my How-to - fusing and such is simple once you get a grasp of the basics.
Last edited by ImagoX; Aug 6, 2007 at 08:32 AM.

Coordinator :: Sin City MINI Club & AMVIV
Joined: Aug 2002
Posts: 4,587
Likes: 1
From: Las Vegas
Since no-one has resonded with a "yes" yet, yes please. I would absolutely like access to your "how to" for rally light installation on a classic.
My only concern about adding 4 or 5 lights in front of the grille is the reduced airflow over the engine during the moderately warm Las Vegas summers.
My only concern about adding 4 or 5 lights in front of the grille is the reduced airflow over the engine during the moderately warm Las Vegas summers.

Thread Starter
|
6th Gear
Joined: Jun 2006
Posts: 5,692
Likes: 2
Since no-one has resonded with a "yes" yet, yes please. I would absolutely like access to your "how to" for rally light installation on a classic.
My only concern about adding 4 or 5 lights in front of the grille is the reduced airflow over the engine during the moderately warm Las Vegas summers.
My only concern about adding 4 or 5 lights in front of the grille is the reduced airflow over the engine during the moderately warm Las Vegas summers.

As for blocking air flow through the front grille: I worried about that as well and read a ton of stuff on the cooling system and learned that because most classic Minis have the side-mounted radiator, airflow through the grille is minimal to the cooling equation. Everything I've read on Mini tuning sites say that if you want the maximum ammount of cooling from a side-mounted radiator setup to install a shroud system that seals the radiator and fan assembly to the side wing. Extra lamps in front of the grille shuold not affect this setup to any noticible degree, UNLESS you did the front radiator conversion or unless you have something extra like an oil cooler radiator mounted in the front grille....
Now, there are cabin fresh air vents and such that face into the front grille, but I can say with 100% certainty that adding 4 lights has not diminished the volume of air through those vents in the slightest...
Last edited by ImagoX; Aug 6, 2007 at 11:05 AM.
1st Gear
Joined: May 2007
Posts: 29
Likes: 0
From: Phoenix, AZ
Hmmmm...
So what I am understanding from your lengthy comments is that you understand the basics of electrical mathematics, but not the actual application of the calculations performed.
So you have each PAIR of lights on a 20A fuse? If so, that's way too high. The calculation for amps is:
Watts / Volts = Amps
So if I assume you're running a pair of 55W lamps per fuse:
110W / 12V = 9.16A (so a 10A fuse will do you).
If you run 4 lamps on a single circuit, it's:
220W / 12V = 18.3A (so use a single 20A fuse for all 4).
With my setup, I purchased 20A and 25A fuses, just in case the 20A unit did not give me enough "overhead" to safely run all 4, but so far the 20A is handling the load with no issues. That said, 20A per pair is still less current than the melting point of your thick wiring (I used 14 gauge wire on my circuit since that's what my relay wiring harness used), but you really should use the smallest fuse that you can for whatever load you expect to create.
I'll put all of this in my How-to - fusing and such is simple once you get a grasp of the basics.
Thread Starter
|
6th Gear
Joined: Jun 2006
Posts: 5,692
Likes: 2
How so? If I have something wrong please tell me - that would be useful information to have...
If you know something I have wrong please share that info. I'm certainly not a licensed electronics installer, nor do I claim to be. I do however have a set of driving lights installed in my Mini using fuses that are well below the failure point of my wire, and the lamps are working. My understanding is that if the rating of the fuse is lower then the melting point of your wire then you're good to go - what do you know that I don't?
If you know something I have wrong please share that info. I'm certainly not a licensed electronics installer, nor do I claim to be. I do however have a set of driving lights installed in my Mini using fuses that are well below the failure point of my wire, and the lamps are working. My understanding is that if the rating of the fuse is lower then the melting point of your wire then you're good to go - what do you know that I don't?
Last edited by ImagoX; Aug 6, 2007 at 09:35 PM.

Hey Argo - are you running the 6 bladed "Tropical" fan? That plus say, a heater matrix from another car up front as a 2nd rad would probably do ya just fine. Then again it gets pretty damn hot over there! Maybe tropical fan, hi performance radiator, electric fan on the other side of the rad, AND the heater core.
