When you click on links to various merchants on this site and make a purchase, this can result in this site earning a commission. Affiliate programs and affiliations include, but are not limited to, the eBay Partner Network.
As I was finally deciding to pull the trigger on the JCW brakes, Sneed announced their piston upgrade kit. (here: http://www.sneed4speed.com/r56-jcw-b...n-upgrade-kit/ ) I go to the track a few times a year and know how hot the brakes can get, so I didn't like the idea of the stock plastic brake components. It made sense to install the upgraded pistons in the calipers before putting the calipers on the car and save the work and hassle of doing it later so I ordered the kit. Yes this is overkill for a mostly daily driver but it makes me happy and I know I'll never have to worry about the plastic bits failing.
Sneed's instructions are pretty simple and brief, it really is easy but there are a few tricks I figured out that might not be obvious if you're doing this for the first time. This also shows how to do a rebuild of the piston seals, pistons, and dust boots so it is useful even if you're not upgrading the pistons.
Step 1: Here's a brand new JCW caliper, it comes with the pads pre-installed. If you're rebuilding an installed caliper you'll need to remove it from the car. Use a punch to tap out the pad retaining pins, then remove the spring clip and pads.
Step 2: Remove the dust boots. There is a little hole at the edge of each boot where you can insert a pick and pry out the boot.
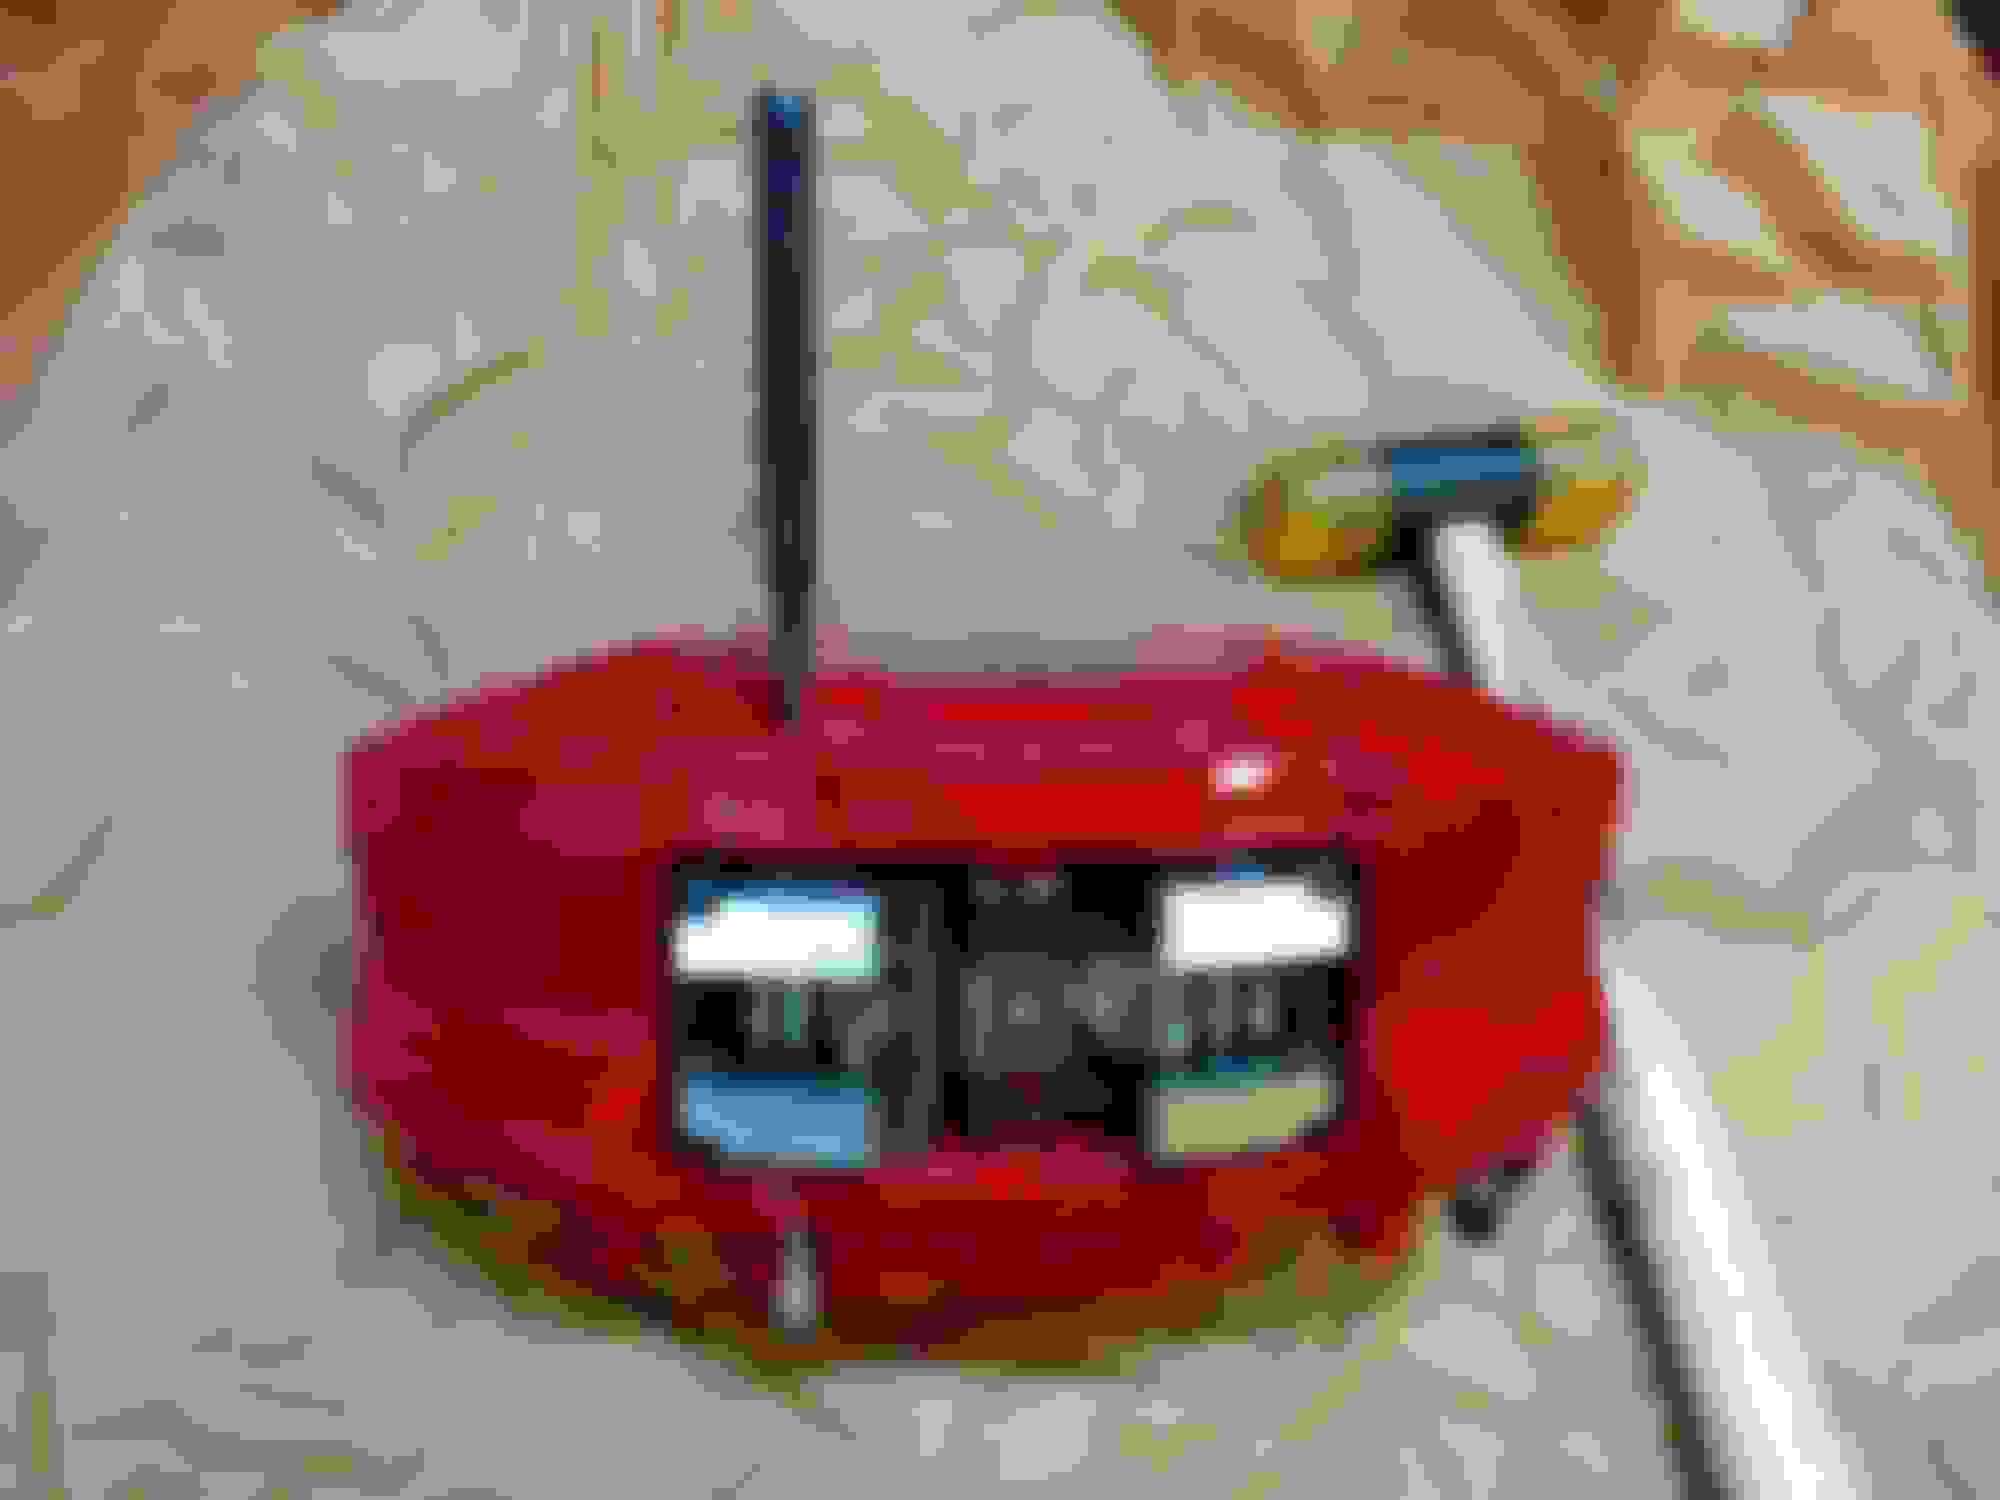
Step 3: Put a block of wood in between the pistons (I used a scrap of 2x4) and use compressed air to push out the pistons. The wood block prevents the pistons from coming all the way out, so you get all 4 out part way. Grab the top of each piston with your fingers and pull all the way out. Note the plastic tops of the stock pistons.
If you try to push out the pistons without removing the dust boots and using a block, then one piston will pop all the way out through the dust boot, tearing it in the process and leaving the other pistons fully seated. I learned this the hard way. The solution was to take out the dust boot, replace the piston, and use the block so the pistons would all come out evenly.
Caution: If you are doing this with calipers that had been in use, first drain as much brake fluid as possible from the caliper, then be wary of residual brake fluid spraying when applying compressed air. Safety glasses and covering everything with a rag are recommended. Using the wood block to pop out all 4 pistons evenly will prevent a big mess.
Step 4: use an appropriate tool to remove the piston seals, be careful not to scratch the cylinder walls. I used a very thin metal blade, a plastic tool would be safer.
Here's a side by side comparison of the OEM vs. Sneed pistons, seals, and dust boots. The OEM piston is a hollow cylinder with a plastic top that contacts the brake pad. The Sneed piston is solid stainless steel. The OEM is very light, 2.2oz vs. 7.4oz for the Sneed (64gm vs. 214gm if you prefer metric), but plastic? The Sneed pistons add some unsprung mass at each wheel but I can live with that.
Step 5: lube the new seals with brake fluid and install in the cylinders, then insert the new pistons. Don't push the pistons down all the way, leave the tops up a little bit to make it easy to install the new dust boots. Add the new dust boots, then press the pistons down all the way and press the dust boots into the recess around each piston.
Finished:
Install the caliper on the car, connect the brake lines, and bleed the brake system. I found the ECS Tuning pressure bleeder and catch bottle made the process fast, easy, and no mess - a couple of tools that I am really happy I purchased and highly recommend.
Time to schedule another track day to try out the new brakes.
Last edited by squawSkiBum; Aug 28, 2015 at 08:02 AM.
Thanks Chris! I need to order some Carbotech pads from you soon.
Nice write up. Do you know if there is a kit for the bigger JCW GP2 Brakes?
Also, just one tiny correction - the added mass of the stainless steel versus the plastic is actually sprung weight, not unsprung. Not that it matters either way since is so miniscule anyway.
Unsprung weight is everything that is not supported by the suspension, that includes the tire, wheels, brake rotor, brake caliper, pads, wheel bearing, etc. Sprung weight is the rest of the car.
The weight difference I posted is per piston, so the total difference per wheel is 4x or about 1.25lb. Tire + wheel + rotor + caliper is probably about 100lb so you're right it isn't a big difference anyway. But it would be nice if the pistons were hollow for reduced mass. Chris - any comment on that?
I think I saw a kit somewhere for the GP calipers, might have been racingbrake.com.
You're right, I had a brain fart...
I'll check out that site. Thanks!
Does anyone know if the front GP2 brake calipers use the same type of plastic/steel pistons as the 4 piston JCW Brembos? For some reason, I thought the GP2 calipers had different type pistons. I believe the front GP2 6 piston, Brembo made calipers are off the BMW 1 series sport brakes.
We tried the 135 pistons and they are not the same as the 4 piston JCW Brembos pistons but do work for the 6 piston GP calipers.
We looked at hollowing the center of the pistons but when you do that the brake pressure then pushes on the inside side walls as well as the end of the piston. This causes the piston to grow if it's cut to thin and by the time we made the hole small enough to insure it wouldn't expand the weight saving wasn't enough to off set the cost of additional machining. Plus with the added dynamic of heat in the brake system and everything expanding at different rates we thought it best to just keep a straight push on the back of the piston to insure it would not stick in the caliper and cause a brake pad over heat problem.
Also about the high temperature brake dust seals. You just need to be careful with them and try to keep brake fluid off of them. Once the caliper is assembled brake fluid will never touch them because it doesn't go passed the piston seals. If you were bleeding the brakes and some fluid got on them they'll be OK just clean it off with brake clean. They also tear easily so don't use pointy objects to install them.
We tried the 135 pistons and they are not the same as the 4 piston JCW Brembos pistons but do work for the 6 piston GP calipers.
We looked at hollowing the center of the pistons but when you do that the brake pressure then pushes on the inside side walls as well as the end of the piston. This causes the piston to grow if it's cut to thin and by the time we made the hole small enough to insure it wouldn't expand the weight saving wasn't enough to off set the cost of additional machining. Plus with the added dynamic of heat in the brake system and everything expanding at different rates we thought it best to just keep a straight push on the back of the piston to insure it would not stick in the caliper and cause a brake pad over heat problem.
Ok, a little confused - are the RB 135 pistons the way to go for JCW GP2 or use the same pistons as the JCW 4 piston calipers per GEMSTER above?
Do you Sneed Speedway sell the kit?
Ah, nevermind. I see GEMSTER posted a link to the 135 pistons.
Is is there a stainless option for the stock �s� calipers?
Originally Posted by squawSkiBum
As I was finally deciding to pull the trigger on the JCW brakes, Sneed announced their piston upgrade kit. (here: http://www.sneed4speed.com/r56-jcw-b...n-upgrade-kit/ ) I go to the track a few times a year and know how hot the brakes can get, so I didn't like the idea of the stock plastic brake components. It made sense to install the upgraded pistons in the calipers before putting the calipers on the car and save the work and hassle of doing it later so I ordered the kit. Yes this is overkill for a mostly daily driver but it makes me happy and I know I'll never have to worry about the plastic bits failing.
Sneed's instructions are pretty simple and brief, it really is easy but there are a few tricks I figured out that might not be obvious if you're doing this for the first time. This also shows how to do a rebuild of the piston seals, pistons, and dust boots so it is useful even if you're not upgrading the pistons.
Step 1: Here's a brand new JCW caliper, it comes with the pads pre-installed. If you're rebuilding an installed caliper you'll need to remove it from the car. Use a punch to tap out the pad retaining pins, then remove the spring clip and pads.
Step 2: Remove the dust boots. There is a little hole at the edge of each boot where you can insert a pick and pry out the boot.
Step 3: Put a block of wood in between the pistons (I used a scrap of 2x4) and use compressed air to push out the pistons. The wood block prevents the pistons from coming all the way out, so you get all 4 out part way. Grab the top of each piston with your fingers and pull all the way out. Note the plastic tops of the stock pistons.
If you try to push out the pistons without removing the dust boots and using a block, then one piston will pop all the way out through the dust boot, tearing it in the process and leaving the other pistons fully seated. I learned this the hard way. The solution was to take out the dust boot, replace the piston, and use the block so the pistons would all come out evenly.
Caution: If you are doing this with calipers that had been in use, first drain as much brake fluid as possible from the caliper, then be wary of residual brake fluid spraying when applying compressed air. Safety glasses and covering everything with a rag are recommended. Using the wood block to pop out all 4 pistons evenly will prevent a big mess.
Step 4: use an appropriate tool to remove the piston seals, be careful not to scratch the cylinder walls. I used a very thin metal blade, a plastic tool would be safer.
Here's a side by side comparison of the OEM vs. Sneed pistons, seals, and dust boots. The OEM piston is a hollow cylinder with a plastic top that contacts the brake pad. The Sneed piston is solid stainless steel. The OEM is very light, 2.2oz vs. 7.4oz for the Sneed (64gm vs. 214gm if you prefer metric), but plastic? The Sneed pistons add some unsprung mass at each wheel but I can live with that.
Step 5: lube the new seals with brake fluid and install in the cylinders, then insert the new pistons. Don't push the pistons down all the way, leave the tops up a little bit to make it easy to install the new dust boots. Add the new dust boots, then press the pistons down all the way and press the dust boots into the recess around each piston.
Finished:
Install the caliper on the car, connect the brake lines, and bleed the brake system. I found the ECS Tuning pressure bleeder and catch bottle made the process fast, easy, and no mess - a couple of tools that I am really happy I purchased and highly recommend.
Time to schedule another track day to try out the new brakes.
This is a very detailed upgrade post on the JCW brake calipers with pictures with outlined do's and don't.
I just checked the sneed4speed website and don't see the brake caliper piston set. I see the dust seals and gasket just not the pistons
I guess I have to physically call them and check.