
Suspension BC coilovers installed (how-to & feedback)


Ryephile helped me with the sizing. I ordered them from Evasive Motorsports and they were $357. Here is the sizing info:
Fronts - Freelength 152mm, diameter 65mm, 8kgmm
Backs - Freelength 178mm, diameter 65mm, 6kgmm
After another day of driving they're just getting better and I can see why race teams use these springs.
One note...I was doing a wheel change for autocross last month and noticed the two rear rubber boots were torn. I called BC in Orlando and they said they had redesigned those boots. They sent me out a replacement pair and I had them in about two days. I put them on when the springs went on. So you might want to give them a call if your boots are torn.

Funny you should mention the boots tearing. I had the same thing happen to mine. I called Cliff at Coast2Coast and he got me a new set from BC. I was going to swap them out if and when I changed to Swift springs. If not then as soon as it warms up here.

Ryephile helped me with the sizing. I ordered them from Evasive Motorsports and they were $357. Here is the sizing info:
Fronts - Freelength 152mm, diameter 65mm, 8kgmm
Backs - Freelength 178mm, diameter 65mm, 6kgmm
After another day of driving they're just getting better and I can see why race teams use these springs.
One note...I was doing a wheel change for autocross last month and noticed the two rear rubber boots were torn. I called BC in Orlando and they said they had redesigned those boots. They sent me out a replacement pair and I had them in about two days. I put them on when the springs went on. So you might want to give them a call if your boots are torn.
Fronts - Freelength 152mm, diameter 65mm, 8kgmm
Backs - Freelength 178mm, diameter 65mm, 6kgmm
After another day of driving they're just getting better and I can see why race teams use these springs.
One note...I was doing a wheel change for autocross last month and noticed the two rear rubber boots were torn. I called BC in Orlando and they said they had redesigned those boots. They sent me out a replacement pair and I had them in about two days. I put them on when the springs went on. So you might want to give them a call if your boots are torn.
 . i agree with the keeps "getting better" comment as well...i seem to be pushing things to find their limits....but it's always good! i can not wait for the dragon as it's my first event after the thaw....then track season starts!!!
in case anyone with a cabrio is considering the swifts, i have the same length and diameter as above, 8 kg fronts, BUT 7 kg rears, because the cabrio weighs more back there!

 so basically its advantages are being more predictable at the limit and a better ride when paired with the BC coils?
One problem I just discovered...I was hearing a tick, tick, tick noise and it got faster and louder with speed. I thought it might be a wheel bearing going bad (I'm at 72,000) but since I just had the springs and some Goodrich stainless brake lines put on the day before, I decided to go back to the shop and have things checked.
Turns out the noise was a wheel weight hitting the new brake line. It trashed the outside brading and I'll have to replace the line. This was caused by the rubber grommet slipping out of the bracket on the coilover. The grommet is much thinner than the OEM grommet and since the lines have less flex than the rubber ones, it must have slid out when I turned the wheel. We put a zip tie around the lines to keep them in place. So if you have after-market brake lines you might want to check this.
Additionally the brake line bracket is positioned differently than the OEM strut bracket and it leaves very little clearance on my wheels (15-inch Konig Rewinds). When the wheel was re-balanced with stick-on weights on the inside lip, the bracket would not clear them. We ended up bending the bracket to provide more clearance.
This probably won't be a problem for those whose use larger wheels but I thought it would still be good to mention.
Oxtox, or anyone else who has installed the BCs on a cabrio...did you install the rear extension cables for the damper adjustment? If you did, can you post some photos of the install? Were you able to use the provided cables or did you need longer ones? I've seen them installed on a tintop but not on a cabrio. This will be the next thing I do and I would like to have the adjustment ***** in the boot, so that's why I'm asking about the cables.
Oxtox, or anyone else who has installed the BCs on a cabrio...did you install the rear extension cables for the damper adjustment? If you did, can you post some photos of the install? Were you able to use the provided cables or did you need longer ones? I've seen them installed on a tintop but not on a cabrio. This will be the next thing I do and I would like to have the adjustment ***** in the boot, so that's why I'm asking about the cables.
. i'm going to try tomorrow...if i do i'll post pics as i believe i might be the first cabrio to do the rear extensions!?i understand the idea about having the cables in the boot, but i think that would require a significant bend in the cable. i never thought about a longer cable...i worry it would be less precise feeling though. i'll try to get pics that will help you decide


Former Vendor
Joined: Jan 2004
Posts: 8,337
Likes: 8
From: oh10
Is the only difference that they inverted the mono-tube design for the RAM's? I'm not sure I've even seen any evidence that they put together a RAM setup for the MINI's.

5th Gear
Joined: Mar 2007
Posts: 678
Likes: 5
In my searching I only see the BR Versions available for the mini...
From looking at their product list there is no option for an inverted version coilover for the mini.
From looking at their product list there is no option for an inverted version coilover for the mini.
Last edited by MidniteCoop; Mar 13, 2009 at 10:34 AM.
And here's the European version with external reservoirs. You'll also find parts listed for sale here:
BC ER Series
BC ER Series
for those of you with cabrios............
i finally got around to putting in the extensions last night! as it turned out, i was able to place the damping adjustment ***** in the boot! no worries about my kids playing with the settings . i tried resizing the pics, but am having trouble, so please excuse the multiple posting....
first, after removing the bench and seat backs, the panels come off.
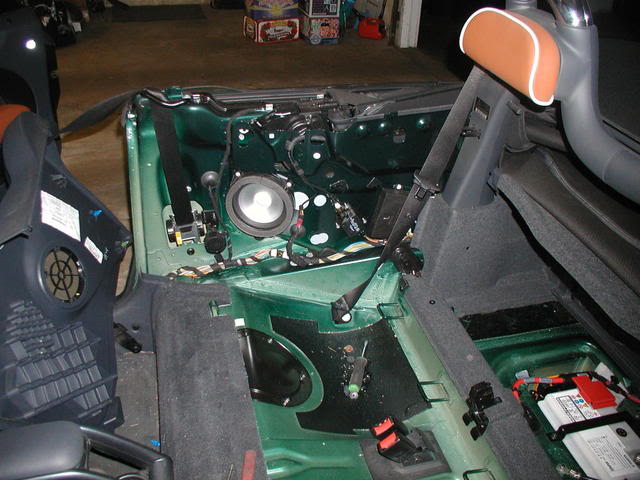
i finally got around to putting in the extensions last night! as it turned out, i was able to place the damping adjustment ***** in the boot! no worries about my kids playing with the settings
. i tried resizing the pics, but am having trouble, so please excuse the multiple posting....first, after removing the bench and seat backs, the panels come off.
Last edited by oxtox; Mar 15, 2009 at 10:04 AM.


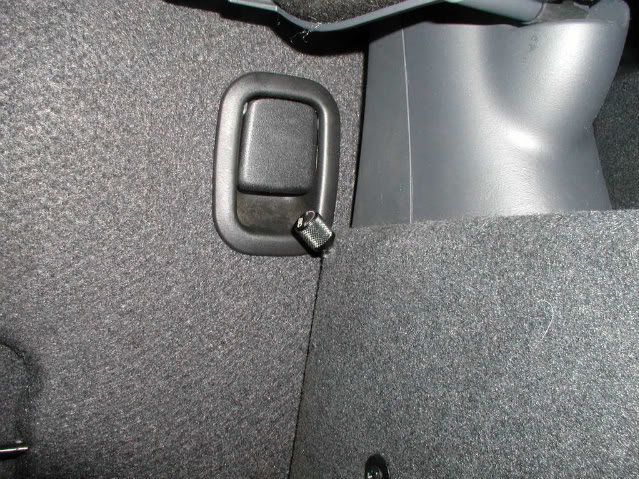
obviousy longer extensions would give you more flexability. on the other hand, mine have virtually no bend. the adjustment feels very precise. hope this helps some of you who may have been on the fence about tearing your cabrio apart. i'd say it's definitely worth it, given how easy it is to change settings now....no more taking the strut out!!!
. i'd say it's definitely worth it, given how easy it is to change settings now....no more taking the strut out!!!
Nice work oxtox! That looks like a project I will want to tackle soon. Thanks for blazing the trail.
I completed a little mod today to fix something that had been bugging me. Before the BC Coilovers I had covers on the holes in my strut towers and very little dirt got into the engine bay. The coilovers leave those holes open I've found that my engine bay is more dirty than ever since I installed the BCs. So I had been looking for something to plug those holes.
I wandered around Home Depot and Lowe's a few times looking for some type of rubber grommet or plug that I could use but couldn't find anything large enough. The holes is about 2.5 inches across so I started thinking about those plastic grommets they use in computer desks to route cables. So this is what I found:
Here is the strut tower hole with no cover. See all the dirt and sand? I didn't used to have dirt like that when those holes were covered.

I found these computer desk grommets at Lowe's for about $5 each.

This is what the grommet looks like. The goal was to get the damper adjustment **** to come through the hole.

The camber adjustment screws touch the bottom edge of the grommet. So I made marks on each side to do some cutting and clear those screws.

Here's the grommet after cutting with a Dremel. The two notches are the cuts I made to clear the camber adjustment screws. To keep the grommet in place I put some of that "sticky tack" putty around the edge.

The just press it in place in the hole and snap the cover back on. Depending on your camber settings you may have to expand the U-shaped hole in the cover. My camber is set at -1.8 and the **** fit perfectly.

I plan to clean up the engine bay to see if it makes a difference and will report back in a few weeks.
I completed a little mod today to fix something that had been bugging me. Before the BC Coilovers I had covers on the holes in my strut towers and very little dirt got into the engine bay. The coilovers leave those holes open I've found that my engine bay is more dirty than ever since I installed the BCs. So I had been looking for something to plug those holes.
I wandered around Home Depot and Lowe's a few times looking for some type of rubber grommet or plug that I could use but couldn't find anything large enough. The holes is about 2.5 inches across so I started thinking about those plastic grommets they use in computer desks to route cables. So this is what I found:
Here is the strut tower hole with no cover. See all the dirt and sand? I didn't used to have dirt like that when those holes were covered.
I found these computer desk grommets at Lowe's for about $5 each.
This is what the grommet looks like. The goal was to get the damper adjustment **** to come through the hole.
The camber adjustment screws touch the bottom edge of the grommet. So I made marks on each side to do some cutting and clear those screws.
Here's the grommet after cutting with a Dremel. The two notches are the cuts I made to clear the camber adjustment screws. To keep the grommet in place I put some of that "sticky tack" putty around the edge.
The just press it in place in the hole and snap the cover back on. Depending on your camber settings you may have to expand the U-shaped hole in the cover. My camber is set at -1.8 and the **** fit perfectly.
I plan to clean up the engine bay to see if it makes a difference and will report back in a few weeks.
Last edited by MINIBee; Mar 15, 2009 at 06:18 PM.
Nice work oxtox! That looks like a project I will want to tackle soon. Thanks for blazing the trail.
I completed a little mod today to fix something that had bugging me. Before the BC Coilovers I had covers on the holes in my strut towers and very little dirt got into the engine bay. The coilovers leave those holes open I've found that my engine bay is more dirty than ever since I installed the BCs. So I had been looking for something to plug those holes.
I plan to clean up the engine bay to see if it makes a difference and will report back in a few weeks.
 . i've noticed the same thing with the engine bay...i assumed it was our sloppy winter weather. i'll be curious to see how your mod works. very clean job
Yes, I did. I used pliers to just bend the edge up a little all the way around so I could get the ball hex in there without cutting. So that made the hole a little larger and thus the hole plugs I could find for sale were too small.