When you click on links to various merchants on this site and make a purchase, this can result in this site earning a commission. Affiliate programs and affiliations include, but are not limited to, the eBay Partner Network.
Supercharger Corrosion and and a scary looking oil pan / valve cover
Stock Problems/IssuesDiscussions related to warranty related issues and repairs, or other problems with the OEM parts and software for MINI Cooper (R50), Cabrio (R52), and Cooper S (R53) MINIs.
Supercharger Corrosion and and a scary looking oil pan / valve cover
For the holiday weekend, I tackled (4) gasket replacements: valve cover, oil filter housing, oil pan, and the cam position sensor o ring. The procedures went generally well with a few caveats.
1. I noted rust on the intercooler left side (smaller inlet heading to SC). Has anyone seen this before?
2. A LOT of bronzing, evident in both the bottom engine components view from the oil pan and the top under the valve cover.
3. I found two plastic pieces in the oil return filter within the oil pan. I have no idea where plastic pieces would even come from. Anyone know?
4. A loose intercooler inlet clamp. Are the clamp pieces that hold the rubber on either side of the intercooler reversible (up to down I mean)? I have a sneaking feeling this is the cause of my new P1109 engine code that has appeared.
Any insight into the 4 issues or concerns above would be greatly appreciated.
Plastic found in oil return filter Oil filter return and bronzing from oil pan perspective Oil pan looking rough
1.) The plastic may be part of the chain guide. Gumbedamit has another thread going on that issue. 2.) How many miles on the engine? IMO the bronze/coffee stain is not the bad issue, its if you have any darker brown sludge deposits. 3.) On the SC clamps, the two sides are different lengths and there is a top and bottom as if you turn upside down would need to be a ant in order to get the screws tightened from the button IMO. 4.) Have a picture on the rust? If its on the driver side, it may be from the water pump.
The plastic may also be pieces of the drain back plunger inside the oil filter housing. They often break or come loose, but I'm not sure if the pieces could end up where you found them. Were they in the pan, or inside the oil return on the other side of the screen?
Your oil pan and oil pickup look normal so wouldn't be too concerned with that.
The pieces for sure look like timing chain guide parts. Likely you have over 100k miles as we see this often enough. The correct repair is a timing chain kit replacement. https://www.waymotorworks.com/timing...0-r52-r53.html
1.) The plastic may be part of the chain guide. Gumbedamit has another thread going on that issue. 2.) How many miles on the engine? IMO the bronze/coffee stain is not the bad issue, its if you have any darker brown sludge deposits. 3.) On the SC clamps, the two sides are different lengths and there is a top and bottom as if you turn upside down would need to be a ant in order to get the screws tightened from the button IMO. 4.) Have a picture on the rust? If its on the driver side, it may be from the water pump.
1. Sure looks like a culprit... I didn't notice anything from the top, but I certainly wasn't looking for that either. Looks like a very involved repair. Sigh
2. 109k. The areas of darkness are evident in the pic... how bad does this look? I didn't see any sludge.
3. I may have inverted the passenger side inlet clamps. I plan on g thing in there to correct it, as I believe this plus a missing clamp,are the culprits behind the new p1109 code.
4. No picture, unfortunately. I can grab one when I check the intercooler inlet clamp. It was definitely the driver side inlet with corrosion, only on the side nearest the cabin, as opposed to the front bumper. Thank you for the response...
The plastic may also be pieces of the drain back plunger inside the oil filter housing. They often break or come loose, but I'm not sure if the pieces could end up where you found them. Were they in the pan, or inside the oil return on the other side of the screen?
The pieces were found inside the oil pickup (return) tube locat d within the oil pan. I changed the oil filter housing gasket, but don't hav a 36 mm socket to actually check the oil filter. Thank you fomthe suggestion.
Your oil pan and oil pickup look normal so wouldn't be too concerned with that.
The pieces for sure look like timing chain guide parts. Likely you have over 100k miles as we see this often enough. The correct repair is a timing chain kit replacement. https://www.waymotorworks.com/timing...0-r52-r53.html
Yes... yes they do. When you do the dirty deed, wanna write a 'how-to' post?!?
I plan on just replacing the rails, which does't require removing the front part of the block. Support the engine from the bottom, remove top engine mount, remove valve cover, remove tensioner. I may or may not need to remove the sprocket gear. I've already replaced the top engine oil seals when I did the valve cover last month. I will let you know how it works out.
1.) The plastic may be part of the chain guide. Gumbedamit has another thread going on that issue. 2.) How many miles on the engine? IMO the bronze/coffee stain is not the bad issue, its if you have any darker brown sludge deposits. 3.) On the SC clamps, the two sides are different lengths and there is a top and bottom as if you turn upside down would need to be a ant in order to get the screws tightened from the button IMO. 4.) Have a picture on the rust? If its on the driver side, it may be from the water pump.
I did indeed flip the inlet retaining clamp on the passenger side of the intercooler. I pulled the IC yesterday and corrected that mishap. After an ECU reset, my code is gone.
I also snapped a couple pictures of the corrosion within the IC and the SC inlet...
Corrosion within IC... This matches the corrosion inside the driver-side inlet to the SC.
Any insights would be greatly appreciated
What are your plans for changing the the guide rails. My rails should be here today, so this weekend I'll be rolling up my sleeves.
One thing that struck me about your pictures, the parts look like they have a varnish on them, I believe you referenced it as "Bronzing". There are several conditions that cause this. I'm not saying this is a problem, but your bottom engine looks different than mine, no Bronzing. I'm putting in a link. Again, I'm not saying this is what you have. When I get home tonight, I will take a picture since my pan is not connected.
I'm thinkng the intercooler and the SC horns are aluminum and I don't know what is inside the supercharger but would not think you would see iron type rust.
I'm thinkng the intercooler and the SC horns are aluminum and I don't know what is inside the supercharger but would not think you would see iron type rust.
Rust may be the wrong word. It's some type of corrosion, affixed to the walls. I don't want to replace the IC and SC just to find some other source for corrosion. The SC is making chiming noises. I believe it may need replacing, but I'll do a service on it first. I'll also probably do the timing g chain and guides. Just gotta find the time to do it.
What are your plans for changing the the guide rails. My rails should be here today, so this weekend I'll be rolling up my sleeves.
One thing that struck me about your pictures, the parts look like they have a varnish on them, I believe you referenced it as "Bronzing". There are several conditions that cause this. I'm not saying this is a problem, but your bottom engine looks different than mine, no Bronzing. I'm putting in a link. Again, I'm not saying this is what you have. When I get home tonight, I will take a picture since my pan is not connected.
Good luck this weekend! I'd love to see a pic of the install and the disparity between our engines. The car is fun to play around with, no doubt about that.
My rails should be here today, so this weekend I'll be rolling up my sleeves.
Curious minds...
How did you make out with the rail replacement project?
Were the broken pieces you found left over from a repair done before you owned your MINI, or were your existing guide rails indeed broken?
Were you able to lift the guide rails out the top without removing the cam sprocket? Looks tight with the sprocket in place. Is it possible that they might be able to come out the timing cover if removed?
I've run into a snag, something happened to my knee, I awakened to find my knee looking like a watermelon so I had to postpone my repair, hopefully I'll be able to get to it this weekend.
On another note, I got the new rails and discovered each rail is actually two pieces. The rails have a hard plastic truss where the softer chain guide sits on top off. The softer plastic chain guide is what was found in the bottom of my oil pan, this would explain why I've not heard any noise from the chain; the chain is now riding on the hard plastic truss. Once I get my knee good, I will complete the job and let you know what happened.
Update: You can remove the rails without having to take the front part of the engine off, you will still need to take the upper mount and the tensioner off. Be careful not to drop the rails while removing or replacing them, it would be very difficult to get to them at the bottom of the compartment. Now my rant:
My rails were not broken, the parts at the bottom of the oil pan were probably from the repair the stealership stated they did at 44K miles, which is funny because they also stated there was an oil pan gasket replacement at 73K miles......... Since I had the parts and already took them out, I just replaced them.
AoxoMoxoA - The top part of my engine looked like yours, (bronzy) so there was no reason to take pictures. I have to do a better job of changing my oil at 5-6K rather than 10K miles.
Last edited by gumbedamit; Jan 27, 2018 at 04:28 PM.
My rails were not broken, the parts at the bottom of the oil pan were probably from the repair the stealership stated they did at 44K miles...
Can't say I'm at all surprised by this. Just add that to the long list of inept dealership repair practices... More evidence that it's best to do your own wrenching on these machines.
Originally Posted by gumbedamit
Update: You can remove the rails without having to take the front part of the engine off, you will still need to take the upper mount and the tensioner off.
Did you have to remove the cam sprocket to lift the rails out?
Originally Posted by gumbedamit
AoxoMoxoA - The top part of my engine looked like yours, (bronzy) so there was no reason to take pictures. I have to do a better job of changing my oil at 5-6K rather than 10K miles.
I believe it was the O.P., aboveliquidice who had the bronzy engine...
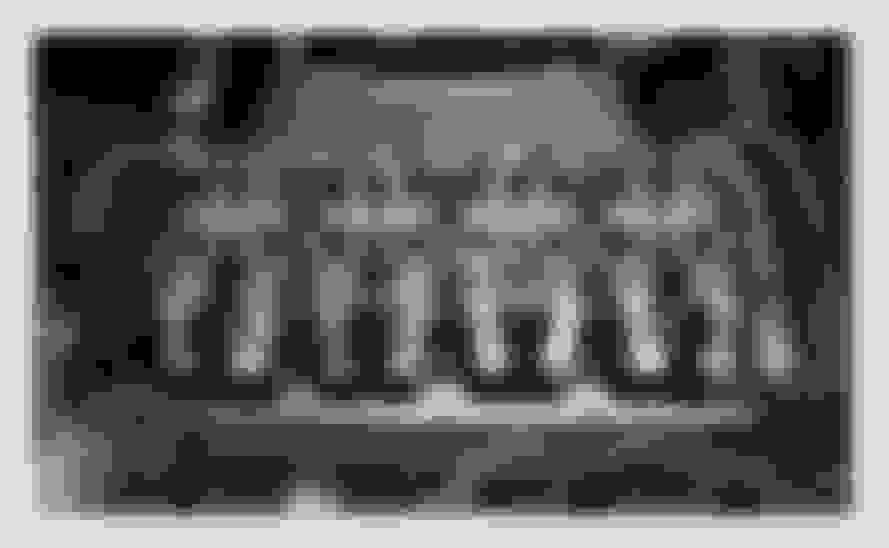
Here is a shot of my valvetrain when I opened it up to do my valve cover gasket back in the fall of 2015 (@ appx, 113,000 miles)... Clean as a whistle. I never did take a pic when I did the oil pan gasket, but the crankshaft looked the same.
Can't say I'm at all surprised by this. Just add that to the long list of inept dealership repair practices... More evidence that it's best to do your own wrenching on these machines.
Did you have to remove the cam sprocket to lift the rails out?
I believe it was the O.P., aboveliquidice who had the bronzy engine...
Here is a shot of my valvetrain when I opened it up to do my valve cover gasket back in the fall of 2015 (@ appx, 113,000 miles)... Clean as a whistle. I never did take a pic when I did the oil pan gasket, but the crankshaft looked the same.
I did not remove the sprocket , once I removed the tensioner, there was enough slack for me to muscle the rails in. Do the non-tensioner side first, there is a pin at the bottom the rail needs to sit on.
Gents, I finally got around to addressing my timing chain guides. I pulled the valve cover, removed the timing chain tensioner, and removed the single bolt holding each rail at the top. However, I can’t figure how to get the guides out. How did gumbedamit or anyone else manage to get these out?
EDIT: Also, should I clean out what appears to be burnt oil in the intercooler? The supercharger was going and has been replaced. A small amount of oil has leaked out of the intercooler after 72hours on its inlet side. An eBay replacement is $90, OEM much more. All three are possible...Thoughts?
Last edited by aboveliquidice; May 29, 2018 at 05:16 PM.
EDIT: Also, should I clean out what appears to be burnt oil in the intercooler? The supercharger was going and has been replaced. A small amount of oil has leaked out of the intercooler after 72hours on its inlet side. An eBay replacement is $90, OEM much more. All three are possible...Thoughts?
I just had my intercooler off this last weekend and had some of the same color, just not nearly as dark. I used a can of brake cleaner and sprayed from one side into the intercooler with it tilted to drain out the other side. I coated the whole thing on both inlet sides spraying it down each track and let it rest. After a few minutes I flushed it with the brake cleaner again letting it drain out the completely. Reversed sides and did it again. The intercooler got really cold due to the spray. Wash and repeat till it ran clear which used the whole can for me. I let ot stand vertical on one side for 30 minutes then flipped it over, shook it, and let it dry with the other side exposed. I didn't clean the supercharger as the oil build up there was minor.
Now the effects for me I can notice is that heat recovery is a bit quicker when stopped at a light. I don't have a scan guage to tell you if there was a change in the charge, but I probably should have done so with my obd tool.
In short its easy enough to clean so do so. From past threads the way I cleaned it is how it sounds people are cleaning theirs after a track day.
Thank you for the intercooler recommendation! I'll take a look at doing so. Glad to hear others are doing it as well.
Any idea on the rails? Muscling them out is possible but also a little nerve racking.