
Removing OEM Aero rear bumper decals...

Removing OEM Aero rear bumper decals...
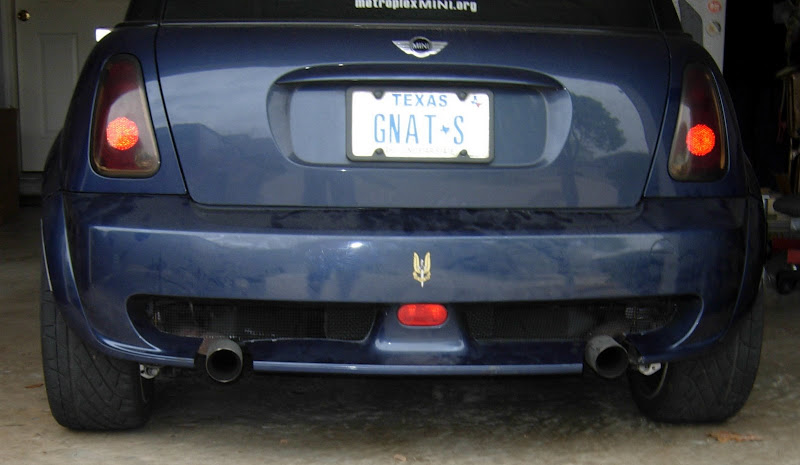
I just installed a used aero kit which came off a 2003 JCW Cooper S and the rear decals are brittle around the edges and seems like they are were sealed to the bumper with Prehistoric Amber......
Any good ideas on how to remove this crap. Most of the brittle part I tried to remove got jammed up under my fingernails like bamboo torture, and the rest is being very difficult.
I am familiar with Goof off and goo gone, but I need to get under the top decal layer and a scraper will not work without damaging the paint underneith.....
Any help from someone who had been in the same boat before would be most appreciated....


Ok Nate, get some better mesh and some cool exhaust tips.
You can do better than that. The cooler the tips the lower the lap times. I read it somewhere on the internets so it must be true.
You can do better than that. The cooler the tips the lower the lap times. I read it somewhere on the internets so it must be true.
Trending Topics
 !
!Not the sorta help I was lookin for exactly

Thanks anyways Nat.
Much like if you had backed up your mini to the back of an F-18 taking off the deck of the Enterprise....
.

2nd Gear
Joined: Nov 2008
Posts: 82
Likes: 0
From: Manassas, VA
What are your plans after removal? I've been thinking of getting some thin carbon fiber sheets and trimming them to fit and gluing them in place. I think the original fake grill decal looks cheap anyway.
Probably go with darker color
Interesting, I was just about to post a similar thread/question. Mine are brittle and a couple of small pieces broke off last weekend when I washed it.
What are your plans after removal? I've been thinking of getting some thin carbon fiber sheets and trimming them to fit and gluing them in place. I think the original fake grill decal looks cheap anyway.
What are your plans after removal? I've been thinking of getting some thin carbon fiber sheets and trimming them to fit and gluing them in place. I think the original fake grill decal looks cheap anyway.
Right now we do not have access to a heat gun, only my girlfriends hair dryer.....lol. And being rather **** when it comes to the MINI's appearance, I had to do something straight away.
Soooooo, after some prepping and removing the loose portions of the rather dumb decal, I gave it a few coats of "non-permanent" plasti-dip for now.
Today I spoke with a freind who has a BMW parts/boutique shop. He says he has a can of foam spray he sells that can be sprayed onto any decal not harming the paint, and emulsifies the glue....BUT....he is a 2.5 hr drive from where I live now, so it will be a few weeks before I can pick some up.
If it works well, I will ALL post all information and photos of this operation in a new thread for fellow NAMr'S.


3rd Gear
Joined: Nov 2006
Posts: 187
Likes: 0
From: Cincinnati, OH
Yes they were brittle, when I washed the car for the first time, pieces just cracked off. So I decided to remove them. This really isn't a big deal to take them off, just make sure you don't use too much heat, just enough to warm them up.
3rd Gear
Joined: Nov 2006
Posts: 187
Likes: 0
From: Cincinnati, OH
Yes they were brittle, when I washed the car for the first time, pieces just cracked off on the edges. So I decided to remove them. This really isn't a big deal to take them off, just make sure you don't use too much heat, just enough to warm them up. A hair dryer on high should do the trick if you do not have a heat gun. If you plan on placing new stickers back on you need to remove the old ones. Just like if you want to paint but have wallpaper, you must remove the wallpaper or it will eventually effect the top coat of paint.

I just purchased some new new decals and they should be here in about a week, I will begin the process of removing old decal and do a how to on what actually works, I have a few ideas kicking around in my head.

3rd Gear
Joined: Oct 2010
Posts: 194
Likes: 2
From: Colorado
I'm so glad I searched before posting. I have the cheesey looking decals that have oxidized and are brittle around the edges. I bought new decals thinking it would be a piece of cake to remove and replace but after reading it and looking at the "faux" grille look, I'm wondering if it wouldn't look better with some other type of grill material? Love to see some installed improvements.

Banned
Joined: Jan 2012
Posts: 470
Likes: 0
i know this is a little off topic, but its somewhat related. if anybody knows it'd same me the trouble of looking further into it or doing more than i have to, to figure it out. i have a stock r53 bumper, and im curious as to how i can remove the 2 plastic mesh panels on either side of the bumper.


They clip into the back of the bumper main plastic skin. You will have to get behind the bumper and pull the clips while pressing into the grille on the front. So they clip in front the back of the bumper.

Number 4 in the diagram;
Rear Bumper Grille - Left Part number 51127068397
http://www.ecstuning.com/Search/SiteSearch/51127068397/
Rear Bumper Grille - Right Part number 51127068398
http://www.ecstuning.com/Search/SiteSearch/51127068398/
You can see how it mounts in the pics below.


On the rear bumper Aero Ornamental grille , has anyone tried to peel and stick the new ones over the old ones if they are still mostly intact and still holding on ? They are very thin so they should not stick out. Other wise the heat gun should work, or letting the bumper set in the hot sun for a while.
We have the new ones here:
Aero Kit : Rear Stickers Aluminum Look Ornamental Grille Rear Set Part number 51120147453 Cooper S/ JCW
http://www.ecstuning.com/Search/SiteSearch/51120147453/
Thanks
Number 4 in the diagram;
Rear Bumper Grille - Left Part number 51127068397
http://www.ecstuning.com/Search/SiteSearch/51127068397/
Rear Bumper Grille - Right Part number 51127068398
http://www.ecstuning.com/Search/SiteSearch/51127068398/
You can see how it mounts in the pics below.
On the rear bumper Aero Ornamental grille , has anyone tried to peel and stick the new ones over the old ones if they are still mostly intact and still holding on ? They are very thin so they should not stick out. Other wise the heat gun should work, or letting the bumper set in the hot sun for a while.
We have the new ones here:
Aero Kit : Rear Stickers Aluminum Look Ornamental Grille Rear Set Part number 51120147453 Cooper S/ JCW
http://www.ecstuning.com/Search/SiteSearch/51120147453/
Thanks
__________________

MINI Guru/ MINI Owner Since 2004 | NEW Lifetime Part Replacement | Local Pickup
Milltek | Genuine MINI | Forge Motorsport | NM Engineering | ECS Performance | M7 Speed
Customer Service Hours: 8am-8pm EST|Sales Team Hours: 8am-11pm | SAT 10am-7pm 800.924.5172
MINI Guru/ MINI Owner Since 2004 | NEW Lifetime Part Replacement | Local Pickup
Milltek | Genuine MINI | Forge Motorsport | NM Engineering | ECS Performance | M7 Speed
Customer Service Hours: 8am-8pm EST|Sales Team Hours: 8am-11pm | SAT 10am-7pm 800.924.5172


2nd Gear
Joined: Aug 2012
Posts: 137
Likes: 6
From: VA
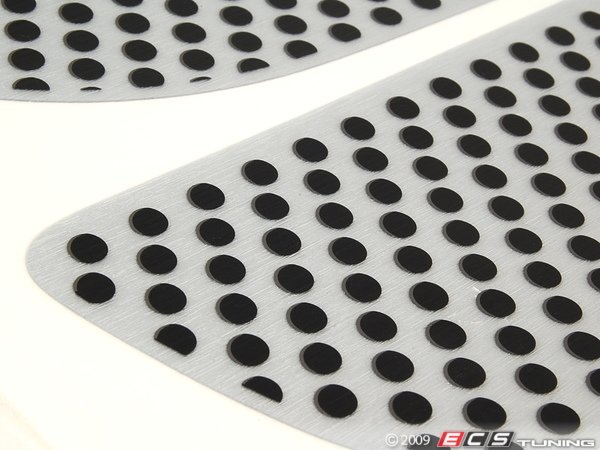
Same thing I did with the aero stickers. Mine were the gold colored ones and were cracked and missing pieces along the edge. I made some custom inserts with perforated aluminum sheet painted black and rubber edging. Looks way better than the stickers.

Thread
Thread Starter
Forum
Replies
Last Post
igzekyativ
MINIs & Minis for Sale
34
Jul 16, 2020 12:54 PM
blackie
MINI Parts for Sale
52
Oct 2, 2015 07:41 PM
bctf1
F55/F56 :: Hatch Talk (2014+)
9
Aug 6, 2015 12:55 PM