
R59 HITCH on my Roadster ordered...


6th Gear


Joined: Jun 2013
Posts: 1,614
Likes: 56
From: Western PA
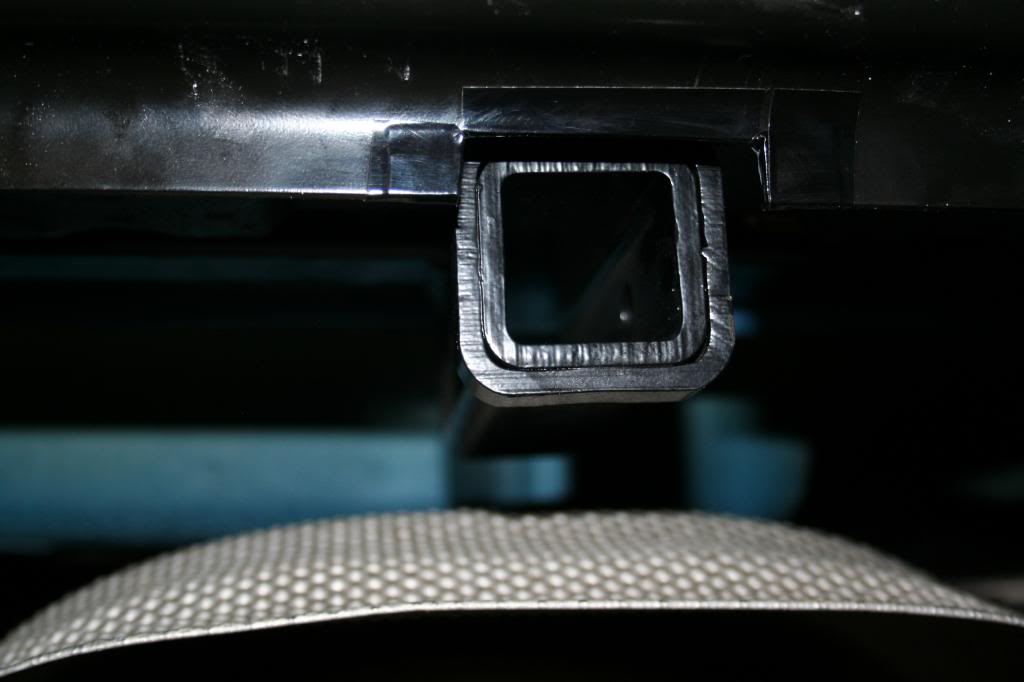
Well I just finished mounted the hitch but of course I didn't noticed that the thing looks crooked. I'm concerned everything I'm going to mount to it is going to look crooked and really bad! What do you guys think?


2nd Gear
Joined: Feb 2009
Posts: 85
Likes: 0
From: Long Island, NY
Is there room for adjustment where the hitch mounts to the frame? Mabey you can loosen the bolts and move the hitch a little to straighten it out!
You could also see how much play there is when the receiver goes in the hitch and mabey you can shim up one side so that it's level!
Your install job looks great tho, good luck in getting that straightened out (pun intended )!
)!
Keep those pictures coming !
Steve
You could also see how much play there is when the receiver goes in the hitch and mabey you can shim up one side so that it's level!
Your install job looks great tho, good luck in getting that straightened out (pun intended
)!Keep those pictures coming !
Steve
6th Gear
Joined: Jun 2013
Posts: 1,614
Likes: 56
From: Western PA
thx Steve,
I'll have to take the bumper off for the third time to see if I can adjust it at the mounting bolt area but it was quite tight the first time...
I'm pretty sure it's the tube receiver that's not welded straight. Knowing how of a perfectionist I can get sometime with certain things I know this is going to drive me crazy... we'll se if I can have it exchanged with Outmotoring.
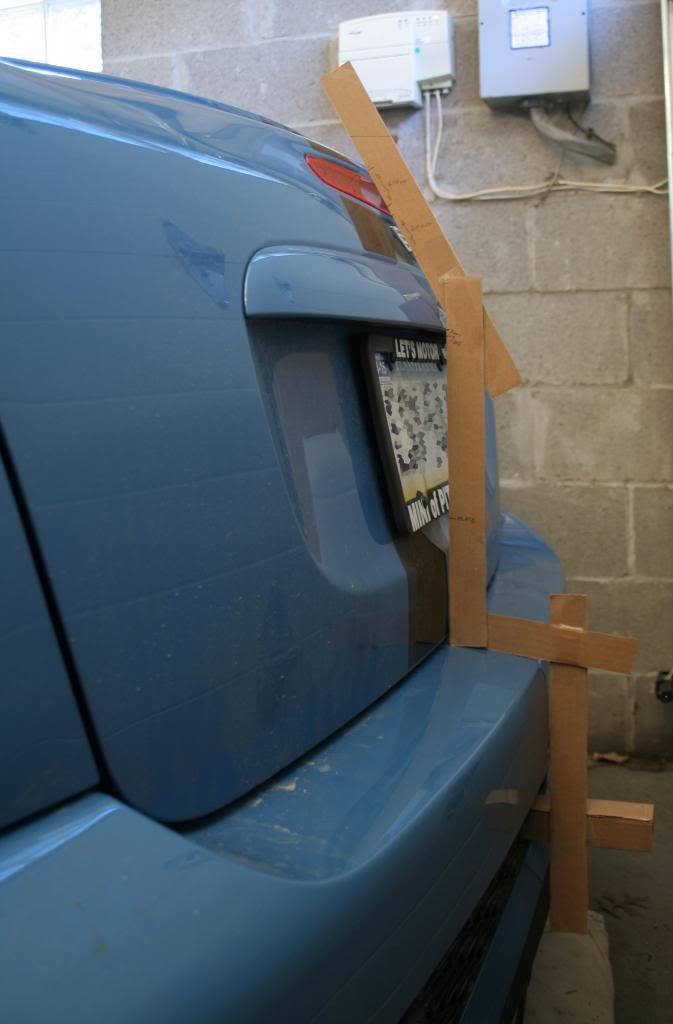
Here is a picture of the next phase of my little project... measuring:
I'll have to take the bumper off for the third time to see if I can adjust it at the mounting bolt area but it was quite tight the first time...
I'm pretty sure it's the tube receiver that's not welded straight. Knowing how of a perfectionist I can get sometime with certain things I know this is going to drive me crazy... we'll se if I can have it exchanged with Outmotoring.
Here is a picture of the next phase of my little project... measuring:

2nd Gear
Joined: Feb 2009
Posts: 85
Likes: 0
From: Long Island, NY
Hopefully Outmotoring will send a replacement, those things drive me crazy too!
With age I've learned to manage my perfectionist tendencies but I can be hyper aware of things that are misaligned,unlevel, and not symmetrical ,even tho it doesn't affect their function!
Are you fabricating a spare tire holder or modifying something ?
I wonder if you could use the Superbumper as a starting point and weld a tire rack to it,as the shock absorber feature seems like a smart thing to have if someone hits you with the spare attatched?
Anyway,just thinking out loud, I've got a couple of other things to get finished before I can start another project, so for now is just a spare in the trunk for us!
Good luck with everything and I know you'll keep us posted!
Steve
6th Gear
Joined: Jun 2013
Posts: 1,614
Likes: 56
From: Western PA
I feel a bit relieved today. Outomotoring is going to send me a replacement with a return label! great customer service Aaron 
I'm just the same. I can tell any thing that is not straight. it's due to my job in part... and yes to my being a perfectionist as well on this types of things, though I try to get better at it with age as well 
Yes, I'm fabricating a tire holder from scratch. I'm senior product designer with much experience making functional prototype so I'm confident I can pull this off without too much headaches. The hardest part for me is to find the time always :p
I'll checkout that Superbumper though just to see what they do, how do they approach the problem...
thx! Greg
Hopefully Outmotoring will send a replacement, those things drive me crazy too!
With age I've learned to manage my perfectionist tendencies but I can be hyper aware of things that are misaligned,unlevel, and not symmetrical ,even tho it doesn't affect their function!
Are you fabricating a spare tire holder or modifying something ?
I wonder if you could use the Superbumper as a starting point and weld a tire rack to it,as the shock absorber feature seems like a smart thing to have if someone hits you with the spare attatched?
Anyway,just thinking out loud, I've got a couple of other things to get finished before I can start another project, so for now is just a spare in the trunk for us!
Good luck with everything and I know you'll keep us posted!
Steve
With age I've learned to manage my perfectionist tendencies but I can be hyper aware of things that are misaligned,unlevel, and not symmetrical ,even tho it doesn't affect their function!
Are you fabricating a spare tire holder or modifying something ?
I wonder if you could use the Superbumper as a starting point and weld a tire rack to it,as the shock absorber feature seems like a smart thing to have if someone hits you with the spare attatched?
Anyway,just thinking out loud, I've got a couple of other things to get finished before I can start another project, so for now is just a spare in the trunk for us!
Good luck with everything and I know you'll keep us posted!
Steve
Yes, I'm fabricating a tire holder from scratch. I'm senior product designer with much experience making functional prototype so I'm confident I can pull this off without too much headaches. The hardest part for me is to find the time always :p
I'll checkout that Superbumper though just to see what they do, how do they approach the problem...
thx! Greg
6th Gear
Joined: Jun 2013
Posts: 1,614
Likes: 56
From: Western PA
Yes, the silver lining is that I'm getting better every time . . . though I did replaced the push pin snaps that holds the two black wheel arch elements together. I'm not looking forward to have to remove those again. What a pain! I'm sure there's a tool for that. . . I did all this without having to put the car on stands and remove the wheels because it's a big time saving. I may do that next time if I want to make the removal of those easier . . . I do have an extra set so if I run out of time I may cut them off again rather than try to remove the pin from the clips which seems almost impossible!
. . . though I did replaced the push pin snaps that holds the two black wheel arch elements together. I'm not looking forward to have to remove those again. What a pain! I'm sure there's a tool for that. . . I did all this without having to put the car on stands and remove the wheels because it's a big time saving. I may do that next time if I want to make the removal of those easier . . . I do have an extra set so if I run out of time I may cut them off again rather than try to remove the pin from the clips which seems almost impossible!


6th Gear
Joined: Jun 2013
Posts: 1,614
Likes: 56
From: Western PA
Well, it's a bit of a mix. I installed by myself a hitch receiver from Outmotoring and I'll be fabricating a spare tire mount system


1st Gear
Joined: Oct 2011
Posts: 30
Likes: 0
From: Madison, WI area
I have an 06 R52, installed 1-1/4 receiver, and LOVE my Saris 2-bike Freedom rack. I leave the rack on all summer, because it is a bit of a pain to pull the rack off. Can't find and extender that comes out far enough to get the pin holes outside the bumper opening. This is the rack I like: http://www.saris.com/product/freedom-2

4th Gear
Joined: Apr 2014
Posts: 361
Likes: 1
Decided on MiniFini / SoftRide Hang2 Combo
I own 2 Minis, a R53 and a R59S. Currently my R53 is my bike hauler, but the R53 is going to my son later this year so I will need a new bike hauler.
I have been following these Roadster hitch threads for some time now and I have begun the process of getting both a hitch and bike rack.
Hitch
Selecting a hitch comes down to a combination of costs, features and aesthetics. While more expensive than the others I opted to go with the MiniFini, primarily for the following reasons.
SportLink2 on a Roadster from a prior post
TowLink

Bike Rack
The Mini is a narrow vehicle. I like the tray mount racks over the hanging racks as they are better at preventing damage to the bikes. But the tray mount racks are wider than the Roadster.
There are several vertical hitch bike racks. The least expensive is the Swagman Jackknife. But once you mount the bikes you end up wider than the Roadster again.
Swagman Jackknife (4 bike carrier, there is a 2 bike option as well)

I have decided to go with the Softride Hang2.

If you are purely a mountain biker, then the North Shore Bike Racks is probably the better option.
http://www.northshoreracks.com/
I have just placed my orders and I will post pictures once completed.
I have been following these Roadster hitch threads for some time now and I have begun the process of getting both a hitch and bike rack.
Hitch
Selecting a hitch comes down to a combination of costs, features and aesthetics. While more expensive than the others I opted to go with the MiniFini, primarily for the following reasons.
- MiniFini was the dealer installable system in the Gen1 days, the documentation for the Gen1 version even has the BMW/MINI logos and trademarks.
- I prefer the look of the MiniFini's 2 mounting points vs the single (simetimes hidden) square bracket.
- I like the option of the MiniFini TowLink spare tire carrier.
SportLink2 on a Roadster from a prior post
TowLink
Bike Rack
The Mini is a narrow vehicle. I like the tray mount racks over the hanging racks as they are better at preventing damage to the bikes. But the tray mount racks are wider than the Roadster.
There are several vertical hitch bike racks. The least expensive is the Swagman Jackknife. But once you mount the bikes you end up wider than the Roadster again.
Swagman Jackknife (4 bike carrier, there is a 2 bike option as well)
I have decided to go with the Softride Hang2.
If you are purely a mountain biker, then the North Shore Bike Racks is probably the better option.
http://www.northshoreracks.com/
I have just placed my orders and I will post pictures once completed.
4th Gear
Joined: Apr 2014
Posts: 361
Likes: 1
Picked up my R59 today after getting the Mini Fini hitch installed.
The SportLink 2 and Attachment Base
I purchased my car with some minor rear bumper damage, and after some research I decided to get the bumper repaired at the same time I had the hitch installed.
My nearest certified Mini Fini installer quoted me a $275 installation fee while my body shop quoted $300.
Fortunately we tested the installation of the attachment base while the car was still at the body shop because the attachment base scratched the newly painted bumper. �Fortunately� because when this happened the body shop simply repainted the bumper at no additional cost.
This scratching was unexpected, and it does mean that I will be applying a clear bra to my rear bumper to prevent future damage. More on this later.
Overall I am pleased with the Mini Fini setup.
There are 2 primary components to the Mini Fini.
Below are 2 photos of the SportLink installed on my R59 Roadster. This is the SportLink 2, designed for Roadster/Coupe S models that do not have the JCW body kit.
The first photo is the standard install; the second photo is after I put on the optional blackout plugs.
Installed

With Blackout Plugs

In the photo below the black bar is the Attachment Base. To install you:
The setup I ordered included the 2� hitch receiver attachment. Mini Fini pre-installed the hitch receiver on the attachment base. Their install placed the nuts for bolts on the car side of the attachment base.
Circled in red below are the bolts after my body shop cut off the excess length. As installed by Mini Fini there was an extra 1/2 inch of bolt protruding beyond the nut. This extra length scratched the bumper during install. My body shop cut off the excess to prevent future damage.
I recommend reversing the bolts when mounting the attachments to the attachment base, this way it would be almost impossible to scratch the bumper with the bolt hardware.
The circle in green below is of the left post that slides into the left mounting hole on the SportLink. This post further scratched the bumper as the attachment base was swiveled up and over for removal. I used a Dremel to grind down the sharp edges; not a final solution but will help prevent future damage.
Attachment Base

An extra half inch of room would go along way to prevent scratching the bumper. Something I will be sharing with Mini Fini.
This scratching issue is another thing to consider when considering a hitch for the Mini.
Even with this scratching issue I am pleased with the overall look of the Mini Fini when not in use, over the other hitch options available.
The Bike Rack
I was originally considering using racks that hold the bikes vertically. The reason for this was to prevent any racks from extending beyond the width of the car.
However upon further research I discovered that these vertical racks were also extremely heavy. Some over 100 lbs for the rack alone.
I decided that a light-weight rack would be best.
For the last 6+ years I have been using the Saris Bones RS rack on my R53 and have been very satisfied. I decided to go with a similarly designed hitch rack from Saris, made out of aluminum.
This last photo is of the Saris Axis Aluminum 3-bike hitch rack. The rack weighs 14 lbs and is easy to install. This is important as I will only be using the rack once or twice a week, and I do not want to leave it on the car.
Saris Axis Aluminum 3-Bike Rack

I have to wait about 30 days before putting the clear bra on the bumper, so I will not have final use photos until then. I will post some picks of the car with rack and bikes attached after the clear bra has been installed.
The SportLink 2 and Attachment Base
I purchased my car with some minor rear bumper damage, and after some research I decided to get the bumper repaired at the same time I had the hitch installed.
My nearest certified Mini Fini installer quoted me a $275 installation fee while my body shop quoted $300.
Fortunately we tested the installation of the attachment base while the car was still at the body shop because the attachment base scratched the newly painted bumper. �Fortunately� because when this happened the body shop simply repainted the bumper at no additional cost.
This scratching was unexpected, and it does mean that I will be applying a clear bra to my rear bumper to prevent future damage. More on this later.
Overall I am pleased with the Mini Fini setup.
There are 2 primary components to the Mini Fini.
- The SportLink that attaches to the car frame
- The Attachment Base that slots into the SportLink and to which other components �attach.�
Below are 2 photos of the SportLink installed on my R59 Roadster. This is the SportLink 2, designed for Roadster/Coupe S models that do not have the JCW body kit.
The first photo is the standard install; the second photo is after I put on the optional blackout plugs.
Installed
With Blackout Plugs
In the photo below the black bar is the Attachment Base. To install you:
- Hold the Attachment Base perpendicular to the SportLink, and align the right post on the Base with the right hole on the SportLink.
- Slide the Base in until it stops
- Rotate the base down to slide in the left post. There is a handle on the other end of the post, this should be aligned vertically. You should see a notch inside the green arrow below. This allows a pin inside the SportLink to pass.
- Slide the locking left post in until it stops, then rotate the handle clockwise until the handle is parallel to the Base and SportLink.
- Use the key to lock the handle in place.
The setup I ordered included the 2� hitch receiver attachment. Mini Fini pre-installed the hitch receiver on the attachment base. Their install placed the nuts for bolts on the car side of the attachment base.
Circled in red below are the bolts after my body shop cut off the excess length. As installed by Mini Fini there was an extra 1/2 inch of bolt protruding beyond the nut. This extra length scratched the bumper during install. My body shop cut off the excess to prevent future damage.
I recommend reversing the bolts when mounting the attachments to the attachment base, this way it would be almost impossible to scratch the bumper with the bolt hardware.
The circle in green below is of the left post that slides into the left mounting hole on the SportLink. This post further scratched the bumper as the attachment base was swiveled up and over for removal. I used a Dremel to grind down the sharp edges; not a final solution but will help prevent future damage.
Attachment Base
An extra half inch of room would go along way to prevent scratching the bumper. Something I will be sharing with Mini Fini.
This scratching issue is another thing to consider when considering a hitch for the Mini.
Even with this scratching issue I am pleased with the overall look of the Mini Fini when not in use, over the other hitch options available.
The Bike Rack
I was originally considering using racks that hold the bikes vertically. The reason for this was to prevent any racks from extending beyond the width of the car.
However upon further research I discovered that these vertical racks were also extremely heavy. Some over 100 lbs for the rack alone.
I decided that a light-weight rack would be best.
For the last 6+ years I have been using the Saris Bones RS rack on my R53 and have been very satisfied. I decided to go with a similarly designed hitch rack from Saris, made out of aluminum.
This last photo is of the Saris Axis Aluminum 3-bike hitch rack. The rack weighs 14 lbs and is easy to install. This is important as I will only be using the rack once or twice a week, and I do not want to leave it on the car.
Saris Axis Aluminum 3-Bike Rack
I have to wait about 30 days before putting the clear bra on the bumper, so I will not have final use photos until then. I will post some picks of the car with rack and bikes attached after the clear bra has been installed.
6th Gear
Joined: Jun 2013
Posts: 1,614
Likes: 56
From: Western PA
Very nice I did not realize how lightweight this Saris was until you mentioned it. I had to double check online since I was a bit surprised.
It led me to find this guy, even lighter! 10 lbs!:
http://www.softride.com/rack-product...na_3_bike_rack
I like the design better in terms of swing but the Saris is obviously nicer looking and might be more sturdy/less noisy.
I still have to come-up with a solution. I'm not satisfied with what I'm finding. It's alright, I'm going to turn this into a design project. I have some ideas but I just have to find the correct hardware and fabrication methods.
That all said for an off-the-shelves solution this is very nice.
Now I'm a bit surprised by the MINI fini adapter. The main point to the MINI fini setup for me personally is that it's anchored at two faraway points making hitch systems way more stable. The idea that it goes back to a single middle point with the adapter is a bit disappointing. But I understand it's all about trade offs with these systems.
Last this looks really tall. I can't imagine how high the bikes are going to be once mounted. I'll be very interested to see what happens in real life. Some are adjustable. I don't know if this one is at the top but the middle bar seems like it's going to be quite up there... The interesting aspect for me here would be to see if the middle tube can be shortened. I don't think it's possible from the bottom end. Maybe from the top end?
I know this doesn't seem to bother too many people but it bothers me

I really don't want to ruined the roadster experience
I did not realize how lightweight this Saris was until you mentioned it. I had to double check online since I was a bit surprised.It led me to find this guy, even lighter! 10 lbs!:
http://www.softride.com/rack-product...na_3_bike_rack
I like the design better in terms of swing but the Saris is obviously nicer looking and might be more sturdy/less noisy.
I still have to come-up with a solution. I'm not satisfied with what I'm finding. It's alright, I'm going to turn this into a design project. I have some ideas but I just have to find the correct hardware and fabrication methods.
That all said for an off-the-shelves solution this is very nice.
Now I'm a bit surprised by the MINI fini adapter. The main point to the MINI fini setup for me personally is that it's anchored at two faraway points making hitch systems way more stable. The idea that it goes back to a single middle point with the adapter is a bit disappointing. But I understand it's all about trade offs with these systems.
Last this looks really tall. I can't imagine how high the bikes are going to be once mounted. I'll be very interested to see what happens in real life. Some are adjustable. I don't know if this one is at the top but the middle bar seems like it's going to be quite up there... The interesting aspect for me here would be to see if the middle tube can be shortened. I don't think it's possible from the bottom end. Maybe from the top end?
I know this doesn't seem to bother too many people but it bothers me
I really don't want to ruined the roadster experience
Last edited by TG.; Mar 29, 2015 at 03:41 PM.

4th Gear
Joined: Apr 2014
Posts: 361
Likes: 1
Still Happy, More Compromises, different rack?
I was finally able to get the paint protection put on my rear bumper, and I used my new setup for the first time this past Saturday.
First an animation showing how the rack is removed. You first pull the left post out of the mount, then rotate vertically as shown, then pull the right post out.

Here is a closeup of the MiniFini and Saris hitch rack.
As you can see the end of the hitch extends away from the bumper by 8 inches. Compared to the MiniDoMore and Curt hitches that are basically flush with the bumper.

This results in a rack that extends some distance from the rear of the car.

Here is a photo with my Vassago Jabberwocky Single Speed mountain bike (sorry, can't express how much I absolutely love this bike). This style of rack always struggles with the sloping top tubes of mountain bikes.

However the extra space allows the trunk to be opened with the bike still attached, and there is plenty of room to use the trunk as a staging area. I think I like the extra space even though it's less than visually appealing.

Here is a front view.

And a rear view with my road bike.

Overall I am happy for now.
Change in Racks?
However one of my ride buddies is getting the 1-Up rack. Only holds 1 bike and weighs 24 pounds. We saw one on another car, I might consider this one and modify it to mount to the MiniFini attachment base without the need for the hitch mount.
Here is a pic of the 1-Up on a MINI using the Curt hitch from the NAM post 2011 JSW tow hitch?
I love that bamboo cyclocross frame

Edit__________________
While previewing using Incognito Mode to test that the images were appearing I noticed that NAM inserts ads into all of the referenced images. Pretty sneaky NAM
First an animation showing how the rack is removed. You first pull the left post out of the mount, then rotate vertically as shown, then pull the right post out.
Here is a closeup of the MiniFini and Saris hitch rack.
As you can see the end of the hitch extends away from the bumper by 8 inches. Compared to the MiniDoMore and Curt hitches that are basically flush with the bumper.
This results in a rack that extends some distance from the rear of the car.
Here is a photo with my Vassago Jabberwocky Single Speed mountain bike (sorry, can't express how much I absolutely love this bike). This style of rack always struggles with the sloping top tubes of mountain bikes.
However the extra space allows the trunk to be opened with the bike still attached, and there is plenty of room to use the trunk as a staging area. I think I like the extra space even though it's less than visually appealing.
Here is a front view.
And a rear view with my road bike.
Overall I am happy for now.
Change in Racks?
However one of my ride buddies is getting the 1-Up rack. Only holds 1 bike and weighs 24 pounds. We saw one on another car, I might consider this one and modify it to mount to the MiniFini attachment base without the need for the hitch mount.
Here is a pic of the 1-Up on a MINI using the Curt hitch from the NAM post 2011 JSW tow hitch?
I love that bamboo cyclocross frame
Edit__________________
While previewing using Incognito Mode to test that the images were appearing I noticed that NAM inserts ads into all of the referenced images. Pretty sneaky NAM
Last edited by dongood; May 25, 2015 at 10:54 AM.
6th Gear
Joined: Jun 2013
Posts: 1,614
Likes: 56
From: Western PA
Good to see it mounted
The combo looks well made. So I'm curious, do the Saris rock a lot sideways when driving? The hitch points looks super strong. but the bottom pole connection looks kind of small in comparison to the rest. But that's just how it looks. It may perform much better than it looks.
I wouldn't be happy myself with how far back and how high the bikes are located trunk access or not. That said I know the pictures don't help it with lens effect. I'm sure it's not as dramatic in real life. But as long as your happy that's all that matters
Like I said the stuff still look like good quality. My only regrets is still not to take advantage of the MINI fini 2 points for stability. One can get it all . . .
. . .
The combo looks well made. So I'm curious, do the Saris rock a lot sideways when driving? The hitch points looks super strong. but the bottom pole connection looks kind of small in comparison to the rest. But that's just how it looks. It may perform much better than it looks.
I wouldn't be happy myself with how far back and how high the bikes are located trunk access or not. That said I know the pictures don't help it with lens effect. I'm sure it's not as dramatic in real life. But as long as your happy that's all that matters
Like I said the stuff still look like good quality. My only regrets is still not to take advantage of the MINI fini 2 points for stability. One can get it all
. . .
4th Gear
Joined: Apr 2014
Posts: 361
Likes: 1
The Saris does sway, but no more than other hitch racks I've seen, and I too am on the fence about how far it sticks out.
A buddy of mine gets his 1up rack next week and I'm going to see what that looks like. The design of the 1up may mean I could easily modify it to attach directly to the attachment base.
The one showstopper for me with the MiniDoMore and Curt hitches was having to reach up under the bumper to insert the hitch pin.
The 1up does not use a hitch pin, so no reaching. For a pure bike carrier the MiniDoMore/Curt with the 1up is probably the best way to go.
I'll post photos of the 1up next week, along with some close-ups of how it attaches.
4th Gear
Joined: Apr 2014
Posts: 361
Likes: 1
Saris out, 1Up in, lessons learned
The Saris swayed just way to much. After seeing the 1Up in person I decided to go that route.
The 1Up rack is rock solid, no movement at all. Plus it's incredibly easy to install and the easiest bike mounting I have ever seen.
Here is a video review of the 1Up.
Lessons Learned
The 1Up Bike Rack is pricy at around $300 for a single bike rack, but it is unbelievably well made and is easy to install and use. I like this rack.
MiniDoMore, Curt and others place the hitch flush with the rear of the car, or slightly inset. This means accessing the hitch pin requires reaching under the bumper. The MiniFini mounts the hitch outside of the bumper, extending things 6" to 8" from the edge of the bumper; but you have easy access to the hitch pin.
However the 1Up rack does not use a hitch pin. Instead it expands to clamp inside of the hitch (watch the video).
MiniDoMore and Curt are cheaper, and the rack will end up close to the car.
With the MiniFini the rack is further out from the rear bumper, providing easy access to the trunk even with a bike mounted.
I like the extra room, so I am not unhappy with the MiniFini.
However if I were to do it again I would probably go the MiniDoMore or Curt route. I really like how TG has hidden the hitch as shown in his posts above.
The Perfect Bike Carrier for the Mini?
I would probably say the MiniDoMore/Curt hitch paired with the 1Up Bike Rack.
Photos: MiniFini and the 1Up Bike Rack with 2" receiver

2nd Gear
Joined: Jan 2014
Posts: 121
Likes: 1
From: Bethesda, MD USA
Any ideas as to why?
I have the minifini mount (sport and bike) and while it's pretty stable, the clamping scheme they use is ridiculously tedious. Un/Threading T-bolts to dis/mount the bikes all the time is annoying. I'd like to find an alternative. Ideally I'd like something that'd handle up to three bikes (2 adult, 1 child) but I'd settle for two.
Was the Saris sway due to the way it plugged into the receiver? I'm tempted to find a welding shop and have them make me something that'd bolt to the minifini bracket and then into something like the bottom portion of the Saris. I don't really "need" access to the trunk, at least not any more than what the minifini already allows.
Thoughts?
4th Gear
Joined: Apr 2014
Posts: 361
Likes: 1
The Saris comes with a locking bolt that immobilizes the hitch insert, the swaying was caused by flex in the upright support.
If your thinking of welding something to the attachment base keep on mind how you rotate the base during install, anything you weld on must not hit the ground as you rotate the base. I was thinking along this line as well but decided against it for this very reason.
The most stable rack I have found is the 1Up shown above. It does not move when attached and is super easy to use.
The Kuat is just as stable but more expensive.
2nd Gear
Joined: Jan 2014
Posts: 121
Likes: 1
From: Bethesda, MD USA
Ok, so it was the column itself that wasn't stiff enough? That'd be a problem. But just how "much" of a problem? The use-case here is for my wife to carry hers & our childs bike for a few miles to nearby trails, over well-paved city roads.
My though on welding was to avoid plugging into a hitch socket. Go from the minifini bracket straight to a bike rack post. Though I haven't seen enough bike racks to know which would be amenable to such a modification, but the Saris sort-of looked like it might be possible. I'm not looking to weld directly to the sport bracket, but to use the same sort of bolts their bike and ski racks use.
As for rotation, the minifini bike bracket is a beast and it rotates just fine. You wiggle the posts out of the bumper and turn it up, clock-wise, to 90 and remove it. I wouldn't think something adapted would be any more or less the same. I'm guessing you're talking about how wide anything would be? Yeah, that'd be an issue to avoid. A platform kind of mount, like that 1up, could be a rotational problem.
I had no idea just how much of a hassle it was going to be when my wife switched from her VW Cabrio to the R57.
2nd Gear
Joined: Jan 2014
Posts: 121
Likes: 1
From: Bethesda, MD USA
An update, we have the mini fini and have used it several times.
Their bike rack setup is a bit annoying to use. The ski rack setup, however, works great.
Truth be told it might be just as well to use mount that has a single 1.25" receiver mount instead. Either way you're looking at putting something behind the bumper and cutting plastic to gain access to it. The Mini Fini looks nice and performs well as a mount, but it's pricey and likely overkill for most folks.

Thread
Thread Starter
Forum
Replies
Last Post
vulkandino
MINIs & Minis for Sale
8
Oct 31, 2015 08:29 PM
ECSTuning
Vendor Announcements
0
Oct 1, 2015 12:13 PM
ECSTuning
Interior/Exterior Products
0
Sep 29, 2015 12:17 PM
ECSTuning
Vendor Classifieds
0
Sep 29, 2015 12:16 PM