
R59 Mud Flaps


Thread Starter
|
4th Gear
Joined: Sep 2012
Posts: 306
Likes: 1
Mud Flaps
I installed the front OEM Mud Flaps tonight (will do the rear tomorrow, don't worry!) and it went well. The only snag I've run into is there is a plastic bolt/screw that you remove from the bottom of where the flap goes prior to installing. Instead of using that bolt, they supply these plugs. For the life of me, I can not get them to fit. Short of putting the car up on ramps or a lift and hammering them in, I can't figure out the solution. Was wondering if anyone else has installed these and has a tip?
Page 9 (end of step 4) illustrates the plug or "dowel" that will not fit.
http://www.outmotoring.com/images/ho...Flaps_gen2.pdf
Page 9 (end of step 4) illustrates the plug or "dowel" that will not fit.
http://www.outmotoring.com/images/ho...Flaps_gen2.pdf
Thread Starter
|
4th Gear
Joined: Sep 2012
Posts: 306
Likes: 1
I don't. I did solve the mystery though this morning while installing the rear flaps. The screw comes out, but due to the angle on the front I didn't realize there was a plastic piece that needed to come out that it threads into. When I get around to doing it I will get it finished right 

6th Gear
Joined: Mar 2003
Posts: 1,341
Likes: 10
From: Nr. Boston, MA
I don't. I did solve the mystery though this morning while installing the rear flaps. The screw comes out, but due to the angle on the front I didn't realize there was a plastic piece that needed to come out that it threads into. When I get around to doing it I will get it finished right

Thread Starter
|
4th Gear
Joined: Sep 2012
Posts: 306
Likes: 1
I did! I forgot to post them, though. Sorry about that, here they are
http://imgur.com/a/vxwID#0
I'm really happy with them. They look completely natural and not added on or out of place.
Clean car pic with them:
https://www.northamericanmotoring.co...here-photo.jpg
https://www.northamericanmotoring.co...ck-photo_1.jpg
http://imgur.com/a/vxwID#0
I'm really happy with them. They look completely natural and not added on or out of place.
Clean car pic with them:
https://www.northamericanmotoring.co...here-photo.jpg
https://www.northamericanmotoring.co...ck-photo_1.jpg
Trending Topics
6th Gear
Joined: Mar 2003
Posts: 1,341
Likes: 10
From: Nr. Boston, MA
These look great. I'm wondering if at least the front ones will work with the JCW aero kit. It's worth a try, I'll probably pick some up to see. The back of the car doesn't get too bad, but the sides get covered in gunk, especially with the winter wheels which are a little more outset.


6th Gear
Joined: Mar 2003
Posts: 1,341
Likes: 10
From: Nr. Boston, MA

Any vendors interested in filling this gap in the market?

2nd Gear
Joined: May 2012
Posts: 88
Likes: 1
Have you noticed less dirt build up on the rear since installing these? I get tired of how dirty it gets on the back hatch area after just a light rain.

I don't see any mud flaps for MINI withe the JCW Body kits , but could be modify to work. Here are the parts with pics to give you idea of the contours.
R58 Cooper S and R58 Cooper Mud flaps - Front set
http://www.ecstuning.com/Search/SiteSearch/82160415114/ES196382/
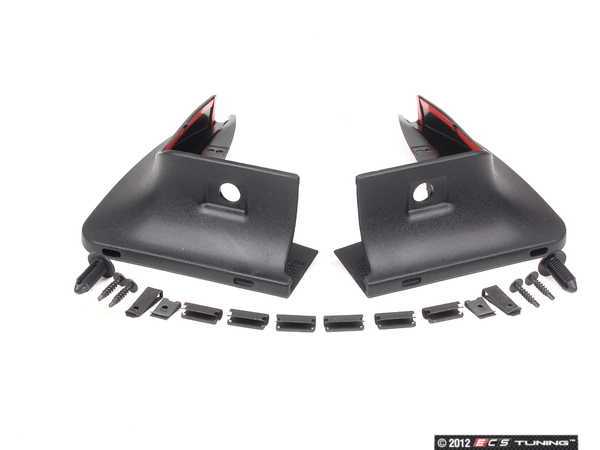
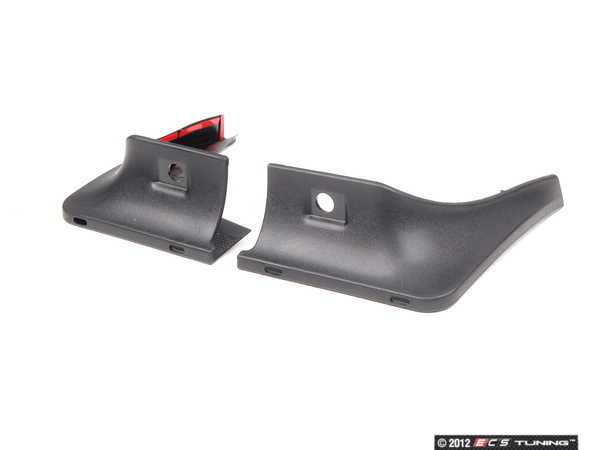
R58 Cooper S / JCW * Fits JCW Rear bumper also * - Rear mud flaps set.
Rear Factory Mud Flaps / Splash Guards Contoured - Priced As Set
http://www.ecstuning.com/Search/SiteSearch/82160415116/ES196384/

THanks and hope that helps.
R58 Cooper S and R58 Cooper Mud flaps - Front set
http://www.ecstuning.com/Search/SiteSearch/82160415114/ES196382/
R58 Cooper S / JCW * Fits JCW Rear bumper also * - Rear mud flaps set.
Rear Factory Mud Flaps / Splash Guards Contoured - Priced As Set
http://www.ecstuning.com/Search/SiteSearch/82160415116/ES196384/
THanks and hope that helps.
__________________

MINI Guru/ MINI Owner Since 2004 | NEW Lifetime Part Replacement | Local Pickup
Milltek | Genuine MINI | Forge Motorsport | NM Engineering | ECS Performance | M7 Speed
Customer Service Hours: 8am-8pm EST|Sales Team Hours: 8am-11pm | SAT 10am-7pm 800.924.5172
MINI Guru/ MINI Owner Since 2004 | NEW Lifetime Part Replacement | Local Pickup
Milltek | Genuine MINI | Forge Motorsport | NM Engineering | ECS Performance | M7 Speed
Customer Service Hours: 8am-8pm EST|Sales Team Hours: 8am-11pm | SAT 10am-7pm 800.924.5172
Last edited by ECSTuning; Jan 2, 2014 at 10:42 AM.
6th Gear
Joined: Mar 2003
Posts: 1,341
Likes: 10
From: Nr. Boston, MA
I don't see any mud flaps for MINI withe the JCW Body kits , but could be modify to work. Here are the parts with pics to give you idea of the contours.
R58 Cooper S and R58 Cooper Mud flaps - Front set
http://www.ecstuning.com/Search/SiteSearch/82160415114/ES196382/
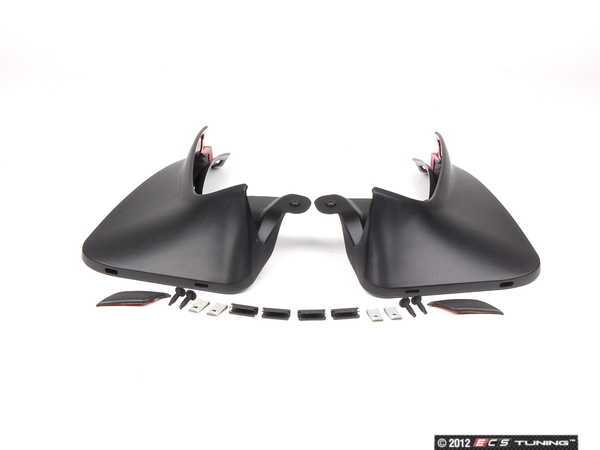
R58 Cooper S - Rear mud flaps set.
Rear Factory Mud Flaps / Splash Guards Contoured - Priced As Set
http://www.ecstuning.com/Search/SiteSearch/82160415116/ES196384/
THanks and hope that helps.
R58 Cooper S and R58 Cooper Mud flaps - Front set
http://www.ecstuning.com/Search/SiteSearch/82160415114/ES196382/
R58 Cooper S - Rear mud flaps set.
Rear Factory Mud Flaps / Splash Guards Contoured - Priced As Set
http://www.ecstuning.com/Search/SiteSearch/82160415116/ES196384/
THanks and hope that helps.
Spiney - Don't know if you saw this but it looks like the rear mud flaps will work on the JCW Rear bumper. 
Part # 82160415116 Rear Factory Mud Flaps / Splash Guards Contoured ( Rear Cooper S and JCW Bumper )
http://www.ecstuning.com/Search/SiteSearch/82160415116/ES196384/
Link to the thread:
https://www.northamericanmotoring.co...ts-new-26.html
Just wanted to let you know.
Part # 82160415116 Rear Factory Mud Flaps / Splash Guards Contoured ( Rear Cooper S and JCW Bumper )
http://www.ecstuning.com/Search/SiteSearch/82160415116/ES196384/
Link to the thread:
https://www.northamericanmotoring.co...ts-new-26.html
Just wanted to let you know.
__________________
MINI Guru/ MINI Owner Since 2004 | NEW Lifetime Part Replacement | Local Pickup
Milltek | Genuine MINI | Forge Motorsport | NM Engineering | ECS Performance | M7 Speed
Customer Service Hours: 8am-8pm EST|Sales Team Hours: 8am-11pm | SAT 10am-7pm 800.924.5172
MINI Guru/ MINI Owner Since 2004 | NEW Lifetime Part Replacement | Local Pickup
Milltek | Genuine MINI | Forge Motorsport | NM Engineering | ECS Performance | M7 Speed
Customer Service Hours: 8am-8pm EST|Sales Team Hours: 8am-11pm | SAT 10am-7pm 800.924.5172
6th Gear
Joined: Mar 2003
Posts: 1,341
Likes: 10
From: Nr. Boston, MA
First attempt to modify the fronts to fit the JCW kit today...
I made a wooden template from a tracing of the car to form them around. Unsurprisingly it turns out that a hairdryer isn't hot enough to soften the plastic sufficiently. I'll borrow a heat gun and have another go next weekend.
I made a wooden template from a tracing of the car to form them around. Unsurprisingly it turns out that a hairdryer isn't hot enough to soften the plastic sufficiently. I'll borrow a heat gun and have another go next weekend.
6th Gear
Joined: Mar 2003
Posts: 1,341
Likes: 10
From: Nr. Boston, MA
Thought I should post what I've done so far "for the record".
I made a tracing of the bottom part of the wheel arch where the flap would fit:

and then cut out some plywood from the tracing to form the flaps around (didn't want to use heat near the car). One form will do, it will just get flipped over for the other side:

I used two sheets of 3/4 inch to begin with, as pictured, but it wasn't thick enough so I added a third sheet later. The flaps aren't a particularly close fit, as you can see here:

Unsurprisingly it turns out that a hairdryer isn't hot enough to soften the plastic sufficiently to be able to reshape them. I'll borrow a heat gun and have another go next weekend.
There's a little pip/protrusion on the flap just where the seam between the wheelarch and the sill trim would be on the non-JCW car, I might need to cut that off if the similar seam lands in a different place on the JCW kit.
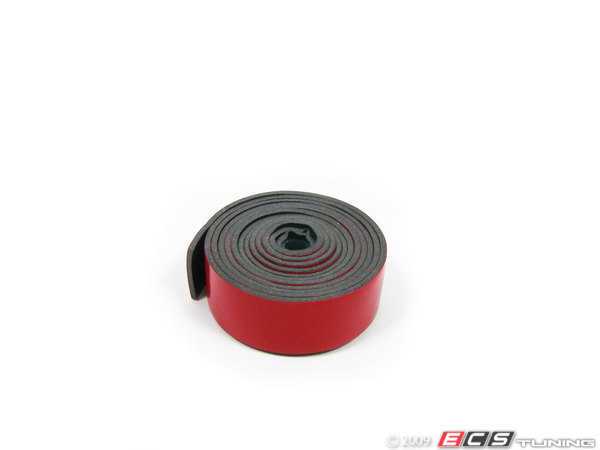
The only other issue I see is that there's a double-sided tape on the mudflap to help secure it to the car, and I'm expecting this to get destroyed either by the heat gun, or by me if I try to remove it and put it back after heating. Does anyone have any idea what that tape would be and where i could get some more?
I made a tracing of the bottom part of the wheel arch where the flap would fit:
and then cut out some plywood from the tracing to form the flaps around (didn't want to use heat near the car). One form will do, it will just get flipped over for the other side:
I used two sheets of 3/4 inch to begin with, as pictured, but it wasn't thick enough so I added a third sheet later. The flaps aren't a particularly close fit, as you can see here:
Unsurprisingly it turns out that a hairdryer isn't hot enough to soften the plastic sufficiently to be able to reshape them. I'll borrow a heat gun and have another go next weekend.
There's a little pip/protrusion on the flap just where the seam between the wheelarch and the sill trim would be on the non-JCW car, I might need to cut that off if the similar seam lands in a different place on the JCW kit.
The only other issue I see is that there's a double-sided tape on the mudflap to help secure it to the car, and I'm expecting this to get destroyed either by the heat gun, or by me if I try to remove it and put it back after heating. Does anyone have any idea what that tape would be and where i could get some more?
Its 3m tape double sided tape. Red backing .
It comes with the red plastic peal backing.
Like this stuff:
http://www.ecstuning.com/Search/SiteSearch/Adhesive_Tape/ES244323/
Good luck on the project, looks great.
It comes with the red plastic peal backing.
Like this stuff:
http://www.ecstuning.com/Search/SiteSearch/Adhesive_Tape/ES244323/
Good luck on the project, looks great.
__________________
MINI Guru/ MINI Owner Since 2004 | NEW Lifetime Part Replacement | Local Pickup
Milltek | Genuine MINI | Forge Motorsport | NM Engineering | ECS Performance | M7 Speed
Customer Service Hours: 8am-8pm EST|Sales Team Hours: 8am-11pm | SAT 10am-7pm 800.924.5172
MINI Guru/ MINI Owner Since 2004 | NEW Lifetime Part Replacement | Local Pickup
Milltek | Genuine MINI | Forge Motorsport | NM Engineering | ECS Performance | M7 Speed
Customer Service Hours: 8am-8pm EST|Sales Team Hours: 8am-11pm | SAT 10am-7pm 800.924.5172

6th Gear


Joined: Jun 2013
Posts: 1,614
Likes: 56
From: Western PA
A few tips...
1. this is the tape you want to use: http://solutions.3m.com/wps/portal/3...M-VHB-RP-Tape/
it comes in different width...
Also, most modern double sided tape have a contact reacting agent. That means that the bond gets stronger after some time in contact. So the best is to have some pressure between the two pieces taped for a day. If you can't let it seat without having any jarring or pressure on the mud flap for about a day.
2. What is most important in heating up plastics is for the heat to reach the core of the material as evenly as possible. So, it would be best to heat it on both sides. I'm use to that when doing hand model product prototypes. Ideally I would remove the old tape so i can do so. If that's not possible just make sure you take your time. Go back and forth with the heat gun relatively quickly and take your time. What you don't want to do is heat the surface of the plastic overly quickly that it will either burn or bubble before the core gets hot enough to form. Keep in mind some plastic don't soften very well under heat and rather have a tendency to burn before melting again so you need extra care when that is the case. As always do a test on an area that does not show first
Otherwise good start with this!
Last edited by TG.; Jan 28, 2014 at 09:02 AM.
6th Gear
Joined: Mar 2003
Posts: 1,341
Likes: 10
From: Nr. Boston, MA
A few tips...
1. this is the tape you want to use: http://solutions.3m.com/wps/portal/3...M-VHB-RP-Tape/
it comes in different width...
1. this is the tape you want to use: http://solutions.3m.com/wps/portal/3...M-VHB-RP-Tape/
it comes in different width...
6th Gear
Joined: Jun 2013
Posts: 1,614
Likes: 56
From: Western PA
Thanks for the tips guys. Is this the same/similar stuff?: 3M tape at AutoZone. I can get this locally.
6th Gear
Joined: Mar 2003
Posts: 1,341
Likes: 10
From: Nr. Boston, MA
Mudflap fitment part deux...
Borrowed a heat gun from a colleague, and managed to re-shape the flaps. I screwed the flap I was modifying lightly to a scrap piece of plywood, using the existing mounting holes plus a couple of other screws to stop it moving around too much. A couple of the screws were long enough to go through the plywood and I used them to clamp into my Workmate to give something to push against.


I needed to cut off the little pips that fit into the side sill seam, they don't line up at all, and they also stop the flap from moulding to the form as closely as I wanted it to.
Warm the inside of the flap with the heat gun. Don't get too close, don't linger in one place for too long, and keep checking the outside to see when it's sufficiently warm. It seemed to be enough when the outside became uncomfortable to touch with your bare hand.

I then pushed the plywood form into the flap, and then held it there until the flap cooled enough. I also held the flap against the sides of the form with light pressure from my fingers until the flap had cooled.
Here's a trial fit (you can also see WHY I want them on the car so badly, this is about 150 miles worth of crap from the roads as they currently are, I cleaned the car last weekend!):

For comparison here is the other side before I modified it. You can see the gaps fairly clearly:

Full fitting will have to wait until tomorrow, it's too dark to wash the car now.
Borrowed a heat gun from a colleague, and managed to re-shape the flaps. I screwed the flap I was modifying lightly to a scrap piece of plywood, using the existing mounting holes plus a couple of other screws to stop it moving around too much. A couple of the screws were long enough to go through the plywood and I used them to clamp into my Workmate to give something to push against.
I needed to cut off the little pips that fit into the side sill seam, they don't line up at all, and they also stop the flap from moulding to the form as closely as I wanted it to.
Warm the inside of the flap with the heat gun. Don't get too close, don't linger in one place for too long, and keep checking the outside to see when it's sufficiently warm. It seemed to be enough when the outside became uncomfortable to touch with your bare hand.
I then pushed the plywood form into the flap, and then held it there until the flap cooled enough. I also held the flap against the sides of the form with light pressure from my fingers until the flap had cooled.
Here's a trial fit (you can also see WHY I want them on the car so badly, this is about 150 miles worth of crap from the roads as they currently are, I cleaned the car last weekend!):
For comparison here is the other side before I modified it. You can see the gaps fairly clearly:
Full fitting will have to wait until tomorrow, it's too dark to wash the car now.