
R59 Mud Flaps


6th Gear
Joined: Mar 2003
Posts: 1,341
Likes: 10
From: Nr. Boston, MA
Well, they're on. I'm not completely happy with them, but they look fine.
I put on the new 3M tape from AutoZone:

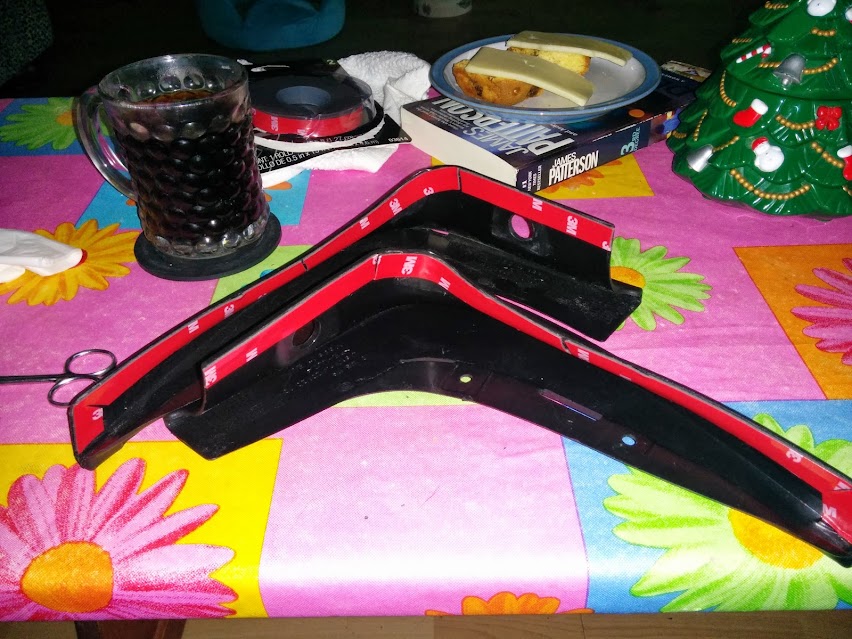
The flaps come with a number of fasteners, some of which I managed to use and some of which wouldn't fit:

Here's the flap held up to the car, with the wheel removed:

Underneath the sill there's a large plug (poor picture, sorry):

You are supposed to remove this and MINI supplies a big plastic rivet that goes through the flap and into this hole. Because of the reshaping of the sill due to the JCW kit this hole both doesn't line up, and is to far from the flap for the supplied rivet to fit. This is the part that I'm unhappy about. I might try to do something better later, but for now I just left the plug in, and did not fit the rivet.
First step is to peel off the backing from the tape, and push the flap into place. Hold it for a little while to make sure it has stuck before you start on the rest of the installation. The upper two clips are usable, either squeeze them in carefully with slip-joint pliers and some protection on the outer visible edge of the flap, or tap them home with a hammer and a piece of wood or a screwdriver. The kit has clips with threaded holes that you are supposed to slide over the edge of the inner wheelarch liner and use screws to hold them in, but I could not get the liner edge out and so I just lightly screwed directly into the liner for now. The lowest clip doesn't line up at all, so I used a small coarse thread screw and screwed lightly into the leading edge of the sill.

I'm about 75% happy with the installation, but from the outside they look fine:

EDIT: Looking at these pictures again, I realize that I'm going to have to do something to plug the hole at the bottom, or it will trap all sorts of mud. Stay tuned...
I put on the new 3M tape from AutoZone:
The flaps come with a number of fasteners, some of which I managed to use and some of which wouldn't fit:
Here's the flap held up to the car, with the wheel removed:
Underneath the sill there's a large plug (poor picture, sorry):
You are supposed to remove this and MINI supplies a big plastic rivet that goes through the flap and into this hole. Because of the reshaping of the sill due to the JCW kit this hole both doesn't line up, and is to far from the flap for the supplied rivet to fit. This is the part that I'm unhappy about. I might try to do something better later, but for now I just left the plug in, and did not fit the rivet.
First step is to peel off the backing from the tape, and push the flap into place. Hold it for a little while to make sure it has stuck before you start on the rest of the installation. The upper two clips are usable, either squeeze them in carefully with slip-joint pliers and some protection on the outer visible edge of the flap, or tap them home with a hammer and a piece of wood or a screwdriver. The kit has clips with threaded holes that you are supposed to slide over the edge of the inner wheelarch liner and use screws to hold them in, but I could not get the liner edge out and so I just lightly screwed directly into the liner for now. The lowest clip doesn't line up at all, so I used a small coarse thread screw and screwed lightly into the leading edge of the sill.
I'm about 75% happy with the installation, but from the outside they look fine:
EDIT: Looking at these pictures again, I realize that I'm going to have to do something to plug the hole at the bottom, or it will trap all sorts of mud. Stay tuned...
Last edited by spiney; Oct 28, 2014 at 09:00 AM. Reason: Spelling

Great job, think it looks great.
The seam on the flap to the JCW side skirt looks factory. Find a piece of thin plastic to cover over or fill the gap. Adhere it to the fabric mesh ( wheel well material) which you can use little screws, stainless steel screws on. I think that would work.
The seam on the flap to the JCW side skirt looks factory. Find a piece of thin plastic to cover over or fill the gap. Adhere it to the fabric mesh ( wheel well material) which you can use little screws, stainless steel screws on. I think that would work.
__________________

MINI Guru/ MINI Owner Since 2004 | NEW Lifetime Part Replacement | Local Pickup
Milltek | Genuine MINI | Forge Motorsport | NM Engineering | ECS Performance | M7 Speed
Customer Service Hours: 8am-8pm EST|Sales Team Hours: 8am-11pm | SAT 10am-7pm 800.924.5172
MINI Guru/ MINI Owner Since 2004 | NEW Lifetime Part Replacement | Local Pickup
Milltek | Genuine MINI | Forge Motorsport | NM Engineering | ECS Performance | M7 Speed
Customer Service Hours: 8am-8pm EST|Sales Team Hours: 8am-11pm | SAT 10am-7pm 800.924.5172
6th Gear
Joined: Mar 2003
Posts: 1,341
Likes: 10
From: Nr. Boston, MA
Covered the gaps today. I'd been struggling to find some black plastic sheet, and spent a bit of time wandering around Lowes yesterday. Found this flashing piece in the roofing department (normally used where vent lines poke through the roof):

It's a good thickness and a nice textured finish. Couple of cuts later I had this:

and a small screw and some clear silicone outdoor caulk and the hole is blocked off:

It's a good thickness and a nice textured finish. Couple of cuts later I had this:
and a small screw and some clear silicone outdoor caulk and the hole is blocked off:
6th Gear
Joined: Mar 2003
Posts: 1,341
Likes: 10
From: Nr. Boston, MA
I also fitted the rear mudflaps too. Much easier. They weren't a perfect fit initially:

but a quick trim:

a couple of extra bits of the 3M body tape:

and they're much better:

I'll get some proper pictures of them on the car when the weather gets a bit better.
but a quick trim:
a couple of extra bits of the 3M body tape:
and they're much better:
I'll get some proper pictures of them on the car when the weather gets a bit better.


Looks great, glad you found that filler piece for the front, keeps the snow and grim from building up in that area. Great DIY mod. +1 on your ingenuity.
__________________
MINI Guru/ MINI Owner Since 2004 | NEW Lifetime Part Replacement | Local Pickup
Milltek | Genuine MINI | Forge Motorsport | NM Engineering | ECS Performance | M7 Speed
Customer Service Hours: 8am-8pm EST|Sales Team Hours: 8am-11pm | SAT 10am-7pm 800.924.5172
MINI Guru/ MINI Owner Since 2004 | NEW Lifetime Part Replacement | Local Pickup
Milltek | Genuine MINI | Forge Motorsport | NM Engineering | ECS Performance | M7 Speed
Customer Service Hours: 8am-8pm EST|Sales Team Hours: 8am-11pm | SAT 10am-7pm 800.924.5172
6th Gear
Joined: Mar 2003
Posts: 1,341
Likes: 10
From: Nr. Boston, MA
Two week update:
The weather has been sufficiently crappy to get an idea of the effectiveness. I think they really help. Here are the sides:


There's plenty of dirt around, but way less splatter and spray as there was last time.
The benefit on the rear is less obvious:


I think the rears have helped keep it a bit cleaner, but it's hard to tell.
The weather has been sufficiently crappy to get an idea of the effectiveness. I think they really help. Here are the sides:
There's plenty of dirt around, but way less splatter and spray as there was last time.
The benefit on the rear is less obvious:
I think the rears have helped keep it a bit cleaner, but it's hard to tell.


Thanks for the update. Like the testing in real world. 
__________________
MINI Guru/ MINI Owner Since 2004 | NEW Lifetime Part Replacement | Local Pickup
Milltek | Genuine MINI | Forge Motorsport | NM Engineering | ECS Performance | M7 Speed
Customer Service Hours: 8am-8pm EST|Sales Team Hours: 8am-11pm | SAT 10am-7pm 800.924.5172
MINI Guru/ MINI Owner Since 2004 | NEW Lifetime Part Replacement | Local Pickup
Milltek | Genuine MINI | Forge Motorsport | NM Engineering | ECS Performance | M7 Speed
Customer Service Hours: 8am-8pm EST|Sales Team Hours: 8am-11pm | SAT 10am-7pm 800.924.5172
5th Gear
Joined: Nov 2015
Posts: 963
Likes: 5
From: Formerly "Glacial" ME, now FL, USA
Excellent work. Really looks like a factory fitment. And those flaps will keep the stuff the tires kick up from directly impacting the paint and lower plastic trim. Win-win.
I ordered a set about 3 weeks ago and are in a box in the boot. Don't have the JCW body kit, so should't be as involved, but not going to attempt install right away. The temperature is dropping through 6 degrees F and our garage isn't insulated. Something I should have done long ago.
I ordered a set about 3 weeks ago and are in a box in the boot. Don't have the JCW body kit, so should't be as involved, but not going to attempt install right away. The temperature is dropping through 6 degrees F and our garage isn't insulated. Something I should have done long ago.

Thread
Thread Starter
Forum
Replies
Last Post
Lex2008
How to
47
Jun 15, 2022 06:18 AM
daviday
R50/R53 :: Hatch Talk (2002-2006)
1
Sep 25, 2015 01:31 AM