
How To Trunk lid grip button not working – DIY


Thread Starter
|
Neutral
Joined: Jun 2013
Posts: 5
Likes: 4
Trunk lid grip button not working – DIY
For all the help I’ve received from DIY posts and videos, here’s my first attempt to ‘give back’….
Ride: 2007 Cooper S R56
Problem:
Rear hatch won't open via the handle on the door.
Pops open fine using the key fob.
On my 2007 Mini Cooper S (R56) the rear hatch / trunk lid failed to open using the handle on the trunk. It would only open using the button on the remote key fob.
It also seemed I wasn't getting the same 'feel' when squeezing the handle.
I had assumed (incorrectly) that the latch handle was a lever that pulled a cable attached to a lock mechanism. With only initial research I guessed one of the following:
I wondered if somehow the locking options were disabling the rear handle, even though the car was unlocked. I followed the owners manual (page 23) to set the Automatic Locking option to off - central locking system remains unlocked. No luck, and no change.
Next I checked #3 - emergency release cable - since it didn't involve disassembly.
Page 23 of the owner's manual also describes how to lift the rear seat to locate the emergency pull cable. I found the cable pull ring on the passenger side and pulled.
It worked, there seemed to be a reasonable amount of slack in the cable, and it returned when released. Again, not the problem.
I finally went after #1 - failure in the mechanism.
Once removed, I discovered the handle didn't attach to a cable. Instead it was connected to an electrical switch, probably activating the same motor circuit the key fob used. I tested if the switch was bad by jumping the leads at the connector to open the door. This worked, pointing to the handle switch as the problem.
The DIY for the testing and replacement follows….
Ride: 2007 Cooper S R56
Problem:
Rear hatch won't open via the handle on the door.
Pops open fine using the key fob.
On my 2007 Mini Cooper S (R56) the rear hatch / trunk lid failed to open using the handle on the trunk. It would only open using the button on the remote key fob.
It also seemed I wasn't getting the same 'feel' when squeezing the handle.
I had assumed (incorrectly) that the latch handle was a lever that pulled a cable attached to a lock mechanism. With only initial research I guessed one of the following:
- Broken latch lever and/or attached cable
- Programming option/error on the key lock function
- Issue with emergency release cable
I wondered if somehow the locking options were disabling the rear handle, even though the car was unlocked. I followed the owners manual (page 23) to set the Automatic Locking option to off - central locking system remains unlocked. No luck, and no change.
Next I checked #3 - emergency release cable - since it didn't involve disassembly.
Page 23 of the owner's manual also describes how to lift the rear seat to locate the emergency pull cable. I found the cable pull ring on the passenger side and pulled.
It worked, there seemed to be a reasonable amount of slack in the cable, and it returned when released. Again, not the problem.
I finally went after #1 - failure in the mechanism.
Once removed, I discovered the handle didn't attach to a cable. Instead it was connected to an electrical switch, probably activating the same motor circuit the key fob used. I tested if the switch was bad by jumping the leads at the connector to open the door. This worked, pointing to the handle switch as the problem.
The DIY for the testing and replacement follows….
Thread Starter
|
Neutral
Joined: Jun 2013
Posts: 5
Likes: 4
Disassembly and Diagnosis
Disassembly and Diagnosis
Remove license plate and frame
Parts/tools: Phillips screwdriver
Remove trunk lid grip
Parts/tools: T20 Torx screwdriver

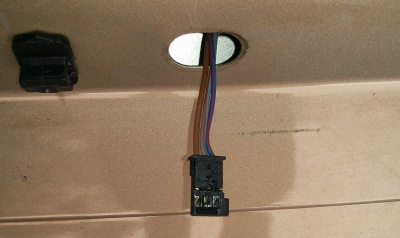
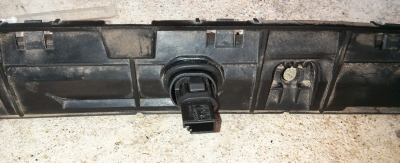
Disconnect electric wiring harness
Parts/tools: Small jeweler's screwdriver
Inspect the switch
On my Cooper it appears some plastic failed around the switch, either on the side clips securing the switch, the latch handle inside, or both.

Test the switch function
Parts/tools: paper clip, insulated pliers
The handle in the trunk grip is not a physical lever to a release cable. Instead it's a simple electrical switch. It appears to accomplish the same function as the key fob button, activating the motor that releases the latch. It's a good idea to test/mimic the switch function to make sure that's the culprit.
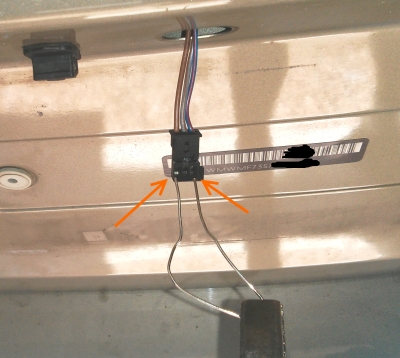
You can do this by 'jumping' the brown and blue/red wires

Next: Replace and Install
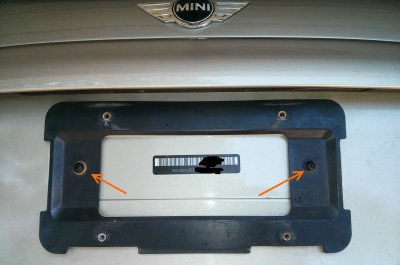
Remove license plate and frame
Parts/tools: Phillips screwdriver
- Remove license plate
- Remove 2 phillips head screws holding license plate holder frame
Remove trunk lid grip
Parts/tools: T20 Torx screwdriver
- Open hatch halfway.
Makes it easier to get at screws, prevents grip from falling off - Remove 4 T20 screws. A little difficult to get off
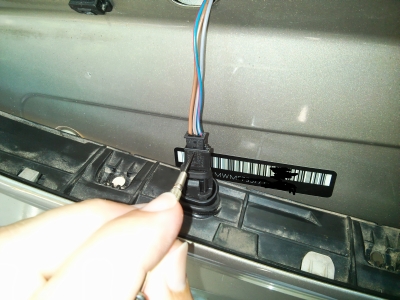
Disconnect electric wiring harness
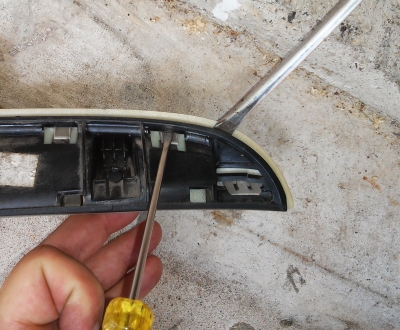
Parts/tools: Small jeweler's screwdriver
- Place the screwdriver into the slot pictured
- Push down, wiggle upper harness sideways to work the plug out
- Set the trunk lid grip assembly off to the side on a protected surface
(towel, cardboard, etc.)
Inspect the switch
On my Cooper it appears some plastic failed around the switch, either on the side clips securing the switch, the latch handle inside, or both.
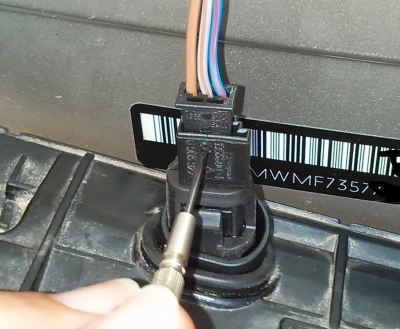
Test the switch function
Parts/tools: paper clip, insulated pliers
The handle in the trunk grip is not a physical lever to a release cable. Instead it's a simple electrical switch. It appears to accomplish the same function as the key fob button, activating the motor that releases the latch. It's a good idea to test/mimic the switch function to make sure that's the culprit.
You can do this by 'jumping' the brown and blue/red wires
- Form a paper clip to the width of the 2 outside contacts (brown and blue/red wires)
- Hold the paper clip with insulated pliers, touch the 2 outside metal contacts inside the plug.
- The hatch should pop open.
If it does it confirms that the switch is at fault
Next: Replace and Install
Thread Starter
|
Neutral
Joined: Jun 2013
Posts: 5
Likes: 4
Replace and Install
Replace and Install
Now that you know the handle switch is at fault, here’s how to replace and repair….
Replace the trunk lid grip
Parts/tools:
Mini Cooper part 51132753603:
Handle, trunk lid, with lamp unit Chrome line exterior
Unfortunately you can't order just the switch - it appears to be molded into the housing.
Likewise, you can't even order the black plastic housing.
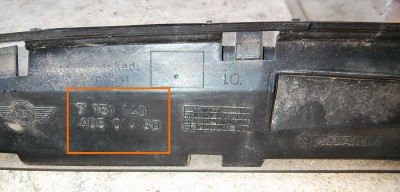
It has a BMW-like part number on it (7 151 140 405 014 50),
but I can't locate that part for sale anywhere (and no Google hits either).
A call to bavauto.com confirms this.
It seems the only option is to order the entire trunk lid grip assembly,
including the cosmetic cover - which you likely don't need.
These are your options, according the listing at RealOem.com :
Swap cosmetic cover
Parts/tools: 2 flathead screwdrivers – one small head, one larger
Remove the plastic cosmetic cover from the old assembly:
Install the original cosmetic cover onto the new assembly:
Reinstall in reverse - very easy.
Now that you know the handle switch is at fault, here’s how to replace and repair….
Replace the trunk lid grip
Parts/tools:
Mini Cooper part 51132753603:
Handle, trunk lid, with lamp unit Chrome line exterior
Unfortunately you can't order just the switch - it appears to be molded into the housing.
Likewise, you can't even order the black plastic housing.
It has a BMW-like part number on it (7 151 140 405 014 50),
but I can't locate that part for sale anywhere (and no Google hits either).
A call to bavauto.com confirms this.
It seems the only option is to order the entire trunk lid grip assembly,
including the cosmetic cover - which you likely don't need.
These are your options, according the listing at RealOem.com :
- $94.52 Chrome line exterior 51132753603
- $97.37 Trunk lid grip primed 51132754240
- $185.51 Trunk lid grip painted (specify color code) 51130430312
Swap cosmetic cover
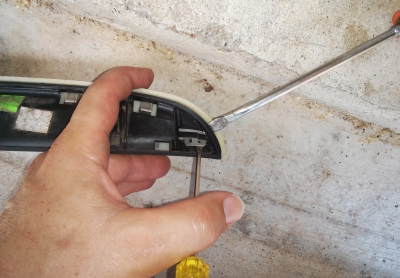
Parts/tools: 2 flathead screwdrivers – one small head, one larger
Remove the plastic cosmetic cover from the old assembly:
- Place the old assembly face down on a covered surface (towel, cardboard)
to protect the cosmetic cover - Remove the cosmetic cover by *gently* prying it off the retaining clips on the black housing:
- Start at one end (far right or left) and free it from this outer clip.
Do this by lifting up on the tab with a small screwdriver
while simultaneously separating the cover from the housing with a 2nd screwdriver.
- Remove the series of inner tabs/clips.
Place the small screwdriver inside the tab and push down slightly,
effectively lifting the edge of the cover over the 'teeth' of the tab on the black housing.
Simultaneously separate the cover from the housing with a 2nd screwdriver.
Work your way down the line to free all inner clips. - Remove the other outer clip as described above
- The cosmetic cover should now lift away from the black housing.
Install the original cosmetic cover onto the new assembly:
- Hold the original cosmetic cover face down in one hand,
the new black housing in the other. - Line up the bottoms of each by aligning the bottom clips
- Pop the tabs in one by one working from end to end
Reinstall in reverse - very easy.
- Check that the rubber seal/O ring is on around the switch
- Plug electrical connection back together
- Install 4 torx screws holding the grip to the hatch/door
- Optional - test operation of the handle
- Install license plate holder frame, then license plate


+1 Nice write up. And a great job on the walk through.
Yes the part number for just the Trunk lid grip base backing part does not come up. Its only as one full part. Popping the rear cover off is great for people who want to transfer the internals and save on painting the new one.
Trunk Lid Grip - Primed Part number 51132754240
http://www.ecstuning.com/Search/SiteSearch/51132754240/
Don't forget there is also the Carbon Fiber version also. Part number 51130415377
http://www.ecstuning.com/Search/SiteSearch/51130415377/
And a Chrome version :
51132753603 Trunk Lid Grip - Chrome
http://www.ecstuning.com/Search/SiteSearch/51132753603/
Button Rubber itself: https://www.ecstuning.com/b-bremmen-...132753603~brp/
Thanks
__________________

MINI Guru/ MINI Owner Since 2004 | NEW Lifetime Part Replacement | Local Pickup
Milltek | Genuine MINI | Forge Motorsport | NM Engineering | ECS Performance | M7 Speed
Customer Service Hours: 8am-8pm EST|Sales Team Hours: 8am-11pm | SAT 10am-7pm 800.924.5172
MINI Guru/ MINI Owner Since 2004 | NEW Lifetime Part Replacement | Local Pickup
Milltek | Genuine MINI | Forge Motorsport | NM Engineering | ECS Performance | M7 Speed
Customer Service Hours: 8am-8pm EST|Sales Team Hours: 8am-11pm | SAT 10am-7pm 800.924.5172
Last edited by ECSTuning; Jun 19, 2024 at 07:06 AM.

2nd Gear
Joined: Nov 2012
Posts: 97
Likes: 3
Thanks OP for a great post!
This happened to my on my Cooper (also 2007) this past week. I tried the other options of reset assuming it happened when I unhooked the battery during a recent repair. After that I assumed the switch itself was at fault, but haven't dove any deeper towards its repair. Thank you for very detailed DIY on this replacement
Mods: Make sticky/ duplicate in DIY section
Trending Topics

2nd Gear
Joined: Feb 2011
Posts: 51
Likes: 1
From: San Diego, CA
Thank you for sharing! I have the same annoying problem. I tried inspecting this myself but got as far as trying to remove that wired quick disconnect and could not get it. I'll have to give that small screw driver a try.


I've had the problem for two years! Finally got around this week to taking it apart to see what's what. Googling the part # led me to your thread. Thanks — great write-up. I'm sure I have the same problem.
2nd Gear
Joined: Nov 2012
Posts: 97
Likes: 3
As a follow up, since 'gkp' replied, I replaced my switch with a new one purchased from ECS and got it painted, installed it, and it works like new.
As a side note, it is very hard to remove the old painted part from the switch part. I was getting my new one painted anyway, but I tried to separate the old one regardless. I was not successful and broke many clips. I would set aside some money to paint the new piece just in case you fail at the separation of the old one like me.
As a side note, it is very hard to remove the old painted part from the switch part. I was getting my new one painted anyway, but I tried to separate the old one regardless. I was not successful and broke many clips. I would set aside some money to paint the new piece just in case you fail at the separation of the old one like me.


The CF version does look very nice in person. 
__________________
MINI Guru/ MINI Owner Since 2004 | NEW Lifetime Part Replacement | Local Pickup
Milltek | Genuine MINI | Forge Motorsport | NM Engineering | ECS Performance | M7 Speed
Customer Service Hours: 8am-8pm EST|Sales Team Hours: 8am-11pm | SAT 10am-7pm 800.924.5172
MINI Guru/ MINI Owner Since 2004 | NEW Lifetime Part Replacement | Local Pickup
Milltek | Genuine MINI | Forge Motorsport | NM Engineering | ECS Performance | M7 Speed
Customer Service Hours: 8am-8pm EST|Sales Team Hours: 8am-11pm | SAT 10am-7pm 800.924.5172

Nice
__________________
MINI Guru/ MINI Owner Since 2004 | NEW Lifetime Part Replacement | Local Pickup
Milltek | Genuine MINI | Forge Motorsport | NM Engineering | ECS Performance | M7 Speed
Customer Service Hours: 8am-8pm EST|Sales Team Hours: 8am-11pm | SAT 10am-7pm 800.924.5172
MINI Guru/ MINI Owner Since 2004 | NEW Lifetime Part Replacement | Local Pickup
Milltek | Genuine MINI | Forge Motorsport | NM Engineering | ECS Performance | M7 Speed
Customer Service Hours: 8am-8pm EST|Sales Team Hours: 8am-11pm | SAT 10am-7pm 800.924.5172

2nd Gear
Joined: Jan 2009
Posts: 142
Likes: 0
From: Florence, Oregon
Had the same issue with my 2007 hatchback. Exterior hatch button no longer worked, and the lock was beginning to spontaneously unlock the hatch while the car was moving - usually while backing out of the garage. Fob button worked correctly.
Removed the exterior hatch handle and found the wiring connector was not fully locked together. Pulled apart without unlocking the connector lock pin. Suspect the contacts were just close enough to hit during car movement, which apparently triggered the unlock. Securely mated the connection and taped. So far, everything is working correctly.
Removed the exterior hatch handle and found the wiring connector was not fully locked together. Pulled apart without unlocking the connector lock pin. Suspect the contacts were just close enough to hit during car movement, which apparently triggered the unlock. Securely mated the connection and taped. So far, everything is working correctly.

2nd Gear
Joined: May 2008
Posts: 93
Likes: 1
From: Lake Zurich, IL
Thanks for the write up and photos!
I found it was not necessary to remove the license plate or holder to remove the handle.
However, If you live where the roads are salted you should remove the plate and get rid if the rust on the captured license plate nuts yearly or they will make it impossible to change the plate without damaging the plate holder

1st Gear
Joined: Mar 2012
Posts: 43
Likes: 0
I've been having the same issue with my 2010 justa - FOB works fine, but the button stopped working. Previously I opened up the switch and found the little plastic holder was broken and I was able to hold it with stings. It stopped working again, so I tried to test the switch using above method.
You can do this by 'jumping' the brown and blue/red wires
When I jumped the wires with paperclip, nothing happens. Any ideas or suggestions?
TIA
jh
You can do this by 'jumping' the brown and blue/red wires
When I jumped the wires with paperclip, nothing happens. Any ideas or suggestions?
TIA
jh

Glad you got it fixed and can use the trunk handle again.
__________________
MINI Guru/ MINI Owner Since 2004 | NEW Lifetime Part Replacement | Local Pickup
Milltek | Genuine MINI | Forge Motorsport | NM Engineering | ECS Performance | M7 Speed
Customer Service Hours: 8am-8pm EST|Sales Team Hours: 8am-11pm | SAT 10am-7pm 800.924.5172
MINI Guru/ MINI Owner Since 2004 | NEW Lifetime Part Replacement | Local Pickup
Milltek | Genuine MINI | Forge Motorsport | NM Engineering | ECS Performance | M7 Speed
Customer Service Hours: 8am-8pm EST|Sales Team Hours: 8am-11pm | SAT 10am-7pm 800.924.5172

1st Gear
Joined: Apr 2014
Posts: 36
Likes: 1
I had an issue with my grip not working as well on my previous mini. It would randomly open while I was driving and you could hear it clicking all the time.
Took it to the dealership and had the grip not working on three different occasions... Turns out that there was a seal that was supposed to be there to keep the water out that wasn't there. (I wish I could tell you why)
They put the deal back in and no more problems.
I've learned that my minis (on #2) are like super models with severe arthritis... Nice to look at and they typically steal the hearts of men, but every now and again they have days when the most basic tasks are hard to complete.

Neutral
Joined: Jun 2015
Posts: 5
Likes: 0
From: Virginia
I've been having the same issue with my 2010 justa - FOB works fine, but the button stopped working. Previously I opened up the switch and found the little plastic holder was broken and I was able to hold it with stings. It stopped working again, so I tried to test the switch using above method.
You can do this by 'jumping' the brown and blue/red wires
When I jumped the wires with paperclip, nothing happens. Any ideas or suggestions?
TIA
jh
You can do this by 'jumping' the brown and blue/red wires
When I jumped the wires with paperclip, nothing happens. Any ideas or suggestions?
TIA
jh


4th Gear
Joined: Aug 2015
Posts: 389
Likes: 9
From: south florida
sub'd for diy and part numbers later
the grip on mine (rubber/plastic) disintegrated, i can still open the hatch by hand if i can find the tiny button up in the handle.
is the exterior painted trim really that hard to swap over - are the clips just brittle and fall apart or just a pita to separate the two pieces?
the grip on mine (rubber/plastic) disintegrated, i can still open the hatch by hand if i can find the tiny button up in the handle.
is the exterior painted trim really that hard to swap over - are the clips just brittle and fall apart or just a pita to separate the two pieces?
The part number are linked above.
__________________
MINI Guru/ MINI Owner Since 2004 | NEW Lifetime Part Replacement | Local Pickup
Milltek | Genuine MINI | Forge Motorsport | NM Engineering | ECS Performance | M7 Speed
Customer Service Hours: 8am-8pm EST|Sales Team Hours: 8am-11pm | SAT 10am-7pm 800.924.5172
MINI Guru/ MINI Owner Since 2004 | NEW Lifetime Part Replacement | Local Pickup
Milltek | Genuine MINI | Forge Motorsport | NM Engineering | ECS Performance | M7 Speed
Customer Service Hours: 8am-8pm EST|Sales Team Hours: 8am-11pm | SAT 10am-7pm 800.924.5172