

R56 shifter play


Thread Starter
|
2nd Gear
Joined: Aug 2010
Posts: 55
Likes: 0
shifter play
it seems like it is a fairly common complaint that there is a bit of play in the shifter assembly, maybe like 1/4" of wiggle from the ****. It looks like there are no after-market stiffer bushings out there to fix this. Has anyone figured out how to clean up this slop or is everyone here just dealing with it? I tried the JCW shifter and it felt very crisp. is there a drop in bushing (or otherwise) from the JCW to the S that would help?
-Alex
-Alex

2nd Gear
Joined: Mar 2010
Posts: 67
Likes: 0
Shifter play fix!!
Ok .... after much NAM research and a trip to lowes I found a fix for the replacement horizontal rod bushing on the shifter. Background.... I installed a b&m short shifter and after installation I had about an inch of play while In gear and the plastic horizontal bushing wouldn't stay in. Well I went to lowes and found this bronze flange in the hardware dept, we're the specialty nuts bolts and bushings are.
http://www.lowes.com/ProductDisplay?...llow&cId=PDIO1
I removed the plastic bushing and cut about a half inch of the small side of the brone flange, roughed up the outside of the flange with some sandpaper,mixed up some quick dry jb weld and coated the outside of the flange and slide it into the sleeve from the outside and made sure the shifter was seated in the flange. It should fit perfect. Then coat the outside of the flange where the lip of the flange meets the black lever. Let it dry over night and ur good. No more play

2nd Gear
Joined: Mar 2010
Posts: 67
Likes: 0
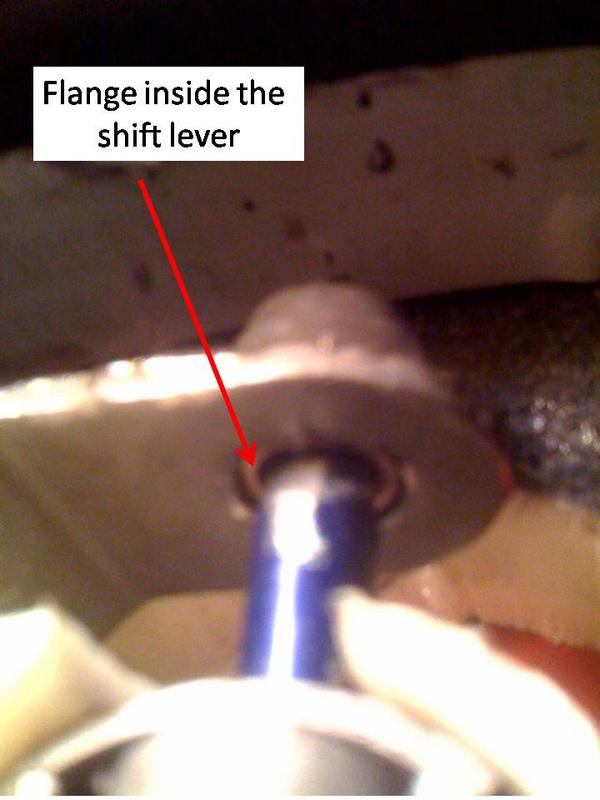
Shifter Pics
Ok guys, I should have taken pics as I was doing it but at the time wasn't sure if it would work.....so these are all "after" pics
Here is the original bushing that wouldn't stay in

Here is the piece I cut off the flange and DID NOT USE, again, I used the end with the lip

This is after I installed the flange, I coated the outide of the flange with JB weld and just slide it in, being carefull not to get any of it on the shifter ball joint. I didn't have any issues of getting the JB on the ball, I waited until it cured a bit before I applied it. After the flange was slide into place I coated the entire outside of the control arm (for lack of a better word) and the flange with JB

Here is the original bushing that wouldn't stay in
Here is the piece I cut off the flange and DID NOT USE, again, I used the end with the lip
This is after I installed the flange, I coated the outide of the flange with JB weld and just slide it in, being carefull not to get any of it on the shifter ball joint. I didn't have any issues of getting the JB on the ball, I waited until it cured a bit before I applied it. After the flange was slide into place I coated the entire outside of the control arm (for lack of a better word) and the flange with JB
Last edited by scottgregory74; Oct 27, 2011 at 09:11 AM.
2nd Gear
Joined: Mar 2010
Posts: 67
Likes: 0
continued....
Here you can see the flange from the inside of the control arm....
Covered the outside with JB
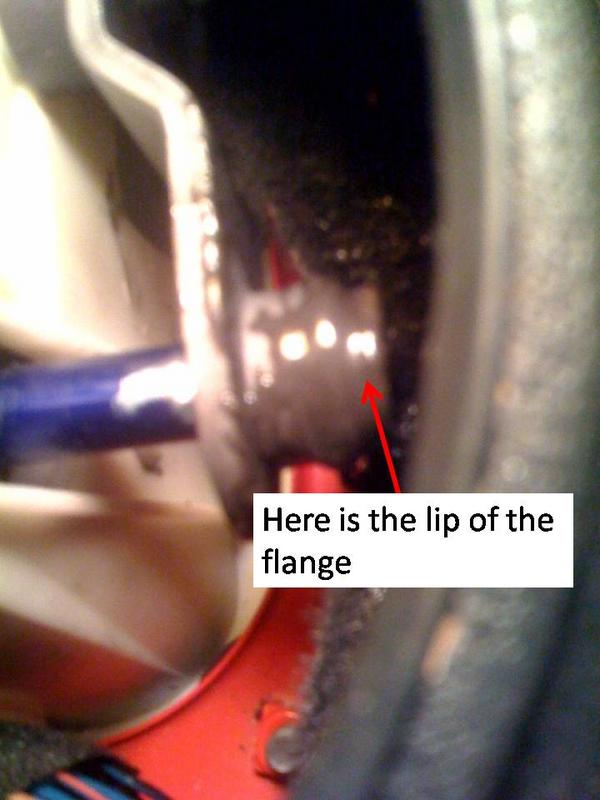
Finished product, nice and tight

any questions please ask away
Covered the outside with JB
Finished product, nice and tight
any questions please ask away
Trending Topics

3rd Gear
Joined: May 2008
Posts: 192
Likes: 0
Great.  Now that you show the pictures, I understand the explanation. Next time I have my R55 console apart I may fill the gaps between the tabs with epoxy to tighten things up a bit. Maybe some tape can be used as a release agent to dissassemble in the future.
Now that you show the pictures, I understand the explanation. Next time I have my R55 console apart I may fill the gaps between the tabs with epoxy to tighten things up a bit. Maybe some tape can be used as a release agent to dissassemble in the future.


5th Gear
Joined: Nov 2010
Posts: 844
Likes: 0
So I have been looking at mine and it doesn't really look the same. After I had my exhaust put in I can't put the craven speed short shifter all the way down. Sounds as if it hits the metal exhaust covering. I don't have a jack or stands to check it out. But the thing is if I slide it up just a bit it shifts great but has more play in it now. I want it tight again. Anyone have any other ideas??

Neutral
Joined: Jan 2016
Posts: 2
Likes: 0
No more play
Thanks much. I went a slightly different way using 1/2"x5/8"X1/2" plastic bushing that fit like a glove. It was a lowes find as well, but the recommendations didn't work for my 2006 R53. This certainly beat replacing the assembly at $300 for parts

Neutral
Joined: May 2021
Posts: 2
Likes: 0
Ok .... after much NAM research and a trip to lowes I found a fix for the replacement horizontal rod bushing on the shifter. Background.... I installed a b&m short shifter and after installation I had about an inch of play while In gear and the plastic horizontal bushing wouldn't stay in. Well I went to lowes and found this bronze flange in the hardware dept, we're the specialty nuts bolts and bushings are.
http://www.lowes.com/ProductDisplay?...llow&cId=PDIO1
I removed the plastic bushing and cut about a half inch of the small side of the brone flange, roughed up the outside of the flange with some sandpaper,mixed up some quick dry jb weld and coated the outside of the flange and slide it into the sleeve from the outside and made sure the shifter was seated in the flange. It should fit perfect. Then coat the outside of the flange where the lip of the flange meets the black lever. Let it dry over night and ur good. No more play
http://www.lowes.com/ProductDisplay?...llow&cId=PDIO1
I removed the plastic bushing and cut about a half inch of the small side of the brone flange, roughed up the outside of the flange with some sandpaper,mixed up some quick dry jb weld and coated the outside of the flange and slide it into the sleeve from the outside and made sure the shifter was seated in the flange. It should fit perfect. Then coat the outside of the flange where the lip of the flange meets the black lever. Let it dry over night and ur good. No more play

Thread
Thread Starter
Forum
Replies
Last Post
IQRaceworks
R50/R53 :: Hatch Talk (2002-2006)
53
Jun 28, 2024 07:29 AM
RobbyD
MINIs & Minis for Sale
11
Jan 29, 2019 01:22 PM
MINI Stupor
R50/R53 :: Hatch Talk (2002-2006)
3
Oct 1, 2015 11:36 AM