
R50/53 Dorky cheapskate modification


Wow, pretty good solution to this problem. I use my cargo cover, so I'm not sure if this would work for me. I'm thinking if I gave a quick tug, and let inertia finish the job, it just might. One way to find out....


Another great "dorky cheapskate" solution is to use old neckties, works like a charm!!

Redid my headliner last night in suede anthracite. Painted all the ceiling bits to match. Wanted to do the pillars, but..just no.Total: $20 for the fabric and the matching paint, and we had some left over headliner adhesive from a previous car. May be cheapskate, but I respect the headliner guys a LOT more now. Holy butts, what a pain.
Before, lol:

After:


Before, lol:
After:

Redid my headliner last night in suede anthracite. Painted all the ceiling bits to match. Wanted to do the pillars, but..just no.Total: $20 for the fabric and the matching paint, and we had some left over headliner adhesive from a previous car. May be cheapskate, but I respect the headliner guys a LOT more now. Holy butts, what a pain.]

1st Gear
Joined: Oct 2011
Posts: 22
Likes: 0
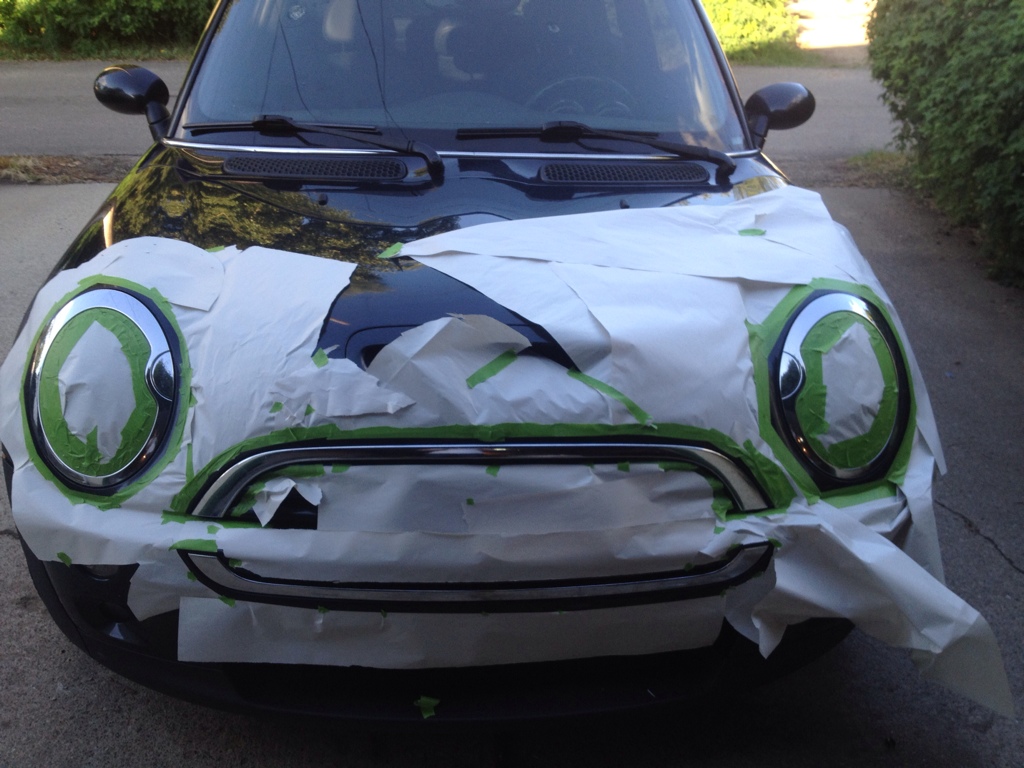
So I made up my mind to black out the chrome on the mini. Was going to do it the hard way by removing trim and painting it properly..... Then came plasti-dip. I picked up a couple of cans. Didn't even use one full one  anywhoo
Magic in a can!!!!!

What it looked like before. Only shot I really had of the front end for a before pic.

Masking off done. This stuff is pretty easy to mask for. Leave gaps to peal excess off.
First coat.

And final finish. Will have to get a couple of spot with a razor to clean it up. Any spray left over is easiely removed by rubbing it off.
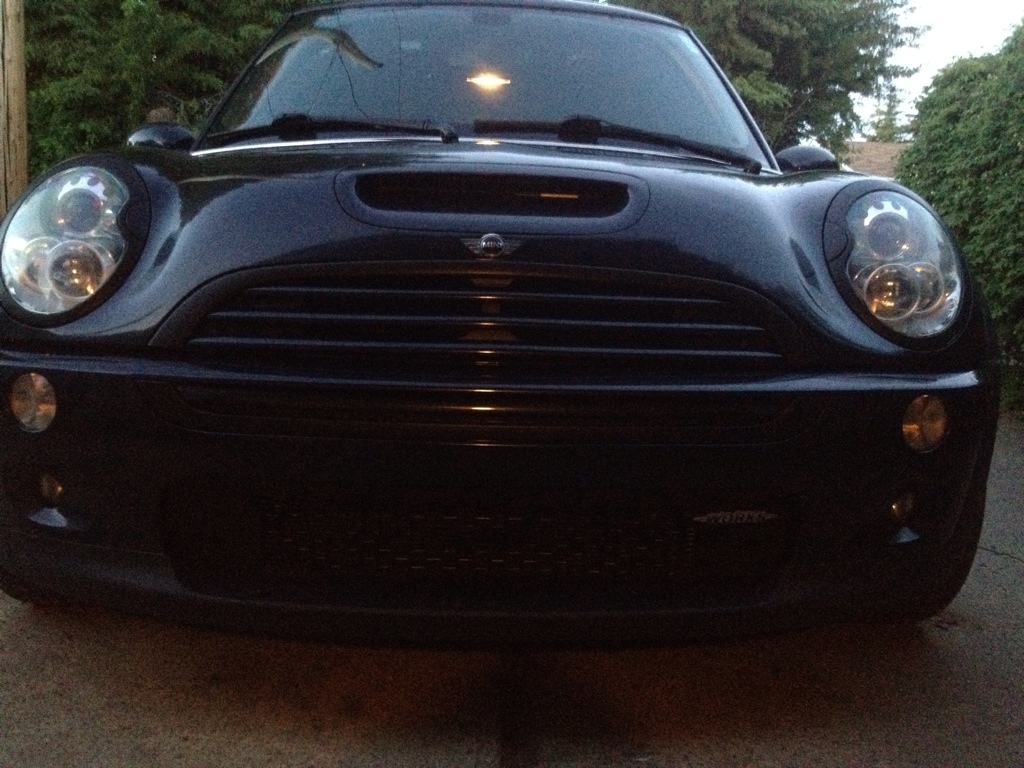
More to come!
anywhooMagic in a can!!!!!
What it looked like before. Only shot I really had of the front end for a before pic.
Masking off done. This stuff is pretty easy to mask for. Leave gaps to peal excess off.
First coat.
And final finish. Will have to get a couple of spot with a razor to clean it up. Any spray left over is easiely removed by rubbing it off.
More to come!

Belt line: Scotch 33+ electrical tape. Seriously. $3.50. Don't stretch it much when you apply, tiuck it in nicely, do it in a shaded 70(ish) degree place, lasts a LONG time, doesn't leave residue like cheapo tapes. You can even line up the bottom edge and allow the top to overlap the rubber trim.


3rd Gear
Joined: Oct 2010
Posts: 194
Likes: 2
From: Colorado
Imitation being the most sincere form of flattery, I bought a lead with two snap buckles on each end. I can pull both seats up at the same time or just one, if I only have one seat down. What a great, cheap answer to crawling through the back hatch! Thanks for the idea. I don't think I've fixed anything on my car for only $7.00!
Just be sure to use the Scotch 33+ tape, as it's suited for the temperature extremes, and has some decent quality to it - and some stretch if you really need it (around the curves at the base of the windshield, for example). It's also just the right satin, not flat and not glossy, almost as if 3M made it for Minis!
(I may have mentioned this a dozen or so pages prior in this same thread...)
(I may have mentioned this a dozen or so pages prior in this same thread...)

6th Gear
Joined: Feb 2011
Posts: 1,575
Likes: 0
From: Maryland, USA
Belt line: Scotch 33+ electrical tape. Seriously. $3.50. Don't stretch it much when you apply, tiuck it in nicely, do it in a shaded 70(ish) degree place, lasts a LONG time, doesn't leave residue like cheapo tapes. You can even line up the bottom edge and allow the top to overlap the rubber trim.
 starting to suspect SOMEONE either works for Scotch or gets kickbacks!
 or maybe he SHOULD get commissions!
6th Gear
Joined: Feb 2011
Posts: 1,575
Likes: 0
From: Maryland, USA
Just be sure to use the Scotch 33+ tape, as it's suited for the temperature extremes, and has some decent quality to it - and some stretch if you really need it (around the curves at the base of the windshield, for example). It's also just the right satin, not flat and not glossy, almost as if 3M made it for Minis!
(I may have mentioned this a dozen or so pages prior in this same thread...)
(I may have mentioned this a dozen or so pages prior in this same thread...)
1st Gear
Joined: Oct 2011
Posts: 22
Likes: 0
I'm sure you could do the door handles with plasti-dip. Just might have to get fancy with a razor. That's what I will be doing.
With the curves, you're looking at a little work any way you go, but if it were me I'd go plasti-dip on those, as it's likely the easiest.
Another option would be to get some matte/satin black vinyl from a sign shop and, using a little heat, apply it around the curves. It will require a seam, but if you're clever you can hide the seam underneath by starting on the top outside of the handle (looking at the picture above, the vinyl would be perpendicular to the line between the camera lens and the handle). While each has its drawbacks and neither is truly "permanent", I think the plasti-dip would be more durable.
...and Giggles, I didn't "insist", simply "suggested"! Though I did do a friend's R56 beltline in the dirt driveway of our cabin at MOTD this year. It's great that the Robbinsville NC Ace Hardware store sells Mini beltline blackout kits!
2nd Gear
Joined: Jan 2009
Posts: 101
Likes: 0
From: dallas ft. worth tx.
Haven't seen this one yet. Painted the inside of my hood scoop red. Gives a very aggressive look and best thing is it was free since i already had the paint.
http://www.flickr.com/photos/claytonyoung44/7427068128/http://www.flickr.com/photos/claytonyoung44/7427068128/ by http://www.flickr.com/people/claytonyoung44/, on Flickr
http://www.flickr.com/photos/claytonyoung44/7427068128/http://www.flickr.com/photos/claytonyoung44/7427068128/ by http://www.flickr.com/people/claytonyoung44/, on Flickr

2nd Gear
Joined: Dec 2011
Posts: 127
Likes: 0
From: Florida
I took the OEM driving light caps and got some silver decal tape to spice them up a bit. I pressed the tape over the raised letters and then used a razor to cut off the excess. For a $3 roll of tape, it is holding up well! They've been done like that for about 3 months now and they look as good as they did from the start! Sorry, I could't find a better picture of them on my laptop.

4th Gear
Joined: Apr 2012
Posts: 459
Likes: 4
From: Toronto, ON
Redid my headliner last night in suede anthracite. Painted all the ceiling bits to match. Wanted to do the pillars, but..just no.Total: $20 for the fabric and the matching paint, and we had some left over headliner adhesive from a previous car. May be cheapskate, but I respect the headliner guys a LOT more now. Holy butts, what a pain.
Before, lol:
After:
Before, lol:
After:
The suede looks amazing, if you could match the pillars that would just be the icing on the cake.