When you click on links to various merchants on this site and make a purchase, this can result in this site earning a commission. Affiliate programs and affiliations include, but are not limited to, the eBay Partner Network.
Hi Guys- still at it...
Was planning to replace the master brake cylinder and watched some youtubes. one guy had to make a little piece to go inside the back of the MBCyl, where the brake booster pin pushes, because the depth of the new MBC was deeper than the original MBC. I just checked mine and here's the variance-
Deepest depth (to the outside edge of the "pipe" in the back of the MBC)
New: 36.5mm Old: 38.8mm
There's a lip inside:
New: 38.8mm Old: 26.5mm
I include the lip because i'm not sure it the booster pin pushed on the deepest part or sits on that lip/ring that's not as far down.
Any thoughts on this or ideas on what i should do?
Just tried bleeding it again and I think there might be a leak where the master cyl is attached to that big round thing. really tough to say becaseu there's been so much spillage but I've been trying to clean it up. would adding dye (so i can do a black light check) be okay for the brake fluid?
As far as that connector and previous modifications i truly have no idea. they didn't give me any records unfortunately.
Tried shaving down a grommet and getting it to clip in but it's so mashed that i think it's flattened in there and no fluid will go through. leaning towards the grommet no belonging in there at this point.
Picture: new one on the left; took apart when thinking about swapping new guts to old casing - the SC on the car now is the same as the one on the left. as i said earlier i've bought a couple of them thinking it might be faulty. the exterior dimensions and shape appear to be the same / oh and in an above post i said that the input bore-hole was deeper in the old one but that's not true upon double check. must have fumbled the calipers.
Thinking the PS recall ship has sailed since i've already swapped it out and currently having no issues so I'll let a sleeping dog lie i suppose.
It's not you. There must be something defective with the part on the left. I was working on a customer car last night and attempted to install the slave he supplied (exact same as left in image above, DORMAN I believe). No matter what I could not get it to fully seat. I tried two used spares I had on hand (FTE/OEM) that look like the part on the right, and they installed no problem. I haven't taken measurements to see where the differences are, but it pissed me off too. Thankfully I had a spare, otherwise I would have sat there cursing covered in fluid for a much longer time. Order an FTE slave and ditch the DORMAN.
awesome - thanks for the input! at least i know im on the right path with the new slave. just need to figure out the master brake cylinder weirdness... might throw the old one back on since you've pretty much confirmed that the crap part was most likely the soul culprit.
Hey uneze,
'still following your progress in hopes you've gotten closer to sorting things out.
Although it's not my intention to throw another curve ball at the matter - Please be sure to check the condition of your brake reservoir:
This is what I've recently discovered on the reservoir on my R53. Due to the reservoir's location mounted directly under the cowl - The top left corner has disintegrated from air, dirt and the elements.
Another example: This one I had pulled from a salvage R53. The damage on this reservoir is the same as mine but not nearly as bad as what I currently have....
As you can see; there is no way I could have pressure bled my system without my tank/reservoir exploding.
I'm glad I checked! - I'm also, almost glad it's been raining the last 2wo weekends which prevented me from preforming the service.
I just received my new (OEM) reservoir on Monday. Unfortunately, again, we are a expecting a wash-out for this weekend. *sigh*.
Good News: The latest slave cylinder worked; it's the exact same style that came out of it. Put back on the old master brake cyl . Everything is tight and seems great.
Bad News: Barely shifts into gear still - Can get it in but incredibly hard. Reverse grinds. 1st and 2nd are the hardest. 3rd is easier. didnt bother checking rest.
I begin this whole thing hoping that the hard shifting problem was the clutch slave cyl. -
Should i now assume it's the clutch plate? Or Is there anything else short of dropping the transmission i can try? Thanks
When slave is compressed for bleeding, there should be ZERO play in the pedal. Pressing with your fingers on the pedal should generate no movement. Is that the result you encountered following bleeding the new slave?
Does it go in/out of gear without issue when the car is off? If so, My first guess would be failed/failing release bearing.
there's a little play... it's easy to push an inch or so down before there's heavy resistance. And yes it goes into gear when the car is off. no problem...
a release bearing; I will do some resreach when I get home; but mind giving me a synapsis of what i might be in for with replaceing this?
so it looks like the transmission has to come out to do this - seems like I might as well replace the clutches and everything while in there...
Thinking i'll end up starting a new thread if i run into problems with that.
so it looks like the transmission has to come out to do this - seems like I might as well replace the clutches and everything while in there...
Thinking i'll end up starting a new thread if i run into problems with that.
It's not easy, but its not that hard. I've done 3 in the last 2 weeks :-) with another coming up.
If you've never done it before, plan on 10-12 hours assuming nothing goes wrong. Go slow. Clearly label everything you remove. You'll thank yourself when reassembling.
Biggest pointers I can offer:
-Get the car up as high as possible (top of jack stands reach should be fine)
-Make sure your floor jack is fairly high lift. Center this on the 'puck' in the middle of the subframe when dropping it, and let the jack do the work. Easy to do this solo with this method.
-If it's been recently refreshed, leave the suspension intact, and just undo the 3 strut mount nuts on each side. (or replace everything now since the subframe will be out)
Feel free to message/email me directly if you get hung up and need quick answers.
@megaDan thanks man! watched a few videos on people doing this so I think i have a feel for the territory. No doubt i'll run up against something and will certainly reach out!
This replacement set is in my price range. pretty low on funds - says it will be good for my r50. any words of warning before i pull the trigger?
I don't know much about the base models, but a quick google of the part number confirms from other trusted sources that you'll be good. Didn't realize yours was an R50.
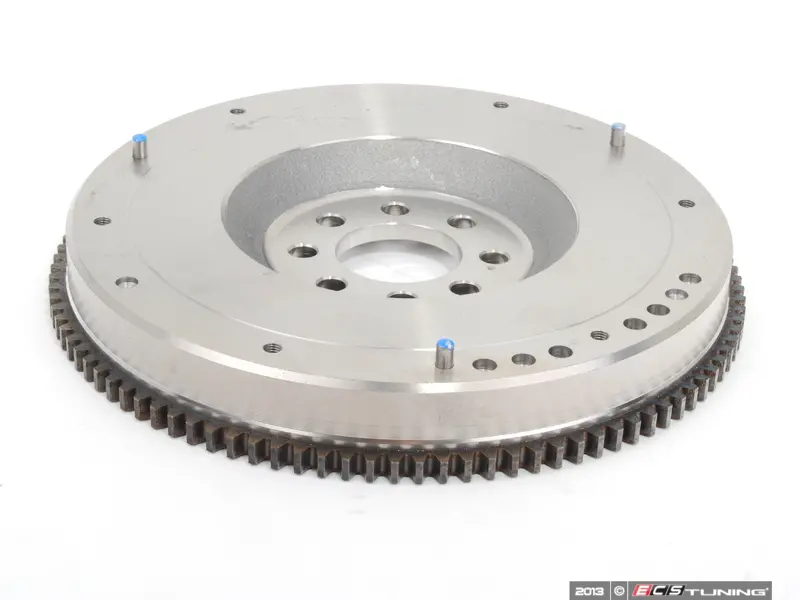
Got the gearbox off the car and posted question about the questionable shape of the flywheel.not getting much traction. The one reply says it�s toast- which I don�t doubt but would love another opinion or two. Also I can�t seem to find any replacements that look the same- mine has a raised clutch-grabbing surface but none of the ones I�ve found do. Have tried everything from eBay to partsgeek and the same ones are up on offer everywhere. Some also have more bolt holes and other differences- though the main attachment holes look like they are compatible- anyways. Wondering if mine it�s def ruined, and if so, do I need to be weary of the different looks of everything that�s for sale- attached a couple pics of what I�m looking at here-
I had mine resurfaced once on my non Dual Mass R52 (cooper). I did not have that hot spot, i had normal wear. On the Dual Mass Cars (R53 S/R52 S) you cannot resurface them. I would just get a new one as yours has way more waer and those cracks.
Might be a newer redesign. You will be fine if you get the replacement from us. Just match to match on the newest part number. Most of the time we have actual pics as we shoot in house, most other sites use generic stock photos so you dont know what will show up.
Looks for the production split in 7/2004. You should have the pre 7/2004 as thats most of the early 2004s. Check your VIN production date.
the machine shop guys thought the flywheel was fine. said they didin't have to go far to get under the heat marks. loads of meat still left. I differed the decision to them and just happy I dont have to drop 5+ bills on a new one - anyways I'm Putting it all back together and have these bushings. Anyone know where they go? pretty sure they (or it...) were somewhere attached the subframe which i dropped and moved out of the way. i feel like there were two tho i'm having trouble locating the other one...
I didn't see anywhere where after you did the bleeding procedure you NEED TO leave the clutch pedal depressed OVER NIGHT and when you go back to it the next day , as you release the clutch try and allow it to extend back up SLOWLY as possible.
I tried EVERYTHING to bleed my slave and it just refused to give me pedal pressure and it seemed like bubbles continually would come out with power bleeding and even pedal pumping , I put 3x entire bottles through and no pedal pressure.. the ONLY thing that brought it back was keeping it depressed over night after doing the bleed procedure..
the machine shop guys thought the flywheel was fine. said they didin't have to go far to get under the heat marks. loads of meat still left. I differed the decision to them and just happy I dont have to drop 5+ bills on a new one - anyways I'm Putting it all back together and have these bushings. Anyone know where they go? pretty sure they (or it...) were somewhere attached the subframe which i dropped and moved out of the way. i feel like there were two tho i'm having trouble locating the other one...
yeah that wasn't mentioned in anything i watched or read, that I remember anyways. interesting idea and if i have further trouble i will try it. but as mentioned above, using the AMS brand/style slave cylinder did the trick. I was at least able to get the clutch pressure back to where it was before i took everything apart. the dorman SC's just sucked in air or something. ran more than than 3 bottles thru trying to get it to stop.
I didn't see anywhere where after you did the bleeding procedure you NEED TO leave the clutch pedal depressed OVER NIGHT and when you go back to it the next day , as you release the clutch try and allow it to extend back up SLOWLY as possible.
Yep. Adam is correct. This solution was posted here on NAM in another thread a while back. I don't think it was ever written in the text book/manual.