When you click on links to various merchants on this site and make a purchase, this can result in this site earning a commission. Affiliate programs and affiliations include, but are not limited to, the eBay Partner Network.
Thanks everyone for the pointers here - with some help here I'm finally happy to report I've completed the job. Car feels much better now with new LCA bushings, strut mounts, and Koni FSD's. The car used to make bad creaking noises when turning (probably mainly from the bad mount)...so not having that anymore and the tighter overall feel the car feels new again.
I really struggled through this job, but like anything now that I've been through it...knowing the challenges and tools needed...I probably could do the job in less than half the time it took me on this first attempt. So wanted to close the loop here and hopefully leave some more pointers for anyone else that happens across this post in the future.
First, as was suggested early in this post and elsewhere - if you're replacing your LCA bushings - the recommended method to do the job cleanly is to drop the subfame of the car and purchase the bushings pre-pressed. Dropping the subframe looks pretty intimidating but after what I've been through seems like very sound advice to follow (along with getting the bushings pre-pressed). What led me a bit astray is there are a couple of videos out there that make it look pretty easy and allow you to avoid dropping the subframe to do the job, the videos are the following:
1. Removing the control arms from the 2 ball joints: if you have never removed ball joints you're in for a fun new experience. Best advice from in my opinion that I saw here was using penetrating oil (PB Blaster or the like) heavily on these two joints days in advance if possible...basically try to give it time to let it do its thing. If you're lucky...you may be able to hammer the control arm off the joints. The inner control arm bushing is tough to get off...my first attempt I ultimately had to use a pickle fork and a very heavy hammer to bust it loose (and in the process damaged the rubber boot on the inner control arm bushing). The second inner control arm I gave the penetrating oil more time and it came off without any fight. The outer control arms required using a ball joint separator on both.
2. Pulling the old control arm out of the old bushing: one of my LCA bushings was completely shot, and I was able to yank it out with some muscle and it came out pretty easily. My second one was still in decent shape and it did not want to pull out. Ultimately, my approach was using a drill to tear up what I could of the bushing (twisting around to get at different angles)...spraying some penetrating oil on the bushing...and using a pry bar and some very hard pulling to get it off. This is not easy to do on jack stands, and it was tough to get leverage and the right angle. I laugh when I see the video of how easy he popped it off on his (referenced above)...it just did not go that way for me. I was exhausted after I finally got the thing off.
3. Pressing in the new bushing: I really wasted a lot of time here with the wrong tool to do the job. User "Blowtranny" set me straight with the advice of making the tool with a 5/8" rod...I was using a 3/8" and it's a night and day difference between the two. You'll see above in this post an in the video some suggestions on how to make a tool to do this. What worked for me were parts I picked up at Home Depot.
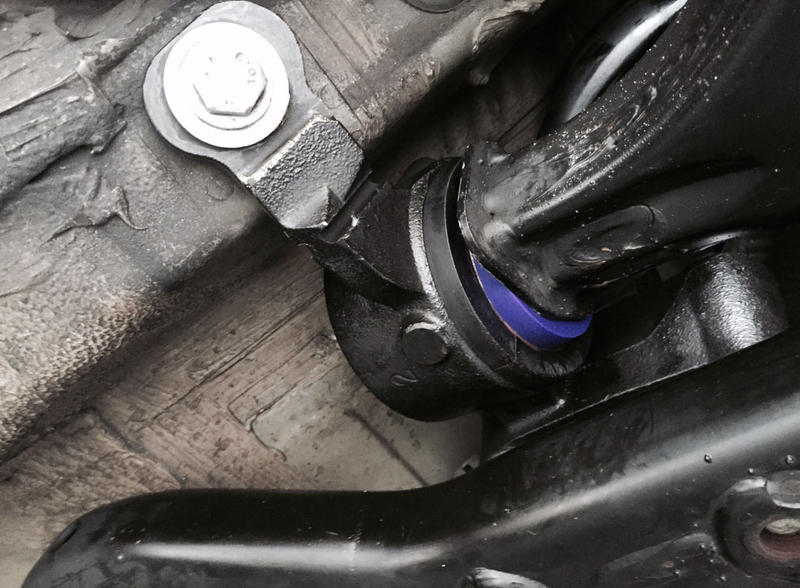
Here is the press I made to put in the bushing:
I put a vice grip on the end to help old it in place (double-nut didn't seem to fully cut it)...as soon as part of the bushing starts to slip in...just with my hand I was able to guide in the bushing with some muscle. The 5/8" rod is thick enough to help keep everything straight and give you good leverage to work it. I just used some Windex as a lubricant and this and this tool made it relatively easy to get in:
While I was able to get it - it does still seem like better advice to just purchase it pre-pressed because this whole process was a struggle.
4. Getting the control arm back on with the new Powerflex bushings in place: on jack stands it's tough to get leverage and an angle here with a pry bar. One went in without much of a fight, but for whatever reason the second one really put up a fight and took a lot of muscle to finally get it to pop in. Again the pre-pressed option looks pretty smart here if you want to save yourself some possibly significant hassles.
But again - this approach passing on dropping the subframe does work...but it's certainly not easy in my opinion.
With the subframe out of the car, what other things would you recommend replacing while it's down besides the basics like balljoints and swaybar bushings?
Look at the power steering hoses. They often weep,
and sometimes can simply be re-clamped instead of replaced,
and it would be a shame to have to drop the subframe again
later just to do that.
So I'm trying to get to my LCA bushings as well... stuck at the inner ball joint. So to keep from ruining it...
can I just pull the axles to get a ball joint seperator in there or... better off using a fork, pulling the cvs and replacing them? outers were shot... suppose the inners should get done anyway right? (looks like without the axles out, I couldn't unbolt them even if I did get it to break loose due to clearance)
OR... if I drop the subframe can I even still use the harbor seperator?
...that, and you can't change the inner ball joints without dropping the subframe (well, you can't torque it properly without the subframe being down).
I'm sorry for your troubles, They are a real pain.
It does however make me glad I bought the right tools for the job. I've done one car already, have the other still to do, and a buddy just did his on Sunday.
As I noted above I too agree dropping the subframe is the right way to do it here to lesson the frustration. But I was invested in not doing it so finished the job without doing so.
In my case, the first inner ball joint I did...I did not give penetrating oil any time...and used a pickle fork and a sledge hammer to pop it off. It damaged the boot on the ball joint...but not that bad. I left it and it's been fine...figure one day a few years down the road or when/if it becomes a problem I'll drop the subframe and replace. The second inner ball joint, I gave penetrating oil at least 24 hours and hit it a few times between...and it came off without a fight and just a tap of a hammer.
love how he skips the step of taking the inner balljoint off. And somehow does it without taking down the subframe. I said screw it and have the subframe almost dropped. I think i'm going to replace the inners anyway, why not... this is a PITA as is, why do it again anytime soon? hah. I've been waiting 3 1/2 months for a shift cable anyway so this heap of crap has been sitting on jack stands as is. Getting really tired of dumping $ into this.... biting my tongue but i might end up getting rid of it for a subaru forester xt. Or somehow afford to keep both but this thing..... mini = NOT reliable at all.
When everyone I knew was always saying "well your car spends more time apart then its on the road" it gets hard to keep saying "well it's 13 years old, these things just needed to be replaced like all the rest" :/
love how he skips the step of taking the inner balljoint off. And somehow does it without taking down the subframe.
Yes - I loved that part too. The videos this guy makes are awesome but he certainly glossed over a big detail here! Probably in his mind it's so easy due to his skill/experience level it's not even worth showing.
Getting really tired of dumping $ into this.... biting my tongue but i might end up getting rid of it for a subaru forester xt. Or somehow afford to keep both but this thing..... mini = NOT reliable at all.
When everyone I knew was always saying "well your car spends more time apart then its on the road" it gets hard to keep saying "well it's 13 years old, these things just needed to be replaced like all the rest" :/
Easy now - just frustration talking at this point! I've had mine since new and for the most part have just needed general maintenance items. Love the car.
I get this particular job is enough can get you in a not-so-positive frame of mind though!
They will be a loose, the balljoint will rock and have up and down play in the ball socket, should be tight when new with no play, and sometimes the boot will leak grease which then means just to replace. Even seen some get water under the boost and work into rust.
I'm doing this now and my outer ball joints are seized beyond belief! I've sprayed PB blaster to soak them, used the ball joint separator tool and an air chisel...nothing is getting them loose! Any suggestions?
I'm doing this now and my outer ball joints are seized beyond belief! I've sprayed PB blaster to soak them, used the ball joint separator tool and an air chisel...nothing is getting them loose! Any suggestions?
Put a cold chisel into the gap between the control arm and the ball joint - hammer away. The ear of the ball joint will eventually bend and the chisel will eventually widen the gap.
Air chisel is what it took my local mechanic to free them as well. I just brought the control arm up there and he had them off in 30 seconds... had previously taken me a few hours of beating and cussing. lol... hang in there, I got all of my stuff replaced, cleaned up the subframe and bolted everything back up. You'll be there soon!
My outers were also rusted in place. I used a long rod (2 1/2 to 3 ft) and a 5 lb sledge. Just position the end of the rod on the top of the ball joint and whack down on the other end. It took a few whacks but they came out no problem. Good luck!
I'm doing this now and my outer ball joints are seized beyond belief! I've sprayed PB blaster to soak them, used the ball joint separator tool and an air chisel...nothing is getting them loose! Any suggestions?
Just finished another one myself... I hear you! 1.5 hours of just removing the balljoint from the LCA (10 mins to remove from the car with a cold chisel from above)
2013 mini countryman, trying to get the control arm ball joint (the center one on that 'boomerang' shaped control arm) thats connected to subframe, is impossible.
I removed the castle nut, I tried a ball joint seperator, but it doesn't open enough to get over that massive mini frame tube, any suggestions???
You are in the wrong are of this forum. Suggest you re-post your question in the forum area devoted to the 2013 Countryman.