
R50/53 DDMini: R50 Salvage Rebuild Thread

6th Gear
Joined: Mar 2009
Posts: 1,980
Likes: 2
From: Eastern Long Island, NY
I'm with mimini1. Great to see a MINI that would otherwise be abandoned in a salvage yard come back to life and be enjoyed. 
Also reminds me a little of that Bud Light commercial with the rescue dog "Here we go".
Also reminds me a little of that Bud Light commercial with the rescue dog "Here we go".


Thread Starter
|
3rd Gear
Joined: May 2012
Posts: 248
Likes: 1
From: MA, SC
Glad that you guys are enjoying it. I have learned quite a bit about the R50. The sheet metal is quite soft and I also noticed this on Rovers specifically Disco II. American made cars the sheet metals are not as easy to bend at least from my experience.
Front and rear bumpers are made of aluminum and boy the welding looks ugly.
Overall, they are nice little cars with attention to small details and they spent time trying to keep things from rattling I notice with many many small clips.
One interesting thing about the rear side airbags, is that when you are trying to pull the pillar plastic piece down, these airbags are tied to the pillar piece and also the metal frame work. So you peel the plastic a little and cut the plastic loop that holds these 3 pieces together. It is quite a task; one thing you are in an awkward position hunched over working in that height and that you have to take your razor blade through 3" opening and cut this plastic loop holding 3 pieces together while not cutting the airbag. I wonder how they got those up the at the first place! I had to do this to lower the headline to adjust the tailgate as it was pushed up from the rear end collision.
On other thing is that on R50, hardly there is any insulation on the floor pan that exhaust note comes right through. I have sound insulation project in the near future.
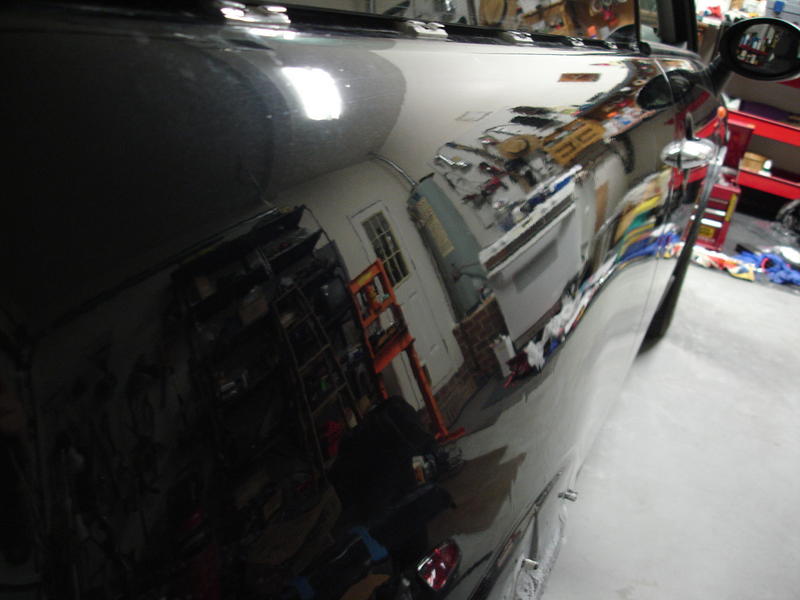
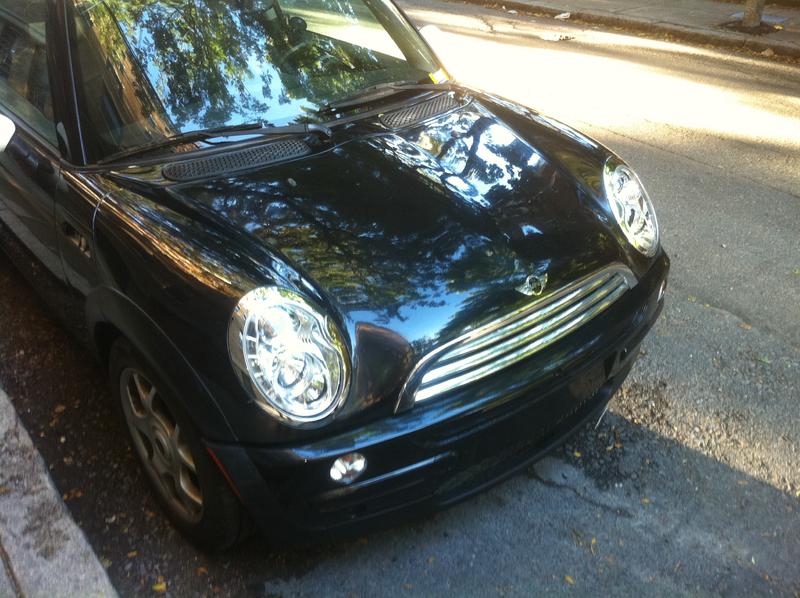
Here are some latest shots.
Added a racing stripe.
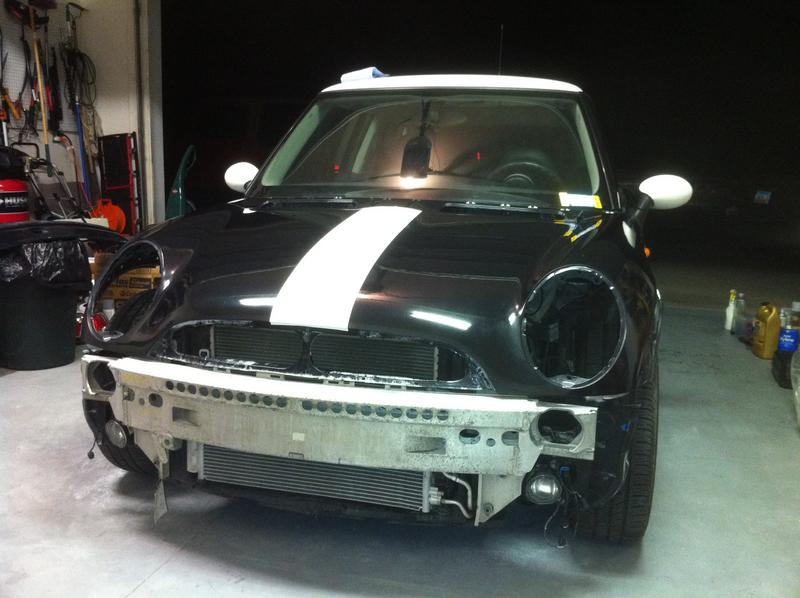

Please excuse the rubbing and polishing compound residue.

Front and rear bumpers are made of aluminum and boy the welding looks ugly.
Overall, they are nice little cars with attention to small details and they spent time trying to keep things from rattling I notice with many many small clips.
One interesting thing about the rear side airbags, is that when you are trying to pull the pillar plastic piece down, these airbags are tied to the pillar piece and also the metal frame work. So you peel the plastic a little and cut the plastic loop that holds these 3 pieces together. It is quite a task; one thing you are in an awkward position hunched over working in that height and that you have to take your razor blade through 3" opening and cut this plastic loop holding 3 pieces together while not cutting the airbag. I wonder how they got those up the at the first place! I had to do this to lower the headline to adjust the tailgate as it was pushed up from the rear end collision.
On other thing is that on R50, hardly there is any insulation on the floor pan that exhaust note comes right through. I have sound insulation project in the near future.
Here are some latest shots.
Added a racing stripe.
Please excuse the rubbing and polishing compound residue.


Thread Starter
|
3rd Gear
Joined: May 2012
Posts: 248
Likes: 1
From: MA, SC
You would not believe what I did today.
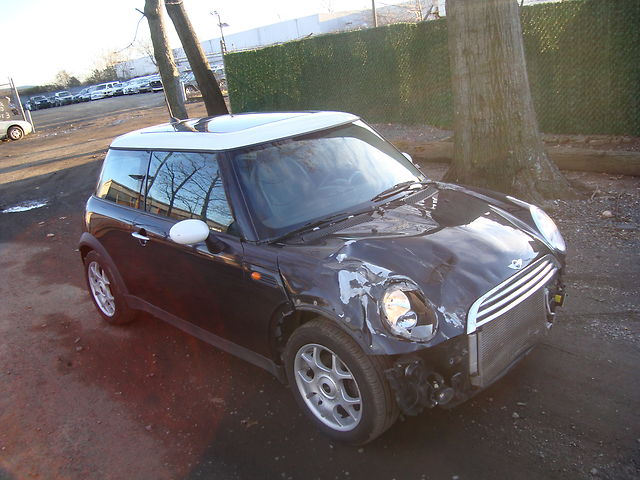
I was trying to fit the bumper cover and I noticed that the tailgate would not close. The tail end has been pushed in that the contour of the bumper would not line up with the frame on the back. I sorta notice this to be a problem when I was fiddling with the tailgate to close without any bumper cover. I had to widen the holes for the tailgate actuator because I had to adjust it further out than how much the actuator would actually allow.
Once I noticed about 1/2" gap, my heart sorta sunk in because wasn't sure if this is something I can do it at home. Then I realize I got something very strong in pulling.
This is a DIY-home-frame straightening.
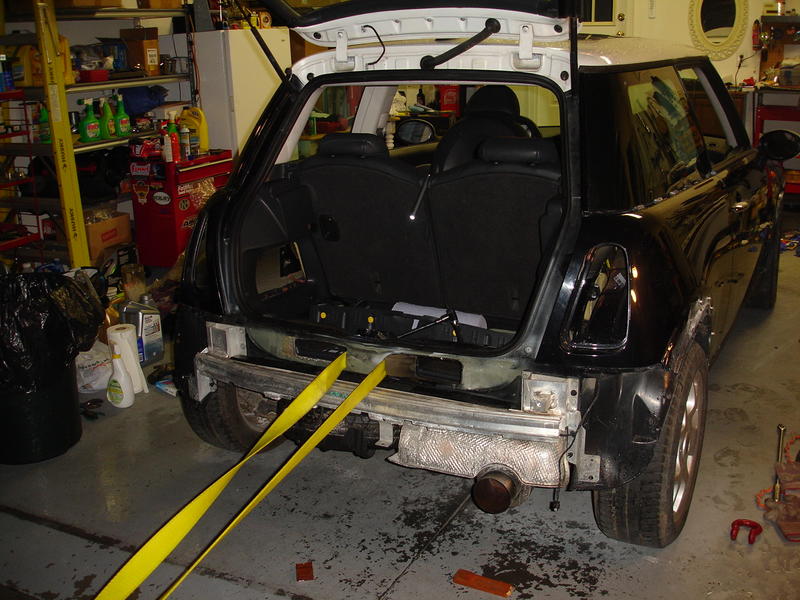
****** strap for pulling vehicle out of places. Looped around the shackle.

Attached on the other end is Warn M8000 winch on 4000lbs Jeep.

At first, either the Jeep or Mini would roll. I placed some weight on the brake pedal and the metal started moving. Kinda scary but the pulling wire moves about 1" a sec under no load I think. So I could regulate it pretty well.
Frame much straighter and the tail gate closes with the bumper cover on!
I hope you guys got some kick out this.
Time for me to go to sleep!
I was trying to fit the bumper cover and I noticed that the tailgate would not close. The tail end has been pushed in that the contour of the bumper would not line up with the frame on the back. I sorta notice this to be a problem when I was fiddling with the tailgate to close without any bumper cover. I had to widen the holes for the tailgate actuator because I had to adjust it further out than how much the actuator would actually allow.
Once I noticed about 1/2" gap, my heart sorta sunk in because wasn't sure if this is something I can do it at home. Then I realize I got something very strong in pulling.
This is a DIY-home-frame straightening.
****** strap for pulling vehicle out of places. Looped around the shackle.
Attached on the other end is Warn M8000 winch on 4000lbs Jeep.
At first, either the Jeep or Mini would roll. I placed some weight on the brake pedal and the metal started moving. Kinda scary but the pulling wire moves about 1" a sec under no load I think. So I could regulate it pretty well.
Frame much straighter and the tail gate closes with the bumper cover on!
I hope you guys got some kick out this.
Time for me to go to sleep!


6th Gear
Joined: Jul 2006
Posts: 1,154
Likes: 8
From: France and Reno/Tahoe
Well done!! It's a good looking MINI, and it is the perfect example of the difference between a financial total loss and a structural damage total loss. So glad you are putting in the effort to give it a second life.
Thread Starter
|
3rd Gear
Joined: May 2012
Posts: 248
Likes: 1
From: MA, SC
Thanks guys.
Believe it or not, they even sell the chassis by itself of different models with different options.. But it cost $8000. LOL
If the owner is inclined to keep the vehicle and the other party is responsible, it can happen. I have seen a late model Jeep being literally transferred over to another frame.
I thought I knew cars, but man, I got a new found respect for body technicians that are good. It takes some effort to make it look good.

1st Gear
Joined: Apr 2012
Posts: 20
Likes: 0
Awesome rebuild! You and I have similar tastes. I have a 03 R53 and a 96 Toyota Land Cruiser 80 series with an ARB up front. I haven't quite saved the dosh to throw in that WARN winch but now I have another justification.
I also attempted body work for the first time on a beater Subaru last summer. It was a lot of the same work with fill, prime, paint, etc. It's a lot of work and I respect you for tackling it. I don't know if I have the stomach to do it again. I did get some nice toys out of it (Compressor, HVLP guns, grinder, multitool, etc).
Best of luck! You are nearly there!
Thread Starter
|
3rd Gear
Joined: May 2012
Posts: 248
Likes: 1
From: MA, SC
The front bumper and other things are shipped.
$150 worth of bolts and nuts arrived. Of course they leave out the biggest part, about a foot long bumper mounting bracket and they still charged me for it.
Anyways, will update as things happen.
$150 worth of bolts and nuts arrived. Of course they leave out the biggest part, about a foot long bumper mounting bracket and they still charged me for it.
Anyways, will update as things happen.
Thread Starter
|
3rd Gear
Joined: May 2012
Posts: 248
Likes: 1
From: MA, SC
Awesome rebuild! You and I have similar tastes. I have a 03 R53 and a 96 Toyota Land Cruiser 80 series with an ARB up front. I haven't quite saved the dosh to throw in that WARN winch but now I have another justification.
I also attempted body work for the first time on a beater Subaru last summer. It was a lot of the same work with fill, prime, paint, etc. It's a lot of work and I respect you for tackling it. I don't know if I have the stomach to do it again. I did get some nice toys out of it (Compressor, HVLP guns, grinder, multitool, etc).
Best of luck! You are nearly there!
I also attempted body work for the first time on a beater Subaru last summer. It was a lot of the same work with fill, prime, paint, etc. It's a lot of work and I respect you for tackling it. I don't know if I have the stomach to do it again. I did get some nice toys out of it (Compressor, HVLP guns, grinder, multitool, etc).
Best of luck! You are nearly there!
M8000s are like the standard of all winches. I mounted the solenoid under the hood so it is somewhat out of the element. Those 0 gauge wires cost $100 to run from the winch to the solenoid whole 3 feet of them.
I never thought I'd use the winch for this. LOL.
I started thinking this build is going to be a cheap quick build but I picked up so many tools and supplies along the way, those added up substantially. But I'd like to think of it as the tuition for the skills I have picked up.
I am just grateful that I didn't have problem getting it registered and titled.
Once the front bumper arrives, this thing is ready to roll on the street. Let's see how long it takes for me to receive the bumper.
Thread Starter
|
3rd Gear
Joined: May 2012
Posts: 248
Likes: 1
From: MA, SC
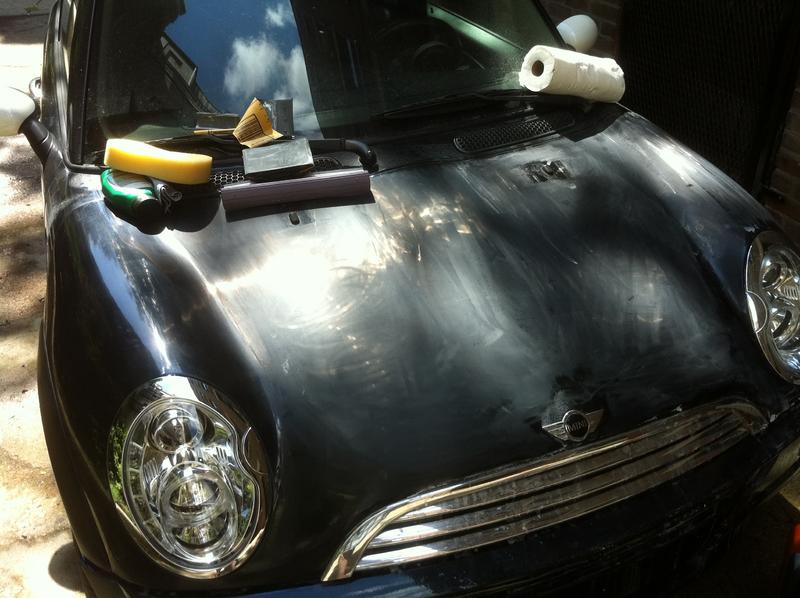
After the straightening last night, after work today I decided to finish the vent mounting and everything else so that the bumper can be bolted on once all of my hardware arrives.
After about an hour work hammering and pulling using slide hammer. Here is the result.
Initially this is how it looked.
Done some work to it.

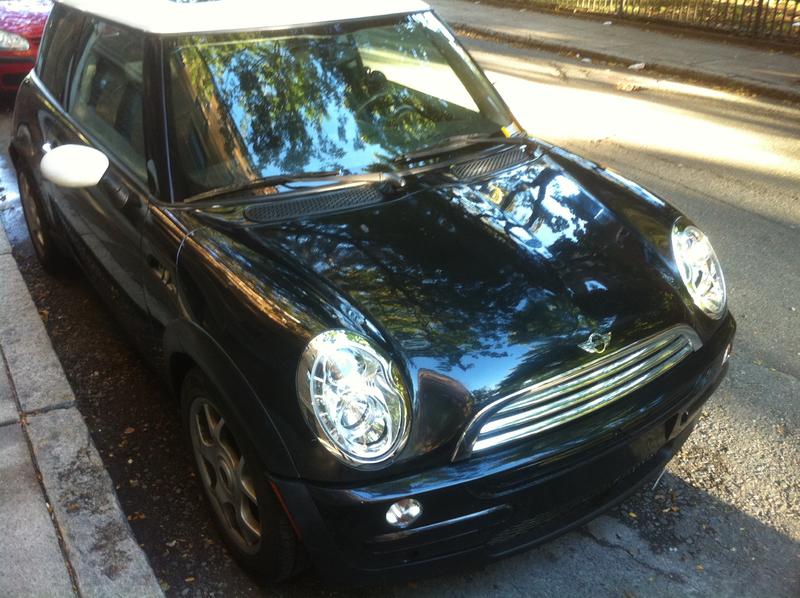
Mounted the vents.

How the bumper looks mounted.
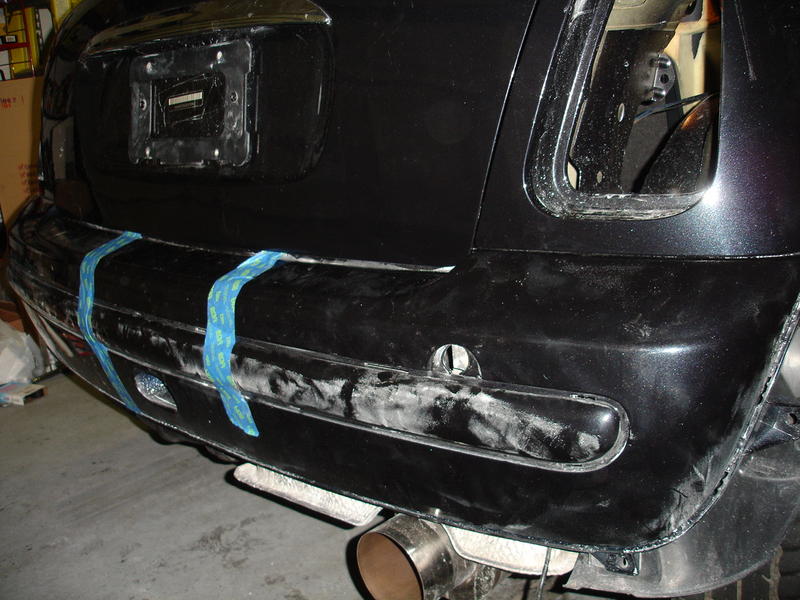
Please forgive rather unpolished bumper. I blended the rear quarter panel and recleared it.
After about an hour work hammering and pulling using slide hammer. Here is the result.
Initially this is how it looked.
Done some work to it.
Mounted the vents.
How the bumper looks mounted.
Please forgive rather unpolished bumper. I blended the rear quarter panel and recleared it.

4th Gear
Joined: Apr 2012
Posts: 342
Likes: 0
From: Based in Mini-apolis, Mn.
[QUOTE=DailyDrivenMini;3537620]Glad that you guys are enjoying it. I have learned quite a bit about the R50. The sheet metal is quite soft and I also noticed this on Rovers specifically Disco II.
Your Disco II was an all aluminum body (except roofline) Funny when seeing them advertised - no rust... DUH
Your Disco II was an all aluminum body (except roofline) Funny when seeing them advertised - no rust... DUH
Thread Starter
|
3rd Gear
Joined: May 2012
Posts: 248
Likes: 1
From: MA, SC
There are more than body panels that makes up a vehicle as we all know. Sad thing is when people think the whole car is made of aluminum. LOL. Hardly so.
My Jeep's sheet metal is much thicker than either R50 or the Rover in every aspect.
From my first hand experience from owning and "Working on" both of them, Mini is not any better than Rover regardless of the material used but I am sure it is stiff/hard where it counts or I sure hope so.
On the other hand, nothing wrong with being soft.
I'd rather have the Mini get crushed and absorb the impact than me absorbing all the energy in a small and light car such as Mini. 

5th Gear

Joined: Jun 2009
Posts: 675
Likes: 36
From: West Seattle
Very nice. I didn't care for that particular stipe myself. I think the car looks better without it.
I saw this on Autotrader (I think) a while ago and thought it would be an easy fix. You are my hero for keeping this R50 on the road. I was looking at Autotrader because my dream is to win the lotto and start collecting bad tranny/bad engine/light body damaged R50's and sending them back out there after being fixed. "Just MINI's; take your "S" elsewhere!" If nothing else, I have the name and slogan of my business ready to go...
Val

Thread Starter
|
3rd Gear
Joined: May 2012
Posts: 248
Likes: 1
From: MA, SC
Thanks. I think it was sitting in the lot for a good 4-5 months before I got it. It was sitting on a dirt lot and I still have traces of dirt in the vents and crevices which I am still struggling to clean out.
Since I picked it up, I changed out the tranny fluid and give it a Mobil1 oil change. Cleaned out the DDM filter and reoiled.
I put on about 3000 miles on it and so far no mechanical problems. Knock on wood. Drove from SC to MA in a day without a problem back in August on 90+ weather.
I love Mini and I think I am going to keep this one awhile.

2nd Gear
Joined: Jun 2009
Posts: 81
Likes: 0
WMW, I emailed you guys a few days back about wrecked Minis. Never heard anything back.  Glad I get to talk to you guys here.
Bought nearly new rear bumper cover with valances $130 shipped, rear bumper carrier with shock absorber and reinformcement for $160 shipped. Front carrier $150 shipped.
I paid $260 for the brand new aftermarket hood shipped.
I am looking for the front bumper. I can get a new one in primer for less than $300 shipped.
NEED:
1. Front Bumper, Cooper S or Base
2. Bumper Mounting bolts and nuts for the front and rear (I am sure they will be thrown away as you part the vehicle. Sell them to me, I actually need them.)
3. Passenger side front Wheel Arch cover
4. Passenger side headlamp for 2006 Just a
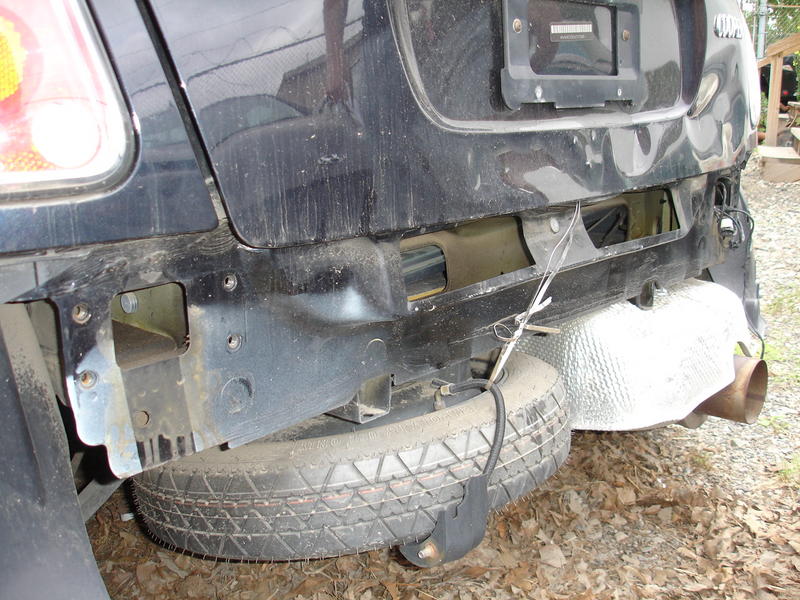
5. Bumper mounting tabs (picture attached)
Let me know as I am ACTIVELY purchasing items every day in fact all those parts I have mentioned were purchased in the past few days. I will be making purchases tonight and every day until I am done. I am trying to finish buying stuff by the end of the week so I can start working on things next weekend as parts arrive and get the thing finished.
Let me know. I am not that far from Atlanta, GA about 3 hours away.
Glad I get to talk to you guys here.Bought nearly new rear bumper cover with valances $130 shipped, rear bumper carrier with shock absorber and reinformcement for $160 shipped. Front carrier $150 shipped.
I paid $260 for the brand new aftermarket hood shipped.
I am looking for the front bumper. I can get a new one in primer for less than $300 shipped.
NEED:
1. Front Bumper, Cooper S or Base
2. Bumper Mounting bolts and nuts for the front and rear (I am sure they will be thrown away as you part the vehicle. Sell them to me, I actually need them.)
3. Passenger side front Wheel Arch cover
4. Passenger side headlamp for 2006 Just a
5. Bumper mounting tabs (picture attached)
Let me know as I am ACTIVELY purchasing items every day in fact all those parts I have mentioned were purchased in the past few days. I will be making purchases tonight and every day until I am done. I am trying to finish buying stuff by the end of the week so I can start working on things next weekend as parts arrive and get the thing finished.
Let me know. I am not that far from Atlanta, GA about 3 hours away.
properly. Also who was the vender for the aftermarket hood?


