
R50/53 DDMini: R50 Salvage Rebuild Thread


Thread Starter
|
3rd Gear
Joined: May 2012
Posts: 248
Likes: 1
From: MA, SC
DDMini: R50 Salvage Rebuild Thread
Hey guys,
Just wanted to share a thread about my rebuild process on a 2006 R50 Astro Black Metallic. I would like to use this thread for also keeping track with my rebuild process and also get help when I do need them.
Here are the before shots. Picked it up on 6/1/2012 and shipped from NJ to SC.
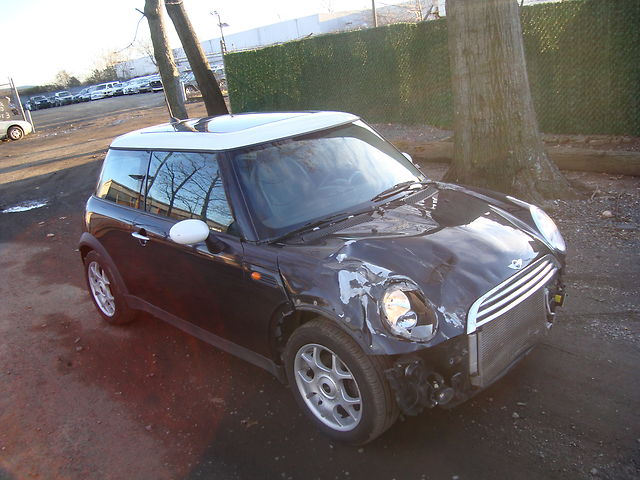
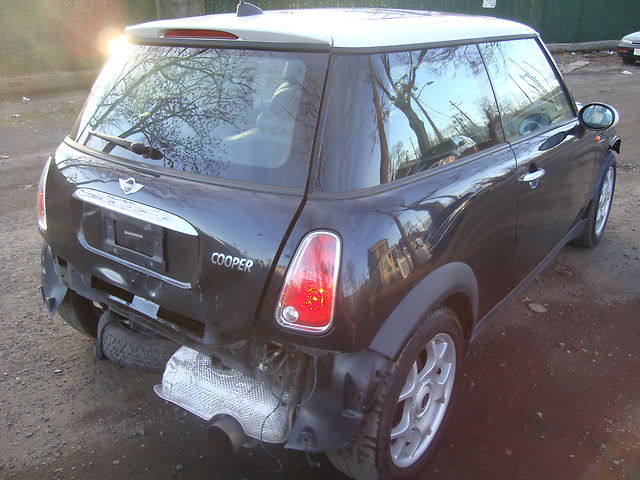
Those who are wondering, it drives fine. Mechanically sound. The vehicle was rear ended and pushed into another "thing".
To me it looked like an easy fixer. We shall see if it really is.
NEED List:
2. Bumper Mounting bolts and nuts for the front and rear
5. Shifter Cables
Just wanted to share a thread about my rebuild process on a 2006 R50 Astro Black Metallic. I would like to use this thread for also keeping track with my rebuild process and also get help when I do need them.
Here are the before shots. Picked it up on 6/1/2012 and shipped from NJ to SC.
Those who are wondering, it drives fine. Mechanically sound. The vehicle was rear ended and pushed into another "thing".
To me it looked like an easy fixer. We shall see if it really is.
NEED List:
2. Bumper Mounting bolts and nuts for the front and rear
5. Shifter Cables
Last edited by DailyDrivenMini; Jun 21, 2012 at 07:02 AM. Reason: So people can see photos without clicking..
Thread Starter
|
3rd Gear
Joined: May 2012
Posts: 248
Likes: 1
From: MA, SC
Yesterday, I started working on the R50 by doing some cleaning. Washed and vacuumed the interior and lubed the door hinges and such.
It was so dirty outside and dusty inside, it felt like a real wreck.
I started working on the rear end. Lift gate was dented pretty badly. I kneeled it out a little, applied bondo and then glazed.


It was so dirty outside and dusty inside, it felt like a real wreck.
I started working on the rear end. Lift gate was dented pretty badly. I kneeled it out a little, applied bondo and then glazed.
Last edited by DailyDrivenMini; Jun 21, 2012 at 07:03 AM.


more pics? fun to watch the process. Learned something about my car seeing your pics, like that I can put air in the spare with that remove value thing (yes, i am bad - never even checked that spare!)

Thread Starter
|
3rd Gear
Joined: May 2012
Posts: 248
Likes: 1
From: MA, SC
I don't know if you can see it from the very first photo but the AC condenser in the front is bent on the driver side close to the ground. I suspected that is why AC did not work because refrigerant has all leaked out. Checked the pressure and there was nothing in the system.
I just replaced the battery and A/C condenser (I wonder how much the dealer will charge to replace the condenser.) last night and charged up the system after pulling the vacuum for 30 minutes. Finally bought the vacuum pump after borrowing it every time I do AC work. I finally bit the bullet and bought it. Freaking expensive!!
AC works now and the car starts on its own power without jumping the battery.
So far after ordering the front and rear bumper carriers, rear bumper cover, hood, and AC condenser and I am still under a grand into the project of course minus the Mini. I am hoping to finish this project with under $2000 including PAINT! Highly hopeful but I am doing all the work!
Wish I can work on this all day long; just not possible with full time job!
Will post some more updates with pictures.

Trending Topics
Thread Starter
|
3rd Gear
Joined: May 2012
Posts: 248
Likes: 1
From: MA, SC
WMW, I emailed you guys a few days back about wrecked Minis. Never heard anything back. Glad I get to talk to you guys here.
Bought nearly new rear bumper cover with valances $130 shipped, rear bumper carrier with shock absorber and reinformcement for $160 shipped. Front carrier $150 shipped.
I paid $260 for the brand new aftermarket hood shipped.
I am looking for the front bumper. I can get a new one in primer for less than $300 shipped.
NEED:
1. Front Bumper, Cooper S or Base
2. Bumper Mounting bolts and nuts for the front and rear (I am sure they will be thrown away as you part the vehicle. Sell them to me, I actually need them.)
3. Passenger side front Wheel Arch cover
4. Passenger side headlamp for 2006 Just a
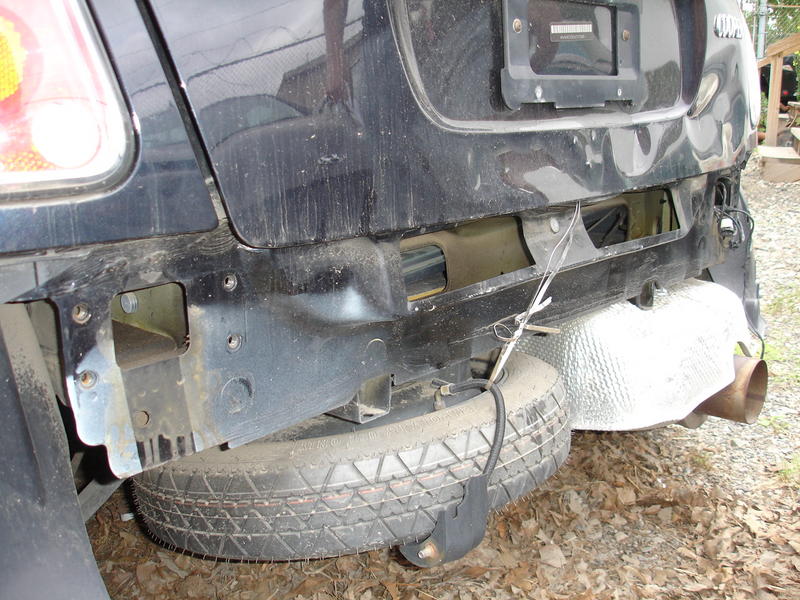
5. Bumper mounting tabs (picture attached)
Let me know as I am ACTIVELY purchasing items every day in fact all those parts I have mentioned were purchased in the past few days. I will be making purchases tonight and every day until I am done. I am trying to finish buying stuff by the end of the week so I can start working on things next weekend as parts arrive and get the thing finished.
Let me know. I am not that far from Atlanta, GA about 3 hours away.
Glad I get to talk to you guys here.Bought nearly new rear bumper cover with valances $130 shipped, rear bumper carrier with shock absorber and reinformcement for $160 shipped. Front carrier $150 shipped.
I paid $260 for the brand new aftermarket hood shipped.
I am looking for the front bumper. I can get a new one in primer for less than $300 shipped.
NEED:
1. Front Bumper, Cooper S or Base
2. Bumper Mounting bolts and nuts for the front and rear (I am sure they will be thrown away as you part the vehicle. Sell them to me, I actually need them.)
3. Passenger side front Wheel Arch cover
4. Passenger side headlamp for 2006 Just a
5. Bumper mounting tabs (picture attached)
Let me know as I am ACTIVELY purchasing items every day in fact all those parts I have mentioned were purchased in the past few days. I will be making purchases tonight and every day until I am done. I am trying to finish buying stuff by the end of the week so I can start working on things next weekend as parts arrive and get the thing finished.
Let me know. I am not that far from Atlanta, GA about 3 hours away.
Last edited by DailyDrivenMini; Jun 12, 2012 at 03:07 PM.

3rd Gear
Joined: Aug 2010
Posts: 213
Likes: 2
Yes an easy fix .mine was a salvage also. Not hurt much.hate the ignorance of some when it comes to damaged cars.have fixed 75 plus salvage vehi
cles over 30 years and never had one that I regret fixing.mine had only 24000 miles.
cles over 30 years and never had one that I regret fixing.mine had only 24000 miles.
Thread Starter
|
3rd Gear
Joined: May 2012
Posts: 248
Likes: 1
From: MA, SC
lathedog. It is an easy fix. Otherwise I would have hesitated in picking it up. This started as a fun project as I let go of my motorcycle. It still is a pain in the rear end to get it titled and registered. I should worry about all the processes but I will worry about it once all the repair is done. This is my first time doing body work. LOL. But I do filling in teeth for living.
Thread Starter
|
3rd Gear
Joined: May 2012
Posts: 248
Likes: 1
From: MA, SC
A big box showed up when I came back home. It is probably the biggest box that I have ever seen. You get the idea with the Mini and the Jeep with 33" tires with 4.5" lift in the background. I also use the jeep for shelf when I work.
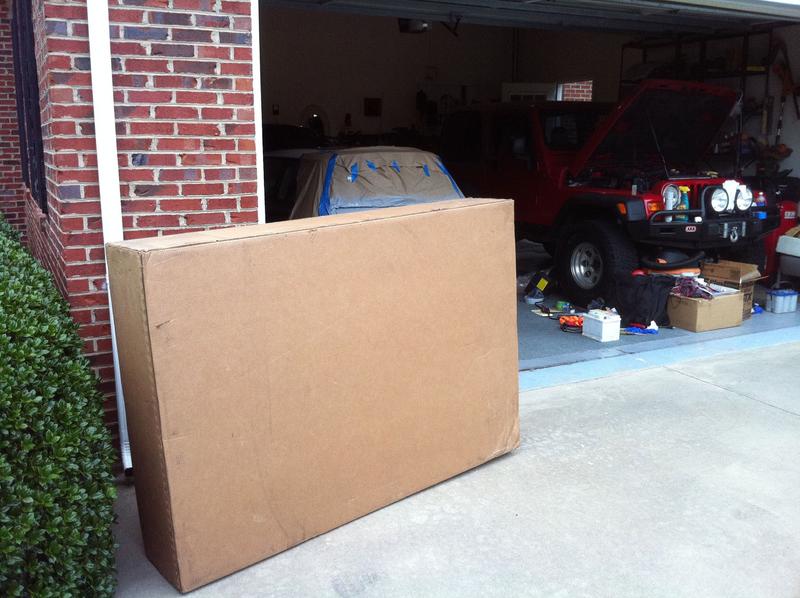
Unboxed it. And there was another box inside containing the hood.
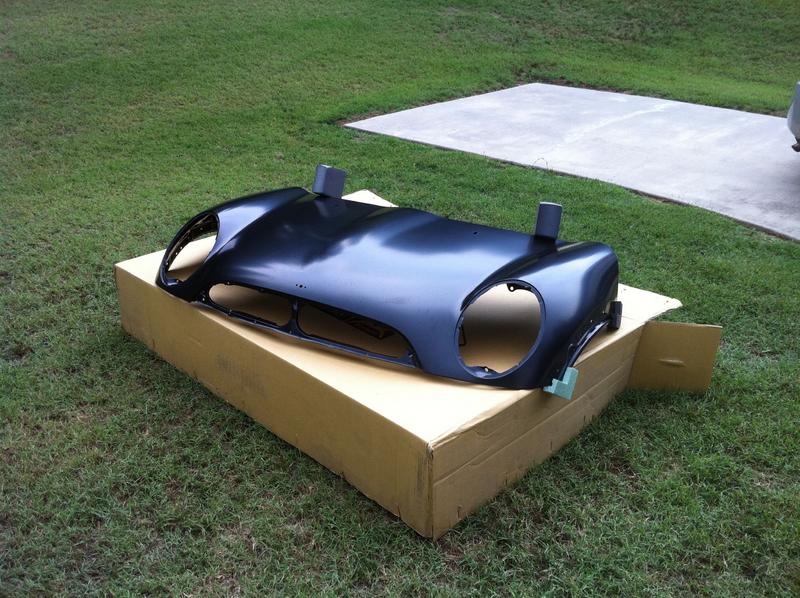
The thin front grill support was bent but I could be manipulated into shape. No major dents that I can see, thus decided to keep it.
So the old hood came off after removing all the wires and such. This is TWO person job. I have done many jobs alone but this I had to have second person.

Unboxed it. And there was another box inside containing the hood.
The thin front grill support was bent but I could be manipulated into shape. No major dents that I can see, thus decided to keep it.
So the old hood came off after removing all the wires and such. This is TWO person job. I have done many jobs alone but this I had to have second person.
Last edited by DailyDrivenMini; Jun 21, 2012 at 07:07 AM.
Thread Starter
|
3rd Gear
Joined: May 2012
Posts: 248
Likes: 1
From: MA, SC
Hood is on.
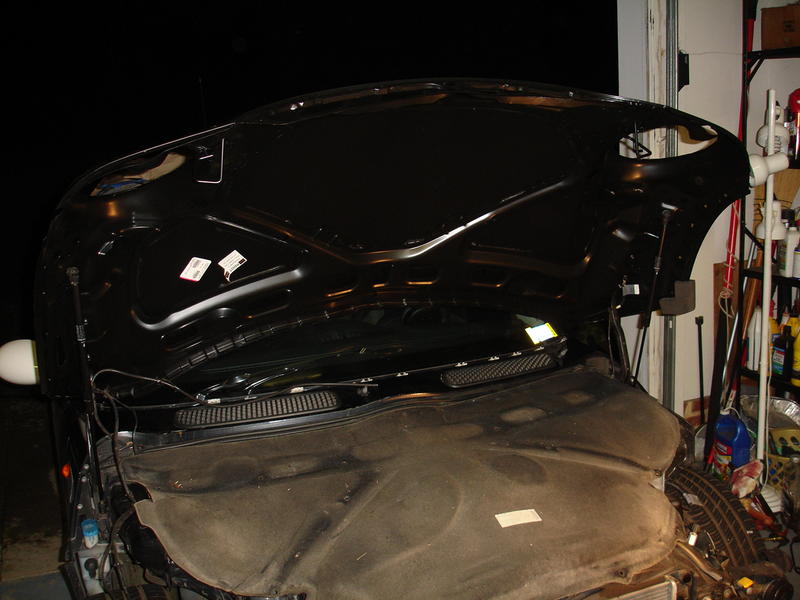
You can see the new condenser.

Will be polishing the tip and fix the ambient temperature sensor code tomorrow.

I use very minimal amount of glaze just to fill the pin holes. I have never used bondo or glaze before. This is my first time doing body work. What do you do when you get pin holes on your bondo work? Or do you get holes on your bondo work at all?
You can see the new condenser.
Will be polishing the tip and fix the ambient temperature sensor code tomorrow.
I use very minimal amount of glaze just to fill the pin holes. I have never used bondo or glaze before. This is my first time doing body work. What do you do when you get pin holes on your bondo work? Or do you get holes on your bondo work at all?
Last edited by DailyDrivenMini; Jun 21, 2012 at 07:08 AM.

4th Gear
Joined: Apr 2012
Posts: 380
Likes: 0
From: Maryland, USA
Love the work you've done so far. I considered doing something similar, but I couldn't find anything with light enough damage for my (very) limited automotive skills. After seeing your work so far I may give it a go sometime in the future. Keep it up!

Thread Starter
|
3rd Gear
Joined: May 2012
Posts: 248
Likes: 1
From: MA, SC
Pure87. You gotta learn sometime somewhere. Don't let anyone discourage you. I have been holding back for years but I used that time to learn. Watch, read, watch, read..... I have been wrenching for about 16 years now mostly on Jeeps, but a few sedans and vans in between doing brakes, radiators, water pumps, AC work..... Since I started with oil change I have done as much as rebuilding transfer cases, installing ring and pinion and differential lockers on Dana axles as a hobby. It is amazing what you can learn from just reading, now you also have Youtube. I didn't have Youtube when I started.
Alright, anyone selling anything? I need parts. I am still waiting to hear from you WayMotorWorks.
Thanks for the compliment guys.
Alright, anyone selling anything? I need parts. I am still waiting to hear from you WayMotorWorks.
Thanks for the compliment guys.

Thread Starter
|
3rd Gear
Joined: May 2012
Posts: 248
Likes: 1
From: MA, SC
Picked up a front bumper cover and the new set of headlights. Supposedly it is DOT/SAE Approved.

The rear bumper cover arrived according to the Fedex. Will assess how much work is needed on the bumper tonight.
The rear bumper cover arrived according to the Fedex. Will assess how much work is needed on the bumper tonight.
Last edited by DailyDrivenMini; Jun 21, 2012 at 07:08 AM.
Thread Starter
|
3rd Gear
Joined: May 2012
Posts: 248
Likes: 1
From: MA, SC
Got the bumper and it is in amazing shape. I wish I had a blue R50 so I can just slap this one on.
Also received the Redline MTL for the tranny. I bet the original owner did not change the oil judging from the cabin filter.
Where are you guys buying your cabin filters?
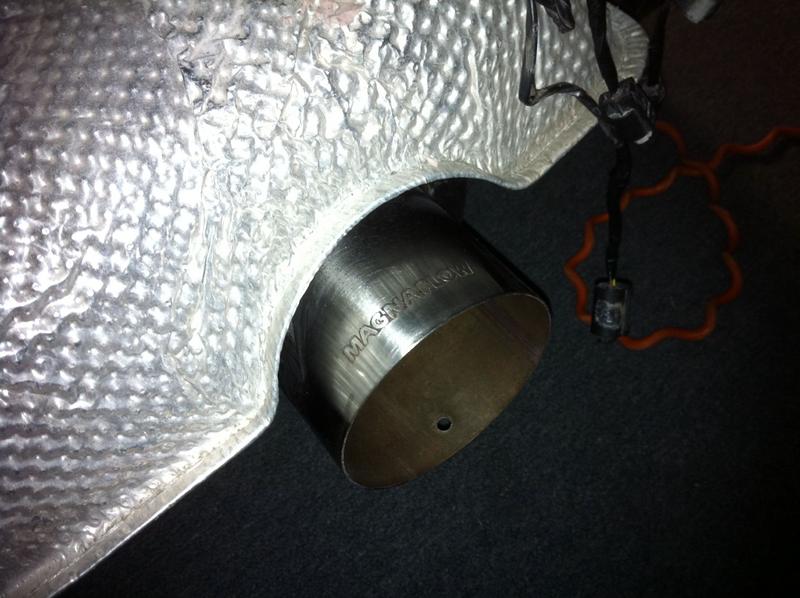
Here is some before and
after shots of the polishing the exhaust tip.
Good nite, folks!
Also received the Redline MTL for the tranny. I bet the original owner did not change the oil judging from the cabin filter.
Where are you guys buying your cabin filters?
Here is some before and
after shots of the polishing the exhaust tip.
Good nite, folks!
Last edited by DailyDrivenMini; Jun 21, 2012 at 07:21 AM.
Thread Starter
|
3rd Gear
Joined: May 2012
Posts: 248
Likes: 1
From: MA, SC
Bought whole bunch of parts for the bumpers and fenders. Talk about some expensive hardwares.... Just darn nuts and bolts adding up to about a benjamin. WTH.
Front bumper carrier arrived yesterday. Fit fine and one of my concern is eliminated as the worst case the frame may have been deviated a little but that is no longer is a concern! I am happy! The adjuster who totaled it, must have been a generous one.
The trunk shelf arrived. Picked up the hood and side mirror bras.
Just bought 1 QT of urethane base coat along with 1 Gal of clear with activator.
Front end is alone around $600. The most expensive part of the build so far.
I bet you didn't know this one. The Cooper S bumper costs less than the Just-a because it has a few less parts/trims.
Paint at $227.
Will be picking up HVLP spray gun, DA sander, sand papers, and more primer, later today.
Sorry about the blurred image. They downgrade the photo when uploaded.
I may start painting this weekend. Let's see what happens!
-MK
Front bumper carrier arrived yesterday. Fit fine and one of my concern is eliminated as the worst case the frame may have been deviated a little but that is no longer is a concern! I am happy!
The adjuster who totaled it, must have been a generous one. The trunk shelf arrived. Picked up the hood and side mirror bras.
Just bought 1 QT of urethane base coat along with 1 Gal of clear with activator.
Front end is alone around $600. The most expensive part of the build so far.
I bet you didn't know this one. The Cooper S bumper costs less than the Just-a because it has a few less parts/trims.
Paint at $227.
Will be picking up HVLP spray gun, DA sander, sand papers, and more primer, later today.
Sorry about the blurred image. They downgrade the photo when uploaded.
I may start painting this weekend.
Let's see what happens!-MK
Thread Starter
|
3rd Gear
Joined: May 2012
Posts: 248
Likes: 1
From: MA, SC
Started painting.. A few days ago.
I have never painted before with the HVLP gun. I have painted only with aerosol paints on few small plastic parts.
I don't have paint booth so my reasoning was to hang the hood as I am painting so that the dust will settle less on the hood.
A mistake.

Base coat went on great, the clear ran like there is no tomorrow.

I bet you guys are laughing at this point. You can say I learned how to paint as I am painting the Mini.
So I fixed the runs using razor blade. Scuffed everything down.

So I decided to reinstall the bonnet on the car and have another shot.

Re-based and cleared again.


And the rear bumper.

How does it look?

Will be wet-sanding tonight and hopefully buffing tomorrow night.
Wish I had a paint booth. It is pain in the rear end fighting dusts and bugs landing on the finish.
Paint wasn't cheap. Spent about $300 in paint and supply.
Now I got a skill to do any car though. No more visits to body shop to fix scratches and dings or even a collision repair!
Front bumper is in backorder; I am ordering a new bumper. S model to be specific. LOL I got an old base model rear bumper with S model front. I am bastardizing the mini!
I have never painted before with the HVLP gun. I have painted only with aerosol paints on few small plastic parts.
I don't have paint booth so my reasoning was to hang the hood as I am painting so that the dust will settle less on the hood.
A mistake.
Base coat went on great, the clear ran like there is no tomorrow.
I bet you guys are laughing at this point.
You can say I learned how to paint as I am painting the Mini.So I fixed the runs using razor blade. Scuffed everything down.
So I decided to reinstall the bonnet on the car and have another shot.
Re-based and cleared again.
And the rear bumper.
How does it look?
Will be wet-sanding tonight and hopefully buffing tomorrow night.
Wish I had a paint booth. It is pain in the rear end fighting dusts and bugs landing on the finish.
Paint wasn't cheap. Spent about $300 in paint and supply.
Now I got a skill to do any car though. No more visits to body shop to fix scratches and dings or even a collision repair!
Front bumper is in backorder; I am ordering a new bumper. S model to be specific. LOL I got an old base model rear bumper with S model front. I am bastardizing the mini!
Thread Starter
|
3rd Gear
Joined: May 2012
Posts: 248
Likes: 1
From: MA, SC
I actually got it titled and tagged now. I am happy!! That was my biggest concern! As soon as the front bumper cover shows up, this thing is ready to drive on the road!
 Coming back alive indeed!
Fluid change will be done this weekend.
