When you click on links to various merchants on this site and make a purchase, this can result in this site earning a commission. Affiliate programs and affiliations include, but are not limited to, the eBay Partner Network.
I recently got a decent deal on part of the JCW air I take for the R53. I have the top part with vent and the foam filter. Unfortunately, I am missing the bottom tub piece and the part that goes up to the firewall with larger holes for air. Does anyone know what the part numbers are so I can find them used? Any help you can provide is greatly appreciated 🙏.
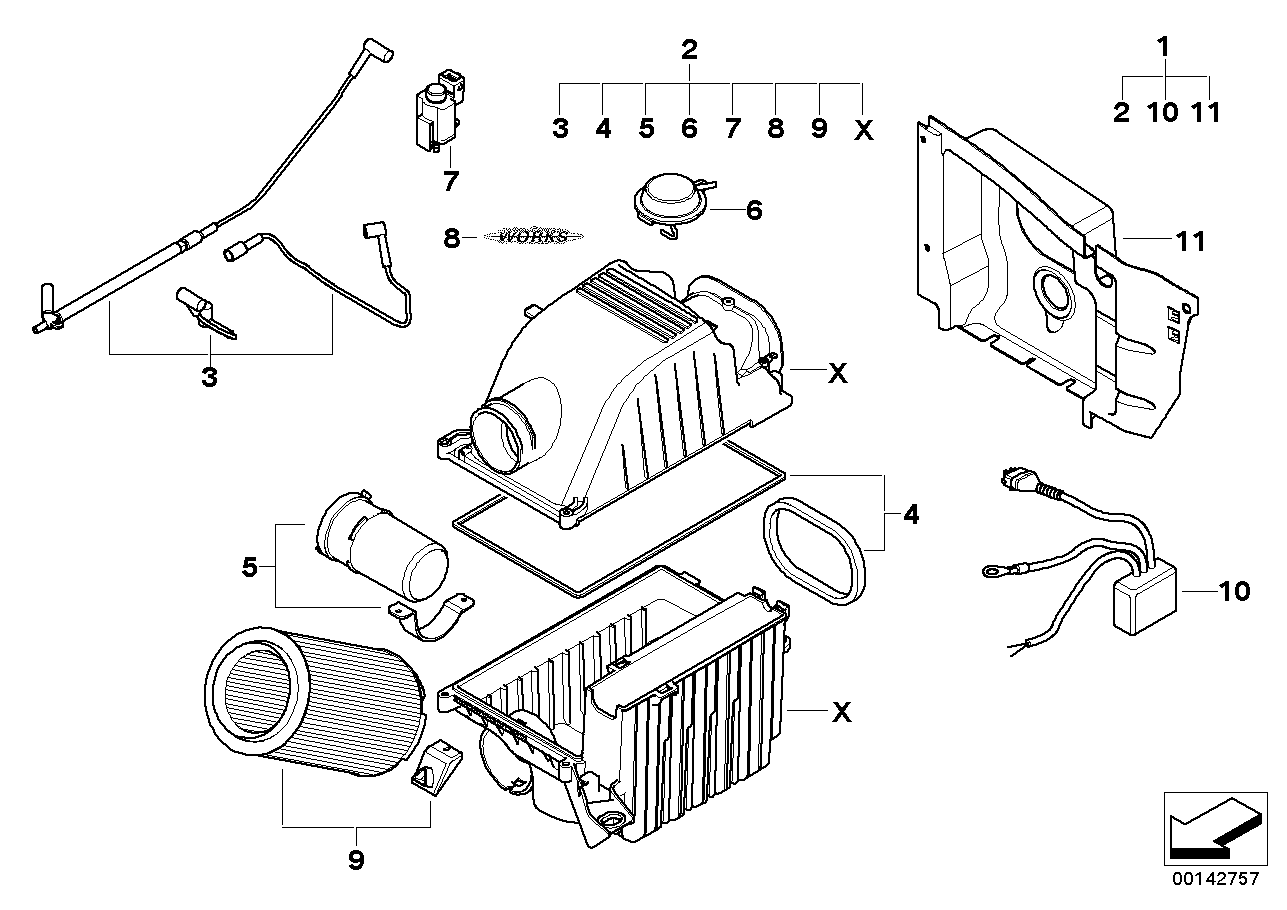
The JCW rear partition....Part no. 51-71-7-174-999
As for the body of the air box, the only time a MINI client received both a new bottom and top was when they purchased the 205hp kit which came with the 380 injectors...Otherwise the bottoms are the same.
What you can do is what's called a "flapper delete" too. Basically is when you remove the large rear flap in the back and disable the vac system and line going to the module which would normally open the large rear flap at 3,800rpm's.
If your purchase came with a "foam filter" that's not standard filter but aftermarket. Alta makes a foam one as does Pipercross...These require special cleaning kits/solution meant specifically for foam filters. They also require oil to be sprayed onto the foam to act as a medium for trapping dirt particles. IMO the foam filters do not trap dirt as well as the paper filters....that said, I have a paper stock OEM JCW filter...but when I do replace it....I'm looking at a better flowing but DRY paper filter from Amsoil.... https://www.ecstuning.com/b-amsoil-p...r/eaau3570~ao/
And while the lower portion of the box may be the same, I believe there may be two parts absent possibly from yours ? # 18 and 19 below. ( been a while since I swapped mine out ) But you can assess that once you have eyes back there. And yes you can remove that lower plug as well. It adds more ambiance to the driving pleasure but it also reduces air box pressures resulting in torque / power reduction. Why the JCW MINI flapper gizmo didn't open until 3,800 rpms when it was wired up.
Thank you for the incredibly thorough responses. If I can press my luck further, I have a couple more questions to ask.
I am indeed missing #18 and 19 from the picture above. Do they represent an inlet to the plastic shroud or is that a cap of some sort?
Also, is the vacuum line different between the JCW and MCS? If doing the flapper delete, I read you do not connect the electronics... But I would think the vacuum part would still need to be connected.
Thank you again for all of the great information and recommendations.
Here is the # key to the diagram that Eurothrasher posted:
Thank you for the incredibly thorough responses. If I can press my luck further, I have a couple more questions to ask.
I am indeed missing #18 and 19 from the picture above. Do they represent an inlet to the plastic shroud or is that a cap of some sort?
Also, is the vacuum line different between the JCW and MCS? If doing the flapper delete, I read you do not connect the electronics... But I would think the vacuum part would still need to be connected.
Thank you again for all of the great information and recommendations.
If I remember correctly, the JCW includes a T fitting to tap into the vacuum system and nothing is touched from stock if the flap controls are not connected. I just removed the flap and all of its components, including #10 and #11 before installing the JCW top half to the stock bottom. If you remove #10 it will leave a hole in the top that you�ll need to seal. You can leave it on, but I just liked the cleaner look of not having it there.
Also, if you go with an aftermarket cone filter try and use #3, the air cleaner element stop, to help secure the filter in the box so it�s not just hanging from the intake. Just an extra precaution to help keep the cone filter from shaking loose over time and having the engine suck in unfiltered air. The Amsoil has a nice metal end plate the stop can stick to.
#18 should already be part of the bottom half of the stock airbox with #19 not really being needed. I�ve read one reason for the flap on the JCW box was for noise laws in the UK/Europe. Most people wouldn�t be driving over 4,500 RPM�s around town too often so the flap would be closed and keep the supercharger whine down. #19 just closes off the existing stock opening for this purpose and isn�t needed if you don�t want hook up the flap. Since you�re missing #18, you can get a replacement or cap off the bottom hole on the airbox and the firewall panel with some plugs.
Completed the install tonight and I could not have done it without the great information in this thread.
EVA foam used to replace deteriorated foam fitting at end of intake housing.
I had to do some refurbishing on the housing. The foam at the end was gone from time and abuse. I traced the opening and transferred to an EVA foam pad I had lying around. I then used the same tracing to cut a home in the stock shroud between the intake and the firewall. Everything fit up as the experts mentioned here. I also used some EVA foam to friction fit a cap for the hole pictured at #18.
The finished product looks stock and I couldn't be happier. Quarantine and curfew prevented a shake down drive tonight... So here's to hoping I have an essential trip to take sometime later this week.
Thanks again to all. I really appreciate the help. If anyone else is contemplating doing the same, please hit me up. This was by far the most economical way to upgrade the intake I saw for the R53.
@RB-MINI addressed my question, but I just wanted to get a second opinion...is the only reason the flapper exists to keep SC noise down at low RPMs? Heck, why would you want to do that?
If I can save weight, make it less complicated, and get better sound, the flapper delete sounds like a good next project!
I can only add that I read the same, somewhat conflicting information. Several videos state 3800 RPM whereas others quoted 4500. It may have been sound or emissions related... or so the internet says.
I can say that my stock supercharger is clearly louder. Around 2500, I can hear distinct air sounds with supercharger whine getting progressively louder. I love the increased noise and definitely feel it was worth the 2 or so hours of my time. The most time consuming portion was tracing and removing the plastic where the larger intake hole rests.
Removing the flap required no tools and 10 seconds... Definitely worth it 👌
Can anyone tell me where the vacuum line is connected to on the engine? It is #27 in the diagram. My vacuum lines are broken on the air filter box and it was broke coming from the engine to the box. Now it has fallen down somewhere in the engine and I can't find where it is connected to. I need to find it and cap it off so it doesn't cause a vacuum leak. I did the flapper delete so I don't need any of the vacuum lines.
Can anyone tell me where the vacuum line is connected to on the engine? It is #27 in the diagram. My vacuum lines are broken on the air filter box and it was broke coming from the engine to the box. Now it has fallen down somewhere in the engine and I can't find where it is connected to. I need to find it and cap it off so it doesn't cause a vacuum leak. I did the flapper delete so I don't need any of the vacuum lines.
Does that come around and go to the brake booster? You may want to follow the vacuum line from the brake booster and see where that goes. I just replaced my brake master cylinder and the line from the booster goes across the top of the booster, down toward the bottom of the airbox and then toward the front of the car. Looks like it is headed in the direction of #27...
Oh, I also need the foam on the airbox connection to the air from the cowl intake. Right now there's 1/4 - 3/8 inch gap. I'd rather have cold air going in there than getting mixed with that from the engine compartment.