
R50/53 Where to find this part?


Thread Starter
|
1st Gear
Joined: Oct 2013
Posts: 47
Likes: 0
Where to find this part?
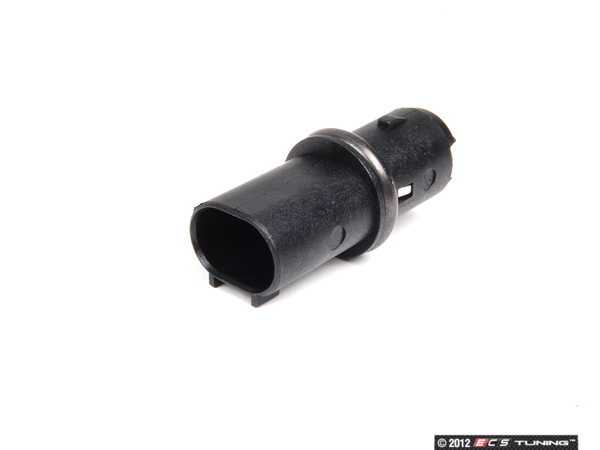
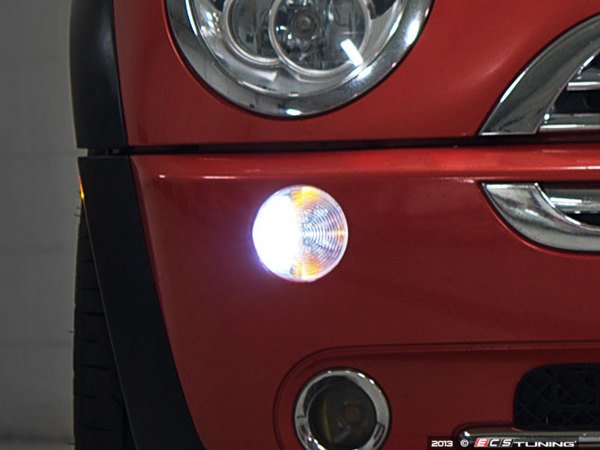
I decided to replace a burned out bulb in the fog/running light below the headlight. This is the light that blinks yellow with the turn signal but blicks white when you hit the unlock/lock button. This is the light located below the headlights. When I went in there, I found that a PO had cut the wires leading to the bulb fitting. I don't have the female connector to fit into the male plug (see pictures). Is there a cross reference part for this so I can pick up the female plus with pigtails at a local auto parts store or do I need to find a junk yard somewhere and cut one off a car? The Mini is an '04.

Thread Starter
|
1st Gear
Joined: Oct 2013
Posts: 47
Likes: 0
It's not the bulb I'm looking for. At the end of the plastic holder it requires a female connector that is connected to the wiring loom. A PO had cut the wires leading to this light and the female connector is missing. I need a female connector with pig tails so I can tie it back into the wiring loom and plug it back into this light.


Thanks for mention 1 qwkmini. 
We have them here: 63138360205 part #.
http://www.ecstuning.com/Search/SiteSearch/ES2009498__ES2673129/
Think the plug end is the same as the ones used on the side markers.
http://www.ecstuning.com/Search/SiteSearch/61138365340/
And
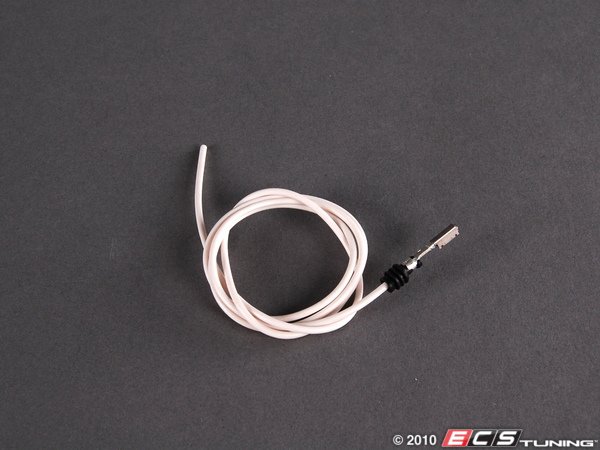
http://www.ecstuning.com/Search/SiteSearch/61130005199/ x 2 per plug 0.2 - 0.5mm�
Just fixed my side markers ( fender arch ) ones with that per plug.
We Have the Led light kit for those outer front bumper marker lights, ( *not the orange flashing ones ). Replaces the stock filament wedge bulb and used the stock socking and everything.
Ziza Front Marker Light LEDs
http://www.ecstuning.com/Search/SiteSearch/MINIGEN1FRZZKT/ES2681740/

Thanks
We have them here: 63138360205 part #.
http://www.ecstuning.com/Search/SiteSearch/ES2009498__ES2673129/
Think the plug end is the same as the ones used on the side markers.
http://www.ecstuning.com/Search/SiteSearch/61138365340/
And
http://www.ecstuning.com/Search/SiteSearch/61130005199/ x 2 per plug 0.2 - 0.5mm�
Just fixed my side markers ( fender arch ) ones with that per plug.
We Have the Led light kit for those outer front bumper marker lights, ( *not the orange flashing ones ). Replaces the stock filament wedge bulb and used the stock socking and everything.
Ziza Front Marker Light LEDs
http://www.ecstuning.com/Search/SiteSearch/MINIGEN1FRZZKT/ES2681740/
Thanks
__________________

MINI Guru/ MINI Owner Since 2004 | NEW Lifetime Part Replacement | Local Pickup
Milltek | Genuine MINI | Forge Motorsport | NM Engineering | ECS Performance | M7 Speed
Customer Service Hours: 8am-8pm EST|Sales Team Hours: 8am-11pm | SAT 10am-7pm 800.924.5172
MINI Guru/ MINI Owner Since 2004 | NEW Lifetime Part Replacement | Local Pickup
Milltek | Genuine MINI | Forge Motorsport | NM Engineering | ECS Performance | M7 Speed
Customer Service Hours: 8am-8pm EST|Sales Team Hours: 8am-11pm | SAT 10am-7pm 800.924.5172
Thread Starter
|
1st Gear
Joined: Oct 2013
Posts: 47
Likes: 0
Yep. That looks like what I need. So I need one electrical connector plug plus two of the bushing contacts? How is the bushing contact connected to the plug. Does the plug open up whereby one inserts the bushing connectors and then snaps it shut or something like that? Thanks for your help.
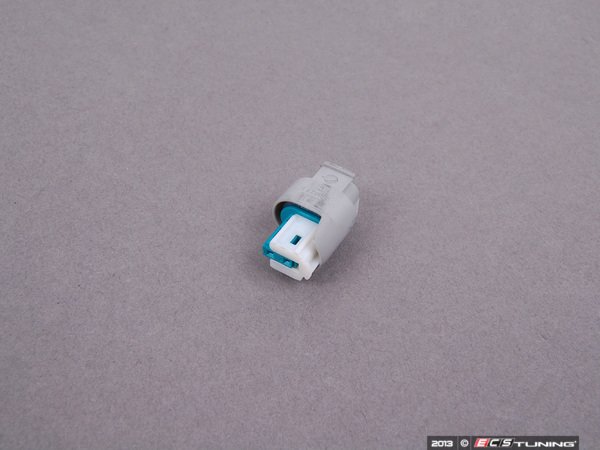
Yep, two wires, one plug per connection. Insert plugs into circle holes on the back. In the right direction, use the old plug as a guide, they snap in. Has little seal gasket, then on the plug head the little white part , then get pushed over and snaps shut, its open and ready to take the plugs in the pics.
Thanks
Thanks
__________________
MINI Guru/ MINI Owner Since 2004 | NEW Lifetime Part Replacement | Local Pickup
Milltek | Genuine MINI | Forge Motorsport | NM Engineering | ECS Performance | M7 Speed
Customer Service Hours: 8am-8pm EST|Sales Team Hours: 8am-11pm | SAT 10am-7pm 800.924.5172
MINI Guru/ MINI Owner Since 2004 | NEW Lifetime Part Replacement | Local Pickup
Milltek | Genuine MINI | Forge Motorsport | NM Engineering | ECS Performance | M7 Speed
Customer Service Hours: 8am-8pm EST|Sales Team Hours: 8am-11pm | SAT 10am-7pm 800.924.5172
Trending Topics
Thread Starter
|
1st Gear
Joined: Oct 2013
Posts: 47
Likes: 0
Yep, two wires, one plug per connection. Insert plugs into circle holes on the back. In the right direction, use the old plug as a guide, they snap in. Has little seal gasket, then on the plug head the little white part , then get pushed over and snaps shut, its open and ready to take the plugs in the pics.
Thanks
Thanks
Ok, I can explain it more.
Take the plug , turn it to this side:
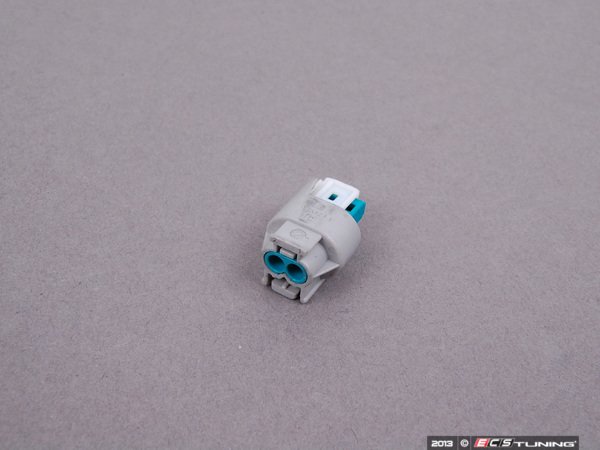
See the two holes.
Take this plug end, look deep inside the two holes, they will be square on the inside and insert into the holes. The bottom part of the square plug inserts into the holes with the prong part clicking into the open notch which you can see in the pic of the plug end.
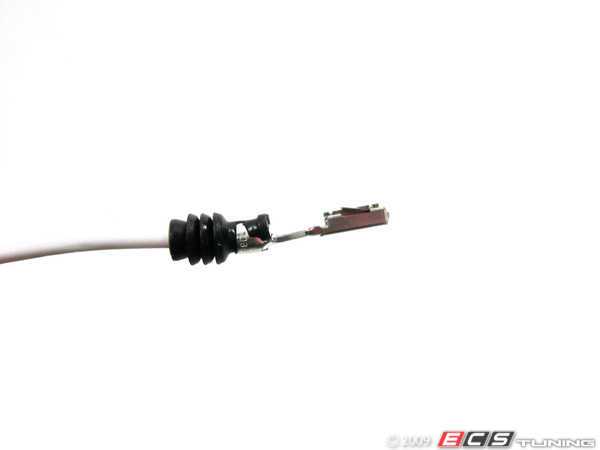
Then snap the white part of the plug over the blue part by slightly pressing it together, should click. Then you are ready to strip the ends of the wires and connect to the older wire, make sure they are clean , soldering them together and them wrap electrical tape or shrink wrap and your done. I always test a bulb into the new plug to make sure the wires are not polarity sensitive. Then I soldered it all in.
Thanks
Take the plug , turn it to this side:
See the two holes.
Take this plug end, look deep inside the two holes, they will be square on the inside and insert into the holes. The bottom part of the square plug inserts into the holes with the prong part clicking into the open notch which you can see in the pic of the plug end.
Then snap the white part of the plug over the blue part by slightly pressing it together, should click. Then you are ready to strip the ends of the wires and connect to the older wire, make sure they are clean , soldering them together and them wrap electrical tape or shrink wrap and your done. I always test a bulb into the new plug to make sure the wires are not polarity sensitive. Then I soldered it all in.
Thanks
__________________
MINI Guru/ MINI Owner Since 2004 | NEW Lifetime Part Replacement | Local Pickup
Milltek | Genuine MINI | Forge Motorsport | NM Engineering | ECS Performance | M7 Speed
Customer Service Hours: 8am-8pm EST|Sales Team Hours: 8am-11pm | SAT 10am-7pm 800.924.5172
MINI Guru/ MINI Owner Since 2004 | NEW Lifetime Part Replacement | Local Pickup
Milltek | Genuine MINI | Forge Motorsport | NM Engineering | ECS Performance | M7 Speed
Customer Service Hours: 8am-8pm EST|Sales Team Hours: 8am-11pm | SAT 10am-7pm 800.924.5172
Thread Starter
|
1st Gear
Joined: Oct 2013
Posts: 47
Likes: 0
I got the parts. Are the wires, once inserted, suppose to "click" and take hold? no matter which way I insert the wires they don't catch. I see how the white part will slide back and forth. I thought maybe the white part locks the wires in place but it seems to have no affect on the wires.

Thread
Thread Starter
Forum
Replies
Last Post
Gil-galad
Eastern Iowa MINIs
63
Nov 17, 2016 02:54 PM
ECSTuning
Vendor Announcements
0
Aug 12, 2015 01:24 PM
marendt428
MINIs & Minis for Sale
0
Aug 8, 2015 04:44 AM