
JCW Underbody Paneling install


Great, you are welcome.
Wanted to make sure you have enough.
Post up some pics when you get it all done. Very nice looking mod.
BTW the R59 looks great.
Wanted to make sure you have enough.
Post up some pics when you get it all done. Very nice looking mod.
BTW the R59 looks great.
__________________

MINI Guru/ MINI Owner Since 2004 | NEW Lifetime Part Replacement | Local Pickup
Milltek | Genuine MINI | Forge Motorsport | NM Engineering | ECS Performance | M7 Speed
Customer Service Hours: 8am-8pm EST|Sales Team Hours: 8am-11pm | SAT 10am-7pm 800.924.5172
MINI Guru/ MINI Owner Since 2004 | NEW Lifetime Part Replacement | Local Pickup
Milltek | Genuine MINI | Forge Motorsport | NM Engineering | ECS Performance | M7 Speed
Customer Service Hours: 8am-8pm EST|Sales Team Hours: 8am-11pm | SAT 10am-7pm 800.924.5172

5th Gear
Joined: Jul 2012
Posts: 777
Likes: 1
From: Richardson, TX
I found several attached that I reused. Some were stripped out and of course you need several where there are none. I think of the 20 I had about 10 new left over. It is an easy install. You can't mess it up because stuff only goes one way.

5th Gear
Joined: Jul 2012
Posts: 777
Likes: 1
From: Richardson, TX
They will fit, at least, an R56 without the aero kit. I put them on mine before putting only the aero bumper on. Hope that helps.
Last edited by MikewithaMini; Oct 23, 2013 at 12:13 PM.

4th Gear
Joined: May 2013
Posts: 314
Likes: 0
Does the 2013 R56 JCW come standard with the underbody panels?
I've been looking into the front "skid plate" piece since I first saw that video but no luck so far. Admittedly I haven't looked very hard lately. Rennline makes a very nice skid plate that would accomplish more or less the same thing but I'd prefer the lighter weight of this GP panel. Honestly, I'm not even sure if that panel made it on to the final version of the GP2 as you can see the car in the pics/video is a prototype with camo, etc. and even the diffuser panels lack the aluminum bracing parts showing up on the final version of the car. My parts dept. guy has his eye out for this piece and if I hear anything I'll certainly post it.
As for the underpanels, they are a cinch to install. My JCW Coupe came from the factory with them installed but I've removed them several times to work on the car. It can be done with the car on jackstands. I've even done it with the car on the ground and my Coupe is lowered though it was a pain feeling for where the fasteners go. Once you slide the panels in place they screw to the underside in several places with little square headed plastic threaded fasteners. I believe a 7 or 8mm socket will do the trick. Don't quote me on the socket size though since it's been awhile since I've done it.
As for the underpanels, they are a cinch to install. My JCW Coupe came from the factory with them installed but I've removed them several times to work on the car. It can be done with the car on jackstands. I've even done it with the car on the ground and my Coupe is lowered though it was a pain feeling for where the fasteners go. Once you slide the panels in place they screw to the underside in several places with little square headed plastic threaded fasteners. I believe a 7 or 8mm socket will do the trick. Don't quote me on the socket size though since it's been awhile since I've done it.


Coordinator :: Eastern Iowa MINIs
Joined: Dec 2006
Posts: 5,520
Likes: 4
From: Decorah, IA
It's high time for me to try this mod on my R59. I've had the GP2 rear diffuser installed for over two years and just recently discovered that the upper side of the diffuser is a collection point for stones, sand, and even standing water. I'm thinking the side panels and front belly pan would help mitigate this, along with the other obvious advantages.
For the side panels, is there a break-out anywhere that shows which fastener goes where around the perimeter of the panel?
For the side panels, is there a break-out anywhere that shows which fastener goes where around the perimeter of the panel?
There is a diagram on the first page and then they talk about the mod.
Here is the link to the diagram and the # corresponds to the locations of hardware.
http://www.realoem.com/bmw/showparts...84&hg=51&fg=75
Thanks
Here is the link to the diagram and the # corresponds to the locations of hardware.
http://www.realoem.com/bmw/showparts...84&hg=51&fg=75
Thanks
__________________
MINI Guru/ MINI Owner Since 2004 | NEW Lifetime Part Replacement | Local Pickup
Milltek | Genuine MINI | Forge Motorsport | NM Engineering | ECS Performance | M7 Speed
Customer Service Hours: 8am-8pm EST|Sales Team Hours: 8am-11pm | SAT 10am-7pm 800.924.5172
MINI Guru/ MINI Owner Since 2004 | NEW Lifetime Part Replacement | Local Pickup
Milltek | Genuine MINI | Forge Motorsport | NM Engineering | ECS Performance | M7 Speed
Customer Service Hours: 8am-8pm EST|Sales Team Hours: 8am-11pm | SAT 10am-7pm 800.924.5172
Coordinator :: Eastern Iowa MINIs
Joined: Dec 2006
Posts: 5,520
Likes: 4
From: Decorah, IA
There is a diagram on the first page and then they talk about the mod.
Here is the link to the diagram and the # corresponds to the locations of hardware.
http://www.realoem.com/bmw/showparts...84&hg=51&fg=75
Thanks
Here is the link to the diagram and the # corresponds to the locations of hardware.
http://www.realoem.com/bmw/showparts...84&hg=51&fg=75
Thanks
All of the right-side panels showing as discontinued is a bit confusing.
Yea, the screw nuts just mach up to the studs already on the underbody, peak your head under the car and you can see them. 
The left and rights are available.
They SS to R56 parts to the R58 parts for the main panels . Here is the part for the R56/R58 models. ( * To fit to the R59 model )
OEM MINI Part nubmers : 51752759385 & 51752759386
http://www.ecstuning.com/Search/ES2530926_ES2530925/
Thanks
The left and rights are available.
They SS to R56 parts to the R58 parts for the main panels . Here is the part for the R56/R58 models. ( * To fit to the R59 model )
OEM MINI Part nubmers : 51752759385 & 51752759386
http://www.ecstuning.com/Search/ES2530926_ES2530925/
Thanks
__________________
MINI Guru/ MINI Owner Since 2004 | NEW Lifetime Part Replacement | Local Pickup
Milltek | Genuine MINI | Forge Motorsport | NM Engineering | ECS Performance | M7 Speed
Customer Service Hours: 8am-8pm EST|Sales Team Hours: 8am-11pm | SAT 10am-7pm 800.924.5172
MINI Guru/ MINI Owner Since 2004 | NEW Lifetime Part Replacement | Local Pickup
Milltek | Genuine MINI | Forge Motorsport | NM Engineering | ECS Performance | M7 Speed
Customer Service Hours: 8am-8pm EST|Sales Team Hours: 8am-11pm | SAT 10am-7pm 800.924.5172
Great, thanks.
__________________
MINI Guru/ MINI Owner Since 2004 | NEW Lifetime Part Replacement | Local Pickup
Milltek | Genuine MINI | Forge Motorsport | NM Engineering | ECS Performance | M7 Speed
Customer Service Hours: 8am-8pm EST|Sales Team Hours: 8am-11pm | SAT 10am-7pm 800.924.5172
MINI Guru/ MINI Owner Since 2004 | NEW Lifetime Part Replacement | Local Pickup
Milltek | Genuine MINI | Forge Motorsport | NM Engineering | ECS Performance | M7 Speed
Customer Service Hours: 8am-8pm EST|Sales Team Hours: 8am-11pm | SAT 10am-7pm 800.924.5172

6th Gear
Joined: Aug 2009
Posts: 1,552
Likes: 10
From: Des Moines, Iowa
Gary, Did you survive the Iowa Winter ok this year? Down here in Des Moines, we didn't have much of a Winter, really. A couple of snows, one in the 7-10" category, a few days of cold temperatures, but our Lil Guy trucked on thru. Yes, I drive it everyday, it's my transportation to and from work, so it has to go. It's never really bad, as I live only 1 1/2 blocks off of Grand, and that is one of the first streets cleared completely in the city.
Two weeks ago we had a sampling of Spring and today it's suppose to be 70, so the top may come down on my way to work at 2:30. It's already feeling nice, so maybe that top may come down sooner than I thought. Keep in touch, and have fun with the r59.
Bill
Two weeks ago we had a sampling of Spring and today it's suppose to be 70, so the top may come down on my way to work at 2:30. It's already feeling nice, so maybe that top may come down sooner than I thought. Keep in touch, and have fun with the r59.
Bill

4th Gear
Joined: Jul 2012
Posts: 309
Likes: 8
From: Richmond, BC
Which part number is for the passenger side? It only says left or right on ECS. Im not sure if left is passenger or right is passenger.
Heard a loud clunk on the freeway today. Jacked up the car and found a nice crack and a hole on the passenger side underbody panel. :(
Heard a loud clunk on the freeway today. Jacked up the car and found a nice crack and a hole on the passenger side underbody panel. :(
The 51752759385 is the driver side ( left ) and 51752759386 is the passenger side ( right ).
Thanks
Thanks
__________________
MINI Guru/ MINI Owner Since 2004 | NEW Lifetime Part Replacement | Local Pickup
Milltek | Genuine MINI | Forge Motorsport | NM Engineering | ECS Performance | M7 Speed
Customer Service Hours: 8am-8pm EST|Sales Team Hours: 8am-11pm | SAT 10am-7pm 800.924.5172
MINI Guru/ MINI Owner Since 2004 | NEW Lifetime Part Replacement | Local Pickup
Milltek | Genuine MINI | Forge Motorsport | NM Engineering | ECS Performance | M7 Speed
Customer Service Hours: 8am-8pm EST|Sales Team Hours: 8am-11pm | SAT 10am-7pm 800.924.5172
Coordinator :: Eastern Iowa MINIs
Joined: Dec 2006
Posts: 5,520
Likes: 4
From: Decorah, IA
There is a diagram on the first page and then they talk about the mod.
Here is the link to the diagram and the # corresponds to the locations of hardware.
http://www.realoem.com/bmw/showparts...84&hg=51&fg=75
Thanks
Here is the link to the diagram and the # corresponds to the locations of hardware.
http://www.realoem.com/bmw/showparts...84&hg=51&fg=75
Thanks
On the first page of this thread pics are posted with the GP2 rear diffuser and the JCW underbody panels.
Thanks
Thanks
__________________
MINI Guru/ MINI Owner Since 2004 | NEW Lifetime Part Replacement | Local Pickup
Milltek | Genuine MINI | Forge Motorsport | NM Engineering | ECS Performance | M7 Speed
Customer Service Hours: 8am-8pm EST|Sales Team Hours: 8am-11pm | SAT 10am-7pm 800.924.5172
MINI Guru/ MINI Owner Since 2004 | NEW Lifetime Part Replacement | Local Pickup
Milltek | Genuine MINI | Forge Motorsport | NM Engineering | ECS Performance | M7 Speed
Customer Service Hours: 8am-8pm EST|Sales Team Hours: 8am-11pm | SAT 10am-7pm 800.924.5172
Coordinator :: Eastern Iowa MINIs
Joined: Dec 2006
Posts: 5,520
Likes: 4
From: Decorah, IA
There are main screw to hold it on with the bracket. Then trim comes preloaded with black screws.
http://www.ecstuning.com/Search/SiteSearch/51747330558/ES2626525/
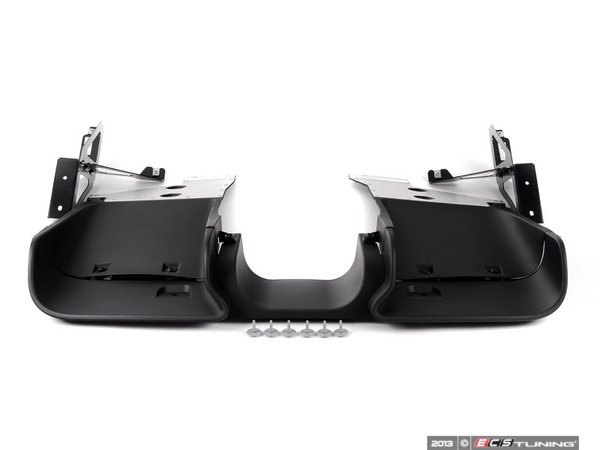
Looks like some people are using other screws to front section. But some guys are not doing this because the main 6 bolts and other preloaded screws hold it on.

Might want to ask Blue Toy ( Steven ) he posted on the first page.
Thanks
http://www.ecstuning.com/Search/SiteSearch/51747330558/ES2626525/
Looks like some people are using other screws to front section. But some guys are not doing this because the main 6 bolts and other preloaded screws hold it on.
Might want to ask Blue Toy ( Steven ) he posted on the first page.
Thanks
__________________
MINI Guru/ MINI Owner Since 2004 | NEW Lifetime Part Replacement | Local Pickup
Milltek | Genuine MINI | Forge Motorsport | NM Engineering | ECS Performance | M7 Speed
Customer Service Hours: 8am-8pm EST|Sales Team Hours: 8am-11pm | SAT 10am-7pm 800.924.5172
MINI Guru/ MINI Owner Since 2004 | NEW Lifetime Part Replacement | Local Pickup
Milltek | Genuine MINI | Forge Motorsport | NM Engineering | ECS Performance | M7 Speed
Customer Service Hours: 8am-8pm EST|Sales Team Hours: 8am-11pm | SAT 10am-7pm 800.924.5172
Coordinator :: Eastern Iowa MINIs
Joined: Dec 2006
Posts: 5,520
Likes: 4
From: Decorah, IA
There are main screw to hold it on with the bracket. Then trim comes preloaded with black screws.
Looks like some people are using other screws to front section. But some guys are not doing this because the main 6 bolts and other preloaded screws hold it on.
Might want to ask Blue Toy ( Steven ) he posted on the first page.
Thanks
Looks like some people are using other screws to front section. But some guys are not doing this because the main 6 bolts and other preloaded screws hold it on.
Might want to ask Blue Toy ( Steven ) he posted on the first page.
Thanks
Welcome.
__________________
MINI Guru/ MINI Owner Since 2004 | NEW Lifetime Part Replacement | Local Pickup
Milltek | Genuine MINI | Forge Motorsport | NM Engineering | ECS Performance | M7 Speed
Customer Service Hours: 8am-8pm EST|Sales Team Hours: 8am-11pm | SAT 10am-7pm 800.924.5172
MINI Guru/ MINI Owner Since 2004 | NEW Lifetime Part Replacement | Local Pickup
Milltek | Genuine MINI | Forge Motorsport | NM Engineering | ECS Performance | M7 Speed
Customer Service Hours: 8am-8pm EST|Sales Team Hours: 8am-11pm | SAT 10am-7pm 800.924.5172
Coordinator :: Eastern Iowa MINIs
Joined: Dec 2006
Posts: 5,520
Likes: 4
From: Decorah, IA
I think I solved another pre-installation mystery that's been bothering me. The OEM diagram below shows the two small asymmetric brackets (Item #5 for the right panel) attaching to the panel with a hex bolt (Item #7)...
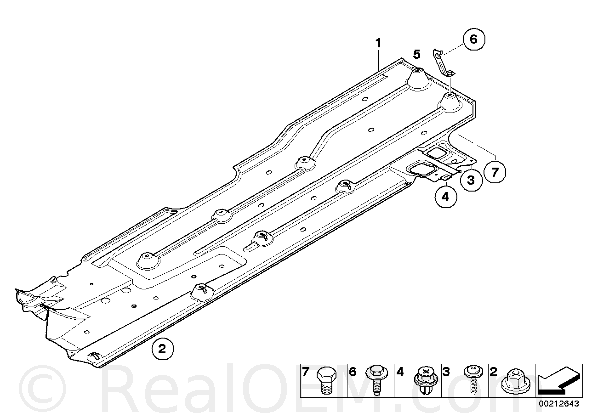
...but the brackets I received didn't have have a hole to accommodate a hex bolt; instead, they're just like the previous pictures in this thread with a welded screw post on the bottom...
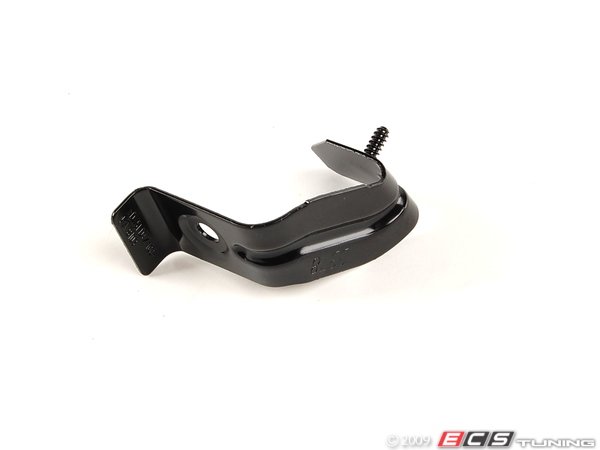
I thought perhaps that the brackets might have been modified since their inception; however, the OEM part numbers appear to have never changed. Anyway, I'm deducing now after a test fit that a couple of plastic nuts, vice hex bolts, should be used to attach these brackets to the panel (and I have a couple of spare hex bolts that I don't really need).
---
...but the brackets I received didn't have have a hole to accommodate a hex bolt; instead, they're just like the previous pictures in this thread with a welded screw post on the bottom...
I thought perhaps that the brackets might have been modified since their inception; however, the OEM part numbers appear to have never changed. Anyway, I'm deducing now after a test fit that a couple of plastic nuts, vice hex bolts, should be used to attach these brackets to the panel (and I have a couple of spare hex bolts that I don't really need).
---
Coordinator :: Eastern Iowa MINIs
Joined: Dec 2006
Posts: 5,520
Likes: 4
From: Decorah, IA
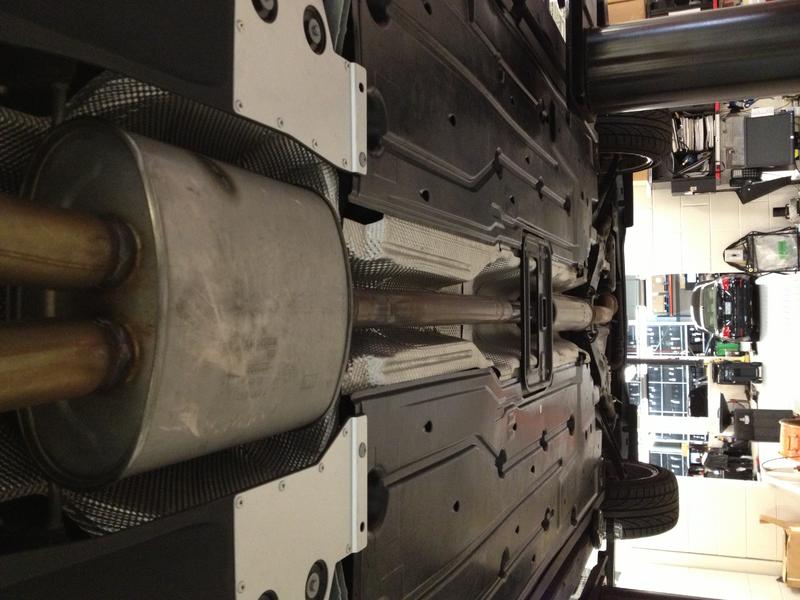
Finished this install on my R59, including the GP2 Belly Pan. I'd post pics but they'd essentially look identical to BlueToy's (appreciate his path-finding for the Roadster adaptation).
Other notes:
I used four stainless steel fasteners to secure the rear edge of the side panels to the rear diffuser. Just seems to make it all more solid.
I'm not completely happy with the two rear speed screws on the belly pan. They just don't have that satisfying lock with the final turn. I'm going to try new clips and screws to see if I can get them to behave better.
In retrospect, it was easier than I had anticipated. A lift, vice doing it with jack stands while laying on my back, would have made it even easier.