Interior/Exterior You-ification: show 'em


#277
 06-22-2008, 06:03 PM

#278
06-24-2008, 06:35 AM

5th Gear
Join Date: Mar 2007
Location: Baltimore
Posts: 637
Likes: 0
Received 0 Likes
on
0 Posts


#279
06-24-2008, 02:09 PM

6th Gear
Join Date: Mar 2005
Location: LI, NY
Posts: 2,384
Likes: 0
Received 0 Likes
on
0 Posts


#283
08-22-2009, 01:46 AM

1st Gear
Join Date: Jul 2009
Location: LA, California
Posts: 36
Likes: 0
Received 0 Likes
on
0 Posts
Sorry for the lame picture quality. These are off my phone.
1st pic: I made some seat pulls out of an old guitar strap. They're black vinyl with a white offset stripe. It was a great looking strap, I just never used it because it didn't match any of my guitars At least it matches well with my seats now. I tried to get my ameoba sticker in there. It's the ONLY sticker I will allow on my car.
2nd pic: Someone mentioned squeezing a drum between the seats. I do this too! These are mini set of bongos. I wear a lot of hats and I found my circular headrests to be a nice shape for holding hats
1st pic: I made some seat pulls out of an old guitar strap. They're black vinyl with a white offset stripe. It was a great looking strap, I just never used it because it didn't match any of my guitars
At least it matches well with my seats now. I tried to get my ameoba sticker in there. It's the ONLY sticker I will allow on my car.2nd pic: Someone mentioned squeezing a drum between the seats. I do this too! These are mini set of bongos. I wear a lot of hats and I found my circular headrests to be a nice shape for holding hats
#285
09-04-2009, 10:29 AM
@ maxmini81
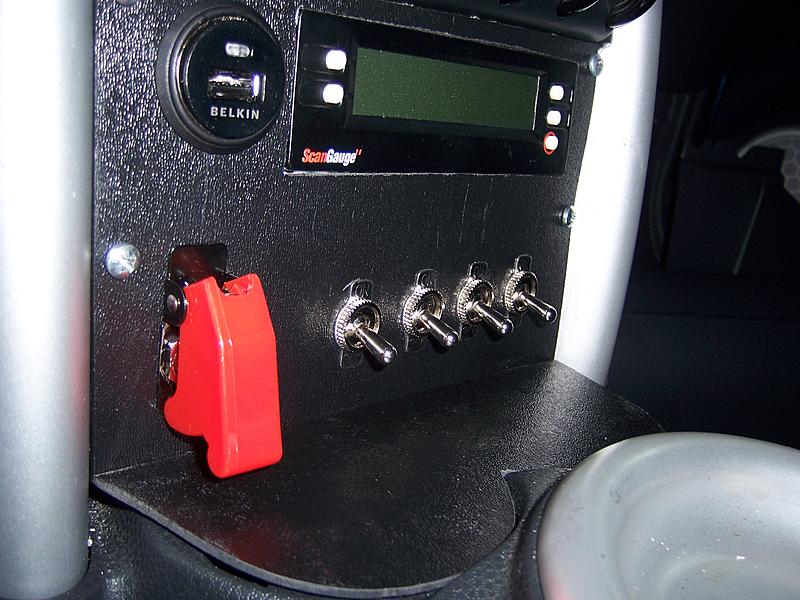
what does the "belkin" thing do ?
got some "new" thinks myself ( forgot to post them here  )
)
self made water/air intercooler:


parst:
- moddified oem intercooler
- the radiator was from a Smart
- the water pump from a bmw 5 series
- a few hoses an stuff
works REALLY well
i did some test runns @ 22C� ( 72F� ) ambient temp. ( inlet air temp readout from obd with a scangauge )
50km -> 220kmh ( 31mph -> 136mph ) revving till 7000rpm = the inlet air temperature reached 26C� ( 79F� )
after that i did the same run 4 times in a row. at the end of the 4. run the inlet air temp had reached 39C� ( 102F� )
right now im thinking about doubling the cooling surface ( a second radiator ) to prevent heat soak
Polished inlet manifold + the 2 things left/right from the intercooler ( forgot to make pictures now that they are installed )
polished outside AND inside


self made exhaust: r53jcw + r56cooperS parts ( had to lift the battery, but it was worth it )


what does the "belkin" thing do ?
got some "new" thinks myself
( forgot to post them here )self made water/air intercooler:
parst:
- moddified oem intercooler
- the radiator was from a Smart
- the water pump from a bmw 5 series
- a few hoses an stuff
works REALLY well
i did some test runns @ 22C� ( 72F� ) ambient temp. ( inlet air temp readout from obd with a scangauge )
50km -> 220kmh ( 31mph -> 136mph ) revving till 7000rpm = the inlet air temperature reached 26C� ( 79F� )
after that i did the same run 4 times in a row. at the end of the 4. run the inlet air temp had reached 39C� ( 102F� )
right now im thinking about doubling the cooling surface ( a second radiator ) to prevent heat soak
Polished inlet manifold + the 2 things left/right from the intercooler ( forgot to make pictures now that they are installed
)polished outside AND inside
self made exhaust: r53jcw + r56cooperS parts
( had to lift the battery, but it was worth it )

#287
09-04-2009, 02:54 PM

Wanderer
Join Date: Jul 2007
Location: St. Louis, Missouri
Posts: 426
Likes: 0
Received 0 Likes
on
0 Posts
#288
09-08-2009, 08:16 AM


#289
09-15-2009, 11:55 AM
Wanderer
Join Date: Jul 2007
Location: St. Louis, Missouri
Posts: 426
Likes: 0
Received 0 Likes
on
0 Posts
New Addition
After realizing how little I actually touch my head unit, I decided to move it to the glove box. I can control what I need via the steering wheel, and the Harmon Kardon Drive and Play and Sirius components. Having completed this move, I used some left over ABS to fabricate a DIN gauge panel to replace the head unit in the center rack.


#291
09-15-2009, 08:31 PM
Wanderer
Join Date: Jul 2007
Location: St. Louis, Missouri
Posts: 426
Likes: 0
Received 0 Likes
on
0 Posts
The **** is actually just an insert in a 12V accessory port. It used to have a Belkin USB port plugged into it, but somehow I lost that. The "Bombs Away" switch is for the Drive+Play/Sirius. All of the switches were originally going to have indicator lights, but the bracket holding the Scan Gauge II got in the way of that. I figured that since the audio components were the most likely to be left on, I'd make that switch stand out. With the addition of the gauges (the toggle panel was built in May), I rewired the entire assembly. So, from left to right we have Audio, AC Power [USB] Port & Gauges, GPS, Outer Driving Lights, Inner Lights (Alta Light Bar). The wiring goes into a double 4-1 hub - the positive side going to the positive battery terminal under the hood. The negative runs behind the euro shelf to a cut-off switch mounted therein (with an indicator light) and is then grounded into the frame behind the dash.


My own little spaceship.
My own little spaceship.
#294
09-16-2009, 06:03 AM

3rd Gear
Join Date: Sep 2009
Location: Iceland
Posts: 158
Likes: 0
Received 0 Likes
on
0 Posts
I couldn't find any custom Passport remote installs on a MINI, so I made up my own rules. I was a bit freaked while drilling through my dash, but it all came out OK.
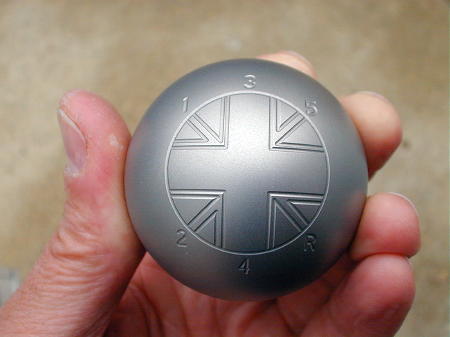
I got a Union Jack on a bead-blasted Whalen ****. I didn't like the bead blasted finish at all (nails-on-a-chalkboard texture, grabbed dirt and oil off of your hand very quickly and looked nasty after 10 minutes) so I figured 'why not?" and got out a microfiber and the Wenol Blue (fine metal polish). It took about an hour of 'polishing my ****' (I made the joke so you wouldn't have to) to get an even finish all the way around.
In the end, I got a nice polished finish that doesn't show fingerprints like the normal Whalen **** and it has a very nice feel to it. It also looks a bit richer than the machine polished ****, so it fits in a bit better w/ my anthracite dash and downtubes.
A similar Whalen **** with a bead-blasted finish:
My **** after an hour of polishing w/ Wenol Blue:
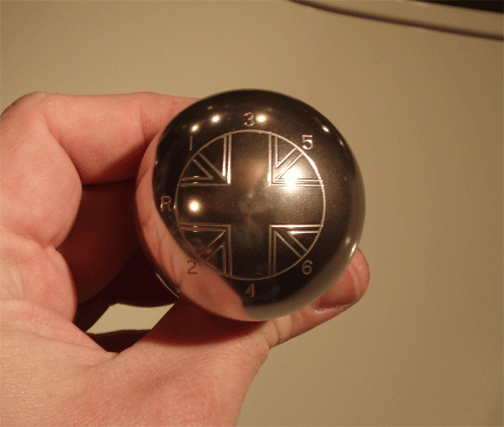
The finished interior:

I got a Union Jack on a bead-blasted Whalen ****. I didn't like the bead blasted finish at all (nails-on-a-chalkboard texture, grabbed dirt and oil off of your hand very quickly and looked nasty after 10 minutes) so I figured 'why not?" and got out a microfiber and the Wenol Blue (fine metal polish). It took about an hour of 'polishing my ****' (I made the joke so you wouldn't have to) to get an even finish all the way around.
In the end, I got a nice polished finish that doesn't show fingerprints like the normal Whalen **** and it has a very nice feel to it. It also looks a bit richer than the machine polished ****, so it fits in a bit better w/ my anthracite dash and downtubes.
A similar Whalen **** with a bead-blasted finish:
My **** after an hour of polishing w/ Wenol Blue:
The finished interior:

#296
01-11-2011, 07:25 PM


#299
01-25-2011, 10:55 AM
What did it take to do this? Just a few hours and a little elbow grease? What polish did you use. This is one thing I've always wanted shiny on the Mini.
#300
01-25-2011, 11:27 AM
you need one of these:
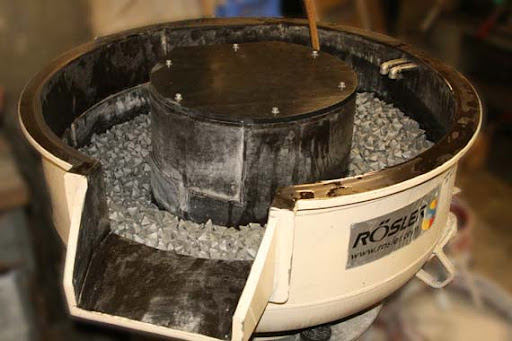
a giant metal tub ( fittet with some giant vibrators ) filled with ceramic abrasive stones ( dont know what they are called in English )
the only thing i did myself was building the steel plate to mount all the parts i wanted to polish ( you can see that in the first pic you quoted )
tough the machine i used looked more like this:

also used to polish wheels
a giant metal tub ( fittet with some giant vibrators ) filled with ceramic abrasive stones ( dont know what they are called in English
) the only thing i did myself was building the steel plate to mount all the parts i wanted to polish ( you can see that in the first pic you quoted
)tough the machine i used looked more like this:
also used to polish wheels