
Interior/Exterior Boost gauge with chrono/nav?


Thread Starter
|
5th Gear
Joined: Jun 2005
Posts: 638
Likes: 0
Boost gauge with chrono/nav?
Anyone know of an available setup for use with the chrono or nav packages?
I'd like something that places the boost gauge in the driver's line of sight near the speedo and tach. A-Pillar would be perfect, but I have concerns about airbag deployment there. Something that holds the gauge just off to the left of the tach would be perfect.
I'd like something that places the boost gauge in the driver's line of sight near the speedo and tach. A-Pillar would be perfect, but I have concerns about airbag deployment there. Something that holds the gauge just off to the left of the tach would be perfect.


4th Gear
Joined: Nov 2004
Posts: 376
Likes: 3
From: Rancho Palos Verdes, CA
ME TOO 
Oh, and an Ammeter/Voltmeter to monitor the battery - I do a lot of raising/lowering the convertible top and windows, and keep my iPod charging when the car is parked, so I'd like to have this info available, in addition to boost.
_Dave_
Oh, and an Ammeter/Voltmeter to monitor the battery - I do a lot of raising/lowering the convertible top and windows, and keep my iPod charging when the car is parked, so I'd like to have this info available, in addition to boost.
_Dave_
Trending Topics

this is what i did
While I don't have the package that you guys have, go look at my pics in the gallery under "bahamabart" - it might get the creative juices flowing.
I purchased an autometer guage (which I am replacing for a VDO - long story), autometer cup and here is the important piece an autometer guage extension bracket. The reason I reference the extension bracket is that it accepted the cup attachement and gave me the length necessary to reach / attach to the screws on the back ofthe stock MINI guage (in my case the single tach). This extension piece was something like 9-12 bucks (cheap) and was made of aluminum so it was easy to shape. I used a hacksaw and then a metal file to reduce the side rails and then using a vise I gave it the curve equal to the back of the stock guages.
As you will see I located the cup lower right side - one could easily mount one on each side or produce to on each side but then they should be welded together.
hopefully this will help you. Others have created custom brackets to accept the autometer cup attachment but I found that by buying the extension bracket the fabrication was minimal. Overall I am pleased and think it looks pretty good. I need to purchase black nuts and bolts as the finishing touch.
so take a look at the pics and if you have any additional questions drop me a note and i will do my best to explain.
BahamaBart
Thread Starter
|
5th Gear
Joined: Jun 2005
Posts: 638
Likes: 0
Bart - that looks great!
Would you mind sharing the long story about the Autometer? I have VDO gauges in my A4 and they've been very poor quality (varying lighting among the same series, incessant buzzing) so I'd love to hear why you're looking to swap out your Autometer, expecially since it seems to suit the car so well.
Also, when you say you used a hacksaw on the "side rails" which portion of the bracket assembly are you referring to?
Lastly, can anyone with a MC with either Nav or Chrono tell me if this same location will be obscured by the steering wheel on one of our cars? (Mine's not delivered yet) If not, do you see the guage inside the wheel or outside?
Thanks!
6th Gear
Joined: Feb 2005
Posts: 2,143
Likes: 1
From: Florida
That is a beatuful setup, but unfortunately doesn't work for us with the nav/chrono. After my new wheels this is my next mod though - I have never been without a boost gauge and I really miss it :( A chrome ring will also be needed for those of us with the chrome interior package. I'm wondering if somehow the new small gauge package from Mini can be useful in this project...
At least now I know the actual gauge setup I want - thanks!
At least now I know the actual gauge setup I want - thanks!


Moderator :: Performance Mods
Joined: Mar 2003
Posts: 5,427
Likes: 6
From: A Den in Maryland
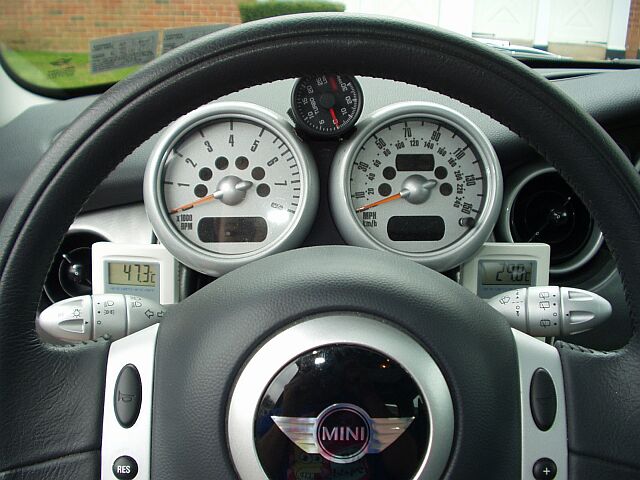
This is what the ProMINI gause setup looks like You can probably get just the mounting setup sans gauges from them and do it yourself, since the kit is set up to have boost and oil pressure on the Nav-equipped cars. With the chrono pack you can have boost with something else, say a voltmeter.

I've been happy with this setup, it's been trouble-free in the year+ since I installed it.
I've been happy with this setup, it's been trouble-free in the year+ since I installed it.
Originally Posted by kaelaria
That is a beatuful setup, but unfortunately doesn't work for us with the nav/chrono. After my new wheels this is my next mod though - I have never been without a boost gauge and I really miss it :( A chrome ring will also be needed for those of us with the chrome interior package. I'm wondering if somehow the new small gauge package from Mini can be useful in this project...
At least now I know the actual gauge setup I want - thanks!
At least now I know the actual gauge setup I want - thanks!
http://leatherz.com/Merchant2/mercha...ry_Code=Gauges
In response to the questions
First to answer the autometer question - as I put it together the brass fittings stuck out of the gauge cup. Since there was thread visible, I torqued it down and broke the gauge. I returned the gauge and the vendor replaced it. On the second one, I started the process over and it too stuck out so I contacted the manufacturer and they informed that the brass fittings should not stick out the back. SOOOOoooo I tried to screw everything in AGAIN - had more success (not 100%) but could live with it! Unfortunately now the gauge reads 2lbs boost. Then I went to the boards here and inquired and everyone said that it did stick out. Bear in mind order gauge, gauge arrives, break gauge, return gauge, wait for new gauge, break gauge, return gauge ..... I have had enough so for the 3rd gauge I decide to switch brands.
Everything was done via Summit and they have been great as a vendor. Autometer can't fault the product, I recognize that I am a bit jaded but I feel that quality is only average. The gauge did look very good!
We will see how the VDO installs and the quality. I am concerned that at this pace I will be placed on a blacklist with gauge makers!!!!!!
Second regarding the extended gauge bracket (If this is not clear pm me and I will send you a drawing) it has "sides" that taper off at the end which I needed to remove so that it would lay flat against the stock pod. If you look at pic hpi 2005_0311_15354 you will see that there is metal that accepts the screw. That metal ran all the way tapering down to the far end right. I simply cut it with a hacksaw a line to the base of the bracket and then since aluminum is brittle broke off the piece I did not want by working it back and forth (limited tools in my house). Then I used a metal saw to smooth out the break.
Since my post others have posted pics with the nav pack and its seems that gauges to either side are visible so this bracket should work. MOST importantly the bracket was cheap, accepts the autoguage cup and once you determine where the gauge should be you drill one whole to align up with the stock pod screws. As you saw in the pics my boost gauge is lower left so I could only attach it using 1 screw so I added double stick tape to ensure it stayed in place/support. Remember I'm the guy that over tightened two gauges and did not want to break the stock pod!!!
Considering what people are charging for gauge pod attachments this is worth the experiment in my opinion.
Good luck on your project

I"m just brainstorming here, since I don't have a car with NAV.
What if you played with the mounting of the tach and speedo, so that they were spread out enough to allow the auxiliary gauges to mount stacked in the middle of them?
I don't even know if it's feasible, but I thought I'd throw the idea out there...
What if you played with the mounting of the tach and speedo, so that they were spread out enough to allow the auxiliary gauges to mount stacked in the middle of them?
I don't even know if it's feasible, but I thought I'd throw the idea out there...

6th Gear
Joined: Oct 2002
Posts: 3,652
Likes: 6
From: Lansdale, PA
Originally Posted by KevinR
I"m just brainstorming here, since I don't have a car with NAV.
What if you played with the mounting of the tach and speedo, so that they were spread out enough to allow the auxiliary gauges to mount stacked in the middle of them?
I don't even know if it's feasible, but I thought I'd throw the idea out there...
What if you played with the mounting of the tach and speedo, so that they were spread out enough to allow the auxiliary gauges to mount stacked in the middle of them?
I don't even know if it's feasible, but I thought I'd throw the idea out there...
Thread Starter
|
5th Gear
Joined: Jun 2005
Posts: 638
Likes: 0
Originally Posted by andy@ross-tech.com
The speedo and tach are siamesed so they are not able to be separated.
Then I could hang the Speedo from a chain around my neck. Yeeeeeeeeeeeeeah Boooooooooyyyyyyyyyy!!!
