
Interior/Exterior Smoked out tail lights?


Thread Starter
|
4th Gear
Joined: Nov 2004
Posts: 363
Likes: 0
From: Queens, NY
Smoked out tail lights?
Does anyone know of a company selling smoked out tail lights? I would like OEM style but smoked out. I don't want to smoke them myself....
Has anyone seen this yet?
Has anyone seen this yet?

Mini Mania sells these:

http://new.minimania.com/web/Item/NMA3028/InvDetail.cfm
A bit pricey, but they look good

http://new.minimania.com/web/Item/NMA3028/InvDetail.cfm
A bit pricey, but they look good

Coordinator :: Low Country MINIs
iTrader: (3)
Joined: Apr 2004
Posts: 1,874
Likes: 0
From: charleston, SC
Heres what you want, the mini mania kit is way overpriced. http://mossmini.com/Shop/ViewProduct...eIndexID=44886
Thread Starter
|
4th Gear
Joined: Nov 2004
Posts: 363
Likes: 0
From: Queens, NY
I dont like doing these types of changes.. I rather spend the money on real lights instead of a spray or film..
Trending Topics

6th Gear
Joined: Apr 2004
Posts: 1,580
Likes: 0
From: Santa Clara, CA
I actually reccomend the real light. I have the film and it is OKAY. It is a bit wrinkly, granted I had never done it before but I think the actual lights would be a better way to go.
Also, the side marker pieces that I received didnt fit properly. The back ones were about 1/2 inch too short
Also, the side marker pieces that I received didnt fit properly. The back ones were about 1/2 inch too short

6th Gear
Joined: Jul 2002
Posts: 3,446
Likes: 10
From: L.A ca
I did mine with the film from Mini mania about 2 years ago. it comes out fine but you really have to be carefull putting it on. R Speed now sells the same pieces for about 1/3 of the cost and I would definatly go with them . Randy


5th Gear
Joined: Nov 2008
Posts: 669
Likes: 0
From: NoHo,CA
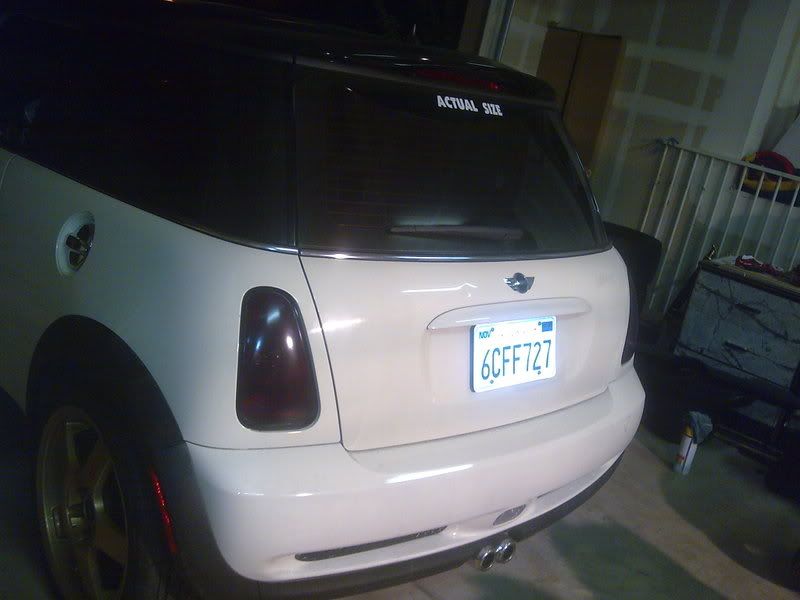
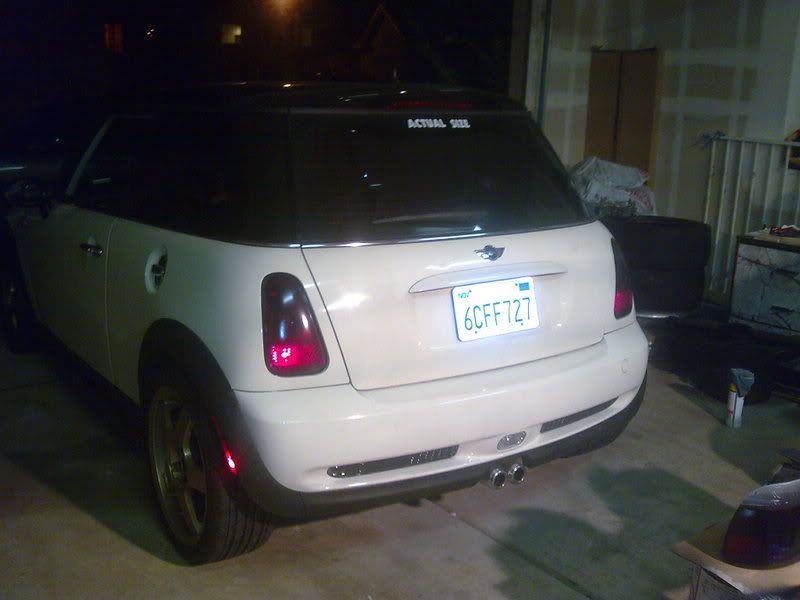
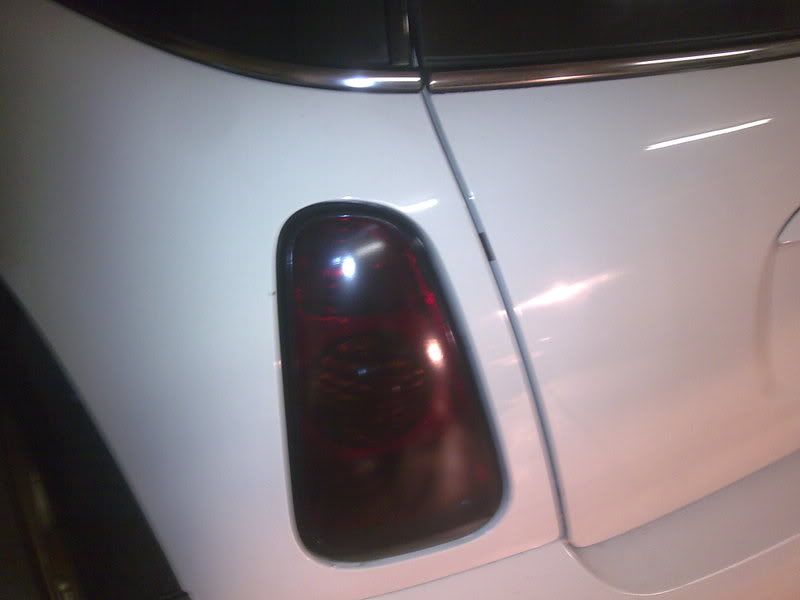
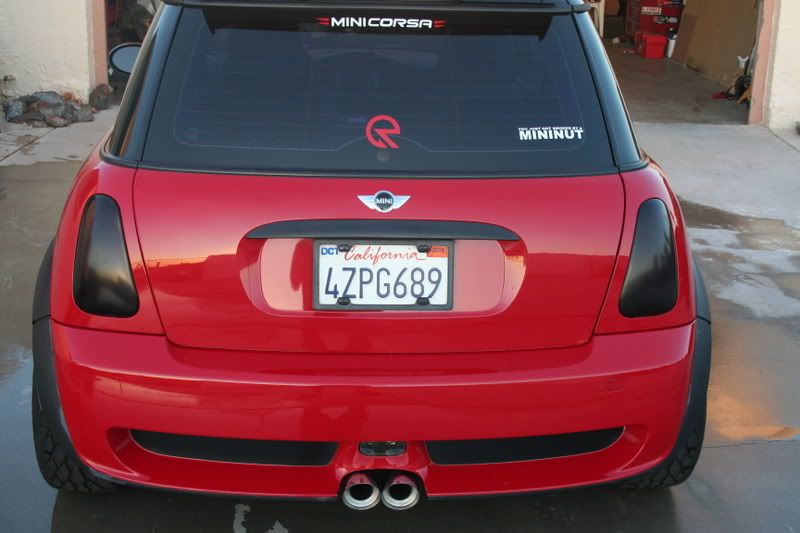
 . I was just wondering if it was removable guess not..here is a pic .


First, let me say that the back up lights, no matter where they are located are rather useless IMO. So tinting the lenses over really makes no difference.
Second. The best film to use is the thicker style from Lamin-X. They make different shades of tint as well for what ever suits you. VERY easy to install, and looks great as well.
Here is their direct link to this part. $29.00 for the pair and they ship fast.
http://www.lamin-x.com/Mini-Cooper-0...rs-p/mn205.htm
BEFORE

AFTER


 Just rims and tires and they are 6.5 in wide
6th Gear
Joined: Jun 2006
Posts: 5,692
Likes: 2
the Lamin-X film is the best rout to go because:
It's inexpensive
You can install it yourself
You can remove it when you sell the car (not everyone likes tinted tails)
Installation-wise, if you take your time and carefully work out every air bubble then you'll end up with something that looks great. I installed both sets on my cars with the tails still on the car and they looked fantastic. In order to do the best install, have the following items on-hand when installing:
The film
The plastic squeegee that comes with the film
A spray bottle with water with a few drops of dish soap in it
A hair dryer
Car polish such as "Scratch-X" or Detailers Paradise's "Swirl"
Microfiber cloths
Wait for a warm day (70 degrees at least) so the film is flexible - it needs to bend around the curve of the tails, remember.
Use a LIGHT MISTING of the the soap water to let the tail film slide on the taillights - this will eliminate any bubbles because the soapy water will sheet between the plastic and the tail lens. Use the squeegee to push out all the remaining water starting in the center and working towards the edges. If you see that the squeegee is lightly scratching the plastic don't panic - I'll tell you why in a later step - just concentrate on getting the film on straight and with no bubbles.
When you get to the edges, wipe away all moisture with your microfiber cloth and then use the squeegee to stick down the film along the edges of the taillights. If the film wants to pull away, use your hair dryer to soften the film a bit then use the squeegee again - the dryer simultaneously dries and softens the film with its heat.
IMPORTANT: If the film goes on crooked, or you see any bubbles that can't be worked to an edge with the squeegee, pull the film up, re-spray and try again - the Lamin-X is very tough and rubbery and will survive being pulled up and repositioned in the install step. DO NOT TRY TO PEICRCE BUBBLES WITH A PIN like you would vinyl graphics as I guarantee you that the the pin-hole will show.
When you're sure you have no bubbles and the edges are all stuck down, allow the film to dry overnight (a day is better). Don't take the car out right away - I'll tell you why in a sec. After drying, check the edges carefully. If anyhting's peeling, now's the time to stick it down. This is why you did NOT drive the car right away - if the edge peeled a tiny bit and dirt got under the film then the glue would be compromised.
PRO FINISH TIP:
After everything's stuck down, take a good car paint polish like Scratch-X, or DP's "Swirl" (this is what I use) and rub some into the film using a circular motion using your other microfiber cloth. The polish will shine up the tail film, making it look like OEM. If you skip this step the film looks pretty good, but polishing the film makes it look FANTASTIC, like the tails are tinted from inside the lens. You can re-polish the film annually or semi-annnually if the film ever starts to look dull - this happens to me after winter and road-salt for example, and a quickie 5-minurte re-polish in the spring makes them look like new!!


3rd Gear
Joined: Nov 2009
Posts: 231
Likes: 0
From: Utah
How often do you get pulled over for these?or are they competely legal?I want to smoke mine, bad, but I am on probation from getting tickets, so I better not really risk it.also, the ones who have used Lamin-X, what one did you use?because they list three tones.thanks! Justin.