
Interior/Exterior Good times with 3M carbon vinyl - PICS

Thread Starter
|
3rd Gear
Joined: Mar 2011
Posts: 279
Likes: 1
From: Simi Valley, CA


I mountain bike and found some very "convenient" uses for vinyl on some of my parts. I've collected a variety of vinyl colors/finishes so not everything is carbon. I don't like things to be too matchy-matchy, especially with a pattern like some carbon has, but the black carbon of this vinyl is nice and subtle.

3rd Gear
Joined: Feb 2011
Posts: 266
Likes: 10
From: Halifax - Canada
 it sometimes get stuck in the ignition. So I called mini, and they wanted me to order a new one ... how did you get urs replace so many time ? my car is 2009 and pretty sure its under warranty still.

Thread Starter
|
3rd Gear
Joined: Mar 2011
Posts: 279
Likes: 1
From: Simi Valley, CA
Wrap the end of a flat head screwdriver with something soft (ie electrical tape) and gently pry between the ring and the tail light itself. Slowly work around the inside and it will eventually begin to pop off. There are a series of clips you're releasing by doing this.

Thread Starter
|
3rd Gear
Joined: Mar 2011
Posts: 279
Likes: 1
From: Simi Valley, CA
The rack does add a little wind noise (although I've had it on for so long now I've forgotten what it was like without it.) I never mind it. Remember too, I have two Thule bike trays that add a little extra as well.
Sunroof open makes everything noisier.
Sunroof open makes everything noisier.

1st Gear
Joined: Apr 2011
Posts: 42
Likes: 0
From: Madison, Wi
I've just stumbled upon this tread. I have to say I'm inspired to do try some wrapping myself. What wrapiings did you use primer on? What squeegees did you use/recommend? I plan on doing headlight rings, mirror caps, gas cap and beltline. Maybe some interior parts as well.
Last edited by BullyR56; May 18, 2012 at 12:31 PM.

Thread Starter
|
3rd Gear
Joined: Mar 2011
Posts: 279
Likes: 1
From: Simi Valley, CA
I've just stumbled upon this tread. I have to say I'm inspired to do try some wrapping myself. What wrapiings did you use primer on? What squeegees did you use/recommend? I plan on doing headlight rings, mirror caps, gas cap and beltline. Maybe some interior parts as well.
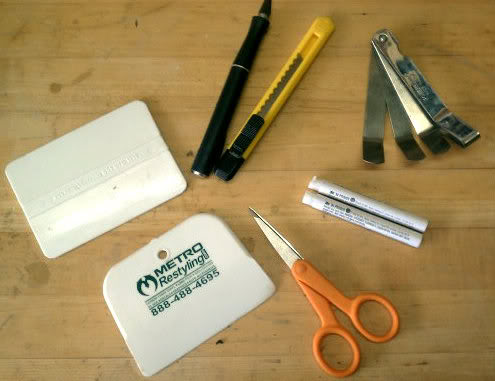
Here are the tools I use the most (fingernail not pictured
 )
)

1st Gear
Joined: Apr 2011
Posts: 42
Likes: 0
From: Madison, Wi
Did you take the headlight rings off when wrapping them? There is a video of the 3M rep doing mirror caps and headlight rings while on the car, obviously hes done that before! So the primer is used when you "tuck" the vinyl on the backside of the pieces? I also saw him use it on the trailing edge of the mirror caps.
Thread Starter
|
3rd Gear
Joined: Mar 2011
Posts: 279
Likes: 1
From: Simi Valley, CA
Did you take the headlight rings off when wrapping them? There is a video of the 3M rep doing mirror caps and headlight rings while on the car, obviously hes done that before! So the primer is used when you "tuck" the vinyl on the backside of the pieces? I also saw him use it on the trailing edge of the mirror caps.


Thread Starter
|
3rd Gear
Joined: Mar 2011
Posts: 279
Likes: 1
From: Simi Valley, CA
Thanks!
They're aftermarket in the sense that I got a free scrap roll of red Oracal vinyl from a nearby vinyl shop (Sticker City), measured and cut 1/4" strips using a t-square and an Exacto knife. I laid blue painters tape where I wanted the stripes to go, then a little squirt of soapy water...laid the stripes down, smoothed out the bubbles and blow dried them. Once they were set, I tucked the edges into the trim and cut off the excess. Voila!
Custom stripes at $0. Nice things is, I have a bunch of left over vinyl to redo sections if they ever get ripped, etc. I actually had to remove my roof stripes since the entire roof is being re-painted today after I damaged it.
Just paying it forward. I've received so much help over the years -thorough responses and photos have saved me a lot of time and money.

Thanks for the inspiration Nate. I might not start vinyl wrapping anything soon, but at least I learned about plasti dip! I Blacked out my front chrome by sanding, priming and spraying. I'm pretty happy with the result, but I still want to black out my wheels. Looks like I'll be plasti-dipping them in the next few weeks.
Tires are still newish so I wasn't planning on getting new black wheels until I needed new tires. I will definitely be looking into the carbon vinyl for some accents down the line. Your mini looks great!
Tires are still newish so I wasn't planning on getting new black wheels until I needed new tires. I will definitely be looking into the carbon vinyl for some accents down the line. Your mini looks great!
Thread Starter
|
3rd Gear
Joined: Mar 2011
Posts: 279
Likes: 1
From: Simi Valley, CA
Thanks for the inspiration Nate. I might not start vinyl wrapping anything soon, but at least I learned about plasti dip! I Blacked out my front chrome by sanding, priming and spraying. I'm pretty happy with the result, but I still want to black out my wheels. Looks like I'll be plasti-dipping them in the next few weeks.
Tires are still newish so I wasn't planning on getting new black wheels until I needed new tires. I will definitely be looking into the carbon vinyl for some accents down the line. Your mini looks great!
Tires are still newish so I wasn't planning on getting new black wheels until I needed new tires. I will definitely be looking into the carbon vinyl for some accents down the line. Your mini looks great!
1st Gear
Joined: Apr 2011
Posts: 42
Likes: 0
From: Madison, Wi
So my vinyl arrived yesterday and I jumped right in. I pulled off my gas cap to give it a go. Three tries later I finally started to get the hang of it. The finger pull is tricky to wrap and stretch without creases,for me atleast. I actually overstretched and tore it as I had multiple attempts to get it to lay down right. A few creases yet around the perimeter but I'm going to throw it on and see how it holds up. Hoping headlight rings will be easier.

1st Gear
Joined: Apr 2011
Posts: 42
Likes: 0
From: Madison, Wi
Here is a shot of my headlight rings and washer caps i recently completed. I need a wider sheet of vinyl to mirror the pastern on the drivers side. I also broke one of the washer cap during removal Stupid cheap plastic lol..
Stupid cheap plastic lol..


Neutral
Joined: Apr 2010
Posts: 10
Likes: 0
I ordered my vinyl CF wrap today. My plan is to CF wrap my roof, tail light/headlight bezzels, Gas cap and "hopefully" the door handles. Unfortunately I found this thread after I orderd my vinyl so I didnt go with 3m,,,, ordered some on ebay that I thought Looked pretty good and easy to apply by "their" videos lol.
This is really my first endeavor into messing with the mini, it sour daily driver and I usually spend most my time tinkering with the saleen so needless to say Im not very educated on how everything on this mini works? Do the headlight bezels/rings even come off? Any advice you experts can offer on removing these pieces (or leaving them on while trying this) would be GREATLY appreciated! Love what youve done with yours so far, nice work and very tasteful!
This is really my first endeavor into messing with the mini, it sour daily driver and I usually spend most my time tinkering with the saleen so needless to say Im not very educated on how everything on this mini works? Do the headlight bezels/rings even come off? Any advice you experts can offer on removing these pieces (or leaving them on while trying this) would be GREATLY appreciated! Love what youve done with yours so far, nice work and very tasteful!

Thread Starter
|
3rd Gear
Joined: Mar 2011
Posts: 279
Likes: 1
From: Simi Valley, CA
While mounted on the car, you wouldn't know the overlap existed but still bothers me so I may try to redo it one of these days.
Nice job on both the gas cap and headlight rings. They're next on my list but haven't decided between carbon and 3Ms new 1080 metallic black (for a more subtle look). Sorry to hear about the washer cover - repairable?
