
Interior/Exterior Has anyone used LEDs in the rear fog light?


Has anyone used LEDs in the rear fog light?
Just curious if anyone has used LED's in their rear fog. I want to take the red lens out and replace with a clear, but I'd like to maintain the *bright* red when it is on. Is that possible to achieve with LED's??

6th Gear
Joined: Mar 2006
Posts: 1,737
Likes: 4
From: Los Angeles
check this out:
https://www.northamericanmotoring.co...d-extreme.html
There have been mods available that will make a 05/06 rear fog operate as either an extra brake light or an extra backup light. Now I have modded my 2006 MCC to do it all with a single light assembly in the bumper. The same fog light is performing all the functions in these photos:
Off

Backup

Brakes

Rear Fog (running lights also turned on; necessary to turn on the rear fog)

The idea behind the mod is really very simple. My bumper light has both a red lamp (for brake and rear fog) and a white lamp (for backup). I used a clear (2004 backup) lens assembly and hooked it up to the backup lights in the taillights. This makes it operate as a third backup light. Then I added a red lamp to the enclosure and connected it to the factory rear fog harness, and I applied mini-roll's mod that makes the factory harness operate as both a rear fog and extra brake light. The end result is a single enclosure that lights up both red and white, and performs all the functions: brakes, backup, and rear fog.
Here is what I did. Hardcore DIYers can assemble all the components separately, but I used mini-rolls' kits from MyMiniParts to make the project easier.
My 2006 MCC came without the rear fog option, so it had only the rubber plug in the bumper, but it was prewired for a rear fog light. I started with mini-rolls' 2005 Backup Light Kit: http://myminiparts.com/proddetail.php?prod=MMBUL.

This kit includes a clear lens assembly for the bumper, and a jumper wire. The instructions describe how to connect the jumper to make the factory rear fog harness function as either an additional backup or brake light. I installed the jumper for a brake light.
I also purchased mini-rolls' Brake/Backup Light Harness Kit: http://myminiparts.com/proddetail.php?prod=BBLH.

This is simply a two-wire harness with connector, to run from a taillight to the fog light fixture. I quick-spliced the wires to the backup light in the taillight. The connector will be plugged into the bulb of the clear lens assembly. After installing both kits, the result is that there two wire harnesses going to the rear fog location. One harness (the new added harness) is to connect to a white lamp (backup), and the other harness (the factory rear fog harness) is to connect to a red lamp (brake and rear fog).
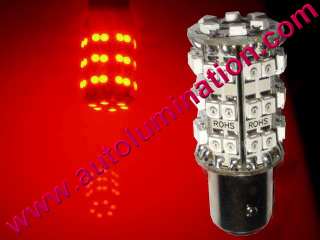
Next is to add a red lamp to the clear lens enclosure. I discovered a flat LED lamp that is compatible with a 1156 bulb (the type used in the rear fog):
http://www.superbrightleds.com/other_bulbs.htm. Scroll down to the item "12VDC 1156/T10 PCB LED Lamp". I purchased the 1156 Red lamp for $10. The lamp is a 36-LED array that looks white but lights up red. Here is the light assembly and LED lamp:


I cut a square hole of about 38 mm into the top (the flat side) of the enclosure.

I made the hole just large enough that all of the LEDs fit through, but the edges of the circuit board overhang the sides of the hole.
I don't have pictures for the next few steps. The LED lamp needs to be connected to the factory rear fog harness, but it should be unpluggable for service (such as removing the rear bumper). On the factory rear fog harness, use quick-splice connectors to get an extra set of wires coming off of it, for connecting to the LED. On the LED lamp, cut off the 1156 bulb plug, and extend the wires so you have more length to work with. Then attach connectors to the wires (I used tongue shaped "quick disconnect" connectors) that allow you to plug and unplug the LED from the factory harness.
The final step is to glue the LED circuit board to the hole in the light assembly, and protect its back with something such as vinyl tape. My final result looks a bit messy, but the back of the LED lamp is sealed and protected.

This setup produces good light from the red LED lamp, though not anywhere nearly as bright as the OEM rear fog. LED light is very directional, and its light should be directly aimed at the viewer for greatest intensity. Although this lamp has 36 LED elements, they are all pointing down and all of its light coming out is reflected, not direct. With the brake lights activated and viewed from straight back, it is similar brightness to the 3rd brake light over the tailgate (which is also LED).
I think I have taken the project as far as I want to, but there are some possibilities for a brighter red light. However, the goal should not be to match the brightness of the OEM rear fog, which would be glaringly bright as an additional brake light. Mounting the LED lamp at the bottom surface of the light enclosure might make it appear brighter because some of the light might possibly be directly viewed. I mounted mine on top because it is a flat surface (a little easier to work with), and there seemed to be less potential for any clearance problems when sliding the light assembly in and out of the bumper. It may be possible to mount LED lamps on both top and bottom for a whopping total of 72 LED elements, which should produce a very bright red light. However, adding the LED lamps effectively makes the light assembly thicker in size. With LED lamps mounted on both top and bottom, I'm not sure whether it would would have clearance to slide in and out of the hole in the bumper (but it should be easy to trim the inner flange of the hole that is visible in the photo).
This was one of my earliest mods on my MCC, and at the time I had minimal experience working on the car. The project simply started out as an idea with uncertain outcome, and I'm thrilled (and I must admit a bit surprised) that it actually worked so well.
Off
Backup
Brakes
Rear Fog (running lights also turned on; necessary to turn on the rear fog)
The idea behind the mod is really very simple. My bumper light has both a red lamp (for brake and rear fog) and a white lamp (for backup). I used a clear (2004 backup) lens assembly and hooked it up to the backup lights in the taillights. This makes it operate as a third backup light. Then I added a red lamp to the enclosure and connected it to the factory rear fog harness, and I applied mini-roll's mod that makes the factory harness operate as both a rear fog and extra brake light. The end result is a single enclosure that lights up both red and white, and performs all the functions: brakes, backup, and rear fog.
Here is what I did. Hardcore DIYers can assemble all the components separately, but I used mini-rolls' kits from MyMiniParts to make the project easier.
My 2006 MCC came without the rear fog option, so it had only the rubber plug in the bumper, but it was prewired for a rear fog light. I started with mini-rolls' 2005 Backup Light Kit: http://myminiparts.com/proddetail.php?prod=MMBUL.
This kit includes a clear lens assembly for the bumper, and a jumper wire. The instructions describe how to connect the jumper to make the factory rear fog harness function as either an additional backup or brake light. I installed the jumper for a brake light.
I also purchased mini-rolls' Brake/Backup Light Harness Kit: http://myminiparts.com/proddetail.php?prod=BBLH.
This is simply a two-wire harness with connector, to run from a taillight to the fog light fixture. I quick-spliced the wires to the backup light in the taillight. The connector will be plugged into the bulb of the clear lens assembly. After installing both kits, the result is that there two wire harnesses going to the rear fog location. One harness (the new added harness) is to connect to a white lamp (backup), and the other harness (the factory rear fog harness) is to connect to a red lamp (brake and rear fog).
Next is to add a red lamp to the clear lens enclosure. I discovered a flat LED lamp that is compatible with a 1156 bulb (the type used in the rear fog):
http://www.superbrightleds.com/other_bulbs.htm. Scroll down to the item "12VDC 1156/T10 PCB LED Lamp". I purchased the 1156 Red lamp for $10. The lamp is a 36-LED array that looks white but lights up red. Here is the light assembly and LED lamp:
I cut a square hole of about 38 mm into the top (the flat side) of the enclosure.
I made the hole just large enough that all of the LEDs fit through, but the edges of the circuit board overhang the sides of the hole.
I don't have pictures for the next few steps. The LED lamp needs to be connected to the factory rear fog harness, but it should be unpluggable for service (such as removing the rear bumper). On the factory rear fog harness, use quick-splice connectors to get an extra set of wires coming off of it, for connecting to the LED. On the LED lamp, cut off the 1156 bulb plug, and extend the wires so you have more length to work with. Then attach connectors to the wires (I used tongue shaped "quick disconnect" connectors) that allow you to plug and unplug the LED from the factory harness.
The final step is to glue the LED circuit board to the hole in the light assembly, and protect its back with something such as vinyl tape. My final result looks a bit messy, but the back of the LED lamp is sealed and protected.
This setup produces good light from the red LED lamp, though not anywhere nearly as bright as the OEM rear fog. LED light is very directional, and its light should be directly aimed at the viewer for greatest intensity. Although this lamp has 36 LED elements, they are all pointing down and all of its light coming out is reflected, not direct. With the brake lights activated and viewed from straight back, it is similar brightness to the 3rd brake light over the tailgate (which is also LED).
I think I have taken the project as far as I want to, but there are some possibilities for a brighter red light. However, the goal should not be to match the brightness of the OEM rear fog, which would be glaringly bright as an additional brake light. Mounting the LED lamp at the bottom surface of the light enclosure might make it appear brighter because some of the light might possibly be directly viewed. I mounted mine on top because it is a flat surface (a little easier to work with), and there seemed to be less potential for any clearance problems when sliding the light assembly in and out of the bumper. It may be possible to mount LED lamps on both top and bottom for a whopping total of 72 LED elements, which should produce a very bright red light. However, adding the LED lamps effectively makes the light assembly thicker in size. With LED lamps mounted on both top and bottom, I'm not sure whether it would would have clearance to slide in and out of the hole in the bumper (but it should be easy to trim the inner flange of the hole that is visible in the photo).
This was one of my earliest mods on my MCC, and at the time I had minimal experience working on the car. The project simply started out as an idea with uncertain outcome, and I'm thrilled (and I must admit a bit surprised) that it actually worked so well.
https://www.northamericanmotoring.co...d-extreme.html
So right now I have nothing in the rear fog light spot, just the black mesh plastic. I would really like a reverse light there to aid in reversing, obviously. I have tinted windows now and its a little hard to see. So, is the whole reverse light install easy or...?
VERY easy install just have to use the little clip splice things to wire it in takes about 5 min to do!! someone sells a kit for it I will try to dig up where I got mine from


OVERDRIVE
Joined: May 2005
Posts: 8,233
Likes: 128
From: San Francisco
That's my rear fog mod quoted in the post!
If you've ever followed behind a MINI with the rear fog turned on, you know that it is bright enough to be annoying. I doubt that there is currently an LED bulb that can match the brightness of the OEM. To get maximum brightness from LEDs, you really need to start with a fixture specifically designed for LEDs. There are compromises if you start with a lamp originally designed for a standard bulb, and simply swap out the bulb with a drop-in LED equivalent. That said, an LED bulb may be bright enough for you, even if it might not be as bright as the OEM. You could try a bulb like this from Superlumination (cheaper equivalents available on eBay).
There's another factor concerning brightness. The OEM rear fog has a red lens designed with optics that make it light up like a bright panel. However the clear lens version is designed for a backup light, and its purpose is to project light outward for the driver, not to look visibly bright for outside observers. So even with a bright bulb, the clear lens version won't look as bright.
In the couple of years after originally creating my rear fog mod, I have since replaced the LED panel with a brighter version like this:

I also added a 2nd panel so there is now a panel on both top and bottom of the lamp. The red output is now much brighter than in the original mod.
Here's the kit. It will add a lot of extra backup light and would be very worthwhile:
http://minspeed.net/MMBUL.htm
It is very easy unless you have a very early '05 model year (late 2004 build) MINI. Those did not come with prewiring for the rear fog.
If you've ever followed behind a MINI with the rear fog turned on, you know that it is bright enough to be annoying. I doubt that there is currently an LED bulb that can match the brightness of the OEM. To get maximum brightness from LEDs, you really need to start with a fixture specifically designed for LEDs. There are compromises if you start with a lamp originally designed for a standard bulb, and simply swap out the bulb with a drop-in LED equivalent. That said, an LED bulb may be bright enough for you, even if it might not be as bright as the OEM. You could try a bulb like this from Superlumination (cheaper equivalents available on eBay).
There's another factor concerning brightness. The OEM rear fog has a red lens designed with optics that make it light up like a bright panel. However the clear lens version is designed for a backup light, and its purpose is to project light outward for the driver, not to look visibly bright for outside observers. So even with a bright bulb, the clear lens version won't look as bright.
In the couple of years after originally creating my rear fog mod, I have since replaced the LED panel with a brighter version like this:
I also added a 2nd panel so there is now a panel on both top and bottom of the lamp. The red output is now much brighter than in the original mod.
VERY easy install just have to use the little clip splice things to wire it in takes about 5 min to do!! someone sells a kit for it I will try to dig up where I got mine from
http://minspeed.net/MMBUL.htm
It is very easy unless you have a very early '05 model year (late 2004 build) MINI. Those did not come with prewiring for the rear fog.
Here's the kit. It will add a lot of extra backup light and would be very worthwhile:
http://minspeed.net/MMBUL.htm
It is very easy unless you have a very early '05 model year (late 2004 build) MINI. Those did not come with prewiring for the rear fog.
http://minspeed.net/MMBUL.htm
It is very easy unless you have a very early '05 model year (late 2004 build) MINI. Those did not come with prewiring for the rear fog.
Yeah thats what I found as well, thank you. But since there currently is not a light in this spot, is the wiring for it still there? I suppose I should just go look under there.
Trending Topics
OVERDRIVE
Joined: May 2005
Posts: 8,233
Likes: 128
From: San Francisco
Check the build date on your door. Only the initial month or two of MY '05 production didn't include wiring. The Minspeed site says wiring began at 10/5/04. The wiring would be coiled and taped up somewhere behind the bumper.

6th Gear
Joined: Oct 2004
Posts: 3,673
Likes: 2
From: Marsala, Sicily
I am going to kick you square in your gumdrops...
 . You could have just asked me instead of sounding like a boobie...I mean noobie...
 Is your LED bright enough???
RKW, will you come to AMVIV and do this install for me?

OVERDRIVE
Joined: May 2005
Posts: 8,233
Likes: 128
From: San Francisco
Duck, I got your PM asking about the difficulty of the mod. I thought I'd reply here in case anybody else might want to know. No, I won't be at AMVIV.
There are two basic parts to the mod. One part is the wiring, and the other part is adding the red LED to the backup lamp. The individual steps are not difficult; it is understanding electrically how the mod works and the understanding the purpose of each step that will give you confidence.
For the wiring, you already have a harness for the red light (rear fog). It will also turn on with the brakes by simply adding a jumper to the wiring harness. You need to add a new harness for the white backup light. This harness will run from the taillight (reverse signal) to the center bumper. After these steps, you will have the required wiring to turn on both red and white lights.
You need to assemble a clear lens backup lamp that will light up both red and white. I suggest putting a red LED bulb in the OEM socket, and adding white LED panels at the top and bottom (on my own car, I have the red/white in reversed positions which took some extra wiring steps). I cut squares out of the top and bottom of the lamp to fit the LED panels. A Dremel with a cutting disc worked well. After assembling the lamp fixture, attach connectors to the new wires, and the lamp still fits in normally.
A nice thing is that you don't have to do everything at one time. You can do steps piecemeal and gradually work towards the final result.
So I just got my kit from Minspeed. All I need to do is simply plug it in to that extra plug up under there, right? I do have a 2006. The kit came with some other wires and a circuit tester. I don't need that stuff, right?
Would there be any way to use a red bulb for the middle that would be brighter for fog use, then use a white LED board spliced in with a diode for backing up purposes ? ( diode to prevent false codes for blown bulb)
Thanks.
Thanks.
PS: Great idea - Fantastic work and write up
6th Gear
Joined: Mar 2006
Posts: 1,737
Likes: 4
From: Los Angeles
you'll have to contact the author on that one: RKW https://www.northamericanmotoring.co...17687-rkw.html
OVERDRIVE
Joined: May 2005
Posts: 8,233
Likes: 128
From: San Francisco
BTW, a diode isn't needed for the white backup light. For the red light, the Minspeed jumper already has a diode mounted inside, and its purpose is so that turning on the rear fog won't also turn on the brake lights at the same time. In any case, I think 1st gen MINI only has blown bulb detection/warning for turn signals, not rear fog, brakes, or backup. Also, when LED replacement bulbs cause the blown bulb warnings, the remedy is resistors (not diodes).
Anyway to secure the LED board to the underside of the piece removed with 3M tape, then leave a small U groove for wires to come out, and then resecure the cut piece back onto the housing. From the top it would almost look untampered with ( except for extra wire )
Yeah I did. Its done. It works great!
 But the instructions from Minspeed do somewhat suck. There is no structure to the steps. I almost messed up and hooked the light up to the brake lights and not the reverse like I want. Luckily I caught myself before I screwed it all up. I could do it with my hands behind my back now however. None the less its going to be nice having more light for backing up! Thanks for the help!

Thread
Thread Starter
Forum
Replies
Last Post
igzekyativ
MINIs & Minis for Sale
34
Jul 16, 2020 12:54 PM
igzekyativ
MINIs & Minis for Sale
28
Dec 23, 2015 10:36 AM