
How To Suspension :: Springs Install How-To


Coordinator :: Hawaii MINI Motoring Club
Joined: Mar 2005
Posts: 626
Likes: 0
From: Austin, Texas - U.S.A.
Strike one.. failed install
--Well Thanksgiving weekend was wide open and I had been gathering tools for weeks for my suspension upgrade job from stock MCS sport suspension to FSD struts. I'd acquired just about every tool for the job except for the long piece of wood.
Got the car jacked up for both front wheels.
Sprayed break loose lubricant all over the strut to knuckle area
Got the brake lines and wires out of the way.
Removed the pinch bolt for the sway bar.
Then proceeded to jack the strut up using a hydraulic jack and a flex head wrench.
4.5 inches later the strut would not come out of the knuckle.
I was amazed at how my wrench stayed put while it pushed my whole driver side suspension setup all the way up into my wheel well.
After 1 hour of letting the lubricant soak and 2 hours of hitting the strut and knuckle with a dead blow hammer I had to call it quits.
Aside from being a dangerous setup and loud operation I figured that the old struts had succumbed to the Hawaiian weather I had kept my MINI in for the first 3 years of its life.
When I went to change her wheels out for her snow tire set a similar thing happened with her rear driver side wheel. The darn thing had seized on something fierce. After banging on the wheel with a dead blow hammer for an hour I decided to go get some break loose. I sprayed that inside of the empty lug nut holes and 15 minutes later was able to hammer the wheel off. Now I put anti-seize compound on everything down there.
I was not so lucky this time with the front struts. They did not budge not even 1 millimeter. I checked.
Hopefully a local shop out here can help me get them off without destroying the old struts. But if they're rusted in bad then it's just as well they go.
I even tried to modify my spring compressors and they were able to safely compress my springs a good 3 inches but even then the struts still would not pop out.
The Bentley manual says to take everything apart down below and just let the strut come down instead of compressing the springs but I was short a couple of bmw special tools to take that route.
At this point I'm thinking of paying a shop that is familiar with bmw and german autos to change out the fronts for me. I believe the rears will be much less of a hassle.
Any suggestions? Fellow Hawaiians?
~p
Last edited by pyratio; Dec 2, 2008 at 09:12 PM.


4th Gear
Joined: Aug 2004
Posts: 397
Likes: 0
From: nnj
Your description only mentions the bolt holding the end link to the strut. There pinch bolt for the knuckle as well. it's inboard. after three salt encrusted winters in the rust belt, I was able to remove the oem struts. There was no indication of rust inside the gripping part of the knuckle.

Thread Starter
|
6th Gear
Joined: Aug 2004
Posts: 1,629
Likes: 7
From: Pipe Creek, Texas


Place the extension into the slot from below and twist 45 degrees.

Coordinator :: Hawaii MINI Motoring Club
Joined: Mar 2005
Posts: 626
Likes: 0
From: Austin, Texas - U.S.A.
trying again this weekend.
--Thanks guys, I'll try again this coming Sunday. Hopefully I won't need that spreader tool.
You guys rock! Thanks for helping out a suspension noob like myself.
~p
You guys rock! Thanks for helping out a suspension noob like myself.
~p

Neutral
Joined: Sep 2007
Posts: 8
Likes: 0
Just wanted to say thanks for this 'how-to' and the good discussion here. Just finishing up my H&R spring install, my first suspension job ever. It has gone pretty smooth. I have some pics - may post on flickr or something when I get it off the camera...


Neutral
Joined: Sep 2007
Posts: 8
Likes: 0
Ah ha, thanks. A little R56 amendment. Justin, wondering about my new end links, supposed to be shorter in the back and longer in the front, as a rule of thumb, yes? Any advice, tip on end links? Are those ALTA front end links in the pics?
John
John
Thread Starter
|
6th Gear
Joined: Aug 2004
Posts: 1,629
Likes: 7
From: Pipe Creek, Texas
I'll answer instead, yes, lengthen fronts & shorten rears, but with H&R springs alone that won't need to be done, if you must have adjustable drop links go for Powergrid, those are Alta links and they strip easily.
Neutral
Joined: Sep 2007
Posts: 8
Likes: 0
Thanks k-huevo, got mixed up, think I was addressing you. Well, I have them and now and wish i didn't (alta). So I'll use them till they **** me off or break I guess. I wish someone would just make a solid non-adjustable set of links for lowered cars. All these moving parts suck, for a suspension component - IMO.
Neutral
Joined: Sep 2007
Posts: 8
Likes: 0
Well it's done now. With H&Rs and Bilsteins and a new rear sway bar. Work great! BUUUTT - I think the rear lowered like I expected but the front, humph. Bout the same to me. ??? I installed new strut mount up front too.
Every thing is seated really well and no noises. Got any ideas? Is this normal?
Every thing is seated really well and no noises. Got any ideas? Is this normal?


4th Gear
Joined: Oct 2005
Posts: 576
Likes: 0
From: Bay Area CA
Place a stick on the jack�s lift pad and use as leverage under the lower spring perch to compress the spring and push the strut out of the steering knuckle. A few taps with a dead blow hammer may be needed to break it free. Exercise cautions if a hand is needed to stabilize the strut, do not place the hand or fingers between the strut & stick or any place where it could be trapped if the strut shifts abruptly.

I just installed Koni struts on my 06 MCS using this write-up as a guide. I wanted to make a couple of points on installing Koni front struts where the directions should change from the directions for stock-like front struts.
For the Koni front strut, do NOT use a "piece of wood" under the lower spring perch to try and compress the spring enough so that it can be maneuvered into the lower control arm. The spring perch on the Koni is pressed into the strut shaft. If you apply upward pressure to it using the wood and a jack procedure above, you will wind up dislodging the perch from the strut.
Notice that the strut is a "two piece" design and the spring perch is pressed in to the strut body.
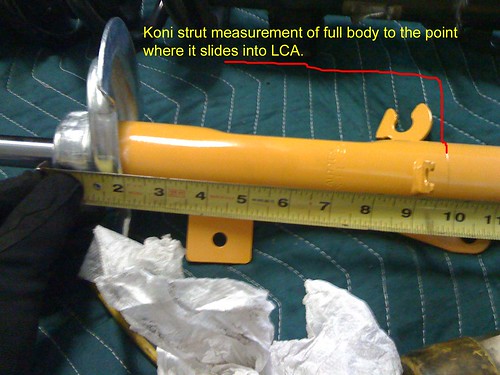
Instead, loosen the 2 bolts that hold the inner ball joint to the front subframe. By loosening those 2 bolts ( I think I might have fully removed one bolt on the passenger side), the lower control arm drops a couple of inches and you can easily maneuver the strut into the lower control arm. It was actually quicker for me to do this than to try screwing around with the wood and jack routine. Safer too.
Good luck.

Comparing the original steps in this thread to my Bentley manual there seems to be no mention of removing the steering tie rod mounting nut (using BMW tool 323090) or removing outer control arm ball joint mounting nut (using BMW tool 321190). Is it only necessary if you have trouble getting the strut out of the steering knuckle?.
http://www.motoringalliance.com/foru...ocks-gen2.html

2nd Gear
Joined: Nov 2009
Posts: 62
Likes: 0
From: Poughkeepsie, NY
so i installed my springs today. I called the alignment shop and asked if I could swing by the shop and get it aligned tomorrow they said yes adn then asked if the springs came with the alignment specs or do I just want it back to the factory specs. I bought H&R springs used and have an email in to the seller but I was curious if anyone knows the answer to this?
Camber is not adjustable on the Front unless you have added adjustment plates but you can gain a little camber on a Gen2 - R56 by this method found here:
http://www.motoringalliance.com/libr...ud-removal-69/
(you may have already done this when you installed the springs)
Doing this will give you a little camber ( a good thing). As far as specs go I would do this:
Front Camber (what ever the mod above gives you)
Front Toe 0
Rear Camber -1
Rear Toe 0
http://www.motoringalliance.com/libr...ud-removal-69/
(you may have already done this when you installed the springs)
Doing this will give you a little camber ( a good thing). As far as specs go I would do this:
Front Camber (what ever the mod above gives you)
Front Toe 0
Rear Camber -1
Rear Toe 0

1st Gear
Joined: Jan 2010
Posts: 19
Likes: 0
From: Rockford, IL
So this morning woke up early, as a matter of fact, I didnt go out last night because I wanted to wake up early to do my springs..........just as I started to loosen the pinch bolt off the knuckle........yup, the head of the bolt broke!
Tried to use a screw extractor and guess what? part of the tip broke leaving it stuck inside.........so now????????? any suggestions? buying a new knuckle?
Tried to use a screw extractor and guess what? part of the tip broke leaving it stuck inside.........so now????????? any suggestions? buying a new knuckle?

21mm Strut Tool and Spreader
Rich