
How To Suspension :: Springs Install How-To


you can use a strapwrench on the shaft, but that's not the most effective. Not sure about all struts, but on my Bilsteins there was no way to 'torque it down'. The nut went to the bottom of the threads and stops - that's why you never use an impact gun!

4th Gear
Joined: Dec 2002
Posts: 314
Likes: 1
From: Sammamish, WA
Great post and other socket ideas
Keith,
Thanks for a truely great post. Very helpful. Keith knows what he is doing, replacing struts. But, don't ask him why.
Caution: I've leavered against the lower spring purch and, once, it poped loose from the strut body. I find that striking the hub assembly with a dead blow hammer is usually sufficient to loosen everything. Sometimes, especially, on the driver's side, I've found it helpful to take the outer ball joint off the hub. This allows the driver's side hub to drop an additional inch or so and makes strut removal easier. It is a snap to reinstall the ball joint at the end of the project.
As far as strut nut removal tools are concerned: I just ground two flats on opposite sides of 21 mm and 22 mm 3/8" drive sockets. This way I can use an open end wrench, or a crows foot extension to turn the nut and can easily torque the fastener. Insert the Torx wrench thru the top to keep the strut shaft from turning, or visa versa. MINI uses 21 mm Nyloc nuts, but many aftermarket strut manufacturers use 22 mm, and new Nyloc nuts in this area come as 22 mm. Good to have both in the tool box.
Regards,
John Petrich in Seattle
4th Gear
Joined: Dec 2002
Posts: 314
Likes: 1
From: Sammamish, WA
Sometimes, washers are helpful
PGT,
Just read your post and agree 100%. Not the place for an impact wrench.
I am careful to add washers, as necessary, under the strut nut to make sure that the nut doesn't run out of threads before the shaft gets clamped securely in the plate bearing assembly. Takes a little eyeballing prior to final assembly.
John Petrich in Seattle

4th Gear
Joined: Nov 2005
Posts: 510
Likes: 0
From: Baltimore, MD
NAM Works!
Just wanted to give a shout out to all the great chain of NAM'ers who helped me get a JCW Suspension Kit installed on my car today. This is really what makes NAM such a great service to all of us who are nuts about this great little car.
First off: Thanks to TampaMCS for deciding to sell your "lightly used" JCW Suspension Kit.
Secondly: Thanks to PGT for buying said Kit, then not finding the time to install it on your own car, and subsequently deciding to sell it (unsuccessfully).
Thirdly: Thanks to NAM's Thread Search feature which allowed me to find PGT's failed and locked 'for sale' thread again, make him a new offer, have it accepted and then purchase said Kit.
Fourthly: Thanks to k-huevo, justintime and simplekid15 for this super helpful post that gave me the confidence to try to tackle this job myself rather than paying MINI about $500 to do it.
Fifthly: Thanks to THE ITCH for the above tip on making your own custom 21mm socket - as he stated, it worked great, and for a lot less money than buying the special overpriced version. All hail the power of the Dremel and a thin little cut-off wheel!
and Sixthly but not lastly: A special Thanks to saakey for providing a helping hand, experience and a nice garage to get this accomplished in. Couldn't have done it without you - and your neighbor David. The "buddy method" works just as fine as a spring compressor!
Can't wait to try anew the ol' on ramp on the way to work tomorrow!

 Cheers.
First off: Thanks to TampaMCS for deciding to sell your "lightly used" JCW Suspension Kit.
Secondly: Thanks to PGT for buying said Kit, then not finding the time to install it on your own car, and subsequently deciding to sell it (unsuccessfully).
Thirdly: Thanks to NAM's Thread Search feature which allowed me to find PGT's failed and locked 'for sale' thread again, make him a new offer, have it accepted and then purchase said Kit.
Fourthly: Thanks to k-huevo, justintime and simplekid15 for this super helpful post that gave me the confidence to try to tackle this job myself rather than paying MINI about $500 to do it.
Fifthly: Thanks to THE ITCH for the above tip on making your own custom 21mm socket - as he stated, it worked great, and for a lot less money than buying the special overpriced version. All hail the power of the Dremel and a thin little cut-off wheel!
and Sixthly but not lastly: A special Thanks to saakey for providing a helping hand, experience and a nice garage to get this accomplished in. Couldn't have done it without you - and your neighbor David. The "buddy method" works just as fine as a spring compressor!
Can't wait to try anew the ol' on ramp on the way to work tomorrow!
Cheers.
good deal man!! Glad you finally got it installed. I just got around to my own install two weekends ago (bought a Koni Sport Kit) and I still need to pull it off again :( Apparently, you don't need to reuse all the washers on the front stack. Or, all the washers included with the camber plates I bought.  The front of my car sits a full inch higher than the rear.
The front of my car sits a full inch higher than the rear.
4th Gear
Joined: Nov 2005
Posts: 510
Likes: 0
From: Baltimore, MD
Yikes Dan - sounds like you've kind of got the ATV thing goin' there! `
Maybe start a new trend - the HIGHLY JACKED MINI!
. . . Oh, I see you were able to locate the red trim rings for your interior. Obviously I think they look great - where'd you end up finding some?
`Maybe start a new trend - the HIGHLY JACKED MINI!
. . . Oh, I see you were able to locate the red trim rings for your interior. Obviously I think they look great - where'd you end up finding some?
what? you mean this isn't how it's intended to be setup?

red rings - bought the titanium ones and used a rattle can of semi-transparent red - meant to look like red anodized. About the only choice I had vs. breaking into your car.
red rings - bought the titanium ones and used a rattle can of semi-transparent red - meant to look like red anodized. About the only choice I had vs. breaking into your car.


5th Gear
Joined: Oct 2005
Posts: 701
Likes: 0
From: Ellicott City, MD
and Sixthly but not lastly: A special Thanks to saakey for providing a helping hand, experience and a nice garage to get this accomplished in. Couldn't have done it without you - and your neighbor David. The "buddy method" works just as fine as a spring compressor!
Can't wait to try anew the ol' on ramp on the way to work tomorrow!
Cheers. right on....so how is she holding up? Did it drop any more? So get this, ever since we did your so nice and perfect- to torque specs and all...i now feel like mine is rattling apart
 Hand tight just isn't satisfying enough for me anymore ...I'm going to get back under there and re-tighten all mine again ..to factory torques
4th Gear
Joined: Nov 2005
Posts: 510
Likes: 0
From: Baltimore, MD
Did it drop any more? . . . .So get this, ever since we did yours so nice and perfect- to torque specs and all...i now feel like mine is rattling apart
Hand tight just isn't satisfying enough for me anymore ...I'm going to get back under there and re-tighten all mine again ..to factory torques Yea, that torque wrench can get a little addicting. Now you can just go nutz - after all your cars you can move on into the house, checking the kitchen cabinetry, the plumbing, door hardware, and most importantly, your bed frame!


Any last words of advice? We're going to attempt this tomorrow.. actually taking aftermarket springs off and putting it back to stock.
I wish I knew someone around Atlanta that had experience with it. I'd give them the springs if they could help us take them off.
I wish I knew someone around Atlanta that had experience with it. I'd give them the springs if they could help us take them off.
it's all pretty straightforward Jenn. Best thing to do is center lift the car and put jackstands under each corner. If you try to remove things by sidejacking, the swaybar is under load and you'll not be able to get full droop on the hubs. In the rear, I used the mounting point for the camber links to lift by and in the front, there's a subframe with a circular hole in the middle - put the jackpad there. As always...used caution...and do this at your own risk....they worked for my car, but there's enough variation over the years this may not be the case for older models.
5th Gear
Joined: Oct 2005
Posts: 701
Likes: 0
From: Ellicott City, MD
Yes, some last words... Good luck!
Oh and just follow these directions at the beginning of this thread and you'll be fine...also, do as PGT says and put the car up on all fours.
I'd also start with the front right (passenger) side first - this is the hardest one. I like to work hardest to easiest (either rear). But once you get the passenger side done, the worst is behind you.
Why you going back to stock... selling?
Alliance Member


Joined: Apr 2003
Posts: 4,101
Likes: 230
From: York, Pennsylvania
Great write-up! Thanks for taking the time to do it for the rest of us. It sure would have been handy when I installed M7 springs about 7 months ago .
The 21mm Hazet socket is available at www.samstagsales.com for under $60 as Hazet p/n 2593-21, but best if you call or email them for a quote. I got mine for $49.99 as a previous customer when I ordered some other tools with it. They carry lots of specialty tools for automotive use. They're also a good source for the 36mm shallow socket used for the MINI oil filter cap.
The 21mm Hazet socket is available at www.samstagsales.com for under $60 as Hazet p/n 2593-21, but best if you call or email them for a quote. I got mine for $49.99 as a previous customer when I ordered some other tools with it. They carry lots of specialty tools for automotive use. They're also a good source for the 36mm shallow socket used for the MINI oil filter cap.
but they sent me the p/n 2593-1 by mistake (7 mm allen wrench with a
plastic handle - lists for $9.09).
Now I have to ship it back collect and wait for the right part to be
shipped again.

I just used a 3/4 inch socet with a hex top to it and a vice grips. Then a 6" long 3/8th alen socket with my tq wrench... Free and ghetto like.
This method works great btw. Did it solo. I got a spring compressor at Advance auto parts for 50... Used it for 4 hours and returned for full price. It's their buy/return loaner program. All auto parts stores will do this. the compressor whill not work with hsport rears. Still had to use the buddy method.
thanks keith.
5th Gear
Joined: Mar 2005
Posts: 772
Likes: 0
I don't mind buying tools (in fact I'm always glad to have an excuse to do so) but I really try to avoid buying proprietary tools that are only good for one thing.
An entire 25-pc GearRatchet set including ratchet handle, SAE 5/8" to 1.25" sockets and 15mm-32mm sockets costs less than two proprietary sockets alone at $92.41, and may prove more useful in other situations. It's not as deep as the cutout sockets so may not work with some camber plates, but then it can be used as a super low-profile standard socket set.
I'm not sure why BMW changed the strut mounts to require the special tool anyway. The older 2002 models can fit a box-end wrench just like the rears.

5th Gear
Joined: Aug 2005
Posts: 918
Likes: 27
From: Pulaski,NY
Only problem here is that you are not utilizing a torque wrench.
I don't mind buying tools (in fact I'm always glad to have an excuse to do so) but I really try to avoid buying proprietary tools that are only good for one thing.

An entire 25-pc GearRatchet set including ratchet handle, SAE 5/8" to 1.25" sockets and 15mm-32mm sockets costs less than two proprietary sockets alone at $92.41, and may prove more useful in other situations. It's not as deep as the cutout sockets so may not work with some camber plates, but then it can be used as a super low-profile standard socket set.
I'm not sure why BMW changed the strut mounts to require the special tool anyway. The older 2002 models can fit a box-end wrench just like the rears.
and? the nut doesn't really get torqued...it goes down until it stops. good luck torquing it.
i posted this on m|u but thought i'd add it here since this how to helped me so much...
Originally Posted by m|u minimusprime
1) Any auto parts store will rent you a spring compression tool for full purchase price and give you your full money back when you are done. IE Buy and return. This really helped getting the fronts taken apart and put back together... It also helped for dismantling the rear, although the buddy method had to be used to re-assemble the back because of the close proxmitey of the coils on the hsports
2) Re-learned how awesome WD-40 is.
3) Getting the strut back into the front knuckle is kinda nerve wracking if you are really focusing on keeping your alignment. I felt like i was wrenching pretty hard on the steering knuckle to get it back in. In the end im sure I didn't use too much force... I'm just one of those people that has a bad habit of braking things because they use too much leverage... always conscious about that.
4) you don't have to remove the wheel wells
5) It's a job that can totally be done solo and even for the first time. I'm not sure how you could do the buddy method on the rear but it can be managable.
6) I stole a trick from others to get around needing special tools. All I needed that may not be in a standard toolbox was:
a - 3/4 deep drive socket with hex top on it (used this to tighten the top strut nuts, grabbed the hex part with a vice grips) I did this to get around a 21mm deep socket. you could also do this with a 21mm socket or 3/4 and just notch the edge so you can grab them with a crecent or channel lock
b - 6" #5 or #6 3/8ths alen socket. I got this so I could tq the top nut correctly without the bmw special tool. Ie hold the nut with the deep socket and vice grips and tq with the tq wrench and alen socket.
c - spring compresser - see above or go to any auto parts store
d - antisieze for pinch bolts
e - 24" breaker bar
d - tq wrench for 100ftlbs.
f - 1"x1"x18" piece of wood.
Thats about all I had to use that was out of the ordinary. Like I said thanks to the help i got before hand everything went perfectly.
5th Gear
Joined: Mar 2005
Posts: 772
Likes: 0
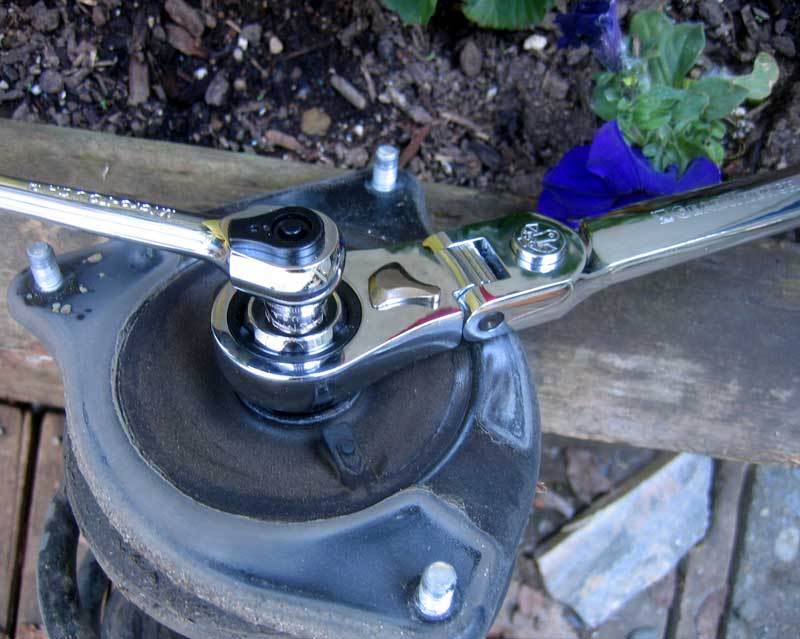
I tightened them with the same reverse-clicking torque wrench that is required for torquing the rears. The ratchet only holds the nut in place while the shaft is tightened; same as the box-end used for the rear struts.
2nd Gear
Joined: Sep 2006
Posts: 86
Likes: 0
good write up, it worked for me good, my bro-in-law and i dropped the car and installed the rear sway bar in 4 hours, first time takes a while with getting all the right tools and figuring it out. one thing we did different, instead of unbolting the drop links at the top where it is extemely difficult to get at, jus undo the bolt at the bottom, comes off in a few seconds. jmho

Thread Starter
|
6th Gear
Joined: Aug 2004
Posts: 1,629
Likes: 7
From: Pipe Creek, Texas
The first time I performed a MINI spring swap I used a 13/16ths spark plug socket, standard 6mm allen wrench, 22mm open end wrench, and large Crescent wrench. The tool combo worked for one front strut nut but the other wouldn’t loosen because there was too much flex in the vertically longer allen shaft; obviously it had excessive torque applied during the previous installation. At the time I didn’t have an impact wrench available and had to hitch-hike (many miles walking, not surprising because it looked as if I was carrying a small arms weapon) into town to have a shop perform the removal for an unexpected added cost.


Last edited by k-huevo; Jun 2, 2007 at 06:01 AM.

4th Gear
Joined: Jul 2003
Posts: 394
Likes: 1
From: KC
4th Gear

Joined: Jul 2007
Posts: 350
Likes: 4
From: Westminster, CO
