
How To Exterior:: How to install GP2 Diffuser


4th Gear
Joined: May 2013
Posts: 314
Likes: 0
Looks great! Can I ask how you lifted the rear onto the ramps? Trying to decide whether to have the shop do it on a lift.
I installed mine this weekend. Really happy with this, as it sort of ties in all the black around the bottom edge of the car and really makes it look sportier - not to mention easy to install.
Sorry if this has all been suggested before by someone else in this thread; but here are some pointers:
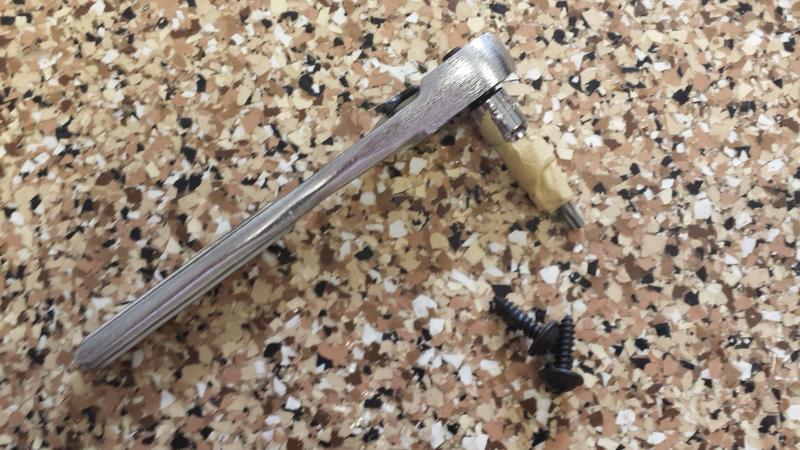
Use a small 1/4" ratchet w/1/4" socket on your torx driver (pic below) for the 'sideways screws' at the corners. I wrapped it up with some tape so the torx driver wouldn't fall out of the 1/4" socket. I had the screws removed in 2 minutes. Getting them back in was a little more work just to get things aligned w/the new diffuser. Which is my second tip: install ALL BOLTS/SCREWS loose then work your way back to front, tightening the sideways corner screws up to the tunnels then to the clips, finally tightening the exhaust hanger bolts with a long extension and swivel (easier than it sounds - plenty of room to get in from the muffler side). My mistake was to tighten everything and leave the sideways screws last...the tunnel was too far back by about 1/8" which left the 'sideways' screw misaligned. Had to loosen up everything on that side to get it all to fit properly.


Sorry if this has all been suggested before by someone else in this thread; but here are some pointers:
Use a small 1/4" ratchet w/1/4" socket on your torx driver (pic below) for the 'sideways screws' at the corners. I wrapped it up with some tape so the torx driver wouldn't fall out of the 1/4" socket. I had the screws removed in 2 minutes. Getting them back in was a little more work just to get things aligned w/the new diffuser. Which is my second tip: install ALL BOLTS/SCREWS loose then work your way back to front, tightening the sideways corner screws up to the tunnels then to the clips, finally tightening the exhaust hanger bolts with a long extension and swivel (easier than it sounds - plenty of room to get in from the muffler side). My mistake was to tighten everything and leave the sideways screws last...the tunnel was too far back by about 1/8" which left the 'sideways' screw misaligned. Had to loosen up everything on that side to get it all to fit properly.


4th Gear
Joined: May 2013
Posts: 314
Likes: 0
I found it buried in another thread and I also verified at the dealer. T20 for a 2013 R56 JCW Aero Kit.
Last edited by cactusjk; Nov 16, 2013 at 07:11 PM. Reason: Wrong bolt size
4th Gear
Joined: May 2013
Posts: 314
Likes: 0
The expanding rivets 07130702966 would not sit flush due to being too large in diameter.
i used the existing passenger side bolt that seemed to work fine. Not sure what is supposed to be used on the drivers side. Maybe nothing since there is no real way to put a clip there. Open for recommendations.
i used the existing passenger side bolt that seemed to work fine. Not sure what is supposed to be used on the drivers side. Maybe nothing since there is no real way to put a clip there. Open for recommendations.
Kurt, you will need 6 bolts, part # 07147117693 and two expanding rivets. It's the same expanding rivet used to hold in the wheel well insulation, so your MINI parts guy can find them.
I don't know that OutMotoring has those in stock, but they definitely did not come in the kit I ordered from the dealership, nor are they listed in the parts list on RealOEM.
I don't know that OutMotoring has those in stock, but they definitely did not come in the kit I ordered from the dealership, nor are they listed in the parts list on RealOEM.


5th Gear
Joined: Oct 2010
Posts: 1,053
Likes: 5
From: Bx, NY
since my MINI came with the under body panel, would I need to get any clips to connect the GP2 rear diffuser during install? If so, would anyone know the part number?
Thanks in advance!
Thanks in advance!


He's right. As long as you have the aerokit bumper it will fit. They make aerokit bumpers that fit all second gen models. Note that even though they make an aerokit for the non-s the diffuser is only meant to work with a central exhaust so you'll have to modify the exhaust in this case.

Coordinator :: Eastern Iowa MINIs
Joined: Dec 2006
Posts: 5,520
Likes: 4
From: Decorah, IA
He's right. As long as you have the aerokit bumper it will fit. They make aerokit bumpers that fit all second gen models. Note that even though they make an aerokit for the non-s the diffuser is only meant to work with a central exhaust so you'll have to modify the exhaust in this case.

---

Thread
Thread Starter
Forum
Replies
Last Post