
How To Drivetrain :: Fuel Pump Replacement


Drivetrain :: Fuel Pump Replacement
Recently replaced my fuel pump due to a failing non-return valve. Figured I'd take a few pictures for a how-to while I was at it...
It's very similar to changing the fuel filter - probably easier.
What you need:
1. New fuel pump and gasket (fuel pump should include the gasket) - autopartswarehouse.com had the best price on a the OEM pump - it's VDO brand (paid $174)
2. 10mm socket
3. Flat blade screwdriver
4. Any kind small hammer (rubber mallet is probably best)
5. Rags or Paper Towels
6. Rubber Gloves
7. Plastic covering and masking tape
8. Something like an oil drain pan to put the old pump in once it's out
9. Vaseline
First, wait until you're just about out of gas to replace it. The less fuel in the tank the better. I was a little above E and there was still plenty of gas in there when I had it open. The official BMW method has you draining the fuel tank - it's not really necessary though. Try to work in a well ventilated area - leave the doors and hatch open to encourage good air circulation. Now, onto to the repair...
Remove the bottom part of the back seat. Release the 4 child seat latch covers. Pull up on the front of the seat at both sides and it will snap right out.

The bracket on the bottom of the seat that snaps off:
The fuel pump is on the driver's side. Use a 10mm socket to remove the nuts and the cover.


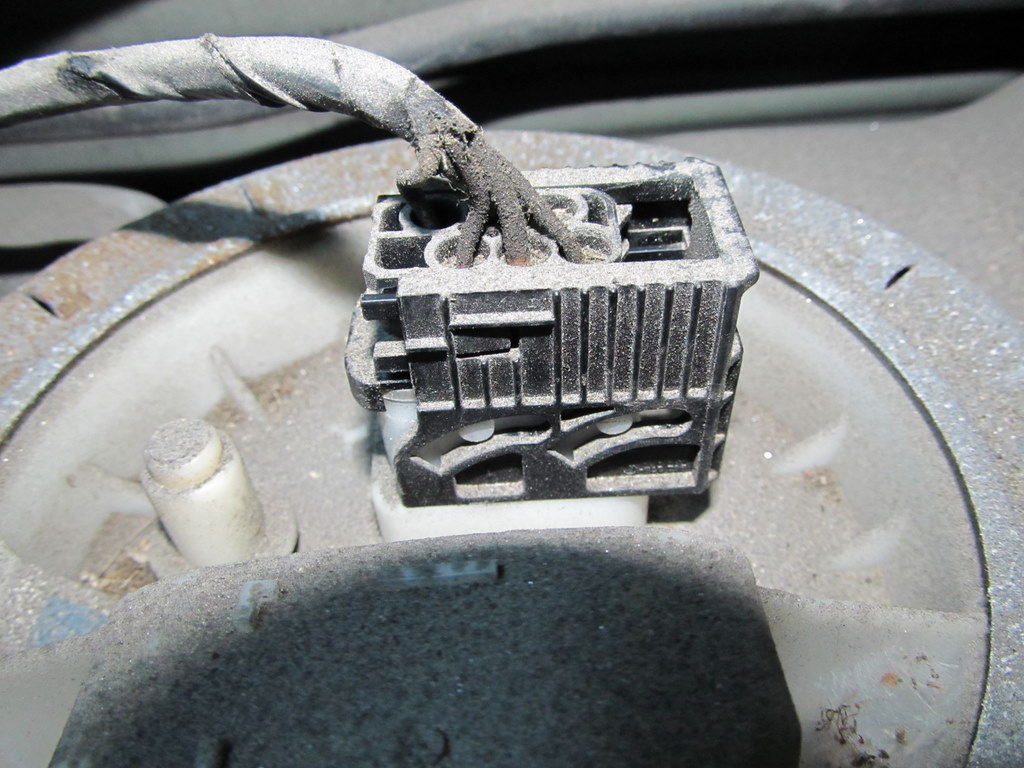
Release the electrical connector by sliding it toward the passenger side of the car. You can see the groves that the pins follow as you loosen it.
Loosen the metal ring using a flat blade screw driver on one of the ridges on top and a hammer or rubber mallet. The metal ring screws on/off. Once you've loosened it with the screwdriver and hammer, you will be able to get it by hand.
Tape down plastic around the surrounding area so you don't get gas all over the interior. Put on your rubber gloves (a step I should not have omitted myself!). You're about to expose the fuel tank - be careful, work slowly, and take necessary precautions. (No smoking, lighters, etc.)

Use your flat blade screwdriver to loosen the top of the fuel pump. This one just pops up with minimal effort.

There are three connections to undo on the old fuel pump.

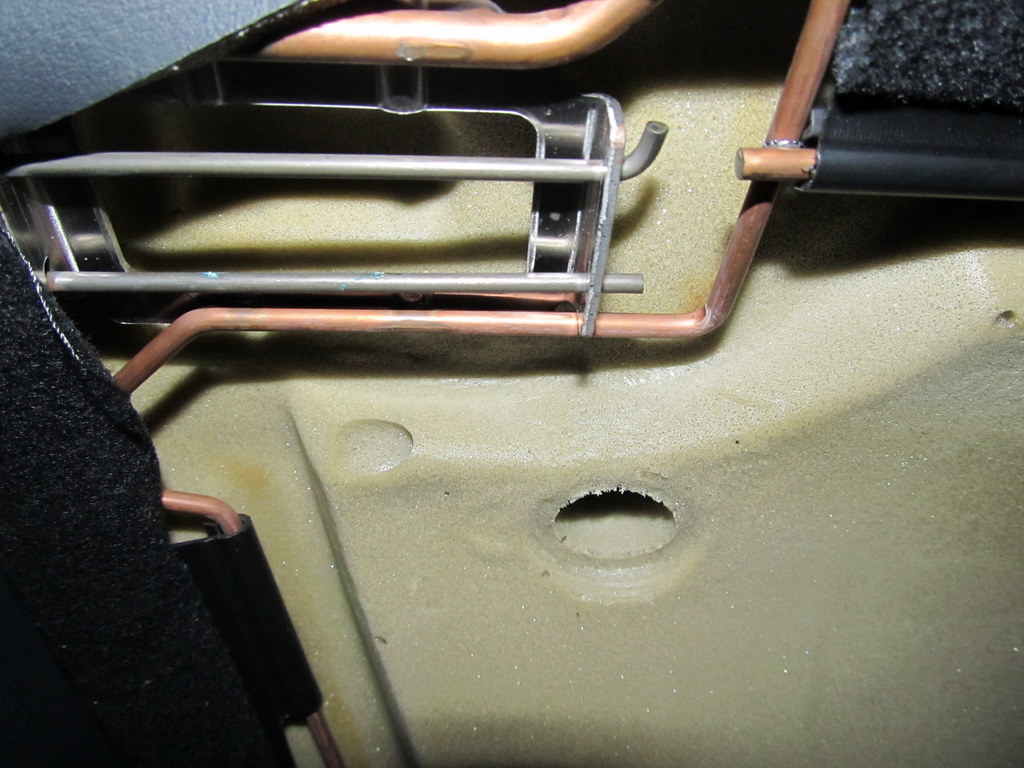
The fuel sending line is pressurized! You can release this pressure using some rags on the schaeder valve on the injection tube (see pic), or cover the connector with rags when you release it. If you don't you'll get sprayed with fuel (like I foolishly did!)
The schaeder valve on the fuel injection tube:

The sending line is protected by plastic clip. Snap off the clip and then pinch the two buttons to slide it off.
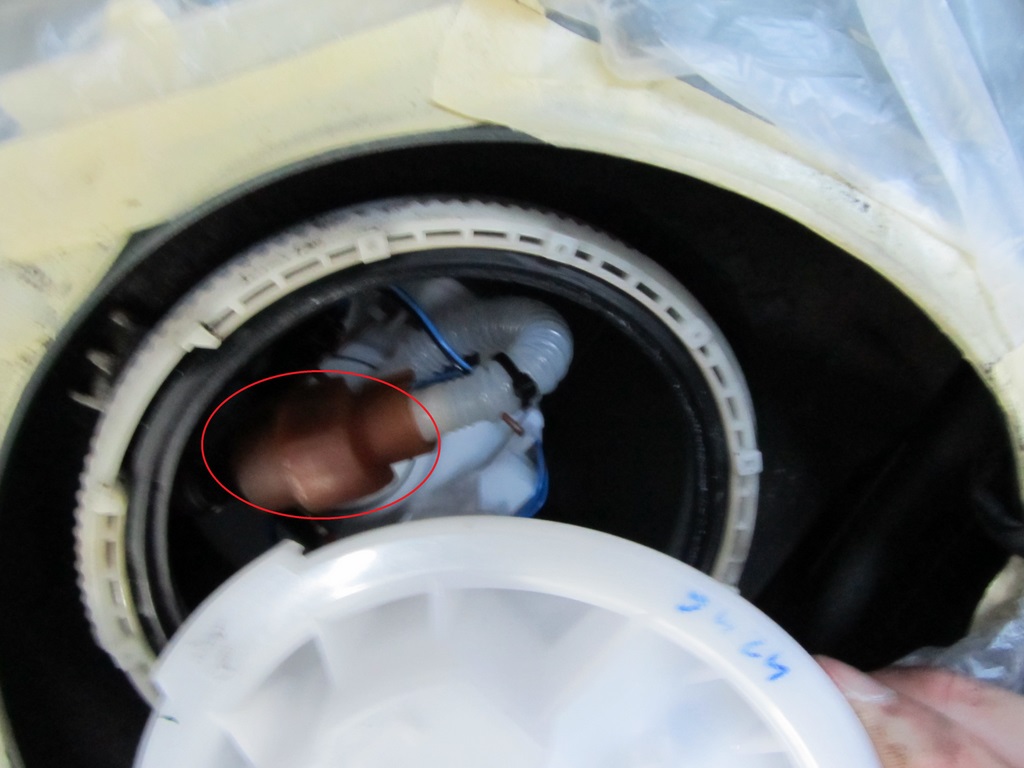
There is another plastic hose that will need to be snapped off the fuel pump and an electrical connector that you pinch and remove.
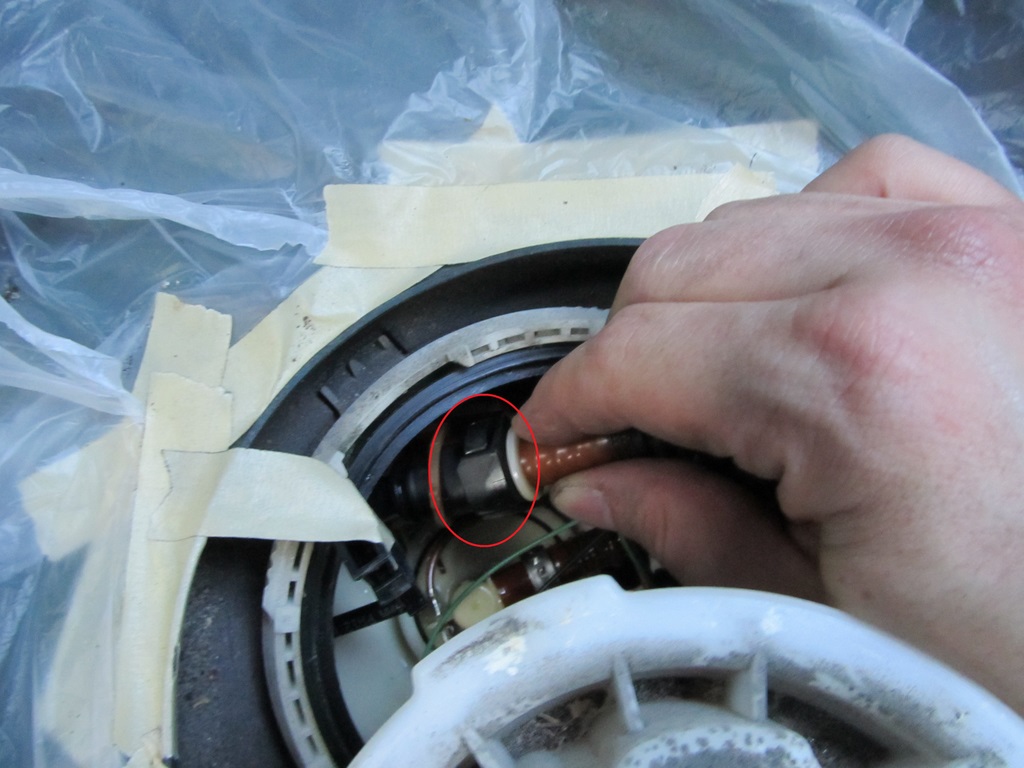
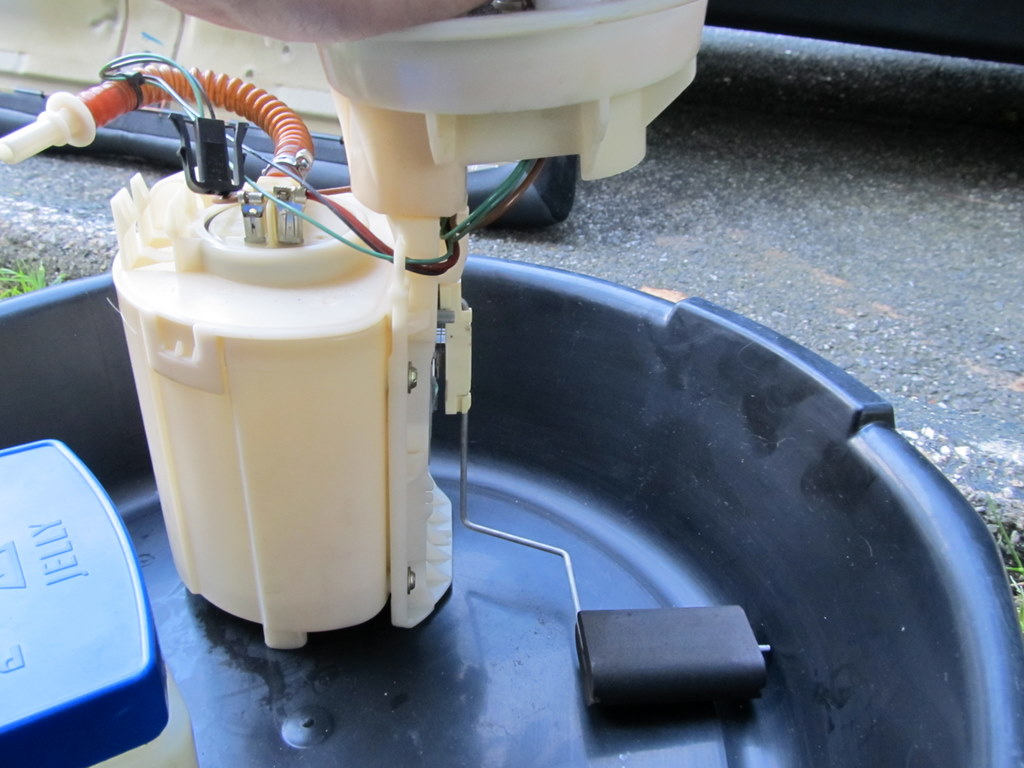
After that, carefully remove the fuel pump - it will be full of fuel. You can carefully drain this fuel back into the tank or drain it into a container to add back to the tank later. Watch out for the level sensor. I found the pump came out easiest when I rotated it 180 degrees.
For the install, carefully place the new pump in. Reconnect the three connectors.
Rub some Vaseline on the new gasket and get in place around the lip of the opening first.
Next, make sure the tab on the top of the pump lines up with the slot on the tank. The fuel pump has a spring the compresses as you push the pump's cover in place. The pictures show how the spring compresses. Press into place and the get the sealing ring started by hand.
The slot and tab that need to line up:

Fully Up:

Fully Compressed:
Once the ring is snug, tighten it up a little with you flat blade and hammer. It doesn't need to go much further, just an inch or so. I was able to line it up with the same location as a piece of tape had been on the previous pump.
Reconnect the electrical connector on top.
Test the pump. Prime the system a few times by turning the key to position and then back off multiple times. Start her up and make every thing is working. Check for leaks.
If everything is good to go, remove all the plastic covering. Use your rags and a cleaner to clean up any fuel spillage. I had a little. Even after cleaning up, it may take a few days for the smell to completely go away.
Replace the black cover and 10mm nuts. These do not need to be very tight - just get them snug.
Snap the back seat and child seat latch covers back into place. Go fill her up and take a good test drive.
You can always check for leaks over the next few days. If you still smell gas after a few days (inside or out), you may have a leak. Open everything up and make sure the gasket and sealing ring are seated correctly.
If you don't smell gas after a few days, enjoy the new fuel pump, and the satisfaction of fixing your MINI and saving a bundle by doing it yourself!
Happy motoring!
It's very similar to changing the fuel filter - probably easier.
What you need:
1. New fuel pump and gasket (fuel pump should include the gasket) - autopartswarehouse.com had the best price on a the OEM pump - it's VDO brand (paid $174)
2. 10mm socket
3. Flat blade screwdriver
4. Any kind small hammer (rubber mallet is probably best)
5. Rags or Paper Towels
6. Rubber Gloves
7. Plastic covering and masking tape
8. Something like an oil drain pan to put the old pump in once it's out
9. Vaseline
First, wait until you're just about out of gas to replace it. The less fuel in the tank the better. I was a little above E and there was still plenty of gas in there when I had it open. The official BMW method has you draining the fuel tank - it's not really necessary though. Try to work in a well ventilated area - leave the doors and hatch open to encourage good air circulation. Now, onto to the repair...
Remove the bottom part of the back seat. Release the 4 child seat latch covers. Pull up on the front of the seat at both sides and it will snap right out.
The bracket on the bottom of the seat that snaps off:
The fuel pump is on the driver's side. Use a 10mm socket to remove the nuts and the cover.
Release the electrical connector by sliding it toward the passenger side of the car. You can see the groves that the pins follow as you loosen it.
Loosen the metal ring using a flat blade screw driver on one of the ridges on top and a hammer or rubber mallet. The metal ring screws on/off. Once you've loosened it with the screwdriver and hammer, you will be able to get it by hand.
Tape down plastic around the surrounding area so you don't get gas all over the interior. Put on your rubber gloves (a step I should not have omitted myself!). You're about to expose the fuel tank - be careful, work slowly, and take necessary precautions. (No smoking, lighters, etc.)
Use your flat blade screwdriver to loosen the top of the fuel pump. This one just pops up with minimal effort.
There are three connections to undo on the old fuel pump.
The fuel sending line is pressurized! You can release this pressure using some rags on the schaeder valve on the injection tube (see pic), or cover the connector with rags when you release it. If you don't you'll get sprayed with fuel (like I foolishly did!)
The schaeder valve on the fuel injection tube:
The sending line is protected by plastic clip. Snap off the clip and then pinch the two buttons to slide it off.
There is another plastic hose that will need to be snapped off the fuel pump and an electrical connector that you pinch and remove.
After that, carefully remove the fuel pump - it will be full of fuel. You can carefully drain this fuel back into the tank or drain it into a container to add back to the tank later. Watch out for the level sensor. I found the pump came out easiest when I rotated it 180 degrees.
For the install, carefully place the new pump in. Reconnect the three connectors.
Rub some Vaseline on the new gasket and get in place around the lip of the opening first.
Next, make sure the tab on the top of the pump lines up with the slot on the tank. The fuel pump has a spring the compresses as you push the pump's cover in place. The pictures show how the spring compresses. Press into place and the get the sealing ring started by hand.
The slot and tab that need to line up:
Fully Up:
Fully Compressed:
Once the ring is snug, tighten it up a little with you flat blade and hammer. It doesn't need to go much further, just an inch or so. I was able to line it up with the same location as a piece of tape had been on the previous pump.
Reconnect the electrical connector on top.
Test the pump. Prime the system a few times by turning the key to position and then back off multiple times. Start her up and make every thing is working. Check for leaks.
If everything is good to go, remove all the plastic covering. Use your rags and a cleaner to clean up any fuel spillage. I had a little. Even after cleaning up, it may take a few days for the smell to completely go away.
Replace the black cover and 10mm nuts. These do not need to be very tight - just get them snug.
Snap the back seat and child seat latch covers back into place. Go fill her up and take a good test drive.
You can always check for leaks over the next few days. If you still smell gas after a few days (inside or out), you may have a leak. Open everything up and make sure the gasket and sealing ring are seated correctly.
If you don't smell gas after a few days, enjoy the new fuel pump, and the satisfaction of fixing your MINI and saving a bundle by doing it yourself!
Happy motoring!
Last edited by gknorr; Jul 8, 2015 at 08:03 PM. Reason: Pictures fixed.

Looks like they're back up. My server must have been down for a few minutes. I did notice they are huge images though - I'll repost compressed, smaller versions when I get a chance so loading goes a little quicker. 

1st Gear
Joined: Apr 2011
Posts: 19
Likes: 0
This repair will go down as one of the simplest I have ever had to do on any vehicle. I had the back seat out and cover off the previous evening. I would say that I was re-assembling the back seat in, at most, 20 minutes. Very easy.
I do have to admit, that even after reading it a couple times, and removing the fuel rail cover, I still failed to bleed the line, and got sprayed slightly.
Thanks for having posted this. Made the job a no brainer. Saved my daughter about $500 doing it myself.
I do have to admit, that even after reading it a couple times, and removing the fuel rail cover, I still failed to bleed the line, and got sprayed slightly.
Thanks for having posted this. Made the job a no brainer. Saved my daughter about $500 doing it myself.

You can also pull the fuel pump relay while the engine is running to depressure the fuel system.
Nice write-up!
Jim
Nice write-up!
Jim
Trending Topics
This repair will go down as one of the simplest I have ever had to do on any vehicle. I had the back seat out and cover off the previous evening. I would say that I was re-assembling the back seat in, at most, 20 minutes. Very easy.
I do have to admit, that even after reading it a couple times, and removing the fuel rail cover, I still failed to bleed the line, and got sprayed slightly.
Thanks for having posted this. Made the job a no brainer. Saved my daughter about $500 doing it myself.
I do have to admit, that even after reading it a couple times, and removing the fuel rail cover, I still failed to bleed the line, and got sprayed slightly.
Thanks for having posted this. Made the job a no brainer. Saved my daughter about $500 doing it myself.

The only thing I would add, I (like an idiot) was trying to pry/pop off the metal retailing ring with the flat head screw driver and mallet. Then I realized it screwed on/off. Other than that a great write up 

Neutral

Joined: Jan 2012
Posts: 5
Likes: 2
Thank you for the write up! I followed your directions but then realized on my gf's 2006 mini cooper convertible it ended up being the fuel pump relay. This relay is now a permanent part of the fuse panel circuit board so it was kind of a PIA to repair. Here is how I did it: Fuel Pump relay repair 2006 MCS Hope this helps someone else before they spend all day searching for it like I did!
Thank you for the write up! I followed your directions but then realized on my gf's 2006 mini cooper convertible it ended up being the fuel pump relay. This relay is now a permanent part of the fuse panel circuit board so it was kind of a PIA to repair. Here is how I did it: Fuel Pump relay repair 2006 MCS Hope this helps someone else before they spend all day searching for it like I did!


Glad its helpful! The images got deleted when I switched web providers a while back. I'll try to get everything working again tomorrow.
Last edited by gknorr; May 6, 2022 at 06:29 PM.

Neutral
Joined: May 2022
Posts: 6
Likes: 0
From: I live in Costa Rica and my Mini is in storage in NC, USA
Thank you for the write up! I followed your directions but then realized on my gf's 2006 mini cooper convertible it ended up being the fuel pump relay. This relay is now a permanent part of the fuse panel circuit board so it was kind of a PIA to repair. Here is how I did it: Fuel Pump relay repair 2006 MCS Hope this helps someone else before they spend all day searching for it like I did!
Last edited by Goldfinch 2; May 6, 2022 at 04:25 PM. Reason: spelling
I recommend doublechecking the fuse number for your build date. They did change the wiring around at various times and it's possible it's a different number. It should be labeled on the cover to the fuse box.
Also, don't forget about the fuel in the line and fuel rail too. There is a check valve in the fuel pump that keeps the line pressurized, so there is likely still fuel in that line and in the fuel rail. You'll probably want to disconnect those and drain/blow out all the old fuel.
Good luck, and hopefully it's back on the road soon!
Neutral
Joined: May 2022
Posts: 6
Likes: 0
From: I live in Costa Rica and my Mini is in storage in NC, USA
Thanks so much, good information! Since I posted I ordered a Bentley repair manual and saw a Utube of the removal and install of the fuel pump and filter assembles. I got depressed as this set up and parts is almost exactly the same a some of the MB's I worked on at the end of my career. . I started counting the days I could retire!! Thanks again!

Thread
Thread Starter
Forum
Replies
Last Post
G3NSM0R3S
1st Gen Countryman (R60) Talk (2010-2015)
16
Jun 15, 2025 12:51 PM
Derek Chung
R50/R53 :: Hatch Talk (2002-2006)
3
Oct 20, 2019 07:06 AM
zapola6
R50/R53 :: Hatch Talk (2002-2006)
4
Mar 24, 2015 09:24 AM
early_apex
Off-Topic :: Autos
4
Aug 31, 2005 10:09 AM