
How To DIY R53 Cooling Fan replacement


Thread Starter
|
2nd Gear
Joined: Feb 2005
Posts: 91
Likes: 0
Plan on 2 hours for this, but it can easily be done in less time. There is no need to jack up car. Can be done with one person, although an extra set of hands helps. Service mode is NOT needed. Car should be cool. Note- this is different technique than the one listed in Bentley manual which uses service mode and removal of the radiator.
Need:
New fan assembly. I used the TYC one from Rock Auto.
Shop vac (helps with reducing the mess when removing upper radiator hose.
Torx T27
8,10 mm 1/4 drive sockets
13mm (3/8"drive)
Narrow flat screwdriver
Phillips screwdriver
Stubby phillips screwdriver (not necessary if car jacked up-needs to be stubby for clearance between bumper and ground)
May want to have a few of the plastic body fasteners found in the wheel wells in case you have to trash any.
5 zip ties (4 for wires, 1 for holding bungee cord to upper radiator hose)
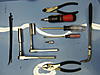
Some sort of pliers to release clamp on radiator hose (really like the long 90 degree ones on right side of this photo helpful for other jobs on mini as well)
1) Turn wheels to full lock in one direction, turn off car.
2) Remove forward most 2 body screws in both wheel wells and the vertically oriented 8mm bolt between wheel liner and the bumper skin (see the girls guide to service mode for more info.
3) Remove the furthest back 2 Phillips screws (may need stubby driver if car not lifted) and 3 10mm bolts on underside of bumper.
4) Remove the torx bolts on either side that attach plastic bumper skin to bumper
5) Pull outwardly from lower part of bumper skin releasing bumper skin from bumper.
6) Detach all electrical bits from bumper skin
7) Note the wire routing through the bumper, fish the wires through the bumper. Then remove the 13mm bolts holding the bumper to the body and remove bumper.
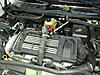
8) Stuff rags between radiator top hose and radiator and the supercharger and alternator. Remove 10mm bolt holding the radiator top hose to the intake body. Remove radiator top hose from body while using shop vac around the hose-radiator connection to reduce the spillage. Bungee cord hose to body (See pic) Note: do not remove the radiator reservoir cap to reduce spillage. You will still get some spillage on floor, but not too dramatic. I used a mat under the car to catch any errant fluid.
9) Remove 10mm bolt holding wire harness and the AC high side port to body on right side of car and disconnect harness. Use very small flathead screwdriver to release clip holding the electrical connectors to the mount.
10) Cut wire ties holding fan wire to the MTFE and pull wires through towards the left side of car.
11) Use small flathead screwdriver to pry central long black pins from the connectors on the upper right and left side of radiator and remove pins. Then pinch the connector from backside while pulling on the connector from the front. The radiator will be somewhat free at this point.
12) Be sure to have your new fan in reach. Tilt radiator (with AC condenser attached to it) towards you about 30 degrees and wiggle upwards and then pull slightly away from car. At this point you should have this view at the back of the radiator unit.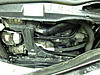
13) Reach down to bottom of radiator unit and release clips on either side retaining lower fins of the fan cowl. You should now be able to wiggle the fan unit upward and it will now come apart from the radiator.
14) Install the fan unit to back of radiator in the obvious manner if you just removed it.
15) Fish wires through hole in MTFE, then put assembly back in starting with lower part of radiator and tilting the top part into place.
16) Attach upper radiator hose and 10mm bolt holding it to intake.
17) Slip black pins back into place at top corners or radiator
18) Fish wire across engine bay to the right side and make the electrical connection. Reattach the harness to body with 10mm bolt. Tidy up wires with new wire ties.
19) Fish wires through the bumper. And reattach bumper using all of the 13mm bolts.
20) Attach all electrical stuff to bumper starting with the temperature sensor. Then reattach bumper skin.
21) Add coolant to system with the bleeder screw out until coolant reaches hole. Put bleeder screw in place. Add more coolant as necessary.
22) Enjoy your new quiet fan. Buy yourself something nice with all the money you saved by doing it yourself
PS- I have more pictures, but for some reason I am limited to 3 uploads for this post.
Need:
New fan assembly. I used the TYC one from Rock Auto.
Shop vac (helps with reducing the mess when removing upper radiator hose.
Torx T27
8,10 mm 1/4 drive sockets
13mm (3/8"drive)
Narrow flat screwdriver
Phillips screwdriver
Stubby phillips screwdriver (not necessary if car jacked up-needs to be stubby for clearance between bumper and ground)
May want to have a few of the plastic body fasteners found in the wheel wells in case you have to trash any.
5 zip ties (4 for wires, 1 for holding bungee cord to upper radiator hose)
Some sort of pliers to release clamp on radiator hose (really like the long 90 degree ones on right side of this photo helpful for other jobs on mini as well)

1) Turn wheels to full lock in one direction, turn off car.
2) Remove forward most 2 body screws in both wheel wells and the vertically oriented 8mm bolt between wheel liner and the bumper skin (see the girls guide to service mode for more info.
3) Remove the furthest back 2 Phillips screws (may need stubby driver if car not lifted) and 3 10mm bolts on underside of bumper.
4) Remove the torx bolts on either side that attach plastic bumper skin to bumper
5) Pull outwardly from lower part of bumper skin releasing bumper skin from bumper.
6) Detach all electrical bits from bumper skin
7) Note the wire routing through the bumper, fish the wires through the bumper. Then remove the 13mm bolts holding the bumper to the body and remove bumper.
8) Stuff rags between radiator top hose and radiator and the supercharger and alternator. Remove 10mm bolt holding the radiator top hose to the intake body. Remove radiator top hose from body while using shop vac around the hose-radiator connection to reduce the spillage. Bungee cord hose to body (See pic) Note: do not remove the radiator reservoir cap to reduce spillage. You will still get some spillage on floor, but not too dramatic. I used a mat under the car to catch any errant fluid.

9) Remove 10mm bolt holding wire harness and the AC high side port to body on right side of car and disconnect harness. Use very small flathead screwdriver to release clip holding the electrical connectors to the mount.
10) Cut wire ties holding fan wire to the MTFE and pull wires through towards the left side of car.
11) Use small flathead screwdriver to pry central long black pins from the connectors on the upper right and left side of radiator and remove pins. Then pinch the connector from backside while pulling on the connector from the front. The radiator will be somewhat free at this point.
12) Be sure to have your new fan in reach. Tilt radiator (with AC condenser attached to it) towards you about 30 degrees and wiggle upwards and then pull slightly away from car. At this point you should have this view at the back of the radiator unit.

13) Reach down to bottom of radiator unit and release clips on either side retaining lower fins of the fan cowl. You should now be able to wiggle the fan unit upward and it will now come apart from the radiator.
14) Install the fan unit to back of radiator in the obvious manner if you just removed it.
15) Fish wires through hole in MTFE, then put assembly back in starting with lower part of radiator and tilting the top part into place.
16) Attach upper radiator hose and 10mm bolt holding it to intake.
17) Slip black pins back into place at top corners or radiator
18) Fish wire across engine bay to the right side and make the electrical connection. Reattach the harness to body with 10mm bolt. Tidy up wires with new wire ties.
19) Fish wires through the bumper. And reattach bumper using all of the 13mm bolts.
20) Attach all electrical stuff to bumper starting with the temperature sensor. Then reattach bumper skin.
21) Add coolant to system with the bleeder screw out until coolant reaches hole. Put bleeder screw in place. Add more coolant as necessary.
22) Enjoy your new quiet fan. Buy yourself something nice with all the money you saved by doing it yourself
PS- I have more pictures, but for some reason I am limited to 3 uploads for this post.

Thanks for the write up, I successfully did this over the weekend. One think I didn't see in the instructions was to remove the actual bumper in addition to the bumper cover. Maybe I missed it but I couldn't accomplish the repair with it in place.

Neutral
Joined: Jun 2010
Posts: 7
Likes: 0
Did this myself, this first day of the new year. Thanks for the helpful writeup.
I used a fan part sourced from Amazon, but when I opened the box, one of the 4 securing tabs was broken off the shroud. Luckily all the electric bits swapped right over, so I loaded all the fresh stuff into the old shroud and buttoned it up.
I used a fan part sourced from Amazon, but when I opened the box, one of the 4 securing tabs was broken off the shroud. Luckily all the electric bits swapped right over, so I loaded all the fresh stuff into the old shroud and buttoned it up.

1st Gear
Joined: May 2011
Posts: 13
Likes: 0
Just Finished this...not too bad. I also purchased the Dorman fan from Amazon. Mine had two connectors.....the original on the car had one. I've learned (ZippyNH) that is kinda like an Appendix from the earlier cars and not used any more (the smaller of the two)
While researching this fix I came accross some incorrect numbers on when the fans (low and high) are actuated. I'm getting this right out of the Bentley Manual:
Low: Comes ON @ 221F and shuts off @ 214F
High: Comes ON @ 234F and reverts to low speed after dropping 7 degrees.
AC and Fan action:
"The cooling fan operates on low speed when the A/C is switched on AND the system pressure reaches 8 bar. The fan switches to high speed should the AC system pressure rise above 18 bar."
This would explain why some people DO NOT get the fan upon immediately turning on the AC.
And I'd like to ask a question also. Since I had coolant blow up all over the engine how long will that smell stay so I can smell a new leak?
Joe in Warner, NH

4th Gear
Joined: Oct 2004
Posts: 345
Likes: 0
Just replaced my fan unit - Thanks Stevendoll! took about 1 1/2 hours and was very easy.
My Dorman also had the "appendix" and I was rather confused so a big additional thanks to wetmini and Zippy for clarification for that piece.
My Dorman also had the "appendix" and I was rather confused so a big additional thanks to wetmini and Zippy for clarification for that piece.


 Just pop the bonnet now and again, and check your parking area to confirm that you're watertight.
Trending Topics

Neutral
Joined: Jul 2013
Posts: 1
Likes: 0
Plan on 2 hours for this, but it can easily be done in less time. There is no need to jack up car. Can be done with one person, although an extra set of hands helps. Service mode is NOT needed. Car should be cool. Note- this is different technique than the one listed in Bentley manual which uses service mode and removal of the radiator.
Need:
New fan assembly. I used the TYC one from Rock Auto.
Shop vac (helps with reducing the mess when removing upper radiator hose.
Torx T27
8,10 mm 1/4 drive sockets
13mm (3/8"drive)
Narrow flat screwdriver
Phillips screwdriver
Stubby phillips screwdriver (not necessary if car jacked up-needs to be stubby for clearance between bumper and ground)
May want to have a few of the plastic body fasteners found in the wheel wells in case you have to trash any.
5 zip ties (4 for wires, 1 for holding bungee cord to upper radiator hose)
Some sort of pliers to release clamp on radiator hose (really like the long 90 degree ones on right side of this photo helpful for other jobs on mini as well)
Attachment 55429
1) Turn wheels to full lock in one direction, turn off car.
2) Remove forward most 2 body screws in both wheel wells and the vertically oriented 8mm bolt between wheel liner and the bumper skin (see the girls guide to service mode for more info.
3) Remove the furthest back 2 Phillips screws (may need stubby driver if car not lifted) and 3 10mm bolts on underside of bumper.
4) Remove the torx bolts on either side that attach plastic bumper skin to bumper
5) Pull outwardly from lower part of bumper skin releasing bumper skin from bumper.
6) Detach all electrical bits from bumper skin
7) Note the wire routing through the bumper, fish the wires through the bumper. Then remove the 13mm bolts holding the bumper to the body and remove bumper.
8) Stuff rags between radiator top hose and radiator and the supercharger and alternator. Remove 10mm bolt holding the radiator top hose to the intake body. Remove radiator top hose from body while using shop vac around the hose-radiator connection to reduce the spillage. Bungee cord hose to body (See pic) Note: do not remove the radiator reservoir cap to reduce spillage. You will still get some spillage on floor, but not too dramatic. I used a mat under the car to catch any errant fluid.
Attachment 55430
9) Remove 10mm bolt holding wire harness and the AC high side port to body on right side of car and disconnect harness. Use very small flathead screwdriver to release clip holding the electrical connectors to the mount.
10) Cut wire ties holding fan wire to the MTFE and pull wires through towards the left side of car.
11) Use small flathead screwdriver to pry central long black pins from the connectors on the upper right and left side of radiator and remove pins. Then pinch the connector from backside while pulling on the connector from the front. The radiator will be somewhat free at this point.
12) Be sure to have your new fan in reach. Tilt radiator (with AC condenser attached to it) towards you about 30 degrees and wiggle upwards and then pull slightly away from car. At this point you should have this view at the back of the radiator unit. Attachment 55431
13) Reach down to bottom of radiator unit and release clips on either side retaining lower fins of the fan cowl. You should now be able to wiggle the fan unit upward and it will now come apart from the radiator.
14) Install the fan unit to back of radiator in the obvious manner if you just removed it.
15) Fish wires through hole in MTFE, then put assembly back in starting with lower part of radiator and tilting the top part into place.
16) Attach upper radiator hose and 10mm bolt holding it to intake.
17) Slip black pins back into place at top corners or radiator
18) Fish wire across engine bay to the right side and make the electrical connection. Reattach the harness to body with 10mm bolt. Tidy up wires with new wire ties.
19) Fish wires through the bumper. And reattach bumper using all of the 13mm bolts.
20) Attach all electrical stuff to bumper starting with the temperature sensor. Then reattach bumper skin.
21) Add coolant to system with the bleeder screw out until coolant reaches hole. Put bleeder screw in place. Add more coolant as necessary.
22) Enjoy your new quiet fan. Buy yourself something nice with all the money you saved by doing it yourself
PS- I have more pictures, but for some reason I am limited to 3 uploads for this post.
i know that this was posted a while ago but if you still have more pics, would you please mail them to me at issip4262@yahoo.co.uk
thanks

Great step by step process! 
-Luccia
-Luccia
__________________
Your Trusted Source For DIY and Parts
FREE SHIPPING over $99 click here
MINI Parts | DIY Help | Facebook | Twitter | Instagram | YouTube | Promos
888.280.7799 | 6am - 5pm PST

FREE SHIPPING over $99 click here
MINI Parts | DIY Help | Facebook | Twitter | Instagram | YouTube | Promos
888.280.7799 | 6am - 5pm PST
4th Gear
Joined: Dec 2006
Posts: 492
Likes: 1
From: Arizona
I printed out these instructions, and was able to replace the fan assembly in about an 1 hour and 45 min.
thank you for putting this together!
just an FYI - I also bought the TYC via Rock Auto. $62 plus $12 shipping.
The car sounds and running just like it should.
thank you for putting this together!
just an FYI - I also bought the TYC via Rock Auto. $62 plus $12 shipping.
The car sounds and running just like it should.

2nd Gear
Joined: Jul 2013
Posts: 89
Likes: 1
Hi guys,
Thank you for this info.
I just replaced TYC fan too but noise is kind of big, I mean when fan runs, sound is big,...how about yours?
I just test with air-condition on and when fan runs, its noise like F-150 truck. lol
Thank you for this info.
I just replaced TYC fan too but noise is kind of big, I mean when fan runs, sound is big,...how about yours?
I just test with air-condition on and when fan runs, its noise like F-150 truck. lol


Thread
Thread Starter
Forum
Replies
Last Post
Kimolaoha
R56 :: Hatch Talk (2007+)
70
Jul 5, 2023 01:04 PM
silence2-38554
R50/R53 :: Hatch Talk (2002-2006)
98
Sep 21, 2016 02:52 PM
thebordella
R56 :: Hatch Talk (2007+)
22
Aug 31, 2015 01:37 PM