
How To Drivetrain ALL :: DIY poly motor mounts


Thread Starter
|
5th Gear
Joined: Jan 2016
Posts: 649
Likes: 12
Drivetrain ALL :: DIY poly motor mounts
So I didn't take any pics during the process but it's incredibly simple. If you are mechanically inclined enough to remove/change a mount you will understand my directions.
While shopping for either inserts or full mount/bushing replacement I decided that this was no show car. It's my daily driver, on top of well over 100 is a lot of money for 1 mount. And inserts while easier and less time consuming will get pricey by the time you buy them for every mount.
I've spent a total of 100 for all the mounts plus 30 for the tube of window weld. So for the price of one BSH lower mount I've done everything.
Time from start to finish;******* 1 full week.
Price to purchase necessary parts and goo;********** $30 - about $150 depending on where you purchase mounts if needed.
DISCLAIMER; UNLESS YOU CAN PARK YOUR CAR FOR UP TO A WEEK DO NOT REMOVE AND USE YOUR CURRENT MOUNTS. DRYING TIME CAN TAKE UP TO 7 DAYS FOR A GOOD SOLID CURE.
*Drying time may vary but it's not worth the risk.
Things you will need.
1. Mounts, new factory style replacement, junk yard sourced, or your current. Doesn't matter which.
2. 3M Window Weld
3. Caulk Gun
4. Gloves, it's gonna get messy
5. Big cardboard sheet/trash bag/newspaper. One of these will do.
6. Necessary tools to replace mounts.
*I won't get into that as this is about DIY cheap performance mounts not the actual swapping.
I'm going to start my directions assuming you have whichever mounts ready to work with.
Nows the time to put your gloves on.
STEP ONE.
First thing is to have mounts ready. Whether you removed your originals, sourced some old junkyard mounts, or bought factory style replacements make sure you clean them real good with degreaser. You want a good surface for the window weld to adhere to.
STEP TWO.
Lay out a piece of cardboard or newspaper or something to work on as this is some messy stuff. Make sure you have all your supplies ready to go, caulk gun, window weld, and mounts.
STEP THREE.
Lay the mounts out on cardboard, load the window weld into the caulk gun.
STEP FOUR.
Some people will tell you differently but it's best to fill everything up in one shot so it will dry solid. Some people say to do it a layer at a time and let it cure so it dries faster but doing it that way can cause the layers to seperate after a few thousand miles. Not cool.
Fill those bad boys up, pack it in good. Optional would be to take a putty knife or similar and smooth the outside out and make it look pretty. I just used my finger. Wasn't t worried about it. Didn't really car about the lower being pretty since no one will see it.
STEP FIVE.
Set them somewhere out of the way, nows the part where you wait a week for it to cure solid. Do not get impatient it will ruin the mount. It will crack the dry outer layer and squeeze the wet center out. Making them hollow again.
STEP SIX.
Install your new solid poly mounts and enjoy the feel of a more solid motor!!
I do have an idea for the passenger side frame mount that I'm going to try. Should only run me about 5 bucks. If it works I'll add it to this How To. If not pretend I never mentioned it........
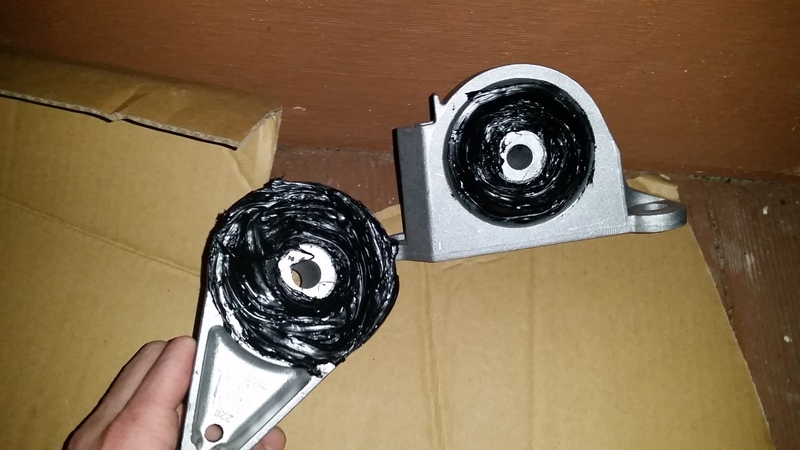
Finished product, still wet though. I just filled them before I took the pic. Was not going for show quality. Function over form, or patience in this case lol. It's not pretty but it's cheap. If you have the time to let the car sit this can be done for about 30 bucks, the price of the window weld.
*
*
While shopping for either inserts or full mount/bushing replacement I decided that this was no show car. It's my daily driver, on top of well over 100 is a lot of money for 1 mount. And inserts while easier and less time consuming will get pricey by the time you buy them for every mount.
I've spent a total of 100 for all the mounts plus 30 for the tube of window weld. So for the price of one BSH lower mount I've done everything.
Time from start to finish;******* 1 full week.
Price to purchase necessary parts and goo;********** $30 - about $150 depending on where you purchase mounts if needed.
DISCLAIMER; UNLESS YOU CAN PARK YOUR CAR FOR UP TO A WEEK DO NOT REMOVE AND USE YOUR CURRENT MOUNTS. DRYING TIME CAN TAKE UP TO 7 DAYS FOR A GOOD SOLID CURE.
*Drying time may vary but it's not worth the risk.
Things you will need.
1. Mounts, new factory style replacement, junk yard sourced, or your current. Doesn't matter which.
2. 3M Window Weld
3. Caulk Gun
4. Gloves, it's gonna get messy
5. Big cardboard sheet/trash bag/newspaper. One of these will do.
6. Necessary tools to replace mounts.
*I won't get into that as this is about DIY cheap performance mounts not the actual swapping.
I'm going to start my directions assuming you have whichever mounts ready to work with.
Nows the time to put your gloves on.
STEP ONE.
First thing is to have mounts ready. Whether you removed your originals, sourced some old junkyard mounts, or bought factory style replacements make sure you clean them real good with degreaser. You want a good surface for the window weld to adhere to.
STEP TWO.
Lay out a piece of cardboard or newspaper or something to work on as this is some messy stuff. Make sure you have all your supplies ready to go, caulk gun, window weld, and mounts.
STEP THREE.
Lay the mounts out on cardboard, load the window weld into the caulk gun.
STEP FOUR.
Some people will tell you differently but it's best to fill everything up in one shot so it will dry solid. Some people say to do it a layer at a time and let it cure so it dries faster but doing it that way can cause the layers to seperate after a few thousand miles. Not cool.
Fill those bad boys up, pack it in good. Optional would be to take a putty knife or similar and smooth the outside out and make it look pretty. I just used my finger. Wasn't t worried about it. Didn't really car about the lower being pretty since no one will see it.
STEP FIVE.
Set them somewhere out of the way, nows the part where you wait a week for it to cure solid. Do not get impatient it will ruin the mount. It will crack the dry outer layer and squeeze the wet center out. Making them hollow again.
STEP SIX.
Install your new solid poly mounts and enjoy the feel of a more solid motor!!
I do have an idea for the passenger side frame mount that I'm going to try. Should only run me about 5 bucks. If it works I'll add it to this How To. If not pretend I never mentioned it........
Finished product, still wet though. I just filled them before I took the pic. Was not going for show quality. Function over form, or patience in this case lol. It's not pretty but it's cheap. If you have the time to let the car sit this can be done for about 30 bucks, the price of the window weld.
*
*


Thread
Thread Starter
Forum
Replies
Last Post
Interior/Exterior Craven Speed Mounts - Scissor Mounts and 60mm Guages
igzekyativ
Interior/Exterior
0
Apr 7, 2014 07:44 PM
Mike S
Drivetrain (Cooper S)
10
Nov 21, 2008 03:15 PM
DougVarney
R50/R53 :: Hatch Talk (2002-2006)
5
Jun 11, 2007 03:16 PM